***You can purchase an INEXPENSIVE AD-FREE PDF of this pattern on Etsy HERE! This beautifully formatted PDF includes the step-by-step pictures and is a total of 5 pages including the cover page. This pattern is also available in the “Home Decor Crochet PATTERN BUNDLE” which includes 9 beautiful designs at a discounted price – check out the bundle HERE! Lion Brand Yarn has put together a convenient kit HERE that contains all the yarn you need to make this luxurious blanket (choose any color you want)!
***This post begins with the step-by-step tutorial: please keep scrolling DOWN for the free crochet pattern with all the written-out numbers!
Once I find a stitch that I love, I enjoy incorporating it into many different designs! I designed the Willow Scarf a year ago using single crochets in the front loop only, making it a very quick and simple, beginner-friendly pattern. I was blown away by how well-received this chunky pocket scarf was, and I have seen so many beautiful finished scarves as you all love this classic and simple design! I used Lion Brand Yarn’s 2020 Color of the Year called “Succulent” for this scarf in a perennial favorite yarn: Wool-Ease Thick & Quick (super bulky level 6 yarn), a beautiful wool/acrylic blend that is easy to care for.
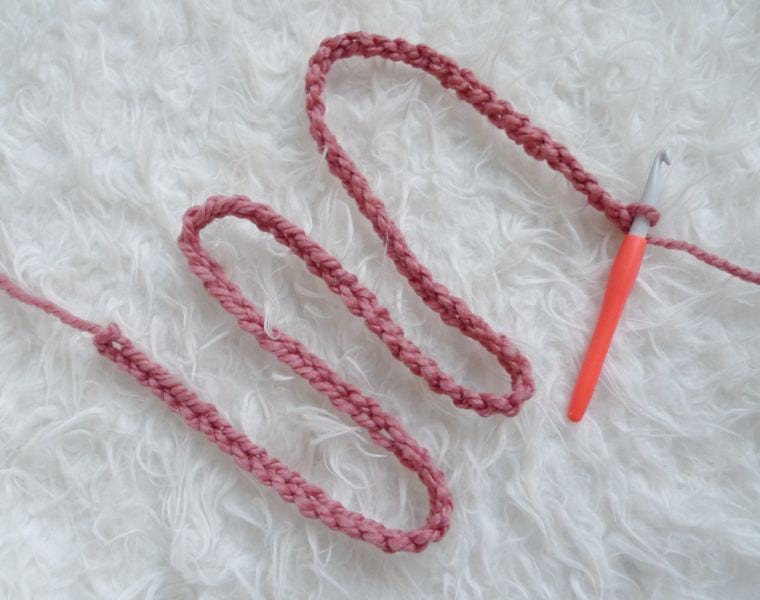
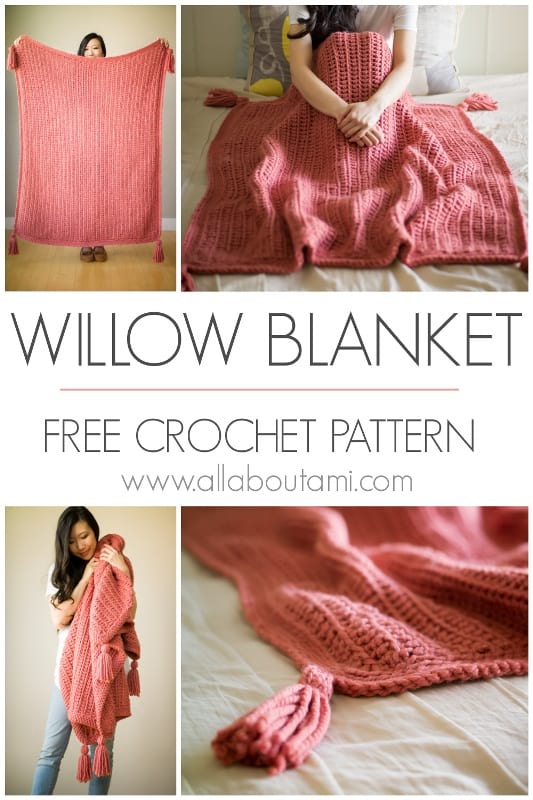
Lion Brand Yarn’s 2021 Color of the Year is “Terracotta“, which is a “soothing earthy color that reflects a feeling of warmth and calmness that we all find in yarn crafts” as described on their site. I thought it would be neat to continue my Willow series by crocheting a blanket with this special shade. It has been a while since I crocheted a blanket, with my last ones being the Chunky Braided Cabled Blanket and the Cross Bobble Blanket! With all this stay-at-home time, I have been wanting to add more crochet and knit home decor items to our home as they add such a feeling of warmth and comfort. To begin, I used my 9 mm hook and crocheted a series of chain stitches. It is important to note that this length will ultimately be the length of your overall blanket, so if you want your blanket to be longer, add more chains, and if you want your blanket to be shorter, decrease the number of chains. As you are building up the number of rows, you will be building up the width of the blanket.
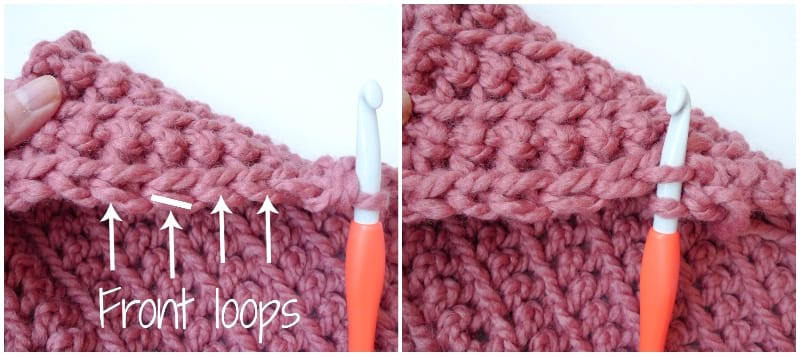
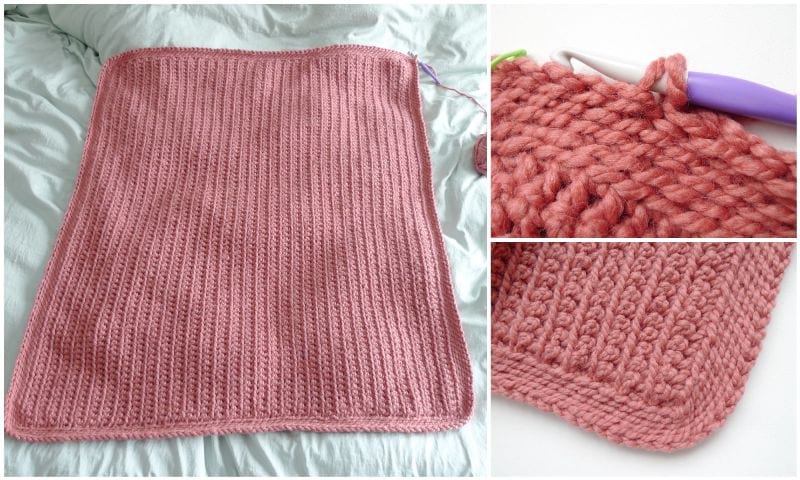
These days, I have really been wanting to work on easy and mindless project that do not require much thinking. I love these types of projects since I can work on them wherever I am around the house without needing to focus. For the entire blanket, you will be working single crochets in the front loops only (FLO). As a reminder, each stitch looks like a V – the loops that are closest to you are called the “front loops” (as indicated by the picture below) while the loops further away from you are the back loops. It is VERY IMPORTANT that you crochet loosely in this design (with very little tension and a loose gauge). This will help you achieve the big, light and airy stitches that give this blanket a lot of drape. If you crochet too tightly, the stitches will be very tight and dense, and your final dimensions will be drastically different (much smaller). Please be sure to compare your gauge to my gauge, and increase your hook size or consciously crochet more loosely if need be.
After you are finished crocheting the body of the blanket and you are happy with the width, it will be time to crochet the border. Starting from where your yarn is (the red circle), you will be working slip stitches around the perimeter of the rectangle. You will work regular slip stitches across the width and slip stitches in the back loops only (BLO) when you are going down the length (when you see that there are both front and back loops).
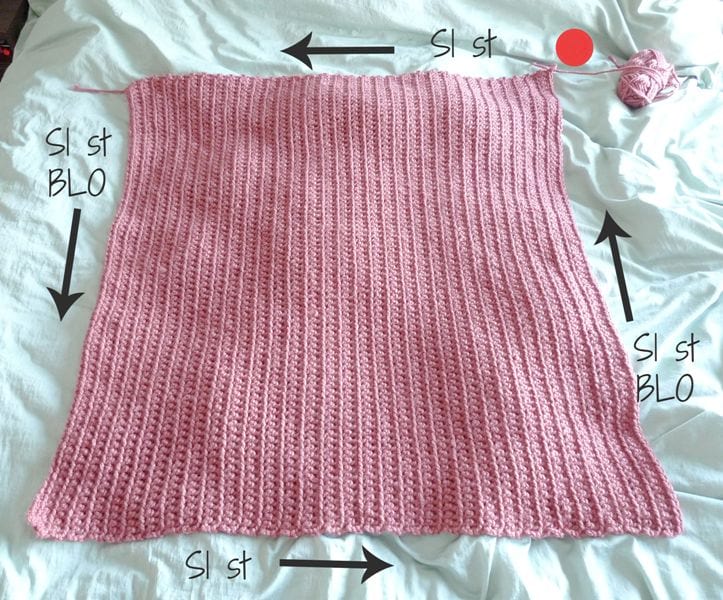
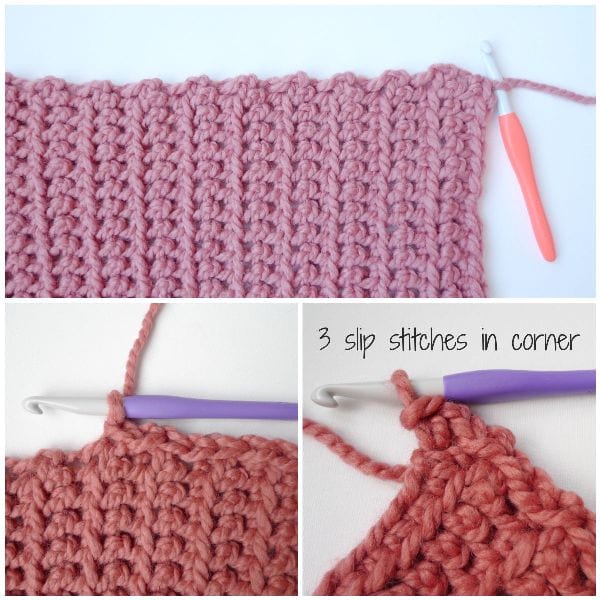
I ended up switching to a 10 mm hook when working the border as you want to crochet these slip stitches very loosely. If you work too tightly and the slip stitches are too dense, this will cause the blanket to curl up and not have the stretch and drape that it should. As you slip stitch around, you can work 3 slip stitches in each corner to help you turn these corners.
In subsequent border rounds, you will be working slip stitches in the back loops only. I tried out different borders, but I like how clean this border is with the subtle lines. I did not want anything too decorative or fancy to take away from the modern vertical lines of this blanket.
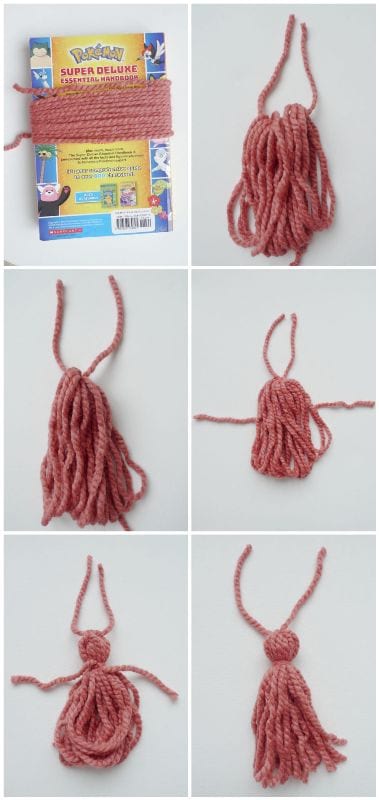
You could either leave the blanket as is or add some special touches such as fringe or tassels! I opted to go with tassels as I love how they add a touch of luxury. Tassels are very easy to make as you can see in this collage below!
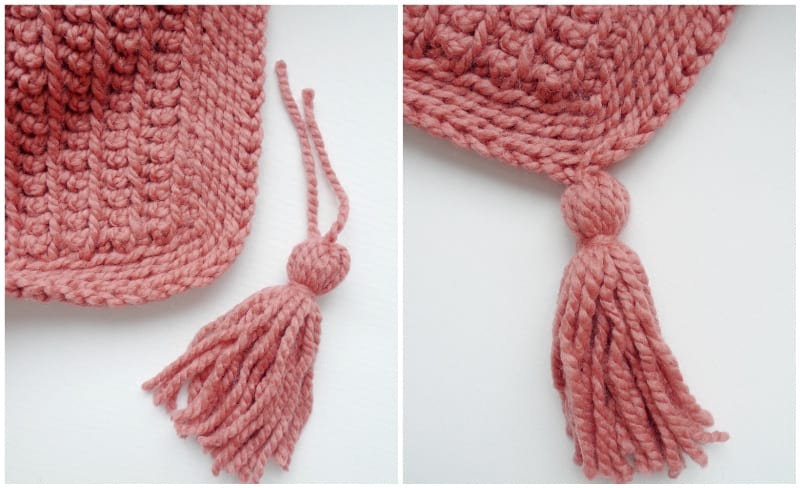
After finishing the four tassels, I tied them each to one corner, and then steam blocked the final tassels and blanket!
When working with Wool-Ease Thick & Quick, remember that you can felt the yarn ends together when joining a new ball! This tip is especially important for big projects, such as this blanket. Felting works when the yarn has some animal fiber component to it, and the 20% wool allows this yarn to be felted – you can read about this process in my blog post entitled “How to Felt Yarn Ends Together“. It is a game-changer as you do not need to waste any yarn by leaving long ends and you do not need to weave in any ends at all!
**********************
Here is the free crochet pattern for the Willow Blanket:
Crochet this beautiful beginner-friendly blanket using basic stitches! The vertical lines and luxurious tassels make this modern blanket a gorgeous touch to any home!
Notes:
- This beginner-friendly blanket is crocheted in turned rows. Working single crochets in the front loops only (FLO) gives a lovely ribbed effect.
- Each single crochet stitch is comprised of two loops that form a V at the top: the front loops and the back loops. The front loops are the loops that are closest to you.
- The number of chains you begin with is the length of the blanket. As you work row by row, you are building up the width of the blanket.
- Note that it is very important that you crochet loosely (with a very loose gauge) to achieve large and airy stitches that are not too dense and tight. Please check your gauge before beginning the blanket and adjust if necessary (consciously crochet more loosely or move up a hook size). Crocheting loosely allows this blanket to have beautiful drape and a larger size. If you crochet too tightly, the final dimension of this blanket will be very different and much smaller.
- A lovely border is crocheted around the blanket using mostly slip stitches in the back loops only. A larger 10 mm hook is used so that the slip stitches do not get too tight or dense (you can move to an even bigger crochet hook if you want looser stitches). The border is worked in continuous rounds.
- Optional tassels are then attached to the four corners.
- If you want to make the blanket wider, add more rows. If you want to make the blanket more narrow, decrease the number of rows.
- If you want to make the blanket longer, add more initial chains. If you want to make the blanket shorter, decrease the number of initial chains.
- You can use a felting tool when joining a new skein of Wool-Ease Thick & Quick for this blanket. See my tutorial and video on how to do this HERE.
- You can block the final blanket and tassels with a steamer to relax the fibers and smooth out the stitches!
Materials:
- 9 mm and 10 mm Clover Amour crochet hooks
- Wool-Ease Thick & Quick by Lion Brand Yarn (super bulky level 6), 8 skeins/848 yds – I used the colourway “Terracotta”; convenient kit available HERE
- Clover felting tool for joining a new skein of yarn
- Steamer for blocking
Gauge: 7 sts and 6 rows = 4″ in single crochet in FLO with 9 mm hook
PATTERN
Blanket:
Using 9 mm hook, chain 85.
Row 1: Starting in second chain from hook, sc across. (84 sts)
Row 2: Chain 1, turn. Starting in second st from hook, sc in front loops only. (84 sts)
R3-67: Repeat Row 2.
Do not fasten off yarn. We will now begin crocheting the border.
Border:
Using 10 mm hook,
Round 1: Slip stitch around the perimeter of the blanket, working 3 slip stitches in each corner. When working along the vertical sides (when the lines are running vertically and you see a front and back loop for each stitch), work the slip stitches in the back loop only.
Round 2-5: Slip stitch in back loop only.
Fasten off and weave in end.
Tassels (make 4) :
Using Wool-Ease Thick & Quick, wrap yarn around book of desired length (mine was 6″/15 cm) 15 times and cut yarn. Cut 12″/30 cm strand of yarn and thread through top of loops. Tie knots. Cut another 12″/30 cm strand of yarn and tie knots about 1″/2.5 cm below top- hide ends with rest of fringe. Use scissors to cut through bottom of loops. Trim if necessary. Attach tassel to corner of blanket using first 12″/30 cm strand of yarn attached to top of tassel. Repeat for all four corners of blanket. Each tassel is about 10 grams of yarn.
Optional: Block the final blanket and tassels with a steamer!
Finished Dimensions: 47″/119 cm long and 45″/114 cm wide
**********************
I LOVE how this gorgeous blanket turned out! It has such a beautiful and modern look to it, and it is unbelievably easy to crochet!
This pop of color with “Terracotta” is a welcome addition to our home. I love how it has a rustic and earthy feel to it. I would say that it does lean more towards a pink tone rather than a red tone if you were wondering how this yarn looks in real life!
Look how big the finished Willow Blanket is! Crochet blankets tend to use a lot of yarn, but I love how I was able to make this blanket (with the tassels too) with 8 balls of Wool-Ease Thick & Quick! It is a generous size and perfect as a throw blanket on the sofa or in a cozy corner (we have a little reading cozy corner set up in our playroom where I read with the girls – there are plenty of crochet and knit pillows and blankets in this special space)!
I love how we start off with the length of the blanket and build up the width with the rows. Seeing stitches run in a different direction than we’re used to provides a striking look, and I love the resulting vertical lines.
It is very relaxing working on this blanket as you crochet loosely and do not need to keep the count or concentrate at all. This results in a blanket with such beautiful drape as you can see below. I am so pleased with how the Willow Blanket turned out, and I hope this gives you some inspiration so you can add some crochet elements to your home too! It is very easy, and you can choose whatever color you would like to match with your decor or add some pops of color!
Enjoy crocheting your own beginner-friendly blankets! The Lion Brand Yarn kit can be found HERE and the PDF for purchase can be found HERE. If you are interested in crocheting more decor items for your home, be sure to check out my “Home Decor Crochet PATTERN BUNDLE” that includes this pattern along with 8 other patterns, including more blankets, baskets and carry-all trays! It makes me so happy seeing my handmade items around the home and they are put to such great use. Keep your eye out for more home decor items coming your way soon as I LOVE designing them! Happy crocheting, everyone!
{This post is sponsored by Lion Brand Yarn! I’ve loved working with their yarn throughout the years and I’m thrilled that I get to collaborate with them every month!}
This pattern is an original pattern by Stephanie Lau of All About Ami. Please do not claim this pattern as your own. If you wish to share this pattern, you may link to this pattern but please do not reprint it on your site. You may keep a copy for your own personal use but please DO NOT sell the pattern or distribute it.
You may sell products made from this pattern but please clearly credit the design to me, Stephanie Lau of All About Ami, and provide a link to my blog www.AllAboutAmi.com. Permission is NOT granted for mass production or factory manufacturing of any kind. Thank you for being respectful and for your understanding!