***You can purchase an INEXPENSIVE AD-FREE PDF of this pattern on Etsy HERE and on LoveCrochet HERE! This beautifully formatted PDF includes ALL the step-by-step pictures and pattern and is a total of 13 pages including the cover page! Lion Brand Yarn has made a convenient kit HERE that includes the pattern and all the 24/7 Cotton yarn needed (choose any shade you want) to crochet this stylish shoulder bag!
***The pattern has been divided into 2 PARTS:
- Part 1 goes through the granny square, assembly and seaming. A detailed step-by-step blog post of the Wildrose Granny Square can also be found HERE (note that the first 4 rounds of the granny square are the same but Round 5 differs in this pattern).
- Part 2 goes through the top edging and strap and can be found HERE!
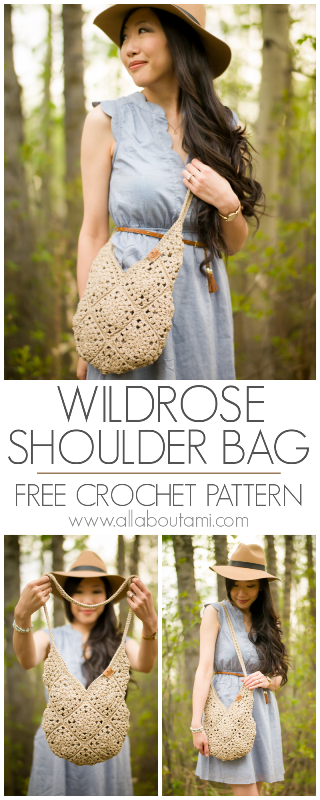
Pattern Description: Crochet the romantic Wildrose Shoulder Bag that is composed of 15 granny squares that are seamed together in a special way! This lovely bag has an effortlessly chic vibe as it holds all your essentials and can be worn on one shoulder or across the body. A variety of crochet stitches using strong and sturdy mercerized cotton makes this design a very fun project!
Skill Level: Level 2 – Easy
Materials:
- 3 skeins of 24/7 Cotton in Taupe (worsted weight level 4 yarn); my bag used 187 g/348 yds (2 skeins) – if you plan on making the strap longer, making the squares bigger, adding a pocket or generally crochet more loosely, I would recommend getting 3 skeins to be safe; purchase the convenient Lion Brand Kit HERE (contains 3 skeins of yarn and the digital pattern with all the step-by-step pictures, 13 pages in total)
- 2.75 mm and 3.75 mm Clover Amour crochet hooks
- Yarn Needle (bent tip helpful for attaching)
- Lock ring stitch markers
- Steamer (optional for blocking granny squares – I use this affordable one HERE)
- Small purse organizer insert (optional to add zipper closure and compartments to this bag)- dimensions of the insert are: Length: 9“/23 cm, Height: 5.9“/15 cm
- Garment tag (optional): my faux leather ones are by Brickbubble (you can get them customized with your logos)
Gauge:
- Granny Square: 4” (10 cm) x 4” (10 cm); diagonal is 5”/12.7 cm
Final Dimensions: Width: 10.5”/27 cm, Height: 13”/33 cm, Straps: 28”/71 cm
Abbreviations:
- Magic Ring (MR): Make a loop. Hold yarn where ends cross. Insert hook into loop and pull up working yarn. Yarn over and work beginning chains. Work subsequent stitches in magic ring and then pull tight to close. See my Magic Ring tutorial HERE!
- Puff stitch (puff st): [YO, insert hook in next st, YO, pull up a loop], repeat 3 times in same st, YO, draw yarn through 7 loops on hook.
- Beginning cluster: Ch 3, [YO, insert hook in st or sp, YO, pull up a loop, YO, draw through 2 loops], rep 2 times in same st or sp, YO, draw through 3 loops on hook.
- Cluster: [YO, insert hook in st or sp, YO, draw up a loop, YO, draw through 2 loops on hook], rep 3 times in same st or sp, YO, draw through 4 loops on hook.
Special decreases used at the bottom of the V for the top edging:
- Half double crochet decrease: YO, insert hook into both indicated gaps. YO, pull through first 2 loops. YO, pull through remaining 3 loops.
- Invisible single crochet decrease (worked across 3 stitches in this pattern): Insert hook into front loops of next 3 stitches. YO, pull through 3 loops. YO, pull through both loops.
- Invisible slip stitch decrease (worked across 3 stitches in this pattern): Insert hook into front loops of next 3 stitches. YO, pull through all loops.
Notes:
- This bag is constructed of 15 granny squares that are seamed together in a special way.
- The granny square design used in this market bag is the Wildrose Granny Square that is also used in the Wildrose Backpack and Wildrose Market Bag. Round 5 has been adjusted so that single crochets are used rather than double crochets (thereby making the resulting granny square smaller).
- The first four rounds of the granny square may curl/puff out, but the last round and blocking will help flatten the granny square. If you want the granny square to be very flat, you could try using a 3.25 mm hook for those initial four rounds.
- Once all 15 granny squares have been crocheted, they are laid out in a special arrangement and seamed together using a special slip stitch seaming method.
- Stitches are then picked up along the top edge of the bag to form the top edging and strap (half double crochets separated by chain 1’s to give a lovely eyelet detail).
- You can adjust the length of the strap based on where you want the bag to hang and whether you want to wear it as a cross-body bag. I am 5’6 for reference and the bag hits me at my hip when I wear it on one shoulder. I can wear it as a cross-body bag at this length too (sits higher up). Keep in mind that your bag will hang lower once you have filled it with contents and more weight is added to it.
- A round of single crochet stitches are then worked along one side of the top edging and strap. Next, a round of slip stitches are worked to help strengthen and widen the strap even more. This is then repeated along the other side of the top edging and strap.
- Special decrease stitches are worked at the bottom of the V for each round to ensure the stitches do not bunch up or puff out at this spot.
- Blocking helps to relax the fibres and ensures the squares lay flat.
- An optional interior pocket is crocheted and seamed into the bag.
- You can purchase a small size interior bag organizer if you would like to add some compartments and zipper closure to this shoulder bag as it perfectly fits.
- You can try adding button closure to this bag (see note in the “Building up the Top Edging & Strap” section of the pattern in Part 2).
- If you would like your bag to be larger, you can work half double crochets or double crochets in Round 5 instead of single crochets. You could also add Round 6 or Round 7 of the Wildrose Granny Square to make each granny square larger (see instructions in pattern below). By making each granny square larger, you will increase the size of your overall bag.
- Generally, the width of the bag is approximately twice the length of the diagonal of the granny square. For example, the diagonal of the granny square in this pattern is 5”/12.7 cm, and the width of the final bag is 10.5”/26.7 cm. If your granny square’s diagonal is 7.5”/19 cm, the width of the final bag would be approximately 15”/38 cm.
- This bag is technically reversible as the “wrong side” has a very unique look with raised/pronounced edges that help define each granny square. You can wear the bag both ways depending on which look you prefer!
PATTERN INSTRUCTIONS
Please reference my detailed Wildrose Granny Square step-by-step tutorial HERE to see how to crochet this granny square (the first four rounds are exactly the same but Round 5 differs). There are 5 rounds in this granny square – if you would like to make your square bigger, please see my tips below for an alternate Round 5 or for the addition of a Round 6 and Round 7. There is also a video tutorial available below!
Granny Square (worked in rounds):
Using 3.75 mm hook,
Round 1: Make Magic Ring. Chain 4 (counts as 1st double crochet and chain 1). *1 dc, ch 1*, rep 11 times in ring. Join with slip stitch to 3rd chain of beginning chain 4. (12 ch-1 spaces and 12 dc).
Round 2: Slip stitch into ch-1 space, Chain 3. *Puff st, chain 1* in each ch-1 space around. Join with slip stitch to 3rd chain of beginning ch-3. (12 puffs)
Round 3: Slip stitch 2 to get to ch-1 space. Work beginning cluster in space. [*Ch 1, cluster* in next 2 ch-1 spaces, Ch 3. Cluster in next ch-1 sp]. Repeat everything between brackets [ ] 2 more times. *Ch 1, cluster* in next 2 ch-1 spaces. Ch 3, slip stitch to 3rd chain of beg ch-3. (12 clusters)
Round 4: Slip stitch 2 to get to ch-1 space. Work beginning cluster in space. Ch 1, work cluster in next space, ch 1. In ch-3 space, work *cluster, ch 3, cluster*. [In next 2 ch-1 sps, work *ch 1, cluster*, Ch 1. In Ch-3 sp, work *cluster, ch 3, cluster*]. Repeat everything between brackets [ ] 2 more times. Ch 1, slip stitch to 3rd chain of beg ch-3. (16 clusters)
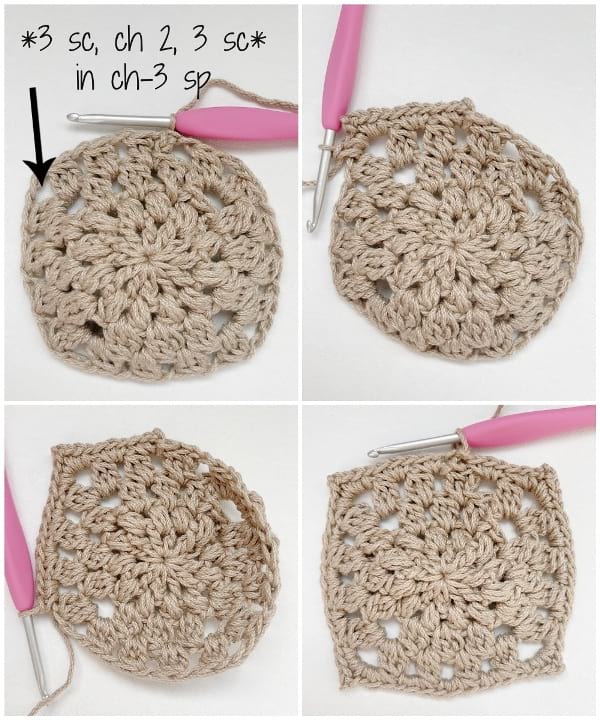
Round 5: Slip stitch 2 to get to ch-1 space, ch 2. Work 2 sc in same space. 3 sc in next ch-1 sp. [In next ch-3 sp, *3 sc, ch 2, 3 sc*. 3 sc in next 3 ch-1 sp.]. Repeat everything between brackets [ ] 2 more times. In next ch-3 sp, *3 sc, ch 2, 3 sc*. 3 sc in last chain space. Slip stitch to 2nd chain of beg ch-2. (60 sc)
Please watch the “Wildrose Granny Square” video tutorial below that shows you how to crochet the 5 rounds in this pattern! Note the following timestamps:
1:33 Round 1
3:08 Round 2
5:24 Round 3
8:46 Round 4
11:20 Round 5 (Wildrose Shoulder Bag)
13:16 Round 5 (Wildrose Backpack & Wildrose Market Bag)
15:18 Round 6 (Wildrose Backpack & Wildrose Market Bag)
18:20 Round 7 (Wildrose Market Bag)
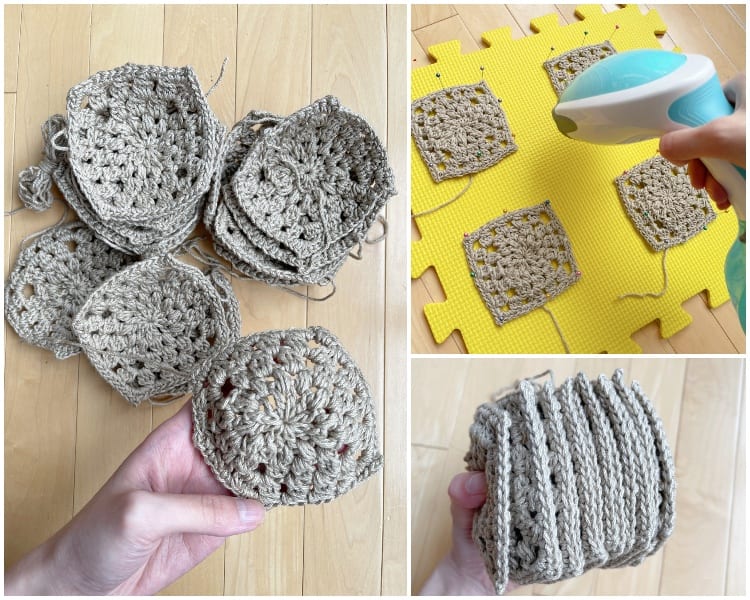
Crochet 15 granny squares in total and block them to ensure they lay flat. This makes it easier when you seam them together. Do not worry if your granny square dimensions vary slightly from the gauge given: your overall bag will just turn out a little bit larger/smaller.
IMPORTANT NOTE: If you would like to make your granny squares larger (thereby making your entire bag larger), you can do the following (the video tutorial above shows you how to crochet these extra rounds as well):
- Work this Round 5 instead of the Round 5 stated in the pattern.
- Add Round 6.
- Add Round 6 and 7
Round 5 (alternate): Slip stitch 2 to get to ch-1 space, ch 3. Work 2 dc in same space. 3 dc in next ch-1 sp. [In next ch-3 sp, *3 dc, ch 3, 3dc*. 3 dc in next 3 ch-1 sp.]. Repeat everything between brackets [ ] 2 more times. In next ch-3 sp, *3 dc, ch 3, 3dc*. 3 dc in last chain space. Slip stitch to 3rd chain of beg ch-3. (60 dc)
Round 6: Ch 3 (counts as dc). Dc in each dc until you reach dc before Ch 3 (7 dc). Skip next dc, *3 dc, ch 3, 3 dc* in Ch-3 corner. [Skip next dc, dc across until reach dc before Ch 3 (13 dc). Skip next dc, *3 dc, ch 3, 3 dc* in ch-3 corner.]. Repeat everything between brackets [ ] 2 more times. Skip next dc, dc 5. Slip stitch to top of Ch 3. (76 dc)
Round 7: Ch 4 (counts as dc and chain 1). Sk 1, dc 1. *Ch 1, sk 1, dc 1* until Ch 3 space. *Dc 2, Ch 3, dc 2* in ch-3 sp. [*Dc 1, ch 1, sk 1* until last st before ch-3 sp. Dc in last stitch. *Dc 2, Ch 3, dc 2* in ch-3 sp]. Repeat everything between brackets [ ] 2 more times. *Dc 1, ch 1, sk 1* until end. Sl st to 3rd chain of beg ch-4. [56 dc interspersed with chain-1 gaps]. Fasten off. Weave in end.
If you work this alternate Round 5 and Round 6, resulting granny square is: 5”/12.7 cm x 5”/12.7 cm. Diagonal is 6.5”/16.5 cm.
If you work this alternate Round 5 + Round 6 + Round 7, resulting granny square is: 5.75”/14.6 cm x 5.75”/14.6 cm. Diagonal is 7.5”/19 cm.
Seaming Granny Squares Together
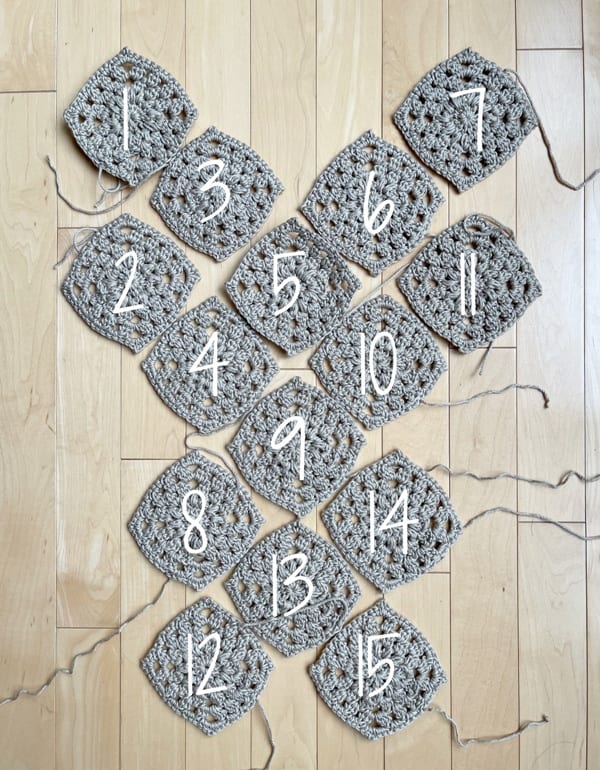
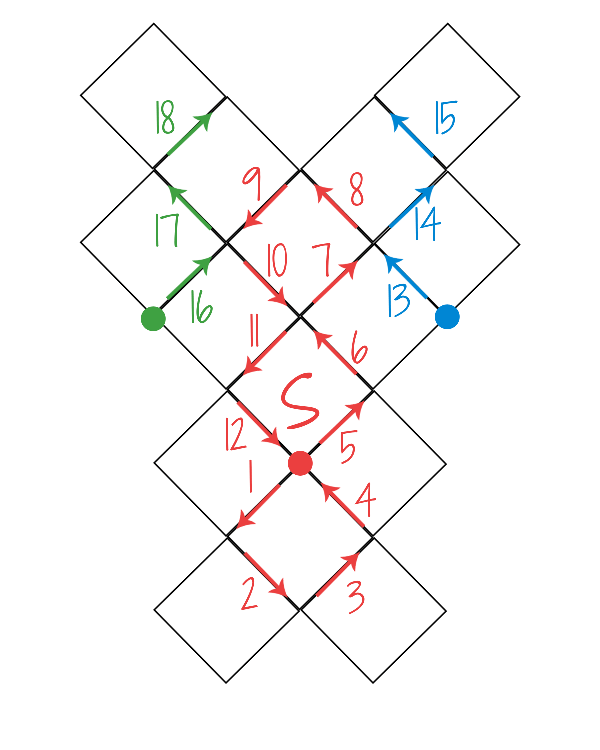
Arrange the 15 granny squares as indicated by diagram below with the wrong sides facing upwards:
We will be using a special slip stitch seaming technique to attach the granny squares together. With this technique, we will be using slip stitches to attach the edges of the squares together with the working yarn (as opposed to using the whip stitch where we work with a long final end and a yarn needle). This seaming technique leaves a visible and pronounced ridge, that is why we seam the wrong sides together so the ridges are on the inside of the bag.
To do the slip stitch seaming, insert your crochet hook into both the front and back loops of one stitch on one granny square. Insert your crochet hook into both the front and back loops of one stitch of the second granny square. Yarn over and draw through all the loops.
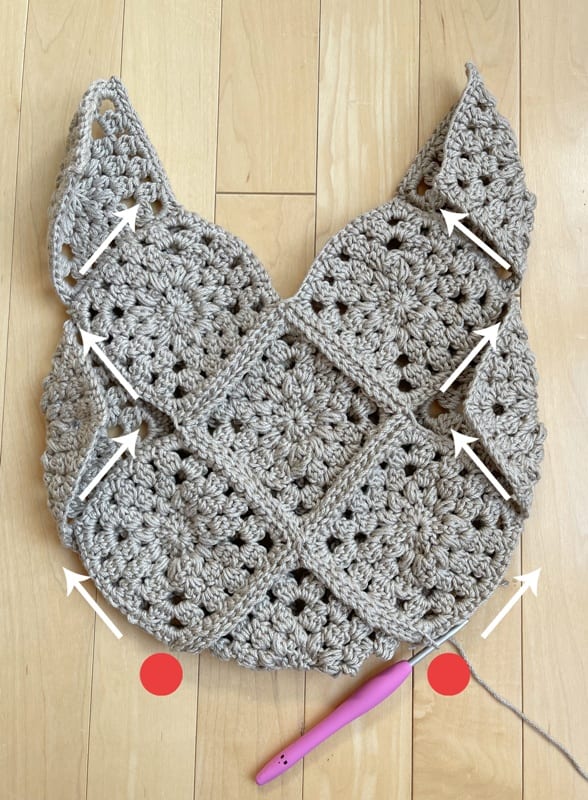
Beginning at the start point as indicated below (the red circle “S”), work the slip stitch seaming to attach the granny squares together. Follow the direction of the arrows to minimize the need to cut and rejoin the yarn. Once you have finished seaming the middle section (arrows 1-12), cut the yarn and rejoin at the points indicated by the diagram below (the blue circle and green circle). Finish seaming (arrows 13-15 and 16-18).
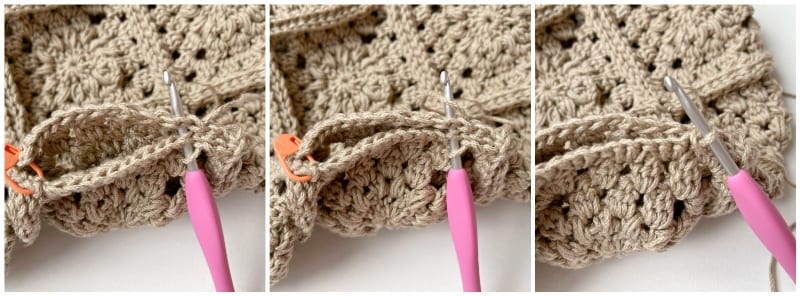
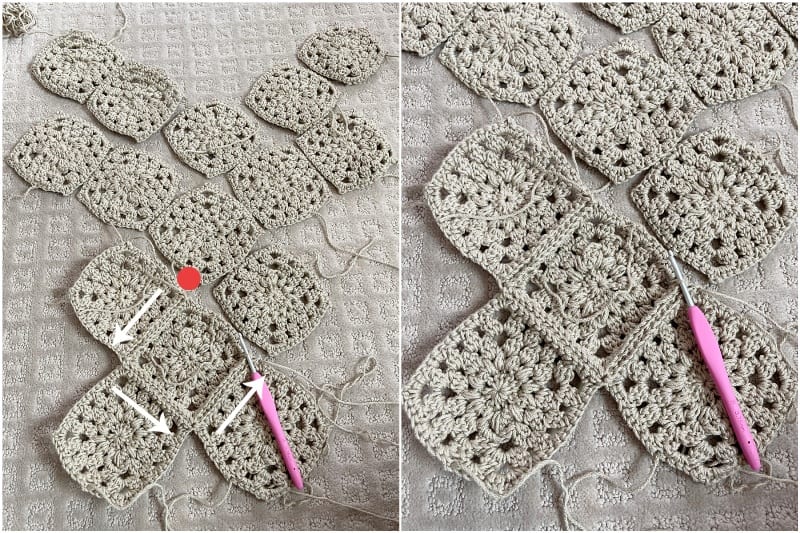
This collage below shows you the start point where the red circle is. The arrows indicate the direction you are working the slip stitch seaming (as illustrated by the previous diagram):
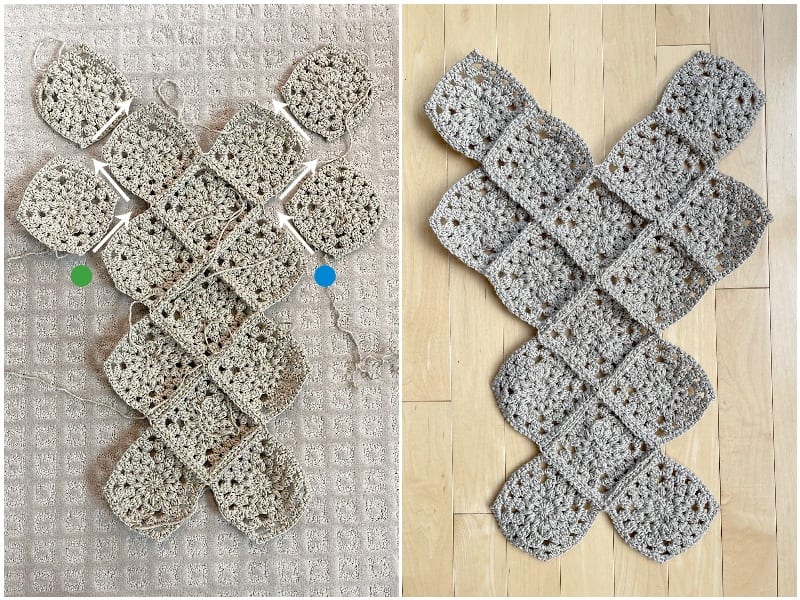
This collage shows you where to rejoin the yarn once you have finished the middle seaming. After you have seamed the squares together on both side edges, you have joined all 15 squares together!
Fold the piece upwards so Square 12 overlaps with Square 3; Square 15 overlaps with Square 6. Fold the outer granny squares inwards (Squares 1, 2, 7 and 11). Note that the collage below shows the right sides facing outwards.
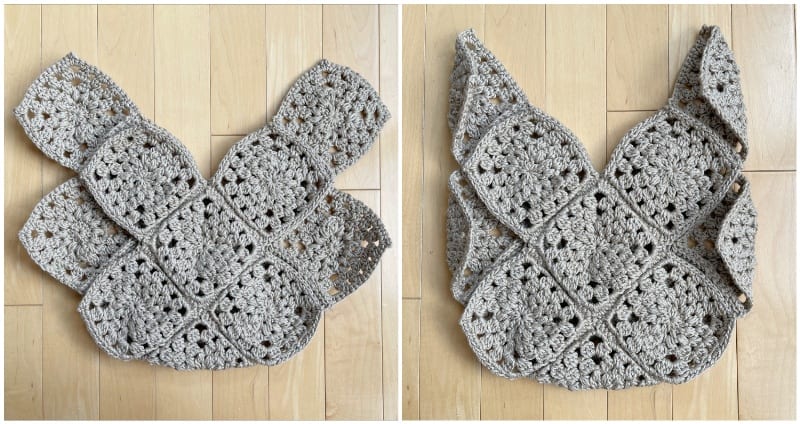
We will now use the slip stitch seaming technique to seam the folded granny squares into place. With the wrong side facing you, start at the red circle and follow the arrows to seam the four edges as shown. Fasten off and repeat the process starting at the other red circle.
Flip the bag inside-out so that the right sides of the granny squares are now facing outwards. You can steam block the bag to help smooth the seams and joined granny squares.
Please head to PART 2 of the Wildrose Shoulder Bag pattern to learn how to crochet the top edging and strap HERE!
{This post is sponsored by Lion Brand Yarn! I’ve loved working with their yarn throughout the years and I’m thrilled that I get to collaborate with them every month!}
This pattern is an original pattern by Stephanie Lau of All About Ami. Please do not claim this pattern as your own. If you wish to share this pattern, you may link to this pattern but please do not reprint it on your site. You may keep a copy for your own personal use but please DO NOT sell the pattern or distribute it.
You may sell products made from this pattern but please clearly credit the design to me, Stephanie Lau of All About Ami, and provide a link to my blog www.AllAboutAmi.com. Permission is NOT granted for mass production or factory manufacturing of any kind. Thank you for being respectful and for your understanding!