***You can purchase an INEXPENSIVE AD-FREE PDF of this pattern on Etsy HERE and on Craftsy HERE! This beautifully formatted PDF includes the step-by-step pictures and is a total of 5 pages including the cover page! You can also purchase a kit HERE on the Lion Brand Yarn website that includes the pattern and all the yarn needed to make this basket in three different colours!
One of the best parts about being a fibre artist is being able to create one-of-a-kind gifts that cannot be bought in stores! This past Christmas, I was brainstorming what to make for Myla’s kindergarten teacher and teaching assistant as I wanted to make them something very special. Now that Myla is in kindergarten, she goes to school everyday, and I am so thankful that Myla has been blessed with an amazing and experienced teacher who is so intentional with everything she does in the classroom. The children are learning so much and I love all the rhymes, songs, and activities she does to help the children learn, explore their senses, and also have fun. I love being able to volunteer in the class and go on field trips, and I am very thankful for my flexibility as a stay-at-home mom/crochet blogger. I do most of my computer work and blogging at night after the kids have gone to sleep- the house is very quiet as I am typing this now!
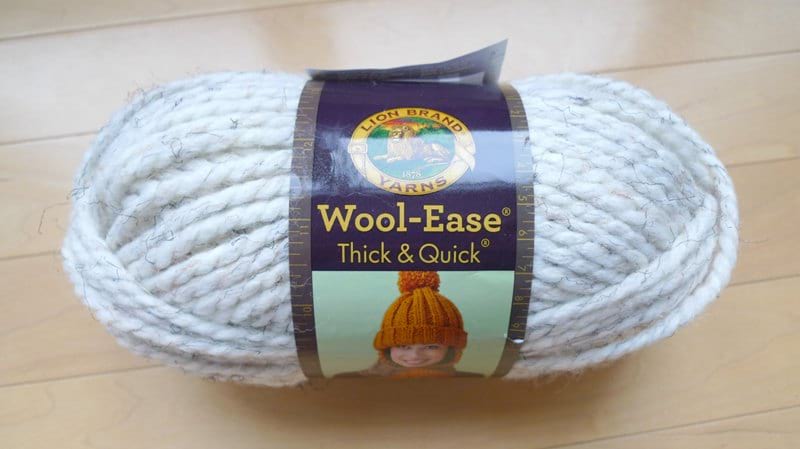
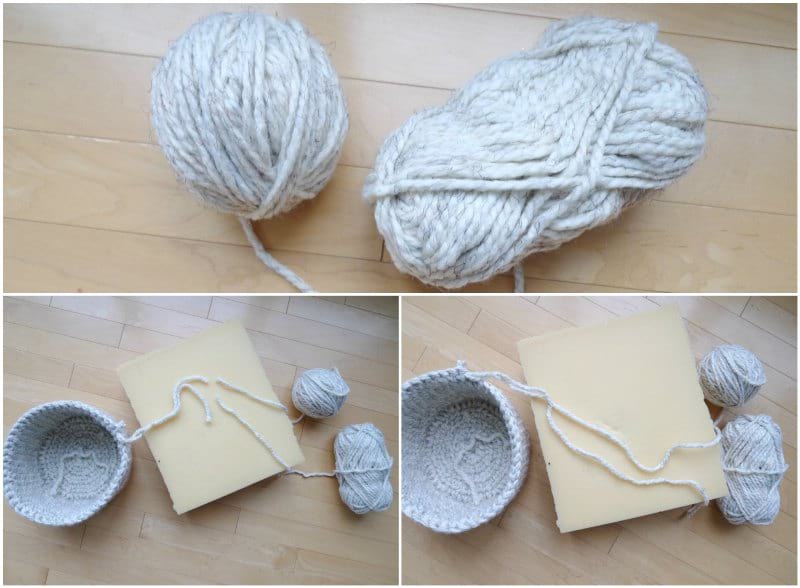
I have crocheted multiple baskets throughout the years, and I thought a crochet basket would be a very special and practical gift that Myla’s teacher would appreciate! Check out my previous blog posts about the chunky baskets I made HERE– I learned some tips working through these patterns, and this time round, I wanted to try using a new stitch! I turned to my trusty Wool-Ease Thick & Quick yarn and chose the beautiful neutral colourway “Wheat“! As a reminder, it is a super bulky (level 6) yarn, and the “Wheat” colourway is actually 86% acrylic, 10% wool and 4% rayon!
I held two strands of yarn together at the same time and used my 8 mm Clover Amour hook to get tight stitches. I used half double crochets worked in closed rounds for the base. [***PLEASE NOTE that these are the step-by-step instructions! If you would like to see the FORMALLY WRITTEN-OUT CROCHET PATTERN with exact stitch counts and increases, KEEP SCROLLING through this blog post and you will find it!].
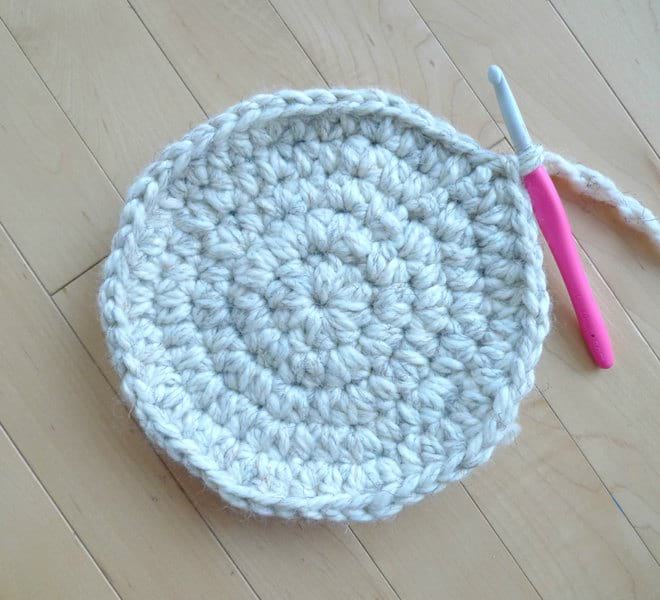
Next, it was time to begin the body of the basket. Half double crochets are special because they create not only a front and back loop, but also a third loop as indicated by the arrows below. I crocheted in the third loops around to help create a clear division between the base and body of the basket

I played around with different stitches for the body of the basket. I started off using the camel stitch (half double crochet in the third loops) like in my Triple Luxe Cowl, but the basket was looking too floppy and not sturdy at all. Then, I decided to use the beautiful “Waistcoat Stitch“, which is also known as Centre Single Crochet! It creates a very sturdy project which is perfect for an item like a basket that you want to be stiff and hold its structure. The stitches look like little “V”‘s or knit stitches- Myla even asked me how I created the little “hearts” on the basket since the stacked stitches resemble hearts!
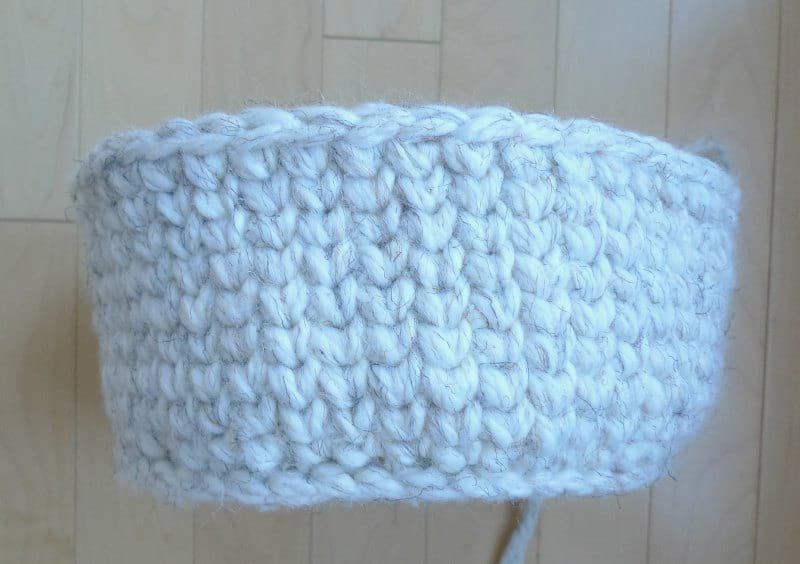
For typical single crochets, you insert your hook into the front and back loops to work your stitch. For the waistcoat stitch or centre single crochet, you actually insert your hook into the middle of the “V”, NOT in the front or back loops!

You insert your hook into the middle of the V, yarn over, pull up a loop, yarn over, and pull through both loops. I demonstrate how to work this stitch with a video found later on in this blog post. For the body of the basket, I worked in continuous, unjoined rounds so that there is no visible seam.
After you have worked through two skeins of Wool-Ease Thick & Quick, you will need to divide up the third skein of yarn (this basket uses 3 skeins of yarn in total). I weigh the skein to get the exact measurement (e.g. 168 grams), start winding a ball, and then continue weighing that ball until it weighs exactly half (i.e. 84 grams). Since this yarn has a wool component to it, you can felt the yarn ends together with a felting needle tool so that you do not need to tie or hide knots. Look how seamless the yarn ends blend together as you add in your two new balls of yarn! Check out my “How to Felt Yarn Ends Together” tutorial HERE!
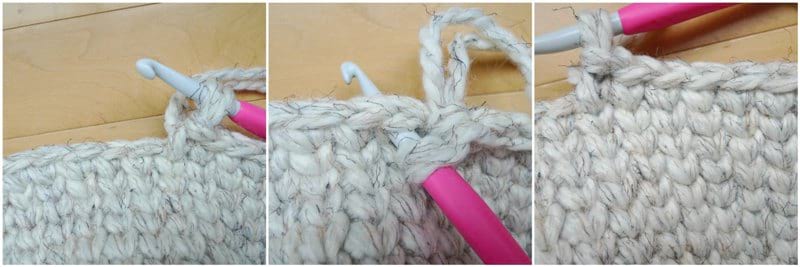
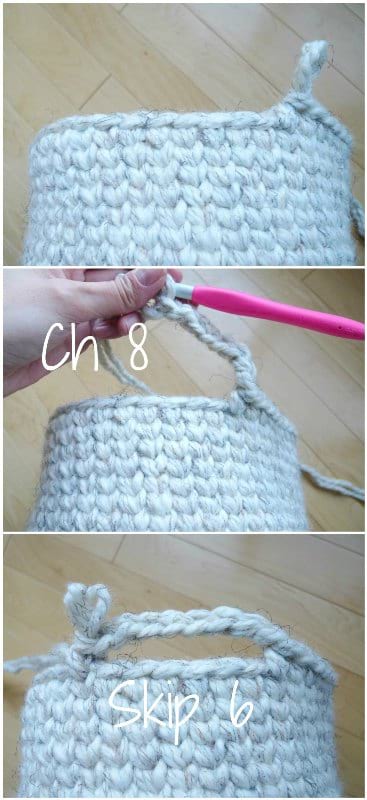
Next, it is time to create the crochet handles! Chain 8, skip 6 stitches, and then continue working the waistcoat stitch around.
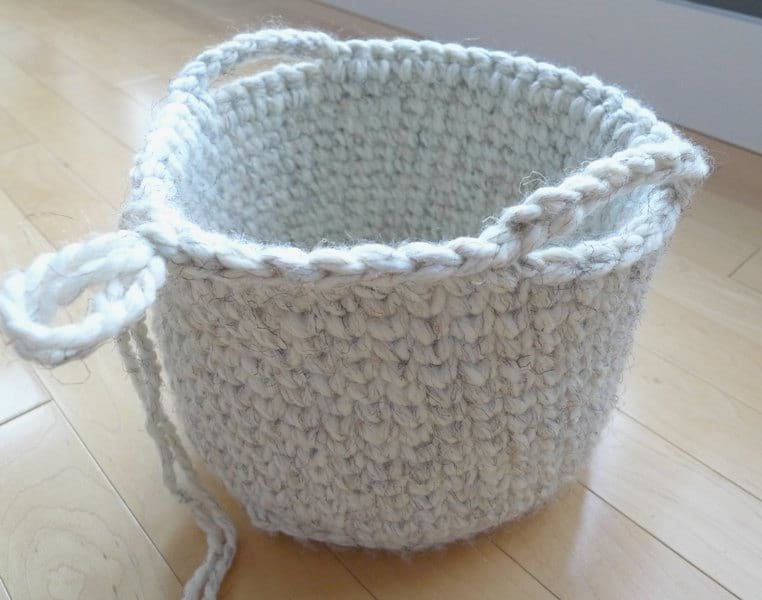
After both handles have been crocheted, it will be time to work the last round of edging.
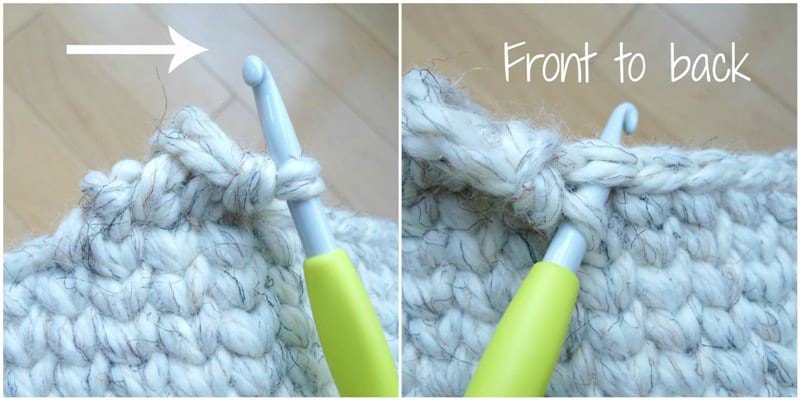
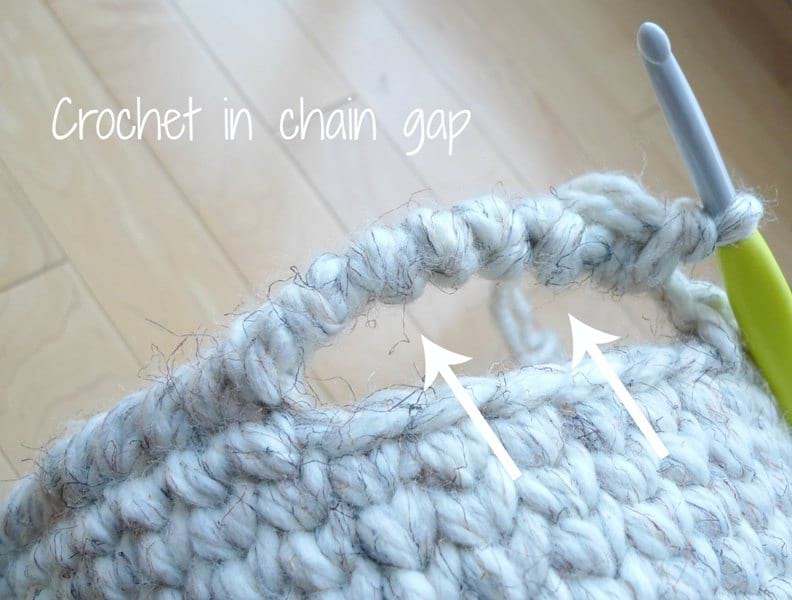
I switched to a smaller 7 mm crochet hook for the edging! This last round is interesting because you will be working the reverse single crochet or crab stitch. Typically, you work clockwise in a round. For this last round, you will be working in the opposite direction, or counter-clockwise. Insert your hook from front to back, yarn over, pull up a loop, yarn over and pull through two loops. It feels kind of awkward at first, but once you get the hang of it, you will be flying through those crab stitches!
When you approach the handle, you will work reverse single crochets into the chain gap!
After completing the last round of reverse single crochets, I sewed on my Brickbubble foldover tag (see my “How to Sew on Garment Tag” tutorial HERE)! Isn’t this basket so cute?
![]()
It is very sturdy and such a great size to store small items!
![]()
I crocheted another basket using the colourway “Grey Marble“! This time, I did not crochet any handles but still did the last round of reverse single crochets. You could keep this basket like this or perhaps add rope or fabric handles!
![]()
We wanted to try adding LEATHER handles to our Grey Marble basket! We still had plenty of leather left-over from our Star Stitch Purse handles, so Ryan cut two strips and created some holes (see leather tutorial HERE).
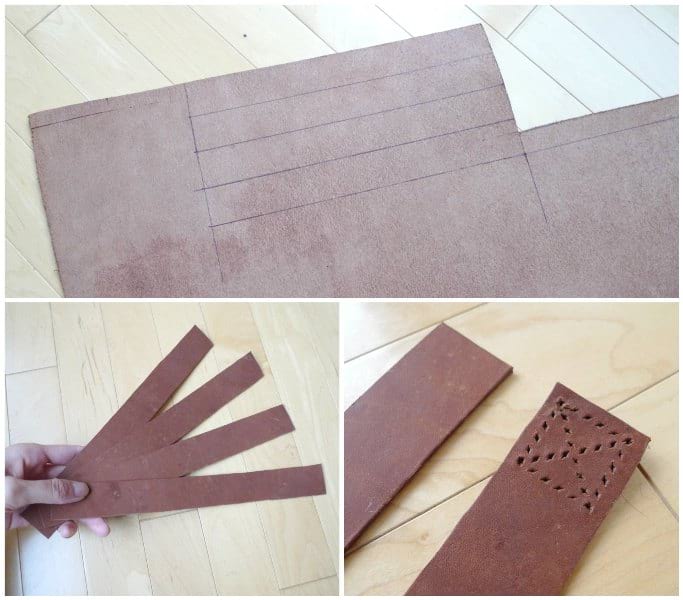
After sewing the leather handles onto the basket with waxed cord, this basket was complete!
![]()
Check out the waistcoat stitch and reverse single crochet in action with my video below!
*************************
Here is the free pattern for the Waistcoat Crochet Baskets:
***Don’t forget you can purchase an INEXPENSIVE AD-FREE PDF of this pattern on Etsy HERE and on Craftsy HERE! This beautifully formatted PDF includes the step-by-step pictures and is a total of 5 pages including the cover page!
![]()
Materials:
- 8 mm Clover Amour hook (for base and body) & 7 mm Clover Amour hook (for edging)
- Lion Brand Yarn’s Wool-Ease Thick & Quick, 3 skeins. I used the colourways “Wheat” and “Grey Marble”. You need to hold two strands of yarn together for this project- divide the third skein of yarn into two equal balls. Find this yarn on the Lion Brand Yarn website HERE! Purchase the Waistcoat Basket KIT HERE!
- Clover Felting Needle Tool & Foam Mat (optional)
- Leather handles, waxed braided cord, diamond punch, rubber mallet (optional- to create leather handles)
- Ultraleather garment tag by Brickbubble (optional)
Notes:
- This basket is crocheted by holding two strands of yarn together.
- The base of the basket (half double crochet portion) is worked in joined rounds. The body of the basket (waistcoat or centre single crochet portion) is worked in continuous, unjoined rounds.
- For the base, always slip stitch to the first hdc of the round, not the Chain 2.
- For the base, after doing your chain 2 at the beginning of the round, work your first stitch in the same stitch where you did your slip stitch and Chain 2.
- When the pattern says to “Inc” or increase, work 2 hdc in the next stitch to increase, i.e. *2 hdc in next st*.
- When we begin to crochet the body of the basket, we single crochet in the third loops created by the half double crochets of the previous round. The third loops can be found behind the front and back loops. This creates a beautiful ridge or edge at the bottom of the basket and helps clearly define the base and the beginning of the body.
- You can choose to crochet a basket with no handles and perhaps add rope or leather handles later on. You could also choose to crochet handles.
- To create a unique and decorative edge, we switch to a 7 mm hook and work the reverse single crochet or crab stitch for the last round. Typically we work clockwise when crocheting the rounds of the basket. For the last round of reverse single crochets, we will be working counter-clockwise.
Special stitches:
- Waistcoat stitch or center single crochet (Csc): Insert hook in the middle of the V from previous row (rather than front and back loops), YO, pull up a loop, YO, pull through 2 loops.
- Reverse single crochet or crab stitch (Rsc): Working from left to right (opposite direction you normally crochet), insert hook from front to back in stitch to the right. YO, pull up a loop, YO, pull through 2 loops on hook.
Gauge: Using 8 mm hook, First 3 rounds = 4.75″/12 cm across
Finished dimensions: 7″ tall, 8.5″ diameter, 27″ circumference
PATTERN:
We will begin crocheting the BASE of the basket (working in joined rounds):
Using 8 mm hook,
Round 1: Ch 2, 10 hdc in Magic Ring. Sl st to first hdc (10 sts).
R2: Ch 2. *Inc*, rep 10 times. Sl st to first hdc (20 sts). [Inc means to work *2 hdc in next st*]
R3: Ch 2. *Hdc 1, Inc*, rep 10 times. Sl st to first hdc (30 sts).
R4: Ch 2, *Hdc 2, Inc*, rep 10 times. Sl st to first hdc (40 sts).
R5: Ch 2. *Hdc 3, Inc*, rep 10 times. Sl st to first hdc (50 sts).
We will now begin crocheting the BODY of the basket (working in continuous, unjoined rounds):
R6: Ch 1, single crochet in third loops around (50 sts- ignore Ch 1 in next round).
R7-20: Center single crochet around (50 sts).
We will now crochet the handles of the basket.
R21: Center single crochet 10, chain 8, skip 6. Csc 19, chain 8, skip 6, Csc 9 (54 sts).
Switch to 7 mm hook and reverse the direction you normally crochet,
R22: Starting in stitch you just finished crocheting from previous round, Reverse single crochet 9. Rsc 10 in chain gap, Rsc 19, Rsc 10 in Chain gap, Rsc 10 (58 sts).
Fasten off. Slip ends through top of first Rsc. Wrap yarn ends around edge to mimic Rsc. Weave in end.
![]()
***Modification without crochet handles:
R21: Center single crochet around (50 sts).
Switch to 7 mm hook and reverse the direction you normally crochet,
R22: Starting in stitch you just finished crocheting from previous round, Reverse single crochet around (50 sts).
Fasten off. Slip ends through top of first Rsc. Wrap yarn ends around edge to mimic Rsc. Weave in end.
Add leather, rope or fabric handles if desired.
![]()
Leather Handles:
- Cut two 26 cm x 3 cm strips of leather.
- Using diamond punch (2 mm) and rubber mallet, poke holes to form square at bottoms of both straps.
- Use waxed braided cord to sew leather straps onto crochet basket (bottom of straps positioned between Rounds 19 and 20, about 6 stitches apart). Cut ends and melt to secure them.
- See my Star Stitch Purse tutorial HERE to learn more about these leather techniques!
*******************************
The Waistcoat Basket is such a wonderful way for you to add some crochet to your home, whether that be in your living room or perhaps a nursery! Since you can choose any yarn colour, you can match the basket to the decor and theme of the room!
![]()
The leather handles on this basket are such a gorgeous addition- as you know, we love mixing materials!
![]()
If you are in need of a unique gift, keep these Waistcoat Baskets in mind! They are perfect housewarming gifts, gifts for teachers, or baby shower gifts! You could even fill the basket with little goodies such as teas, towels, books, and more! You can purchase a KIT to make the Waistcoat Basket in three different colours (Wheat, Grey Marble and Obsidian) on the Lion Brand site HERE! Myla’s teachers LOVED their baskets when we gifted them on the last day of school before the Christmas break! I might need to make one for ourselves! Keep up to date with my work by subscribing to my newsletter HERE! Have fun crocheting your own baskets and adding some handmade to your home!
![]()
{This post is sponsored by Lion Brand Yarn! I’ve loved working with their yarn throughout the years and I’m thrilled that I get to collaborate with them every month!}
This pattern is an original pattern by Stephanie Lau of All About Ami. Please do not claim this pattern as your own. If you wish to share this pattern, you may link to this pattern but please do not reprint it on your site. You may keep a copy for your own personal use but please DO NOT sell the pattern or distribute it.
You may sell products made from this pattern but please clearly credit the design to me, Stephanie Lau of All About Ami, and provide a link to my blog www.AllAboutAmi.com. Permission is NOT granted for mass production or factory manufacturing of any kind. Thank you for being respectful and for your understanding!