***You can purchase an INEXPENSIVE AD-FREE PDF of this pattern on Etsy HERE! This beautifully formatted PDF includes the step-by-step pictures and is a total of 5 pages including the cover page. This pattern is also available in the “Crochet Cowls & Scarves PATTERN BUNDLE” which includes over 20 beautiful designs at a discounted price – check out the bundle HERE! Lion Brand Yarn has put together a convenient kit HERE that contains all the yarn you need to make this luxurious scarf (5 different color options available)!
Lion Brand Yarn has unveiled their Color of the Year for 2020, and it is this beautiful color called “Succulent“. As described on their website, “Succulent is a soft green with blue undertones. It is a celebration of nature and was chosen to be the Yarn Color of the Year because it reflects our concern and respect for the environment. Succulent is a reminder that nature can be the antidote to the technology that may at times overwhelm our lives. It brings calm and reflects the feeling of peace we all find in yarn crafts.”
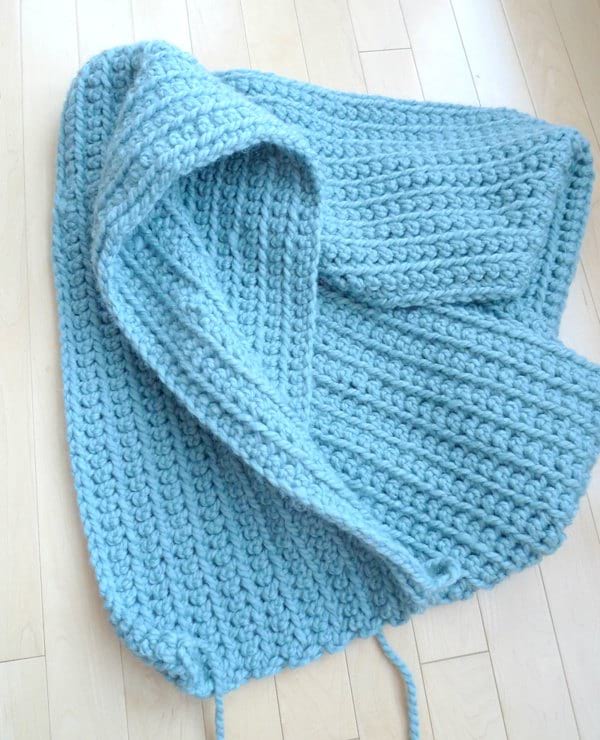
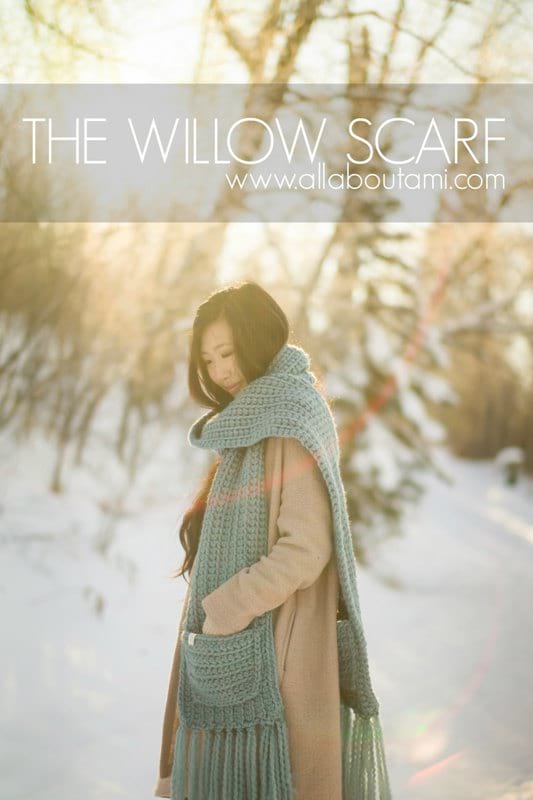
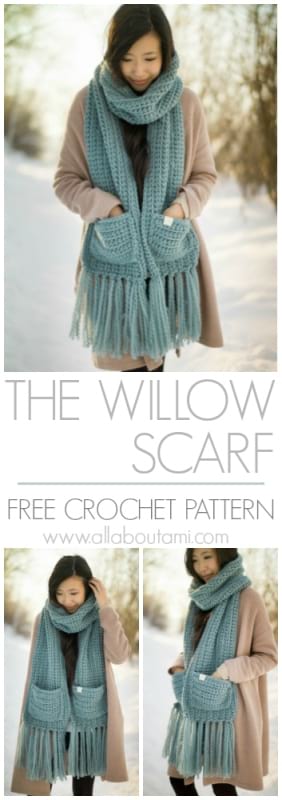
Succulent is a colour that I do not frequently wear or have in my wardrobe, so I was excited to work with it. It is a lovely calming shade, and I thought it would be fun to crochet a statement scarf with it. Most of my jackets are neutral coloured (black, grey, white, camel), and I knew that Succulent would provide a beautiful pop of color and a welcome breath of fresh air during the drab winter. This statement scarf is beginner-friendly as it uses basic stitches, thick yarn and a large crochet hook. If you have always been wanting to learn how to crochet, give this design a try!
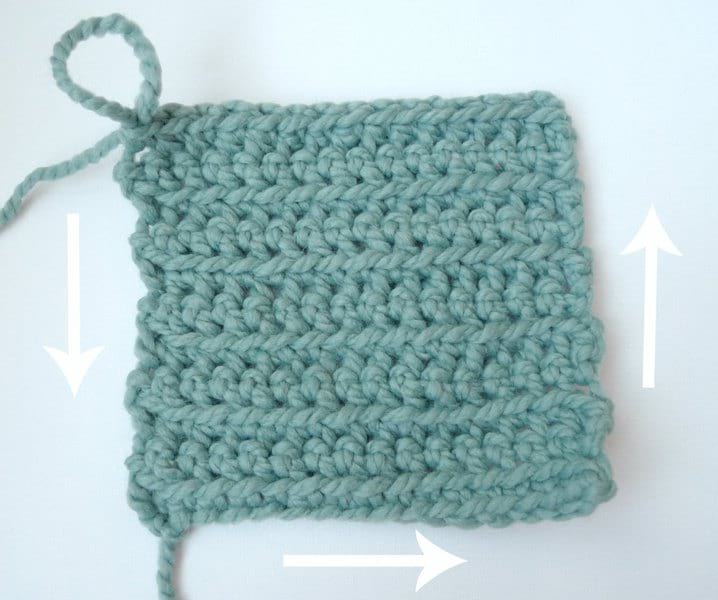
To begin, work a long series of chain stitches with your 9 mm hook (exact numbers written in pattern below after the step-by-step tutorial). This length will determine the overall length of the scarf as we will be working in turned rows. For Row 1, work in the bumps behind the chains as indicated by the arrows in the pictures below.
For this entire design, we will be working single crochets in the front loops only (FLO). Each single crochet is comprised of two loops that form a V at the top: the front loops and the back loops. The front loops are the loops that are closest to you as indicated by the white arrows.
Continue working single crochets in the front loops only to get this beautiful ribbed effect. As you keep adding more rows, you are increasing the width of the scarf.
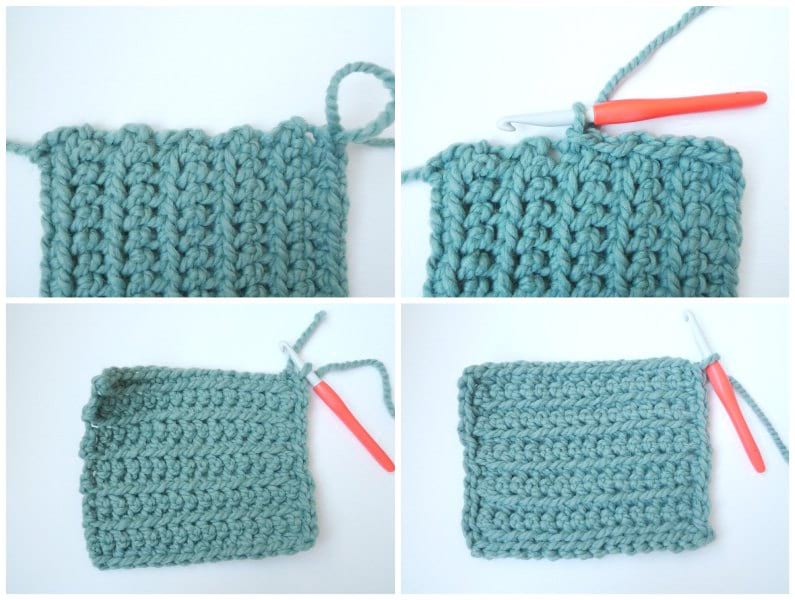
Once you are finished crocheting your scarf, it is time to crochet the optional pockets! Crochet this square and get ready to add a clean edging around the border. To do so, we will work slip stitches down one side of the pocket, along the bottom, and up the other side of the pocket.
Work slip stitches along the side of the pocket by working one slip stitch per row (since there are 11 rows, you will work 11 slip stitches). The slip stitch edging adds such a polished finish.
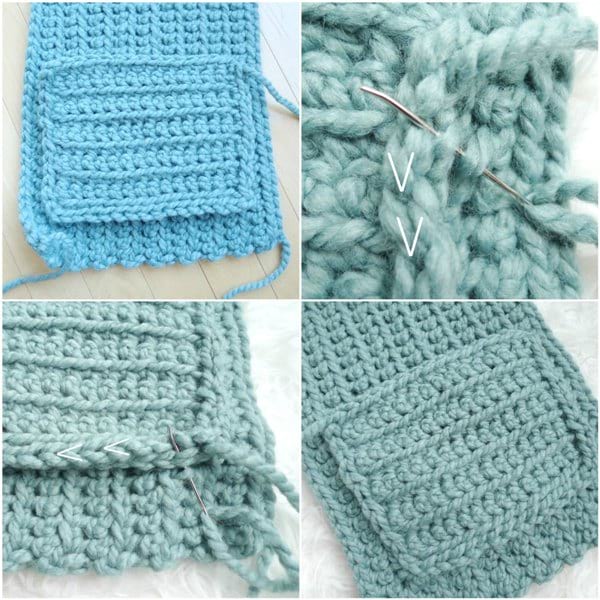
It is time to attach your pockets to your scarf. Position the pockets on each bottom of the scarf, ensuring that they are on the same side (see approximate measurements in pattern below). Use the long yarn tail and whip stitch the pockets onto the scarf, trying to pick up stitches behind the front and back loops of the pocket in order to leave the front and back loops untouched (notice the V’s in the pics below). Note that the pocket has horizontal lines to contrast the vertical lines of the scarf – you can choose to orient the pocket to have vertical lines as well.
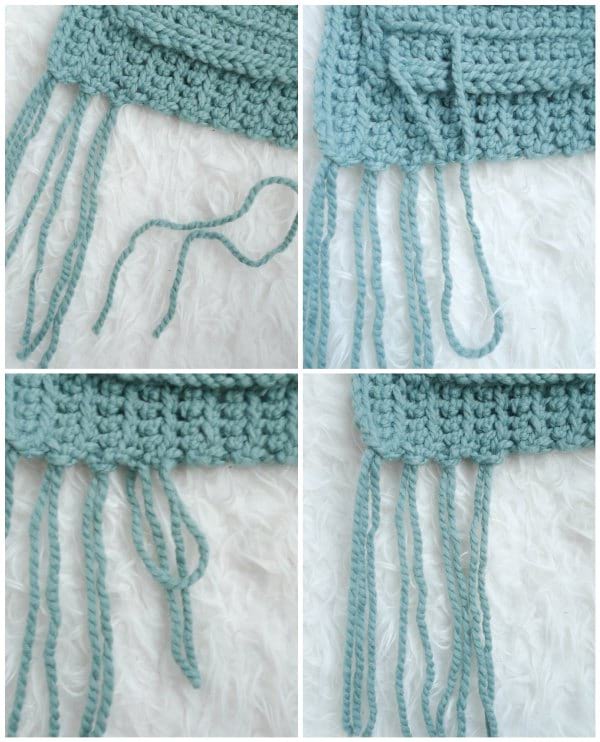
It is now time to add the luxurious fringe (see detailed instructions below in pattern). Each fringe section should take up the width of two rows.
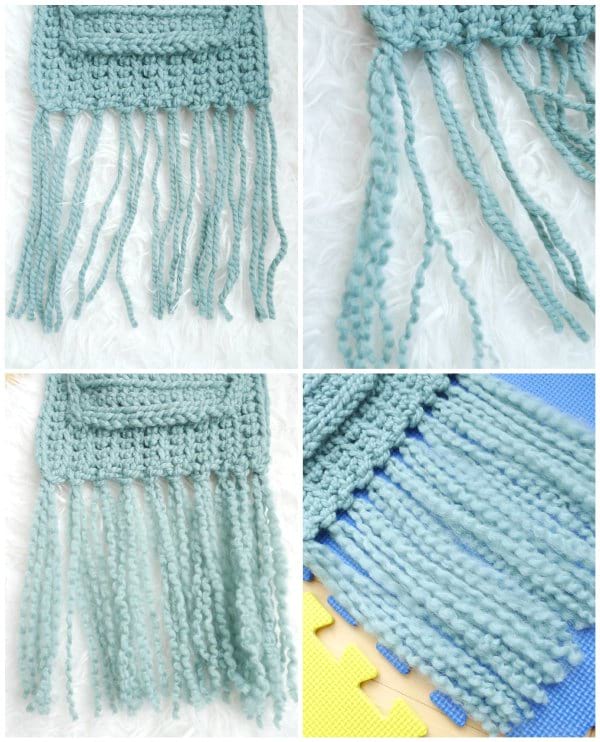
If you would like fuller fringe, you can carefully untwist each strand of yarn – each strand untwists into two separate strands (so each chunk of 2-stranded fringe becomes 4 strands). You can watch me demonstrate this process HERE (I used the same technique for the Chunky Dotty Scarf). You can block your fringe with a steamer to get it to be more even.
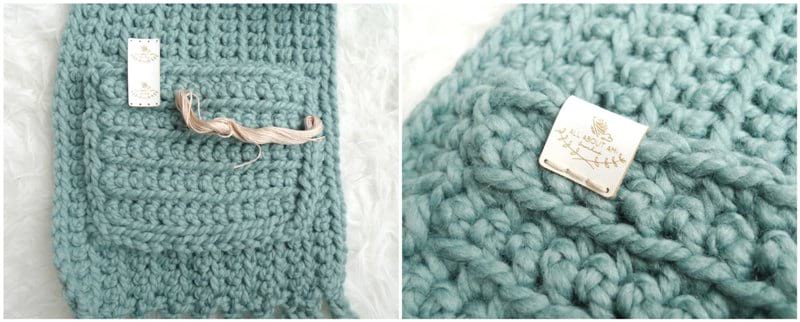
As a final touch, I like to sew on my ultraleather garment tag by Brickbubble onto the pocket with embroidery floss and a bent tip tapestry needle. It gives such a professional look to my handmade pieces!
*****************************
Here is the free crochet pattern for the Willow Scarf:
Crochet this stunning beginner-friendly statement scarf using basic stitches! The cozy pockets are the perfect place to keep your hands warm, and the luxurious fringe add such a lovely touch. Choose your favorite color and stay warm and stylish with the Willow Scarf!
Notes:
- This beginner-friendly scarf is crocheted in turned rows. Working single crochets in the front loops only (FLO) gives a lovely ribbed effect.
- Each single crochet stitch is comprised of two loops that form a V at the top: the front loops and the back loops. The front loops are the loops that are closest to you.
- Optional pockets and fringe are added at the end.
- The scarf has vertical lines while the pocket has contrasting horizontal lines. You can choose to orient the pocket with either horizontal or vertical lines.
- If you want to make the scarf wider, add more rows. If you want to make the scarf more narrow, decrease the number of rows.
- If you want to make the scarf longer, add more initial chains. If you want to make the scarf shorter, decrease the number of initial chains.
- If you want to make this scarf into a cowl, you can whip stitch the ends together at the end.
- This scarf lays flat naturally and does not require blocking.
- You can use a felting tool when joining a new skein of Wool-Ease Thick & Quick for this scarf. See my tutorial and video on how to do this HERE.
Materials:
- 9 mm Clover Amour crochet hook
- Wool-Ease Thick & Quick by Lion Brand Yarn (super bulky level 6), 4 skeins – I used the colourway “Succulent”; convenient kit available HERE (includes all the yarn required and printed pattern – 5 different color options available)
- Bent tip tapestry needle (for attaching pockets)
- Optional: Ultraleather garment tag by Brickbubble, Clover felting tool for joining a new skein of yarn
Gauge: 7.5 sts and 8.5 rows = 4″ (single crochet in front loop only)
PATTERN
SCARF:
Using 9 mm hook, chain 166 (optional: leave long initial end to become part of the fringe).
Row 1: Starting in second chain from hook, sc across. (165 sts)
Row 2: Chain 1, turn. Starting in second st from hook, sc in front loops only. (165 sts)
R3-19: Repeat Row 2.
Fasten off and leave long end to become part of the fringe.
POCKETS (make 2):
Using 9 mm hook, chain 16.
Row 1: Starting in second chain from hook, sc across. (15 sts)
Row 2: Chain 1, turn. Starting in second st from hook, sc in front loops only. (15 sts)
R3-11: Repeat Row 2.
Do not fasten off. We will now crochet a clean edging around the pocket using slip stitches. Work slip stitches down the side of the pocket (11 slip stitches since there are 11 rows), across the bottom (15 stitches), and back up the other side of the pocket (11 slip stitches). Fasten off and leave long end for sewing.
Position pockets on each bottom of the scarf (ensure that they are on the same side). I positioned my pocket approximately 1.5″ from the sides (about the width of two rows) and 2″ from the bottom (about 5 stitches left at the bottom). Use yarn tail and whip stitch pockets onto scarf, trying to pick up stitches behind the front and back loops of the pocket in order to leave the front and back loops untouched. Weave in end. [Note: the pocket has horizontal lines that contrast the vertical lines of the scarf. You can choose to orient the pocket so that they have vertical lines as well.]
FRINGE: Cut 20 strands of yarn, each 22” long (10 strands for each side). Insert a large crochet hook into a space at the bottom, from right side to wrong side. Pull up one end of the strand (end is now on the right side). Insert large crochet hook into adjacent space, from right side to wrong side. Pull up the other end of the strand. Pull both strand ends through bottom loop that is located on the wrong side. Each fringe section should take up the width of two rows. Keep repeating across both sides. If fuller fringe is desired, you can carefully untwist each strand of yarn – each strand untwists into two separate strands (so each chunk of 2-stranded fringe becomes 4 strands). You can watch me demonstrate this technique in this IGTV video HERE. Block fringe and trim if necessary.
Finished Dimensions: 9″/23 cm wide, 88″/224 cm long (without fringe)
***Watch me demonstrate how to crochet in the front loops only and how to slip stitch around the pocket in my video below:
***********************
The Willow Scarf is such a beautiful statement scarf that works up quickly and easily using basic stitches. Don’t you love how the single crochets look with the striking vertical lines?
I adore items with pockets as I love having a place to rest my hands and store small items!
Succulent is such a gorgeous shade, and I am excited that this color has been chosen as Lion Brand Yarn’s Color of the Year. It is a welcome addition to my wardrobe and I think this shade is flattering on everyone. The Willow Scarf is very warm since it uses a wool blend yarn (80% acrylic/20% wool) and is also very easy to care for. Wool-Ease Thick & Quick is a favourite of many! You can check out the convenient kit HERE (5 different colour options available) as it includes all the yarn you need as well as the printed pattern.
If you have always been wanting to learn how to crochet or you are in the mood for a mindless and easy project, give the Willow Scarf a try! Using super bulky yarn and a large crochet hook is a great way to learn how to crochet, and you will be whipping up your own beautiful statement scarf in no time. The Willow Scarf would also make the perfect gift as who wouldn’t love a scarf with cozy pockets?
Enjoy working up your beautiful scarves, everyone! You can subscribe to my e-mail newsletter HERE to keep up to date with my work. I love staying warm in my handmade pieces, and I know you do too – happy crocheting!
{This post is sponsored by Lion Brand Yarn! I’ve loved working with their yarn throughout the years and I’m thrilled that I get to collaborate with them every month!}
This pattern is an original pattern by Stephanie Lau of All About Ami. Please do not claim this pattern as your own. If you wish to share this pattern, you may link to this pattern but please do not reprint it on your site. You may keep a copy for your own personal use but please DO NOT sell the pattern or distribute it.
You may sell products made from this pattern but please clearly credit the design to me, Stephanie Lau of All About Ami, and provide a link to my blog www.AllAboutAmi.com. Permission is NOT granted for mass production or factory manufacturing of any kind. Thank you for being respectful and for your understanding!