The Midnight Dunes Set
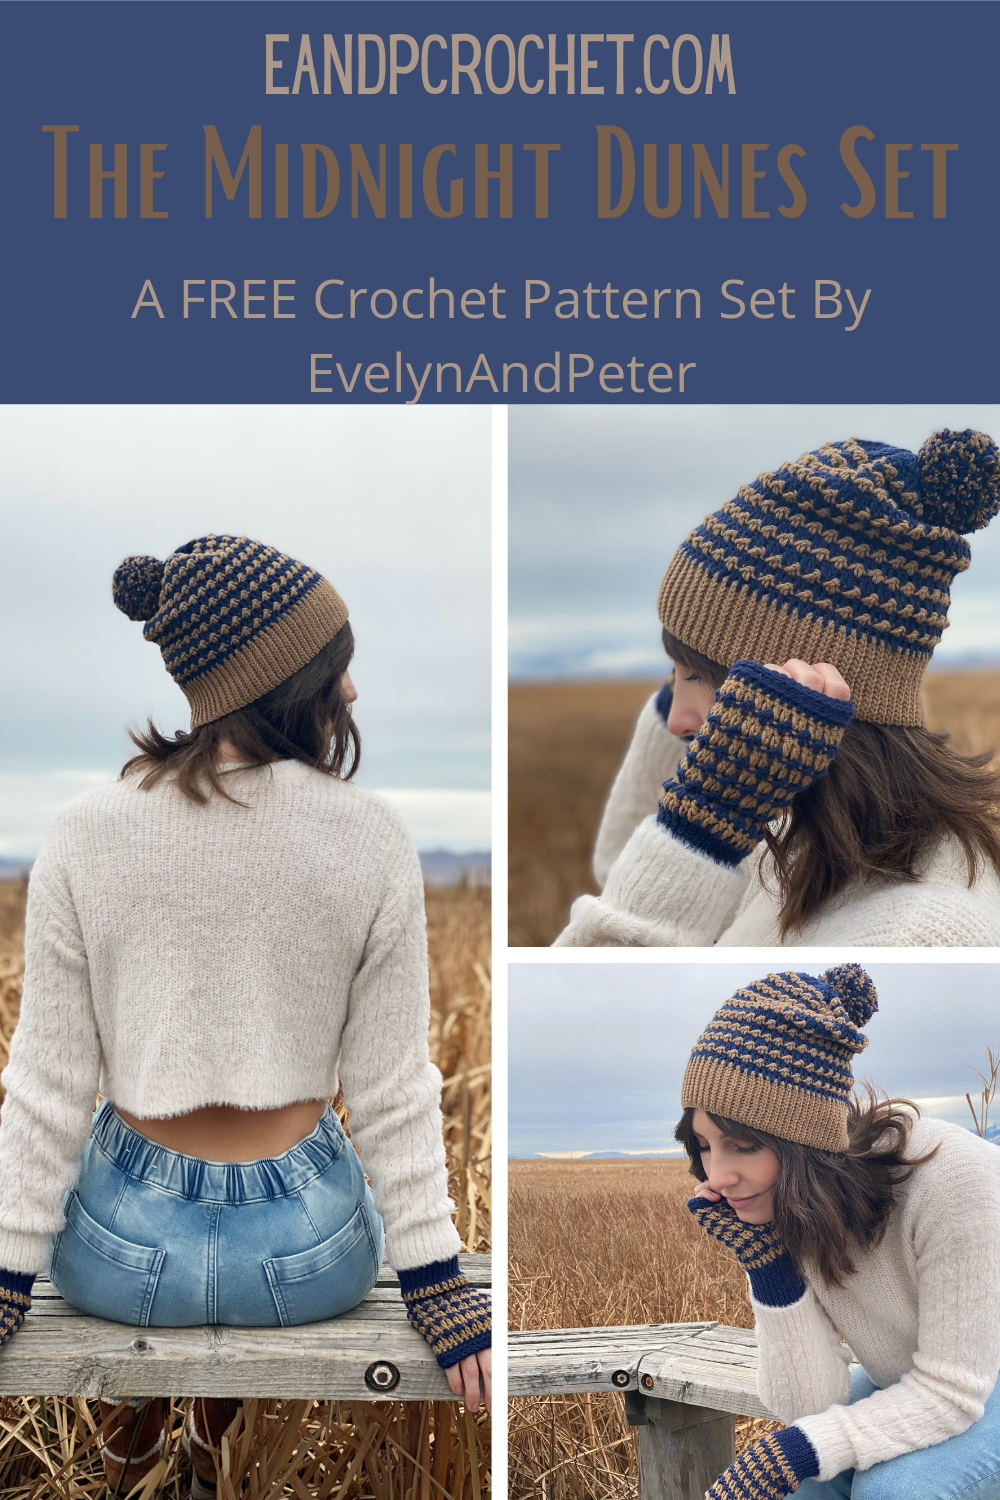
When I got my hands on Lion Brand Merino Camel I knew immediately I wanted to make a matching beanie and fingerless mitt set. The super soft and fine yarn was perfect for the Midnight Dunes Set!
The colors reminded me of a nautical east coast chilly beach feel. I asked my followers on Instagram what they thought a good name would be and someone suggested The Midnight Dunes set! A really fitting name in my opinion!
This set is great for an advanced beginner. Maybe you already have the basics down and want to try out something a bit more challenging then scroll on down! You will be doing some color work and fun stitches.
I even made full VIDEO tutorials for both the beanie and the mitts! So if your still new to crocheting you can follow right along! You can find the beanie video here and the mitt video here!
LINKS:
-
The Midnight Dunes Set is available as a kit through Lion Brand. The kit comes with the PDF digital pattern + all the yarn required to make both the beanie and mitts. You can pick your own colors!
-
The Midnight Dunes Set is on Ravelry! Be sure to give it a heart and save it to your queue! You can also purchase the low cost ad-free PDF.
-
This set is available on Etsy!
-
Check out The Midnight Dunes set is on Lovecrafts!
-
Don’t forget, The Midnight Dunes set is available as a full video tutorial! Check them out here and here!
Description:
The Midnight Dunes Beanie and Mitt set are the perfect winter accessories. Mix and match your color choices for a fun striped look. The extra stretchy ribbing gives your beanie and mitts a super comfy fit.
Materials:
-
Lion Brand Merino Camel Fine (2) Weight Yarn. 2 balls in Tan/Color A(204 yards), 2 balls in Navy/Color B (245 yards)
-
4.00mm Crochet Hook
-
Yarn Needle
-
PomPom maker (optional)
Sizes: One Size Only- Fits the average adult female head and hands.
Gauge:
16 Dc by 11 rows(2 row repeat within pattern-dc row, 1dc and 1 Sl St)= 4×4”
Finished Beanie Measurements:
9.25” W (center of beanie at widest point), 10” L
Finished Mitt Measurements:
3.75” W, 8” L
Pattern Notes:
-
The Ch 2 does not count as a St. The Ch 1 in the ribbing does not count as a St.
-
The Ch 3 in the main body of the hat and mitts counts as 1 Dc. The Ch 1 in the main body of the hat and mitts counts as 1 Sl St.
-
You will TURN after every round in the main body (where you are doing the stripes/colorwork) of the hat and mittens.
-
Beanie and Mitts are worked from the bottom up.
Links:
Click here to view a full video tutorial on the beanie!
Click here to view a full video tutorial on the fingerless mittens!
Abbreviations (US Terms):
Sl St- Slip Stitch
Ch- Chain
BLO- Back Loop Only
Dc- Double Crochet
Inc- Increase (work 2 stitches into same space)
St- Stitch
Dc2tog- Double Crochet 2 Together (decrease)
Hdc- Half Double Crochet
3rd loop- The third loop located on the back of the Hdc stitch.
Beanie Pattern:
With Color A-
Ch 16
Row 1: 1 Sl St in second Ch from hook and each Ch across, turn. (15 Sl St)
Rows 2-144: Ch 1, 1 Sl St (BLO) in each St across, turn. (15 Sl St)
Join-
Fold your ribbing together so the bottom (first row) is now lined up with the last row. You will be inserting your hook through both stitches of both the first and last row and slip stitching to join. Sl St row 1 and row 144 together being sure to keep your stitches correctly alined. When you reach the 15 Sl St, drop Color A right before you YO and pull through. Pick up Color B and pull it through to complete the stitch. Your working yarn is now Color B. Do not cut Color A. Turn your ribbing correct side out so that the seam is now on the inside of the hat. You will now be working into the side of the rows of the ribbing.
Round 1: Ch 2 (does not count), work 1 Dc into the same space. You will be working your Dc stitches in between the “ridges” of the ribbing. Work 1 Dc into the next 7 spaces in between the ridges. Work 2 Dc (increase) into the following space. *8 Dc, Inc* Repeat from * to * around. Sl St to the top of the first Dc made to join, dropping color B and picking up color A, TURN. (80 Dc)
Round 2: Ch 1 (counts as 1 Sl St), 1 Dc in next St. *1 Sl St, 1 Dc* repeat from * to * around. Join to the beginning Ch 1 with a Sl St, dropping color A and picking up color B, TURN.
Round 3: Ch 3 (counts as 1 Dc), 1 Dc in each St around, join to the top of the Ch 3 with a Sl St, Drop color B and pick up color A, TURN. (80 Dc)
Rounds 4-12: Repeat Rounds 2 & 3. Be sure to turn and switch yarns with every round.
Round 13: Ch 3, 1 Dc in next 7 Sts, Dc2tog, * 8 Dc, Dc2tog* repeat from * to * around, Drop color B and pick up color A, join and TURN. (72 Dc)
Round 14: Repeat Round 2.
Round 15: Ch 3, 1 Dc in next 6 Sts, Dc2tog, *7 Dc, Dc2tog* repeat from * to * around, drop color B and pick up color A, join and TURN. (64 Dc)
Round 16: Repeat Round 2.
Round 17: Ch 3, 1 Dc in next 5 Sts, Dc2tog, *6 Dc, Dc2tog* repeat from * to * around, drop color B and pick up color A, join and TURN. (56 Dc)
Round 18: Repeat Round 2.
Round 19: Ch 3, 1 Dc in next 4 Sts, Dc2tog, *5 Dc, Dc2tog* repeat from * to * around, join to the top of the Ch 3 with a Sl St, do not change colors do not turn. (48 Dc)
Round 20: Ch 3, 1 Dc in next 3 Sts, Dc2tog, *4 Dc, Dc2tog* repeat from * to * around, join. (40 Dc)
Round 21: Ch 3, 1 Dc in next 2 Sts, Dc2tog, *3 Dc, Dc2tog* repeat from * to * around, join. (32 Dc)
Cut yarn leaving a tail long enough to sew the top of the hat shut. Using your yarn needle weave the tail of yarn through the front loop only of each St around. Pull tight to close. Turn your hat inside out and use the same tail of yarn to make a couple of knots at the top of your beanie securing it shut. If you are adding a pompom you can also use this same tail of yarn to join. Weave in all ends.

Fingerless Mitt Pattern (right and left):
With Color B-
Ch 16
Row 1: 1 Sl St in second Ch from hook and each Ch across, turn. (15 Sl St)
Rows 2-54: Ch 1, 1 Sl St (BLO) in each St across, turn. (15 Sl St)
Join-
Fold your ribbing together so the bottom (first row) is now lined up with the last row. You will be inserting your hook through both stitches of both the first and last row and slip stitching to join. Sl St row 1 and row 54 together being sure to keep your stitches correctly alined. When you reach the 15 Sl St, drop Color B right before you YO and pull through. Pick up Color A and pull it through to complete the stitch. Your working yarn is now Color A. Do not cut Color B. Turn your ribbing correct side out so that the seam is now on the inside of the mitt. You will now be working into the side of the rows of the ribbing.
Round 1: Ch 2 (does not count), work 1 Dc into the same space. You will be working your Dc stitches in between the “ridges” of the ribbing. Work 1 Dc into the next 7 spaces in between the ridges. Then, work 2 Dc (increase) into the following space. *8 Dc, Inc* Repeat from * to * around. Sl St to the top of the first Dc made to join, dropping color A and picking up color B, TURN. (30 Dc)
Round 2: Ch 1 (counts as 1 Sl St) 1 Dc in next St. *1 Sl St, 1 Dc* repeat from * to * around. Join to the beginning Ch 1 with a Sl St, dropping color B and picking up color A, TURN.
Round 3: Ch 3 (counts as 1 Dc), 1 Dc in each St around, join to the top of the Ch 3 with a Sl St, Drop color A and pick up color B, TURN.
Rounds 4-8: Repeat rounds 2 & 3. Be sure to turn and switch yarns with every round.
RIGHT ONLY-
Round 9: Ch 3, 19 Dc, Ch 5, Sk 5, 5 Dc, join to top of Ch 3, drop color A and pick up color B, TURN. (25 Dc and 5 Ch)
Round 10: Ch 1, 1 Dc in next, *1 Sl St, 1 Dc* repeat around. Note- When you reach the Ch 5 Sp continue your stitch repeat as normal, working the Sl St and Dc stitches into the actual Ch’s. Continue *1 Sl St, 1 Dc* to end. Join to the beginning Ch 1 with a Sl St, drop color B and pick up color A, TURN.
LEFT ONLY-
Round 9: Ch 3, 4 Dc, Ch 5, Sk 5, 20 Dc, join to top of Ch 3, drop color A and pick up color B, TURN. (25 Dc and 5 Ch)
Round 10: Ch 1, 1 Dc in next, *1 Sl St, 1 Dc* repeat around. Note- When you reach the Ch 5 Sp continue your stitch repeat as normal, working the Sl St and Dc stitches into the actual Ch’s. Continue *1 Sl St, 1 Dc* to end. Join to the beginning Ch 1 with a Sl St, drop color B and pick up color A, TURN.
BOTH RIGHT AND LEFT-
Round 11: Repeat Round 3. (30 Dc)
Rounds 12 &13: Repeat Rounds 2 & 3. Do not turn after round 13.
Round 14: Ch 1 (does not count) 1 Hdc in each St around. Join to the top of the first Hdc with a Sl St, do not turn. (30 Hdc)
Round 15: Ch 1, 1 Hdc in the 3rd loop of each St around. Join with a Sl St to the first Hdc, do not turn.
Round 16: 1 Sl St in the 3rd loop of each St around. Join to the first Sl St made. (30 Sl St)
Tie off.
Thumb Hole:
Join color B with a Sl St to the bottom right corner of the thumb hole.
Round 1: Ch 1 (does not count), work 5 Hdc along bottom of opening, 3 Hdc up the side, 5 Hdc along the top, 3 Hdc down second side, join to the first Hdc with a Sl St. (16 Hdc)
Round 2: Ch 1, 1 Hdc in the 3rd loop of each St around, join to the top of the first Hdc with a Sl St.
Round 3: 1 Sl St in the 3rd loop of each St around, join to the first Sl St made. (16 Sl St)
Tie off and repeat on second mitt. Weave in all ends.

I hope you guys love The Midnight Dunes Beanie and Mitts! Click here If you want to check out a different fingerless mitten pattern!

