
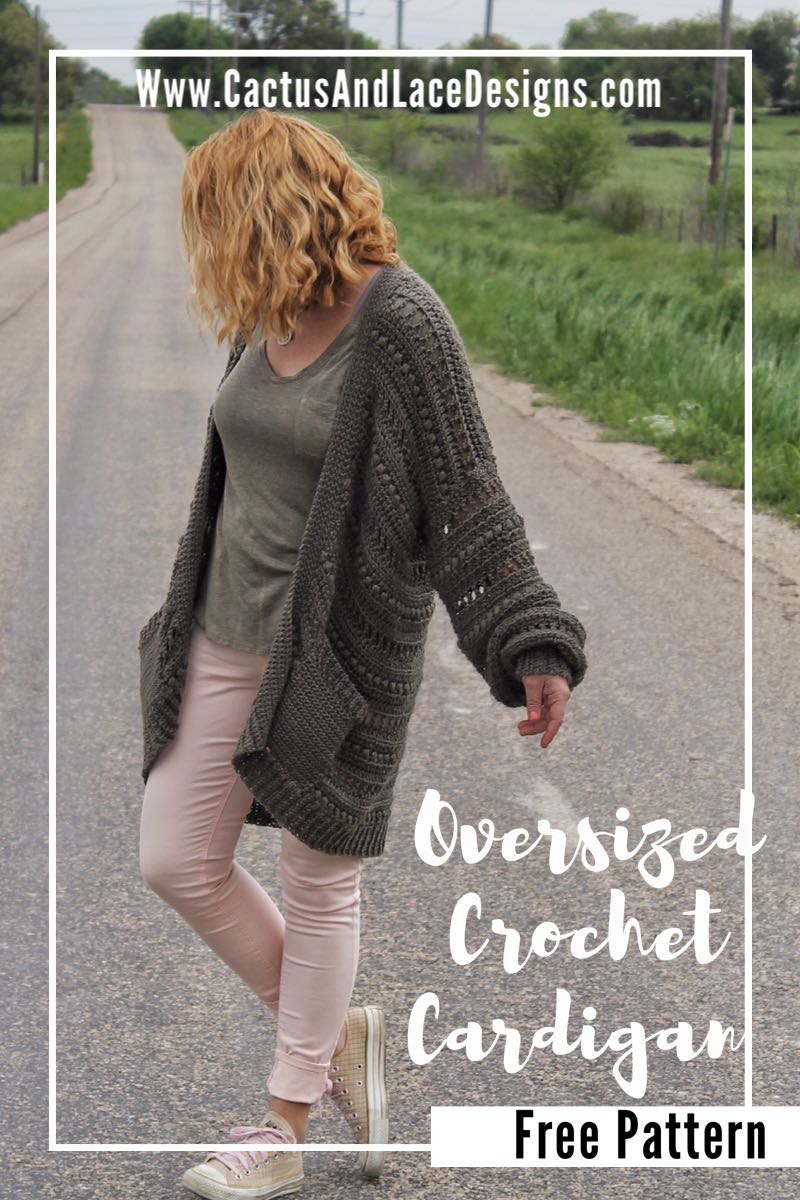
Oversized Crochet Cardigan~ The Haven Cardi~ Free Pattern

An oversized crochet cardigan – My Haven Cardi– is a free pattern here on the blog! This Cardi is made in one piece, with minimal seaming, therefore making it a quick and easy project for beginners and experienced crocheters alike.
Scroll down for the FREE Pattern first, or purchase the complete Color Coded PDF here!

The Inspiration + Design
Do you have a favorite piece of clothing, something you could wear all day everyday?! For me, that one special piece is a big oversized pink cardigan. I bought this particular cardigan a few years ago, way before I had even dreamed of making my first crocheted garment, yet one of the first things I said after buying it was, “I am going to make something like this one day!”
Since I had never made a crochet garment before, designing one definitely seemed out of reach! But a girl’s gotta dream right?
And dreaming is what I did……
After many many months of researching and practicing my design skills, I finally felt comfortable enough to start designing garments! And once you start making your own clothes, there’s no going back.
So a few months ago, as I was sitting in my favorite pink sweater, trying to nail down my next design, I knew I was finally ready to replicate my favorite cardi!

What makes this Oversized Crochet Cardigan so special?
There are two things that are a must for my designs. Firstly, it needs to be simple! No one has endless hours to spend trying to understand and work through complicated instructions, at least I know I don’t!
So simple designs, simple construction, simple stitches are what I tend to use. And Secondly, texture is everything in my eyes! Give me all the simple textured stitches specifically the Puff Stitch, and I will be a happy girl.

So keeping to my design must-haves, the main body of this oversized crochet cardigan is crocheted all in one piece using simple yet textured stitches. The sleeves are then crocheted in rounds and attached to the main body, creating virtually no seaming! Therefore, Minimal seaming equals maximum simplicity!!

A Cardigan for Everyone
This Oversized Crochet cardigan has, without a doubt, been the most rewarding design I have made to date! The oversized fit, the slouchy arms, the way the stitches create a “not too hot & not too cool” feeling of warmth….. In fact, everything about this cardigan makes my heart happy.
And when you make something this good, you want everyone to be able to make it too! For this reason, I included instructions for sizes from Xtra Small to 5XL!
So no matter what size or skill level you are, I got ya covered! 😉

Pattern
~Purchase the Color Coded Printable PDF Here
~ Save it to your Ravelry Here

To sum up:
This Oversized crochet Cardigan is made in one piece, with minimal seaming, therefore making a quick and easy project for beginners and experienced crocheters alike.
Yarn
~LionBrand Basic Stitch Anti-pilling Yarn
Because I am a big fan of LionBrand Yarns, I used LionBrand Basic Stitch in the Color Taupe, for this oversized crochet cardigan and I cannot be more pleased with the end result. Since I knew this was going to be a much worn and very loved piece of clothing I wanted a yarn that would not only last a while but also feel super cozy and soft. This yarn is so soft, surprisingly light weight and it super durable. (I’ve washed my cardi at least 3 times so far and it still looks as good as new). I highly recommend it!

Below is the approximate yardage for all sizes:
| Sizes | XS | S | M | L | XL | 2X | 3X | 4X | 5X |
| Approx yds | 1100- 1200 | 1200- 1300 | 1300-1400 | 1400-1500 | 1600-1700 | 1700- 1800 | 1800-1900 | 1900-2000 | 2000-2100 |
Notions
Gauge
13 St and 6 rows in Extended Hdc in the BLO = 4”
Sizing
This Oversized crochet Cardigan pattern is designed to be very forgiving and slouchy with approximately 9” in positive ease added. The Bust measurements are finished garment sizes not actual bust measurements!
| Size | XS | S | M | L | XL | 2X | 3X | 4X | 5X |
| Bust | 39” | 43” | 47” | 51” | 55” | 59” | 63” | 67” | 71” |
| Length | 30” | 30” | 31” | 31” | 32” | 32” | 32” | 32” | 32” |

Abbreviations Used
St- Stitch
Ch- Chain
Yo- Yarn Over
Sl St- Slip Stitch
Sc- Single Crochet
Blo- Back Loop Only
Ehdc- Extended Half Double Crochet
Edc- Extended Double Crochet
Ps- Puff Stitch
Pattern Notes
-Oversized Crochet Cardigan is worked from the bottom up in one piece and then divided for the armholes
-Sleeves are then worked in turned rounds. After you have joined with a slip stitch to end each round, Turn your work so that the next round is worked in the opposite direction.
-Oversized Crochet Cardigan is worked in a 6 row repeat; The row repeat is as follows- Ehdc, Ehdc, Ps, Ehdc, Ehdc, Edc
-All stitches are worked in the Back loop only, with the exception of the Ps rows, which are worked through both loops.
-Total Stitches are indicated between [ ].
-The sizing guide follows size XS(S, M, L, XL, 2X, 3X, 4X, 5X). E.g. “Sc 9(10, 11, 12, 14, 15, 16, 17, 18)” means Sc 9 for XS, Sc 10 for Small, Sc 11 for Medium, Sc 12 for Large, Sc 14 for XL, Sc 15 for 2X, Sc 16 for 3X, Sc 17 for 4X, Sc 18 for 5X. If there is only one number, it applies to all sizes.
Special Stitches
Extended Half Double Crochet– Yo, insert hook into the next St. Draw up a loop (3 loops on hook). Yo, then pull through one loop. Yo, then pull through remaining 3 loops.
Extended Double Crochet– Yo, insert hook into the next St. Draw up a loop (3 loops on hook). Yo, pull through one loop. Yo, then pull through 2 loops. Yo, then pull through remaining 2 loops.
Puff Stitch– YO, insert hook into next stitch and bring up a loop. You now have 3 loops on your hook. YO, then insert hook back into the same stitch, and bring up a loop, you now have 5 loops on your hook. Repeat this 2 more times (4 times total), ending with 9 loops on your hook. YO, then pull through all the loops, and finish with a CH 1.

The Oversized Crochet Cardigan Pattern
Instructions written XS (S, M, L, XL, 2XL, 3XL, 4XL, 5XL)
Starting with the bottom ribbing.
Ch 11
Row 1: Sc in the 2nd Ch from the hook and in each Ch across. Turn. [10 Sc]
Row 2: Ch 1. Sc in the Blo of the first St and each St across. Turn. [10 Sc]
Repeat row 2 until you have a total of 103(115, 129, 141, 155, 167, 181, 193, 207) rows of ribbing.
Do not Fasten Off
You will now be working into the top of your ribbing.
Rotate ribbing to work across the row ends. Starting in the very first open space, 2 Sc, then *Sc in the next 9 (10, 11, 12, 14, 15, 16, 17, 18) St, then 2 Sc in the next St * a total of 10 times ending with a Sc in the remaining 2 (4, 8, 10, 4, 6, 10, 12, 16) stitches. Turn. [114(126, 140, 152, 166, 178, 192, 204, 218) Sc]

Row 1: Ch 1. Skip the first St. (where the Ch 1 is) *Ps next, don’t forget your Ch 1 to secure the Ps after each one, skip the next St*. Repeat from * to * across ending with a Ps in the last St. Turn. [57(63, 70, 76, 83, 89, 96, 102, 109) Ps]
Row 2: Ch 2. Working in the Blo, Ehdc in the first St and each St across. Turn. [114(126, 140, 152, 166, 178, 192, 204, 218) Ehdc]
Row 3: Ch 2. Working in the Blo, Ehdc in the first St and each St across. Turn. [114(126, 140, 152, 166, 178, 192, 204, 218) Ehdc]
Row 4: Ch 3. Skip the first St (where the Ch 3 is). *Edc in the Blo of the next St, Ch 1. Skip the next St.* Repeat from * to* across ending with an Edc in the last St. Turn. [57(63, 70, 76, 83, 89, 96, 102, 109) Edc]
Size 2XL ONLY- When working your Edc rows on the body only, you will Skip the first St (where the Ch 3 is) AND skip the next St. *Edc in the Blo of the next St, Ch 1. Skip the next St.* Repeat from *to* across ending with an Edc in the last St. Turn. [89 Edc]
Row 5: Ch 2. Working in the Blo, Ehdc in the first St and each St across ending with an Ehdc in the top of the Ch 3 turning Ch. Turn. [114(126, 140, 152, 166, 178, 192, 204, 218) Ehdc]
Row 6: Ch 2. Working in the Blo, Ehdc in the first St and each St across. Turn. [114(126, 140, 152, 166, 178, 192, 204, 218) Ehdc]
***Reminder- All rows are worked in the BLO with the exception of the Ps rows which are worked through both loops.***
Repeat rows 1- 6 until you have a total of 26 rows.
Do Not Finish Off. This is where we will divide for arm holes. Row numbers will restart for simplicity.
***If you would like your sweater to be shorter or longer simply add or omit rows before you divide for your arm holes.***

Panels will be divided as follows
| Size | Left Front | Back | Right Front |
| XS | 26 | 60 | 26 |
| S | 28 | 68 | 28 |
| M | 32 | 74 | 32 |
| L | 36 | 78 | 36 |
| XL | 40 | 84 | 40 |
| 2XL | 42 | 92 | 42 |
| 3XL | 46 | 98 | 46 |
| 4XL | 50 | 102 | 50 |
| 5XL | 52 | 112 | 52 |
With working yarn still attached begin your first front panel.
First Front Panel
Row 1: Ch 2. Ehdc in the Blo of the first 26(28, 32, 36, 40, 42, 46, 50, 52) Stitches. Turn. [26(28, 32, 36, 40, 42, 46, 50, 52) Ehdc]
Row 2: Ch 3. Skip the first St (where the Ch 3 is). *Edc in the Blo of the next St, Ch 1. Skip the next St.* Repeat from * to* across ending with an Edc in the last St. Turn. [13(14, 16, 18, 20, 21, 23, 25, 26) Edc]
Row 3: Ch 2. Ehdc in the Blo of the first St and each St across ending with an Ehdc in the top of the Ch 3 turning Ch. Turn. [26(28, 32, 36, 40, 42, 46, 50, 52) Ehdc]
Row 4: Ch 2. Ehdc in the Blo of the first St and each St across. Turn. [26(28, 32, 36, 40, 42, 46, 50, 52) Ehdc]
Row 5: Ch 1. Skip the first St. *Ps next, don’t forget your Ch 1 to secure the Ps after each one, skip the next St*. Repeat from * to * across ending with a Ps in the last St. Turn. [13(14, 16, 18, 20, 21, 23, 25, 26) Ps]
Row 6: Ch 2. Ehdc in the Blo of the first St and each St across. Turn. [26(28, 32, 36, 40, 42, 46, 50, 52) Ehdc]
Repeat rows 1-6 until you have a total of 12(12, 13, 13, 15, 15, 16, 16, 18) rows in the panel.
***Each size should finish off on an Ehdc row***
Finish off leaving long tail to seam shoulders
Back Panel
With your first front panel done and on your right side, skip the first open stitch from row 26. Attach yarn in the next stitch.
Row 1: Ch 2. Ehdc in the Blo of the next 60(68, 74, 78, 84, 92, 98, 102, 112) stitches. Turn. [60(68, 74, 78, 84, 92, 98, 102, 112) Ehdc]
Row 2: Ch 3. Skip the first St (where the Ch 3 is). *Edc in the Blo of the next St, Ch 1. Skip the next St.* Repeat from * to* across ending with an Edc in the last St. Turn. [30(34, 37, 39, 42, 46, 49, 51, 56) Edc]
Row 3: Ch 2. Ehdc in the Blo of the first St and each St across ending with an Ehdc in the top of the Ch 3 turning Ch. Turn. [60(68, 74, 78, 84, 92, 98, 102, 112) Ehdc]
Row 4: Ch 2. Ehdc in the Blo of the first St and each St across. Turn. [60(68, 74, 78, 84, 92, 98, 102, 112) Ehdc]
Row 5: Ch 1. Skip the first St. *Ps next, don’t forget your Ch 1 to secure the Ps after each one, skip the next St*. Repeat from * to * across ending with a Ps in the last St. Turn. [30(34, 37, 39, 42, 46, 49, 51, 56) Ps]
Row 6: Ch 2. Ehdc in the Blo of the first St and each St across. Turn. [60(68, 74, 78, 84, 92, 98, 102, 112) Ehdc]
Repeat rows 1-6 until you have a total of 12(12, 13, 13, 15, 15, 16, 16, 18) rows in the panel.
Finish Off
Second Front Panel
With your first front panel and back panel done and on your right side, skip the first open stitch from row 26. Attach yarn in the next stitch.
Row 1: Ch 2. Ehdc in the Blo of the last 26(28, 32, 36, 40, 42, 46, 50, 52) Stitches. Turn. [26(28, 32, 36, 40, 42, 46, 50, 52) Ehdc]
Row 2: Ch 3. Skip the first St (where the Ch 3 is). *Edc in the Blo of the next St, Ch 1. Skip the next St.* Repeat from * to* across ending with an Edc in the last St. Turn. [13(14, 16, 18, 20, 21, 23, 25, 26) Edc]
Row 3: Ch 2. Ehdc in the Blo of the first St and each St across ending with an Ehdc in the top of the Ch 3 turning Ch. Turn. [26(28, 32, 36, 40, 42, 46, 50, 52) Ehdc]
Row 4: Ch 2. Ehdc in the Blo of the first St and each St across. Turn. [26(28, 32, 36, 40, 42, 46, 50, 52) Ehdc]
Row 5: Ch 1. Skip the first St. *Ps next, don’t forget your Ch 1 to secure the Ps after each one, skip the next St*. Repeat from * to * across ending with a Ps in the last St. Turn. [13(14, 16, 18, 20, 21, 23, 25, 26) Ps]
Row 6: Ch 2. Ehdc in the Blo of the first St and each St across. Turn. [26(28, 32, 36, 40, 42, 46, 50, 52) Ehdc]
Repeat rows 1-6 until you have a total of 12(12, 13, 13, 15, 15, 16, 16, 18) rows in the panel.
Finish off leaving long tail to seam shoulders
Seaming the shoulders
With your sweater laying in front of you, fold the left panel over the back panel, and then your right panel over the back panel.
***It should be noted that there is no Right Side or Wrong side to this cardi as both sides look the same. So, it does not matter which side you do the seam on.***
You should then line up your stitches to assure you sew the shoulders evenly.
For example, if your front panel is 22 stitches wide, you will seam up to the 22nd stitch of the back panel on both sides.
Using your yarn needle and yarn tails mattress seam the shoulder pieces to the back piece along the black line.

Sleeves (Make 2)
Cuff
Ch 15
Row 1: Sc in the second Ch and in each Ch across. Turn. [14 Sc]
Row 2: Ch 1. Sc in the Blo of each St across. Turn. [14 Sc]
Repeat row 2 until you have a total of 26(26, 26, 26, 31, 31, 31, 31, 36) rows of ribbing.
Do not fasten off.
You will now be connecting the two short ends of the cuff by slip stitching them together.
Fold the cuff with the short sides together (row 1 & row 26(26, 26, 26, 31, 31, 31, 31, 36). Going through both loops on each end of the band, Sl St the edges together. [14 Sl St]
Ch 1 and flip the band to where the seam is now on the inside of the band and turn your cuff to face you.


You will now start working the main portion of the sleeves
Row 1: 2 Sc in the first St (where your Ch 1 is) and in each stitch around. Join with a Sl St to first Sc. [54(54, 54, 54, 64, 64, 64, 64, 74) Sc]

***This portion of the sleeves is worked in TURNED rounds. Join at the end of each round with a Sl St and then TURN your work so that your next round will be worked in the opposite direction.***
Row 2: Ch 1. Ps in the same space as your Ch 1, don’t forget your Ch 1 to secure the Ps after each one, skip the next St, Ps in the following St. Continue around, ending with a Ps in the second to last St, join into your first Ps. Turn. [27(27, 27, 27, 32, 32, 32, 32, 37) Ps]


Row 3: Ch 2. Working in the Blo, Ehdc in the first St and around. Join with a Sl St to your first Ehdc. Turn. [54(54, 54, 54, 64, 64, 64, 64, 74) Ehdc]
Row 4: Ch 2. Working in the Blo, Ehdc in the first St and around. Join with a Sl St to your first Ehdc. Turn. [54(54, 54, 54, 64, 64, 64, 64, 74) Ehdc]
Row 5: Ch 3. Working in the Blo, Skip the first St (where the Ch 3 is) *Edc, Ch 1 in the next St, skip the next St*. Repeat from * to * around ending with an Edc in the last St. Join with a Sl St to the top of the Ch 3. Turn. [27(27, 27, 27, 32, 32, 32, 32, 37) Edc]


Row 6: Ch 2. Working in the Blo, Ehdc in the first St and around. Join with a Sl St to your first Ehdc. Turn. [54(54, 54, 54, 64, 64, 64, 64, 74) Ehdc]
Row 7: Ch 2. Working in the Blo, Ehdc in the first St and around. Join with a Sl St to your first Ehdc. Turn. [54(54, 54, 54, 64, 64, 64, 64, 74) Ehdc]
Repeat rows 2-7 until you have a total of 23(24, 24, 26, 26, 26, 26, 27, 27) rows.
***If you would like your sleeves to be shorter or longer simply omit or add more rows before you finish off.***
Finish off leaving a long tail to sew the sleeves to your sweater.
Attaching sleeves
Turn your sweater and your sleeves which ever way you choose is wrong side out. Then, line up your sleeve seam with the under side of the armhole and mattress seam around the arm hole.

Turn your sweater right side out.
Collar Band
Turn your sweater so that the Right side front panel is facing you. Attach yarn in the bottom right corner of your sweater.

Row 1: Sc evenly around the edges of the first front, then around the neckline, and finally back down the second front. Make sure to use the same amount of Sc on both sides of the sweater. When you reach the bottom corner of the Left front panel, Ch 1 and Turn.

Row 2-7: Sc in each stitch around.
***The amount of Sc stitches around does not matter, however a good rule is to place 2 Sc St in the edge of each of the rows. You can also adjust the collar width by doing more or less rows of Sc around. ***
Pockets Option 1 (make 2)
Ch 6
Row 1: Sc in the second St and in each across. Turn. [5 Sc]
Row 2: Ch 1. Sc in the Blo of each St across. Turn. [5 Sc]
Repeat row 2 until you have a total of 19 rows of ribbing.
Do Not finish off
You will now be working into the top of your ribbing
Row 1: Starting in the very first open space, Sc 20 evenly across the top of the ribbing. Turn. [20 Sc]
Row 2: Ch 1. Sc in the first St and each St across. [20 Sc]
Repeat row 2 until you have a total of 22 rows.
Finish Off
If you would like your pocket to be wider, add more rows to the ribbing section. Then take the number of rows in the ribbing and add 1 to get the number of Sc stitches you will be using.
Pocket Option #2
Ch 21
Row 1: Ehdc in the 3rd Ch from hook and in each Ch across. Turn. [20 Ehdc]
Row 2: Ch 2. Ehdc in the Blo of the first St and each St across. Turn. [20 Ehdc]
Row 3: Ch 3. Skip the first St (where the Ch 3 is). *Edc in the Blo of the next St, Ch 1. Skip the next St.* Repeat from * to* across ending with an Edc in the last St. Turn. [10 Edc]
Row 4: Ch 2. Ehdc in the Blo of the first St and each St across. Turn. [20 Ehdc]
Row 5: Ch 2. Ehdc in the Blo of the first St and each St across. Turn. [20 Ehdc]
Row 6: Ch 1. Skip the first St. *Ps next, don’t forget your Ch 1 to secure the Ps after each one, skip the next St*. Repeat from * to * across ending with a Ps in the last St. Turn. [10 Ps]
Row 7: Ch 2. Ehdc in the Blo of the first St and each St across. Turn. [20 Ehdc]
Row 8: Ch 2. Ehdc in the Blo of the first St and each St across. Turn. [20 Ehdc]
Row 9: Ch 3. Skip the first St (where the Ch 3 is). *Edc in the Blo of the next St, Ch 1. Skip the next St.* Repeat from * to* across ending with an Edc in the last St. Turn. [10 Edc]
Row 10: Ch 2. Ehdc in the Blo of the first St and each St across. Turn. [20 Ehdc]
Finish off leaving a long tail to attach.
Attaching pockets
Lay your oversized crochet cardigan in front of you, and position the pockets where you like them. For instance, I lined the bottom of my pocket up with the top of the ribbing section on both front panels, and about 3 Edc or Ehdc stitches from the collar. Then, take a long piece of yarn, starting at the top right corner of the pocket and mattress stitch the pocket to the sweater.

Last but not least, tie off, tuck in all your loose ends and wrap yourself up in your new favorite Oversized crochet cardigan!

Make sure to pin this pattern for later, and if you do make one tag me @Cactus.and.lace on Instagram and use the hashtag #CactusandlaceDesigns . I can’t wait to see your Haven Cardi, and I would love to share your pics! 🌵
Other Free Crochet Patterns You Might Love


The Wren Tank// The Wren Tee// The Summer Breeze Tank// The Baja Hoodie
Comments are closed.
Aimee
March 30, 2020 at 9:35 pmThank you! Hoped to try this soon after seeing on @peridotpolkadots insta! 😃💓
cactusandlace.designs
April 1, 2020 at 2:58 pmOh yay! I can’t wait to see it 😉
Kaila Soja
April 19, 2020 at 1:13 pmI am struggling with crocheting into the top of the ribbing. “Starting in the very first open space, 2 Sc, then *Sc 9 (10, 11, 12, 14, 15, 16, 17, 18), 2 Sc * a total of 10 times ending with a Sc in the remaining 2 (4, 8, 10, 4, 6, 10, 12, 16) stitches. Ch 1, Turn. (114, 126, 140, 152, 166, 178, 192, 204, 218)”. I’m trying to make the Large. I’ve gone across and after doing this but counting the stitches on the rows, I always get more stitches then the 140 I’m supposed to have and I don’t want to ruin the rest of this beautiful cardigan. Help 🙁
cactusandlace.designs
April 19, 2020 at 6:23 pmHi Kaila. The large should have a total of 152 sc across the top of the ribbing. The 140 is for the size medium. 😊
Kaila
April 20, 2020 at 12:25 pmI was confused on how to transition from ribbing to the rest BUT I purchased the color coded instructions from your Etsy page and apparently I was doing it right, just looking at the wrong number. I can’t wait to finish this cardigan!