
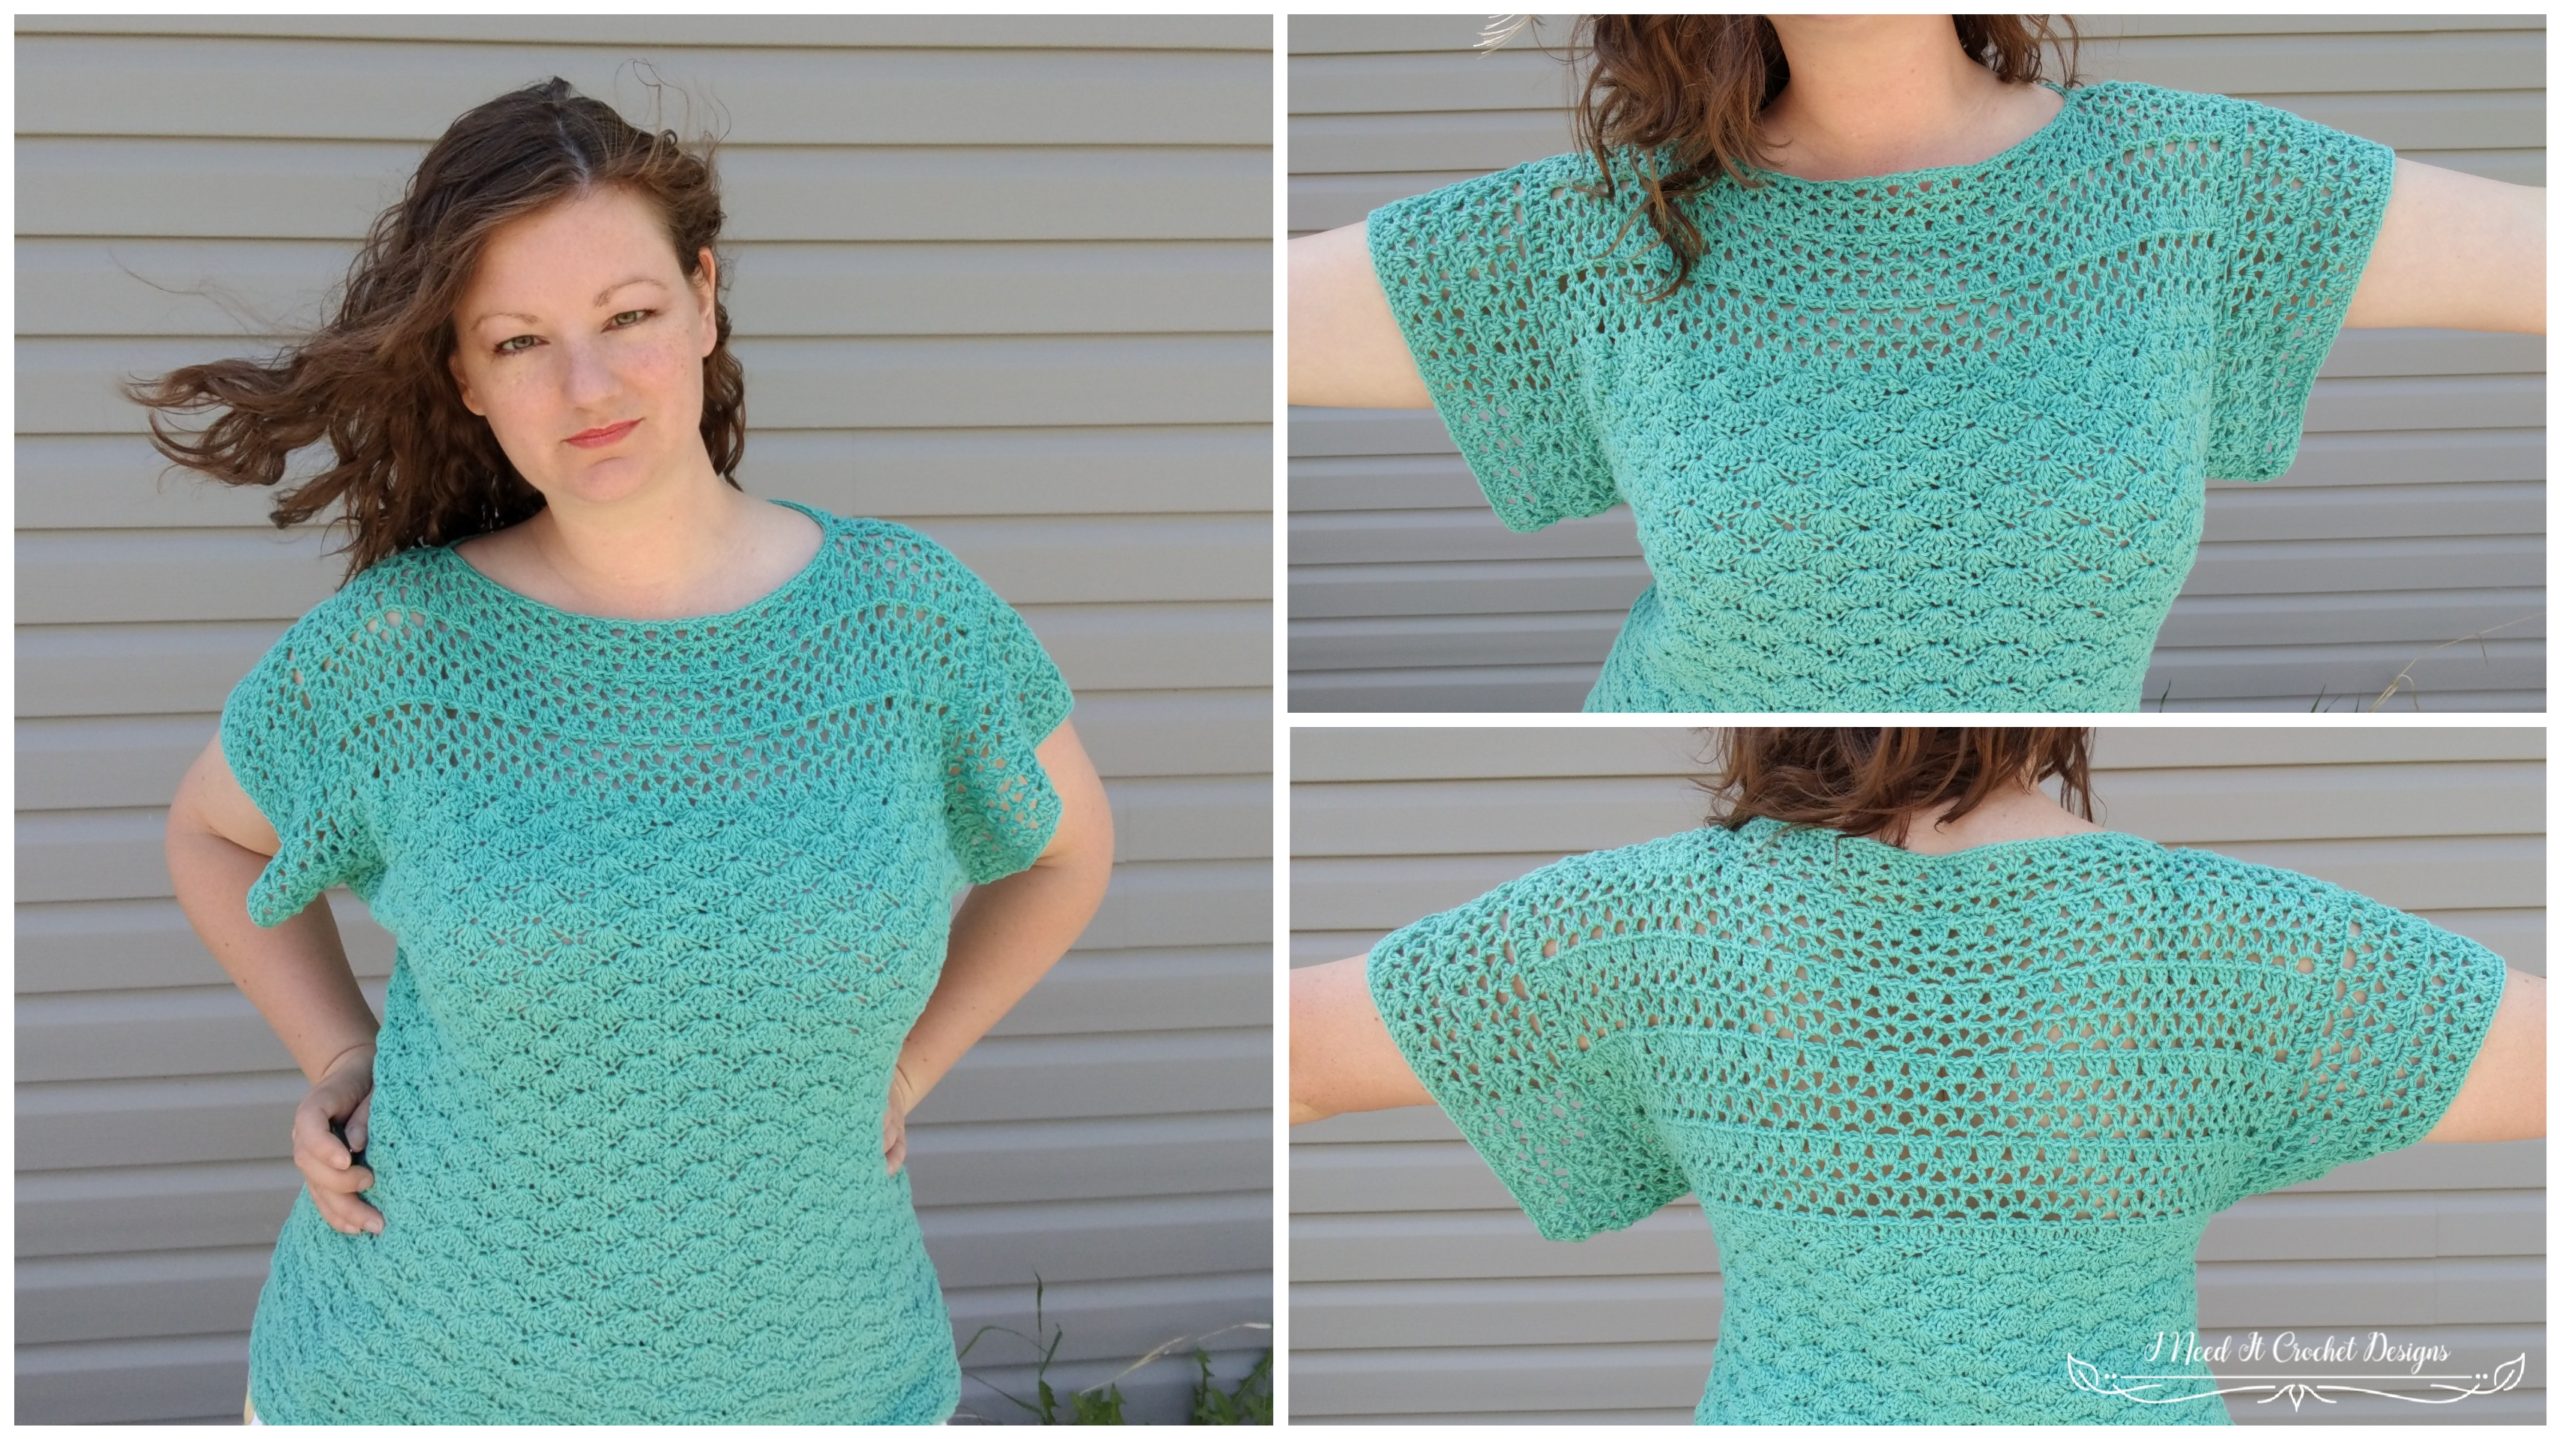
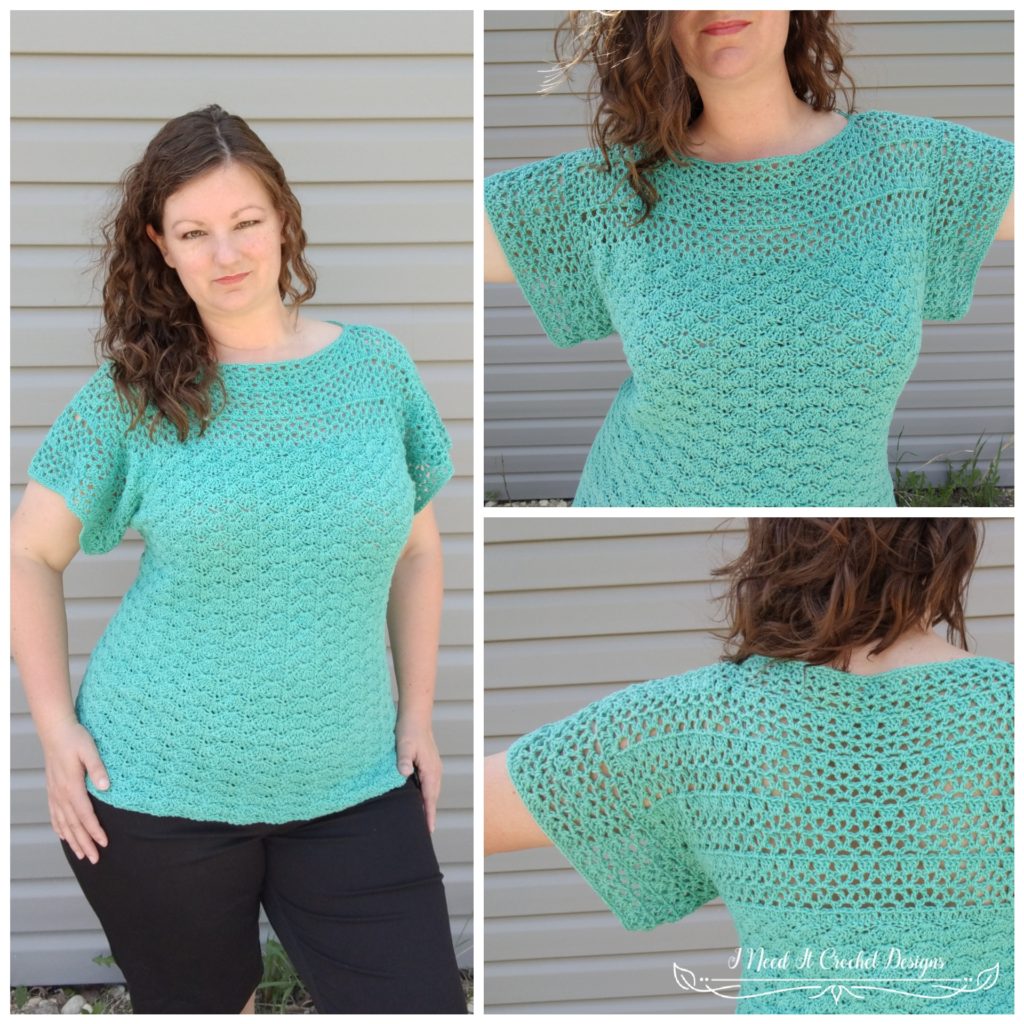
Aerwyna Blouse – Free Crochet Pattern
The Aerwyna Blouse free crochet pattern is copyrighted by I Need It Crochet. You may not copy, share, change, or sell the pattern itself. Also, you may not claim this pattern as your own. All pictures contained in this pattern fall under the copyright and may not be used.
Finished items made from this pattern belong to you and you may do what you wish with them. If you choose to sell them on Etsy I would very much appreciate it if you credited me as the pattern designer.


Or… Just scroll down to see it for free!
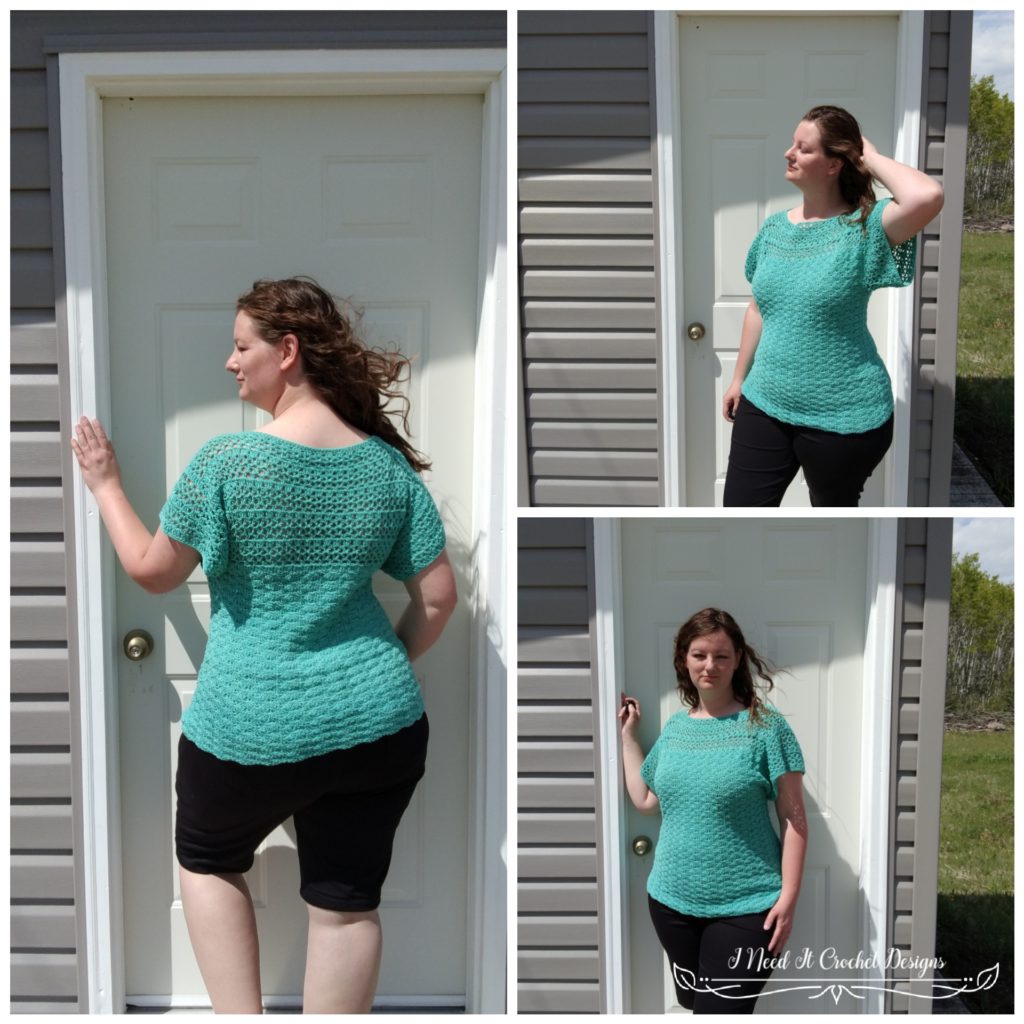
I was having trouble coming up with a name for this pattern, so I turned to my wonderful fans on Facebook and Instagram. I was blown away by all the fantastic name ideas! The majority of you suggested names that had to do with water, which was totally understandable, because the pattern is mostly shells and I made mine in this gorgeous aqua green colour.
So, I googled names that have to do with water and I found Aerwyna. It means “friend of the sea”. How beautiful! <3 So, I named this pattern The Aerwyna Blouse. I love it!
One of my least favourite things about crochet is the same thing many other people dislike… sewing. I don’t love sewing pieces together. Sometimes it’s a necessary evil, but it’s tedious and often just doesn’t look good. I have designed top patterns that work from the top down, and from the bottom up seamlessly and I thought that was the only way. So I was pleasantly surprised when I discovered a new way to make a seamless top! This one starts at the back armpit. You work upwards toward the neck, then create the neck hole, then continue working down the front. Once your front is as long as your back, you join them up and continue working downward, this time in the round! I love it! I may never sew another piece together! Ok, I know that’s wishful thinking, but can you blame me? 😉
And while I’m on the subject of wishful thinking, let me talk about this yarn. For this pattern, I reached deep into my stash and came out with Bernat Cotton-ish. I know, I know. The yarn is discontinued. But I love it! The blend of acrylic and cotton is on point and the weight is perfect for summer tops. One thing I will say, is that this yarn is listed as a #3 DK weight, and I don’t think that is accurate. I tested the WPI (wraps per inch) and I got 15 wpi, which is more of a #2 sport weight. But then again, it is right on the low end of sport weight.
As such, The Aerwyna Blouse crochet pattern will work with many #2 weight yarns, and even some #3 weight yarns! a few of my testers made theirs with Premier Yarns Cotton Fair (#2), Paton’s Lace (#2), and Lion Brand Mandala (#3).
So dig into your stash and pull out that pretty yarn you were saving for something special! Let’s get hooking!
Blouse Pattern Info
Finished Sizes:
Instructions given to fit size X-small; changes for small, medium, large, X-large, 2X-large, 3X-large, 4X-large, and 5X-large are in ()
XS (S, M, L, XL, 2XL, 3XL, 4XL, 5XL)
Finished Bust: 33” (34”, 37”, 40”, 44”, 48”, 52”, 56”, 60”)
Finished Length: Customizable. Length on model shown is 25”.
Materials:
I used Bernat Cotton-Ish, which is 55% Cotton/45% Acrylic. It is listed as a #3 DK Weight yarn, but it is actually a little thin for dk, so a #2 Sport weight would work as well.
Approximately 700 (850 , 1000 , 1200, 1300 , 1400 , 1500 , 1600 ) yds to make the length shown.
H/5mm Hook
Stitch Markers
Yarn Needle
Scissors
Subscribe to get acces
Read more of this content when you subscribe today.
Do you have a favourite brand of hook? My favourite crochet hooks are definitely Clover Amour! As soon as I started using them, I noticed a huge decrease in the strain in my hands, giving me a lot more time to crochet! And if you use this link to buy a set, I’ll get a small commission. 😉
Gauge:
See gauge swatch pattern below.
Always be sure to make a gauge swatch. It will save you a lot of time and heartache!
Abbreviations:
Sk = Skip
Sp = Space
St = Stitch
Ss = Slip Stitch
Ch = Chain
Dc= Double Crochet
Sh = Shell (See notes)
V st = V Stitch (See notes)
Sc2Tog = Single Crochet Two Together
Notes:
Ch1 at the beginning of a row is never considered a stitch.
Ch3 at the beginning of a row is always considered a Dc.
A shell consists of 5 Dc in the same stitch.
A V Stitch consists of a (Dc, Ch1, Dc) all in the same stitch.
When asked to work into a Vst, you are working into the ch space between the dcs of the Vst.
I have added many pictures to help you along the way.
The model above has a 40” bust and is wearing a size Large.
Choose your size according to the finished measurements noted above and your preferences.
Gauge Swatch
1. Ch 17. Dc in 3rd ch and each ch across. Turn.
– 15dc
2. Ch 1, Sc in 1st st. *Ch3, sk 2 sts, sc in next st.** Repeat from * to ** across.
– 5 ch3 + 6 sc
3. Ch 3, V st in each ch3 sp across. Dc in last st. Turn.
– 5 V st + 2 dc
4. Ch 3, V st in each V st across. Dc in top of ch 3. Turn.
– 5 V st + 2 dc
5. Ch 3, (3 dc) in each V st across. Dc in top of ch 3. Turn.
– 17 dc
6. Ch 1, sc in 1st st. *Ch3, sk 3 sts, sc in sp between 3dc groups.** Repeat from * to ** until only 4 sts left unworked. Ch 3, sc in top of ch 3. Turn.
– 5 ch3 + 6 sc
7. Repeat row 3. Turn.
– 5 V st + 2 dc
8. Repeat row 4.
– 5 V st + 2 dc
Gauge swatch should measure 4” x 4”
How To Crochet a Summer Top
Instructions
Top Back
Ch 69 (75, 81, 87, 93, 105, 111, 123, 129) and proceed to row 1.
Or, FDC 67 (73, 79, 85, 91, 103, 109, 121, 127). This is the right side of your work. Turn and proceed to row 2.
1. Dc in 4th ch and each ch across. This is the right side of your work. Turn.
– 67 (73, 79, 85, 91, 103, 109, 121, 127) dc.
2. Ch 1. Sc in 1st st. * Ch 3, sk 2 sts, sc in next st. ** Repeat from * to ** across. Turn.
– 22 (24, 26, 28, 30, 34, 36, 40, 42) ch3 + 23 (25, 27, 29, 31, 35, 37, 41, 43) sc.
3. Ch 3. V st in each ch3 sp across. Dc in last st. Turn.
– 22 (24, 26, 28, 30, 34, 36, 40, 42) V st + 2 dc.
4. Ch 3, V st in each V st across. Dc in top of ch 3. Turn.
– 22 (24, 26, 28, 30, 34, 36, 40, 42) V st + 2 dc.
5. Ch 3, (3 dc) in each V st across. Dc in top of ch 3. Turn.
– 68 (74, 80, 86, 92, 104, 110, 122, 128) dc.
6. Ch 1, sc in 1st st. *Ch3, sk 3 sts, sc in sp between 3dc groups.** Repeat from * to ** until only 4 sts left unworked. Ch 3, sc in top of ch3. Turn.
– 22 (24, 26, 28, 30, 34, 36, 40, 42) ch3 + 21 (25, 27, 29, 31, 35, 37, 41, 43) sc.
Repeat rows 3 – 6 until you have a total of 17 (17, 17, 21, 21, 21, 25, 25, 25) rows. You should be ending on a row 5 repeat.
The Top Back section of the Aerwyna Blouse is complete. We will now continue on to the top front section. The first row will create the neck opening, then we will continue working down the front.
Top Front
1. Ch 1. Sc in 1st st. *Ch3, sk 3 sts, sc in sp between 3dc groups.** Repeat from * to ** 4 (4, 4, 5, 6, 7, 8, 10, 11) times.
Ch 36 (42, 48, 48, 48, 54, 54, 54, 54). Sk next 36 (42, 48, 48, 48, 54, 54, 54, 54) sts. Sc in sp between 3dc groups.
*Ch3, sk 3 sts, sc in sp between 3dc groups.** Repeat from * to ** until only 4 sts left unworked. Ch 3, sc in top of ch3. Turn.
– 10 (10, 10, 12, 14, 16, 18, 22, 24) ch 3 + 12 (12, 12, 14, 16, 18, 20, 24, 26) sc + 1 ch 36 (42, 48, 48, 48, 54, 54, 54, 54).
2. Ch 3. V st in each ch 3 sp across to neck opening. Sk the sc and 1 ch st, V st in next ch st.
*Sk 2 ch sts, V st in next ch st. ** Repeat from * to ** until there is only 1 ch st left unworked.
Sk the next ch and 1 sc st. V st in each ch 3 sp across. Dc in last st. Turn.
– 22 (24, 26, 28, 30, 34, 36, 40, 42) V st + 2 dc.
3. Ch 3, V st in each V st across. Dc in top of ch 3. Turn.
– 22 (24, 26, 28, 30, 34, 36, 40, 42) V st + 2 dc.
4. Ch 3, (3 dc) in each V st across. Dc in top of ch 3. Turn.
– 68 (74, 80, 86, 92, 104, 110, 122, 128) dc.
5. Ch 1, sc in 1st st. *Ch3, sk 3 sts, sc in sp between 3dc groups.** Repeat from * to ** until only 4 sts left unworked. Ch 3, sc in top of ch3. Turn.
– 22 (24, 26, 28, 30, 34, 36, 40, 42) ch3 + 23 (25, 27, 29, 31, 35, 37, 41, 43) sc.
6. Ch 3. V st in each ch3 sp across. Dc in last st. Turn.
– 22 (24, 26, 28, 30, 34, 36, 40, 42) V st + 2 dc.
Repeat rows 3 – 6 until you have 8 (8, 8, 12, 12, 12, 16, 16, 16) rows. You will be ending on a row 4 repeat. Now we will begin the Shell Rows.
1. Ch 1. Sc in 1st st, sk 2 sts, Sh in next st, sk 2 sts.
*Sc in next st, sk 2 sts, Sh in next st, sk 2 sts. ** Repeat from * to ** 4 (4, 4, 5, 5, 6, 7, 8, 8) times. Sc2Tog over next 2 sts.
*Sk 2 sts, Sh in next st, sk 2 sts, Sc in next st. ** Repeat from * to ** across. Turn.
– 11 (12, 13, 14, 15, 17, 18, 20, 21) sh + 12 (13, 14, 15, 16, 18, 19, 21, 22) sc.
2. Ch 3. 2 dc in 1st st, sk 2 sts, sc in next st. *Sk 2 sts, Sh in next st, sk 2 sts, sc in next st ** Repeat from * to ** across until there are only 3 sts left unworked. Sk 2 sts, 3 dc in last st. Turn.
– 10 (11, 12, 13, 14, 16, 17, 19, 20) sh + 11 (12, 13, 14, 15, 17, 18, 20, 21) sc + 6 dc.
3. Ch 1. Sc in 1st st. *Sk 2 sts, Sh in next st, sk 2 sts, sc in next st. ** Repeat from * to ** across. Turn.
– 11 (12, 13, 14, 15, 17, 18, 20, 21) sh + 12 (13, 14, 15, 16, 18, 19, 21, 22) sc.
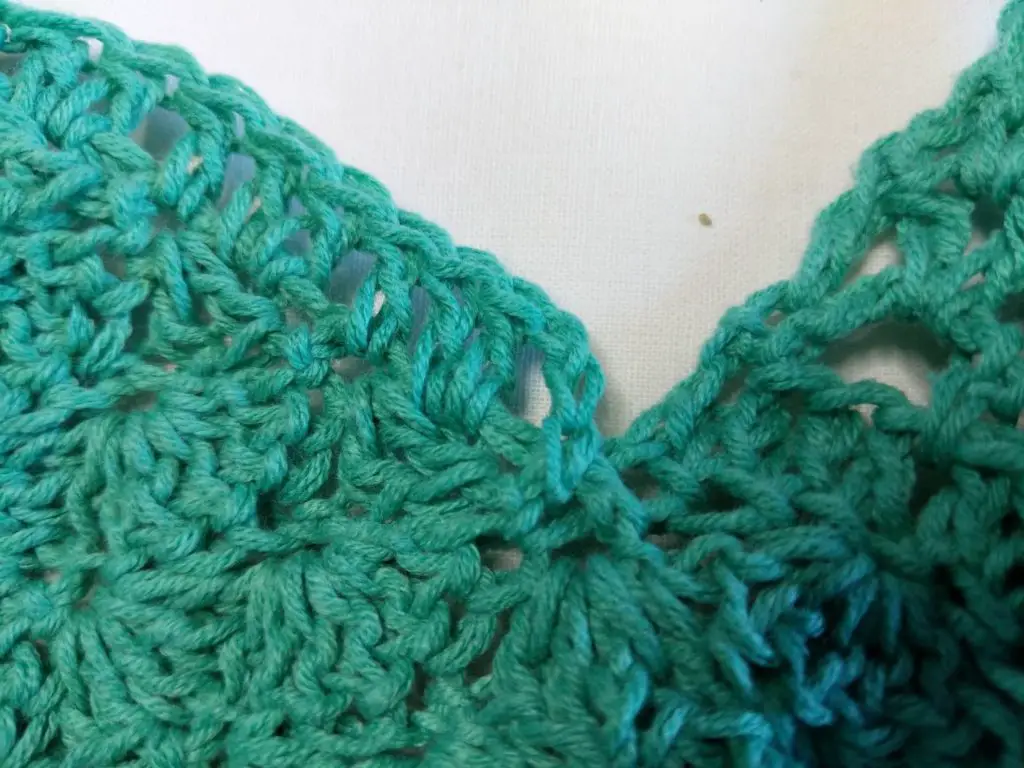
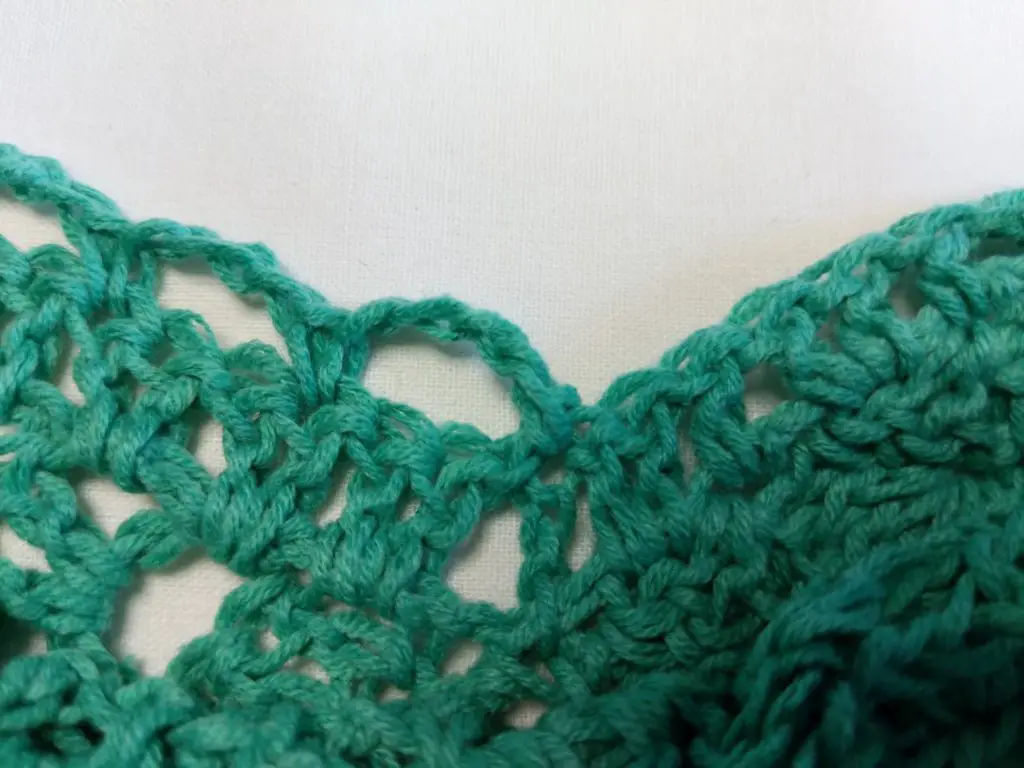
Repeat rows 2 & 3 until you have a total of 10 Shell rows. You should end on a row 2 repeat. You should now have a rectangle with a slit down the middle, similar to Figure 1 . Next we will be joining the front and back, then working in the round from the armpits down to make the bottom section of the Aerwyna Blouse.
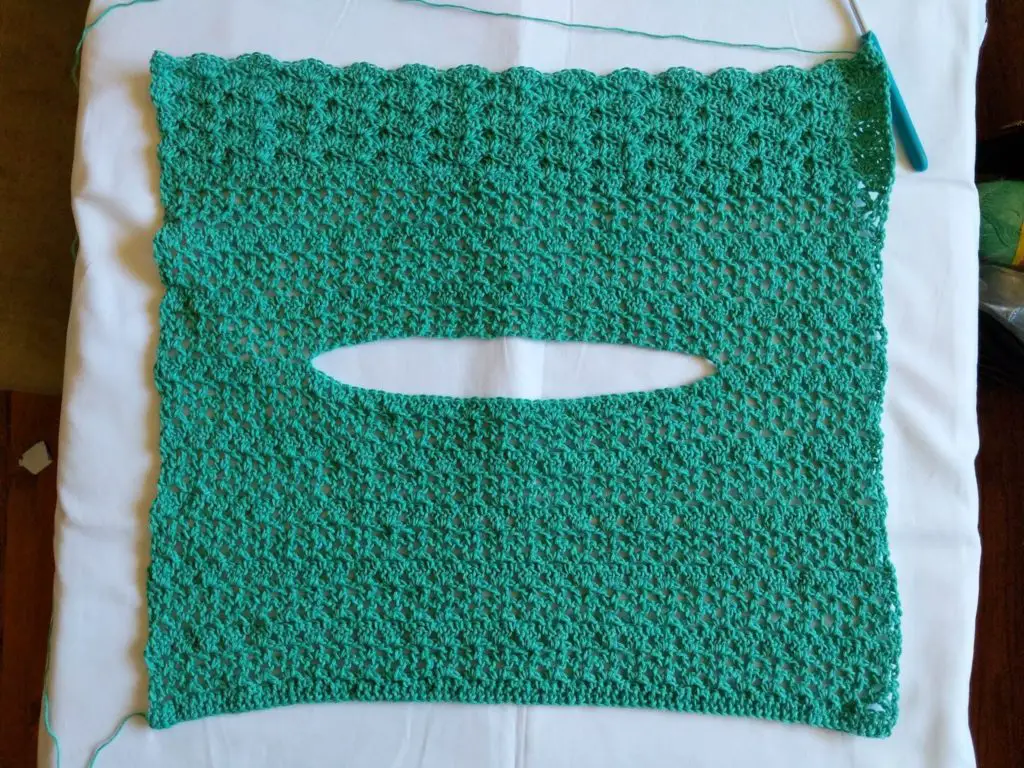
Aerwyna Blouse – Free Crochet Pattern
Bottom
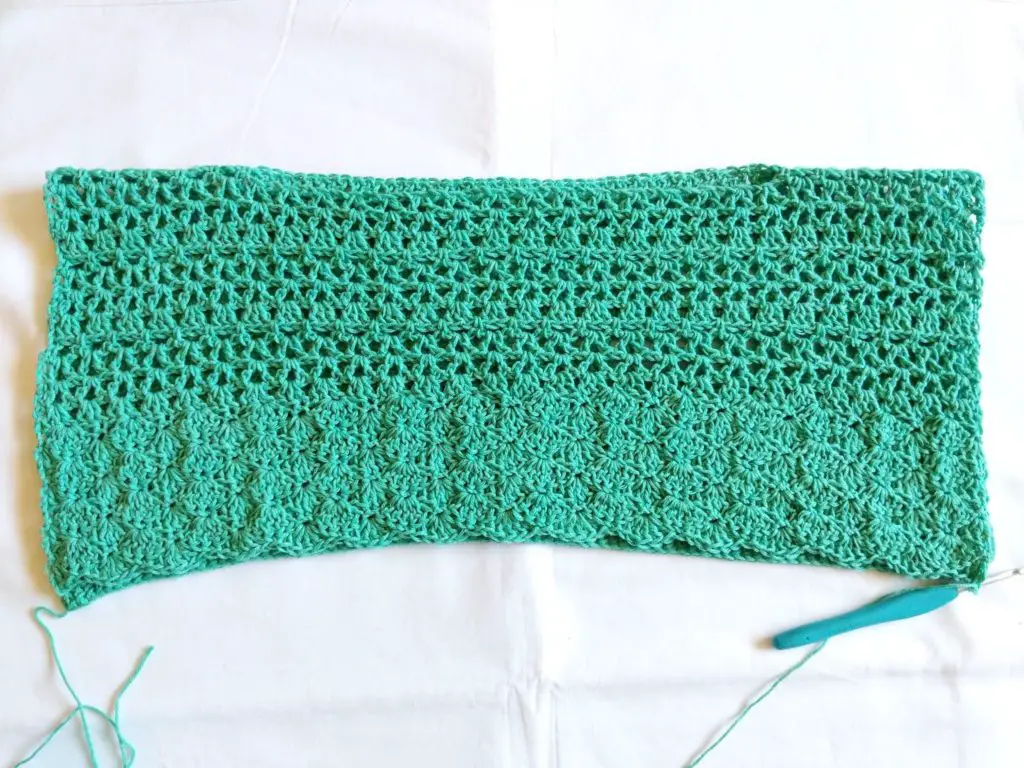
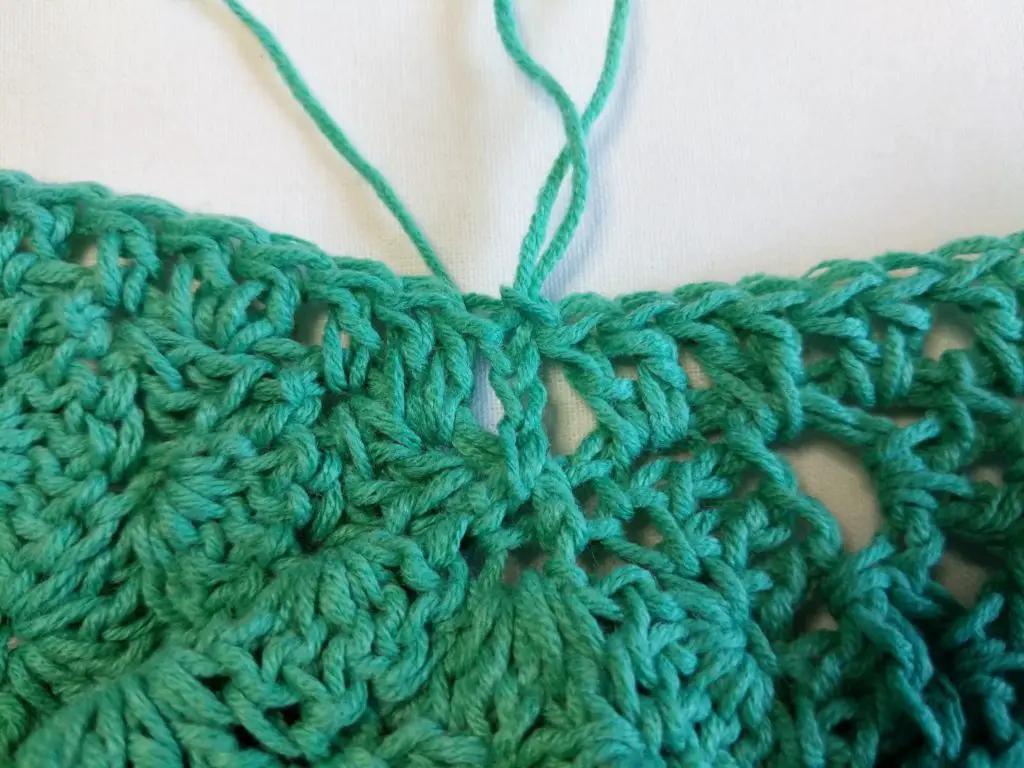
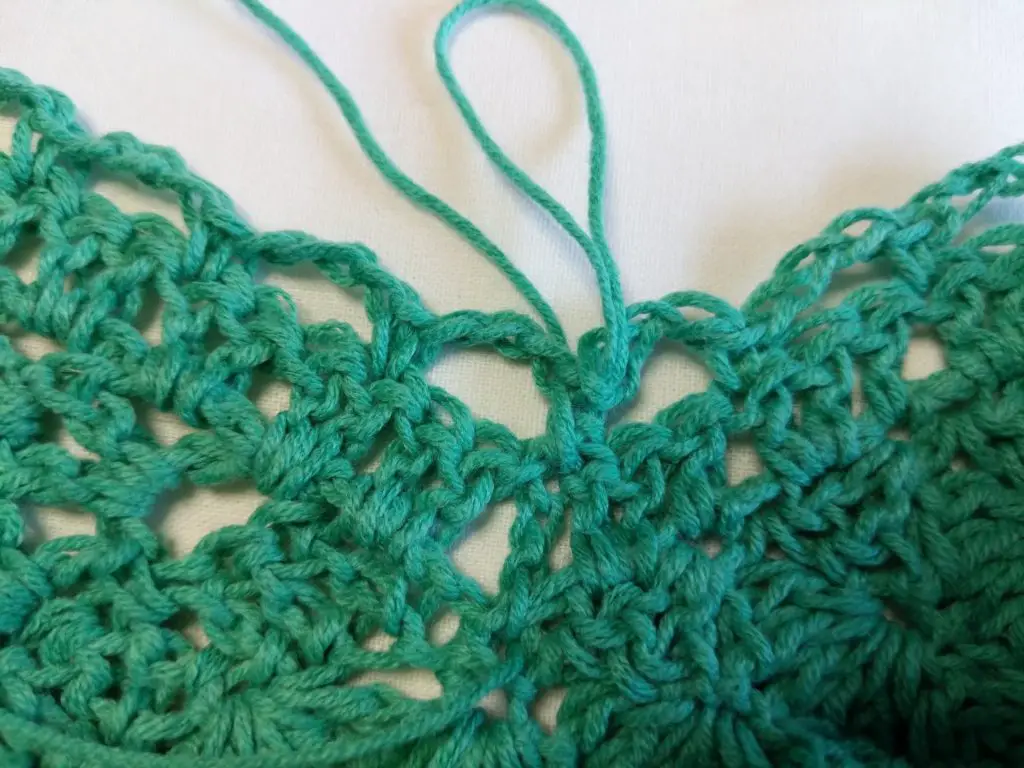
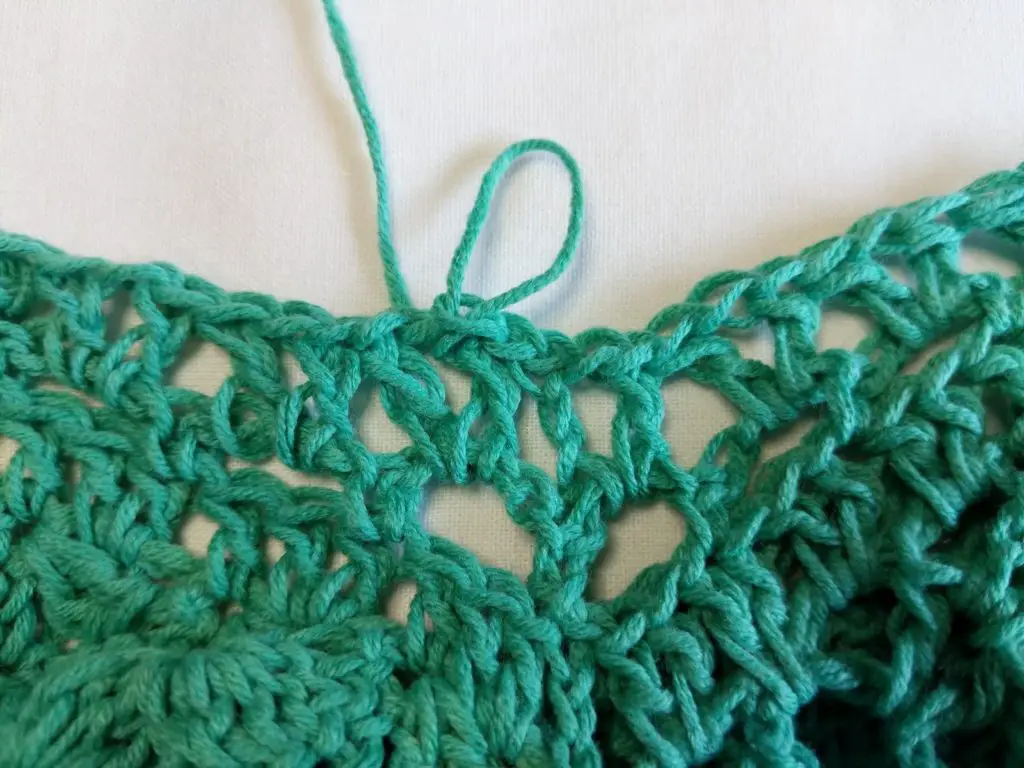
Fold your work so that the right sides are together and the bottom of your first row meets the top of the row you just worked, as in Figure 2. To make this part a little easier, you can hold the sides of these rows together with locking stitch markers. Place your hook back into the loop you were previously working from and slip stitch to join with the bottom of the 1st row of the back section (see Figure 3). Turn. You will begin the first round by working the front, then continuing on to the back.
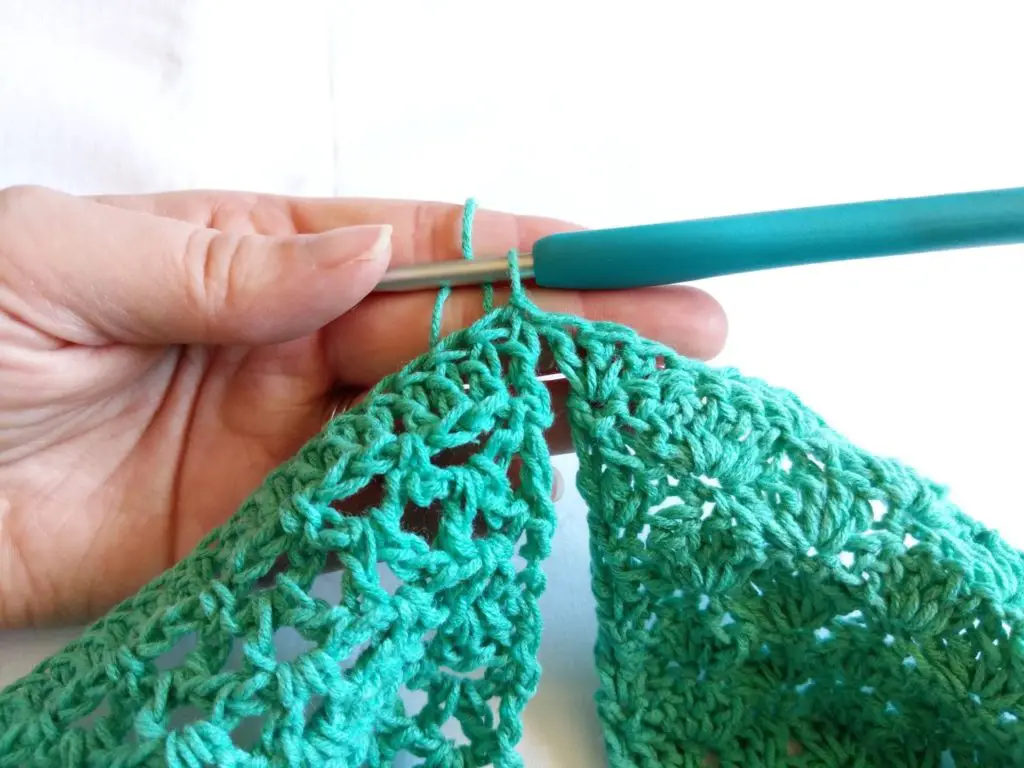
1. Sc2Tog over the st you just ss into and the next st (see Figure 4).
Sk 2 sts, Sh in next st. *Sk 2 sts, sc in next st, sk 2 sts, sh in next st. ** Repeat from * to ** across until there are only 3 sts left unworked in the front section.
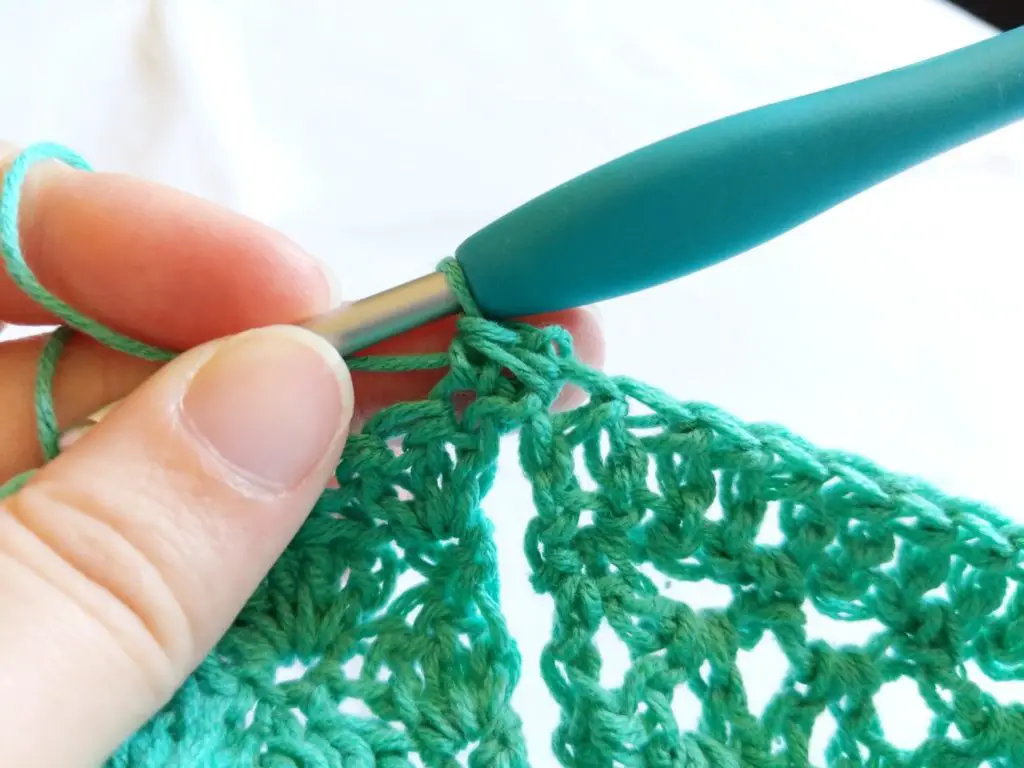
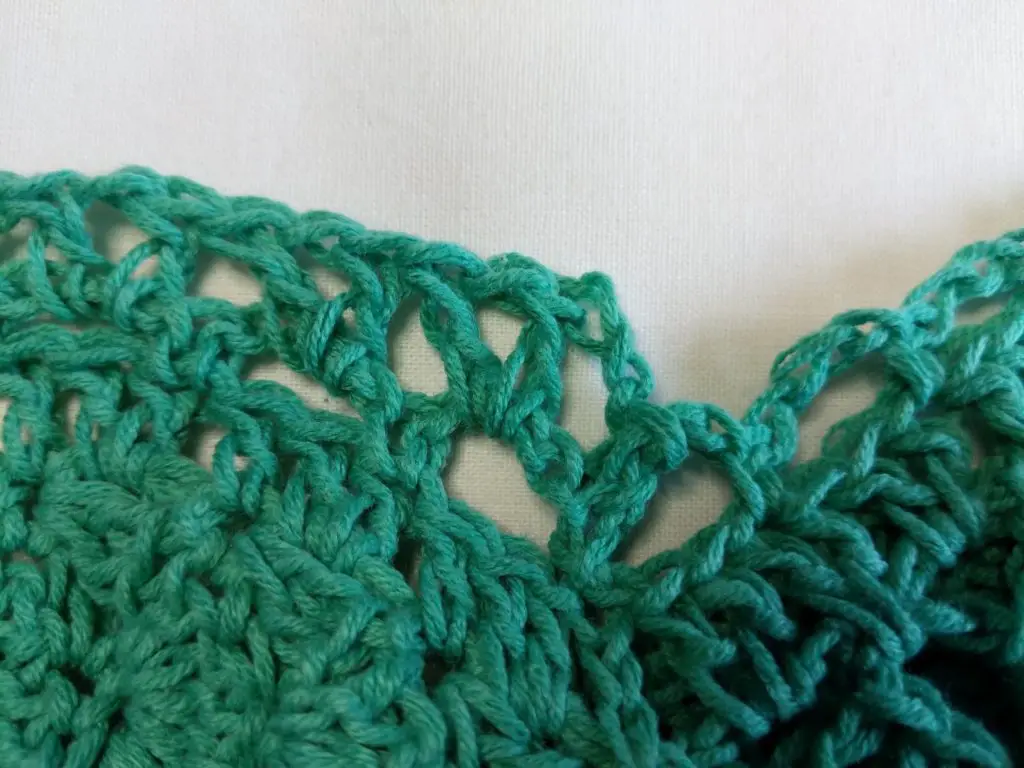
Sk 2 sts, Sc2Tog over last st of the front section and the bottom of the 1st row of the back section (see Figure 5).
Sk 2 sts, sh in the next st. *Sk 2 sts, sc in the next st, sk 2 sts, sh in the next st.** Repeat from * to ** until there are only 2 sts left unworked in the round. Sk 2 sts, ss to 1st st. Turn.
– 22 (24, 26, 28, 30, 34, 36, 40, 42) sh, sc.

2. Ch 3. 2 dc in 1st st. Sk 2 sts. *Sc in next st, sk 2 sts, sh in next st, sk 2 sts.** Repeat from * to ** around until there are only 2 sts left unworked. 2 dc in same st as ch 3. Ss to top of ch 3. Turn.
– 22 (24, 26, 28, 30, 34, 36, 40, 42) sh, sc.
3. Ch 1. Sc in 1st st. Sk 2 sts, sh in next st, sk 2 sts. *Sc in next st, sk 2 sts, sh in next st, sk 2 sts. ** Repeat from * to ** around until there are only 2 sts left unworked. Ss to 1st st. Turn.
– 22 (24, 26, 28, 30, 34, 36, 40, 42) sh, sc.
Repeat rows 2 & 3 until you have achieved the desired length. I worked 39 rows to get the length shown in my pictures. Fasten off. Adjust your garment so it is right side out.
Sleeves Of Crochet Top
Left: Join yarn in the bottom of the armpit.
1. Ch 3. Work dc into the sides of the rows in the following manner:
Starting with shell rows, Place 2 dc in each dc row, Place 1 dc in each sc row (see Figure 6).
Continuing to the lace rows, Place 2 dc in each dc / V st / sc, ch3 row.
Work in this manner around the entire armhole.
Sizes 3XL, 4XL, and 5XL, work 1 more dc into the same st as the ch 3.
Ss to top of ch 3 (see Figure 7). Turn.
– 66 (66, 66, 82, 82, 82, 99, 99, 99) dc.
2. Ch 1. Sc in 1st st. Ch 3, sk 2 (2, 2, 3, 3, 3, 2, 2, 2) sts. *Sc in next st, ch 3, sk 2 sts. ** Repeat from * to ** around (see Figures 8 & 9). Ss to 1st sc, ss into ch 3 sp. Turn.
– 22 (22, 22, 27, 27, 27, 33, 33, 33) ch 3, sc.
3. Ch 3 V st in next ch 3 sp and each ch 3 sp around. (Dc, ch 1) into same ch 3 sp as starting ch3. Ss to top of ch 3, ss into next dc, ss into ch sp of V st. Turn. (see Figures 10 & 11)
– 22 (22, 22, 27, 27, 27, 33, 33, 33) V st.
4. Ch 3. V st in next V st and each V st around. (Dc, ch 1) into same ch 3 sp as starting ch 3. Ss to top of ch 3, ss into next dc, ss into ch sp of V st. Turn.
– 22 (22, 22, 27, 27, 27, 33, 33, 33) V st.
5. Ch 3. 2 dc in same sp as ch 3. 3 dc in next V st and each V st around. Ss to top of ch 3. Turn.
– 66 (66, 66, 81, 81, 81, 99, 99, 99) dc.
6. Ch 1. *Sc in the sp between the 3 dc groups, ch 3, sk 3 sts. ** Repeat from * to ** around. Ss to 1st sc, ss into ch 3 sp. Turn.
– 22 (22, 22, 27, 27, 27, 33, 33, 33) ch 3, sc.
7. Repeat round 3.
– 22 (22, 22, 27, 27, 27, 33, 33, 33) V st.
8. Repeat round 4.
– 22 (22, 22, 27, 27, 27, 33, 33, 33) V st.
9. Repeat round 5. Do not turn.
– 66 (66, 66, 81, 81, 81, 99, 99, 99) dc.
10. Ch 1. Sc in 1st st and each st around. Fasten off.
– 66 (66, 66, 81, 81, 81, 99, 99, 99) sc.
Right: Join yarn in the bottom of the armpit as you did with the left sleeve.
1. Ch 3. Work dc into the sides of the rows in the following manner:
Starting with the lace rows, Place 2 dc in each dc / V st / sc, ch3 row.
Continuing to the shell rows, Place 2 dc in each dc row, Place 1 dc in each sc row.
Work in this manner around the entire armhole.
Sizes 3XL, 4XL, and 5XL, work 1 more dc into the same st as the ch 3.
Ss to top of ch 3. Turn.
– 66 (66, 66, 82, 82, 82, 99, 99, 99) dc.
Rows 2 – 10 of the right sleeve are worked the same as the left sleeve.
Now we will finish off the neckline.
Neckline
With the back of the Aerwyna Blouse facing you, join your yarn in the stitch closest to the right shoulder.
1. Ch 1. Sc in 1st st and each dc across. Sc in side of sc. Sc in each ch across, Sc in side of sc. Ss to 1st sc. Fasten off.
– 74 (86, 98, 98, 98, 110, 110, 110, 110) sc.
Now you just have to weave in your ends and you are done!
I hope you enjoyed making your Aerwyna Blouse. It will be the perfect piece for the summer days ahead. Wear it to the beach, around town, or to a family barbecue. You’ll be reeling in the comliments! 😉
I look forward to seeing all your beautiful pictures on Ravelry!
If you’d like to know when I post new patterns and tutorials, head on over to my Facebook and Instagram and give me a like and a follow!
If you enjoyed this free pattern for the Aerwyna Blouse, you may want to check out my other designs!
Aerwyna Blouse – Free Crochet Pattern

Aerwyna Blouse – Free Crochet Pattern
And until next time… Happy Hooking! 😉
I have some cascade heritage wave yarn (sock weight just about) that I am dying to use.. do you think I could use that here?
Hello Anne!
Cascade Heritage Wave is a #1 Fingering weight yarn, so it might be a tad too light. You could always try it out with the gauge swatch and see how it goes, though. Just be sure to pay attention to your tension when you move on to making the top. Good luck!
Sarah
I love this pattern, but I don’t want the lattice part to go that far down my back. Would it work if I made the front pattern twice? In other words, do the beginning part of the front pattern instead of the back pattern, then continue with another front pattern? Thank you for your help!
Hi Mary Anne.
I’m not sure if it would work that simply. You see, when you are working the upper back you are working upwards. Then when you work the lower body, you will be working downwards. So, if you were to start with the shells pattern, the stitches would look inverted in the back once you began working the lower body.
But, if you use a different solid stitch (like hdc or dc) for the first part of the upper back, it might look less awkward and more like a design element.
I hope that helps!
Sarah
I have got to the shell stitches,but have no slit for the neck line,where am I going wrong?
Hi Margaret,
The neck opening is made in Row 1 of the Top Front section. 🙂
– Sarah