 When Lauren of The Thinking Closet and Vanessa of Tried and True asked me if I wanted to participate in their second annual Scarf Week I absolutely had to say yes.
Because: 1. I love puns. I mean. How could you not love a punny series like this?

I mean. Right?
2. I love Lauren and Vanessa. If you need evidence of their awesomeness, just go ahead and reference that image above.
3. I love scarfs. So many types of scarfs, ways to wear scarfs, things to make with scarfs. They are great. I often wish I lived somewhere cooler so I could wear them for more than like one week in December.
So, yes. I am all in for Scarf Week. I decided to put together a new crochet pattern, and I came up with this lacy, lightweight neckerchief.

I think the neckerchief shape and tassels make it look kinda of-the-moment, and the lightweight yarn and lacy stitches make it a bit summery.
If you have never crocheted with fingering or lace weight yarn, can I recommend giving it a try? Using a lighter yarn may take a bit longer, but it will give you a really beautiful, soft fabric with great drape.
Materials (I have included Affiliate links below. Thanks for supporting Persia Lou!)
- Lace weight yarn about 50-70g [I used Knit Picks Shadow, which is a wool because it’s what I had on hand. I would like to try it with Knit Picks Lindy Chain, a slightly thicker fingering weight cotton/linen blend because I think it would be great for summer. If you use a fingering weight yarn, you may want to bump your hook up to a size H (5.00 mm)]
- Size G 4.00 mm Hook
- If you use yarn that comes in a hank, a yarn swift can help you to keep it from getting all tangled, but it is totally optional.
Tassel Neckerchief Pattern – This pattern uses American crochet terms
Special Stitches
Picot: Ch 3, sl st in base of ch. That’s it – picot made! See image below.

Picot Shell: In specified stitch work (3 dc, picot, 2 dc). There are three picot shells in the image below.

Row 1: Begin with 200 foundation single crochet [fsc (I just added a video for how to make the foundation single crochet stitch! Check it out HERE and be sure to subscribe to my youtube channel for more video tutorials.)] or any multiple of 5 foundation single crochet stitches to create a base of your desired length. For the scarf pictures I actually used 160 fsc, which was long enough, but when I would prefer it to be a bit longer to make it looser when tied. (If you prefer, you can also use a starting chain of any multiple of 5 and then go back and single crochet in each chain.) Ch 1, turn.
Row 2: *Skip 4 fsc, and work picot shell into next stitch, repeat from * until you reach the end of the row, sl st into last stitch. Ch 5 (counts as dc, ch 2), turn.
Row 3: Work (dc, ch 2, dc) into space between next two picot shells, ch 2, repeat from * until you reach the end of the row, dc in last stitch. Ch 1, turn.
Row 4: Skip ch 2 sp, work picot shell into next ch 2 sp, repeat from * until you reach the end of the row, sl st to last stitch. Ch 5 (counts as dc, ch 2), turn.
Repeat Rows 3 and 4. As you repeat the pattern each Row 4 repeat will have one fewer picot shell than the previous picot shell row. Eventually you will finish with only one picot shell. Finish off and weave in ends.

I finished off my neckerchief by adding coral edging and mini tassels. I like the contrast of the bright coral with the neutral brown.

I used fingering weight yarn (Knit Picks Palette) because it’s what I had on hand. Fingering weight yarn is just a bit thicker than lace weight. I would recommend using lace weight for the edging if you have it available.
To add the edging, join your contrasting color to any edge and work single crochet stitches all the way around. Finish off and weave in ends. I made a pile of mini tassels and tied them on the the pointed edge of the scarf. They are super easy to make and all you need is yarn, scissors, and your fingers to make them!

And that’s it! Tie on your sweet new neckerchief and rock it! Awkwardly posing for photos is completely optional.


This pattern is free for personal use. Please do not redistribute or sell my pattern. If you would like to share it with a friend, just send them here. 🙂 You may create items for sale using my pattern, but I would appreciate a link back where possible. If you make a neckerchief I would love to see it! Post it to my facebook page or tag me on instagram!
Want More Scarf Week Inspiration?
The fiber arts fun has only just begun! Be sure to chomp those shark scarf teeth into each of these inspirational D.I.Y. projects hitting the blog-o-sphere today.
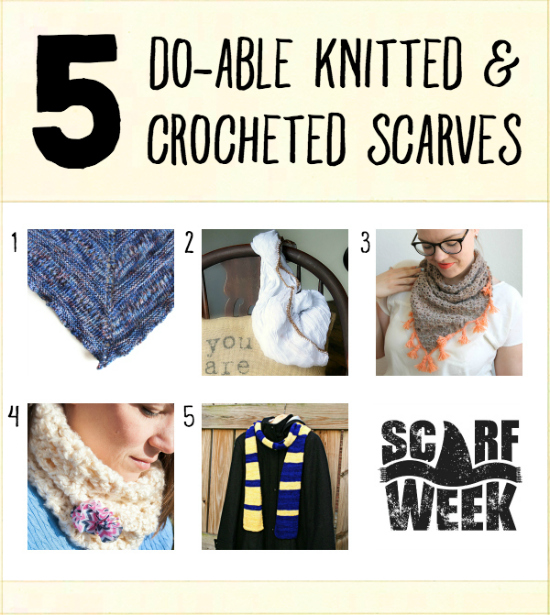
Click the images above or links below to check ’em out.
1. How To Construct and Knit a Triangular Shawl by It Was Weekend
2. Add a Crocheted Metallic Edge to a Store Bought Scarf by 7 Alive
3. Tasseled Crochet Neckerchief Pattern by Persia Lou
4. DIY Decorated Swell Shell Crochet Cowl by The Crafting Nook
5. Knitted Collegiate Scarf Pattern by 4 You With Love
Tomorrow will be the final day of Scarf Week, and the theme is Scarf Refashions! You don’t want to miss it!

To access all 5 days of Scarf Week, visit our co-coordinators, Lauren from The Thinking Closet and Vanessa from Tried & True. This week, they have been updating their posts with the clickable collages as they go live. And you can also explore all of the creative projects we’ve been sharing on social media with our hashtag, #ScarfWeek2015.


Comments + Project Love
Marilyn says
This is beautiful and I agree, the pop of color that the orange edging & tassels add really makes your shawl/scarf extra special
persialou says
Thank you so much, Marilyn!
Elena aka. Midsommarflicka says
Oh, I like that one. DEFINITELY have to improve my crochet skills! I want one like this 😉
Love, Elena
persialou says
Thank you, Elena! 🙂
Camila says
LOVE LOVE LOVE this!!! Seems simple enough even for me!!! hahaha! I’ll have to try this very soon!
XOXO Pinning!
persialou says
Thank you, Camila!
Kadie says
This is beautiful!! I love the contrast in colors! I want to make one asap!!
Amy W says
SO cute!
persialou says
Thanks, Amy! 🙂
Lauren @ The Thinking Closet says
Aw, shucks. Way to make me turn 50 shades of red with your sweet sweet comments there at the top of your post. Scarf Week 2015 was most definitely bigger, better, and scarfy-er because of you. I’m so very glad you were a part of it! You and your crochet skillz never fail to make me swoon. The color combo. you chose it just perfect. And for the record, you manage to make awkward photo posing look totally non-awkward and cool! Off to pin….
persialou says
Haha – Thank you! I’m not sure about the non-awkward and cool, but I appreciate the kinds words. 🙂
Lynne says
thanks for the free pattern
Aune says
Thanks for this beautiful neckerchief and neat pattern.
I am currently doing it and I am now at row 4 and I am doubting if I am doing something wrong because the actual picots are not linked anywhere. Is that normal? I can’t seem to see it from the pictures so I might be doing wrongly the row 3. Should the (dc, ch 2, dc) go in the 2ch space between picot shells or inside the 3ch in the picot?
Thanks,
Nicole says
Hey Alexis!! I adore your site I’ve already made 2 feather and fan blankets and so many hats! I decided to tackle this project but I’m a little stuck on how to do the third row with (dc, 2ch, dc). How would it fit in between the picot shells? Thanks so much!