
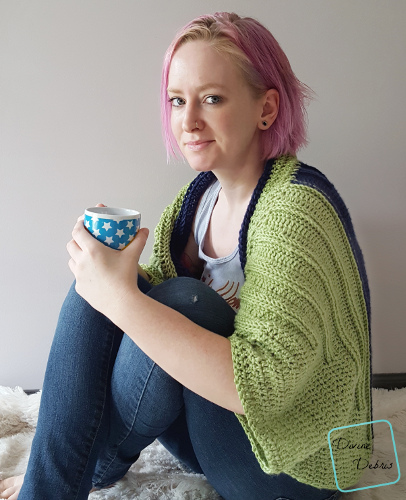
Hi everyone! How are you doin’ this week? I’m finally getting around to releasing the Tasha Traditional Shrug!
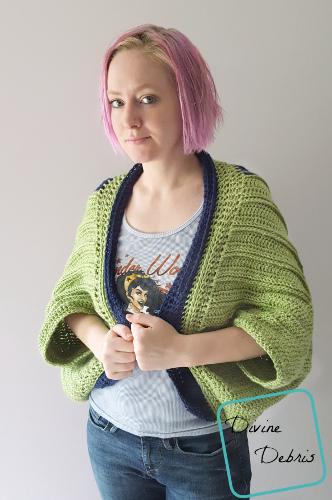
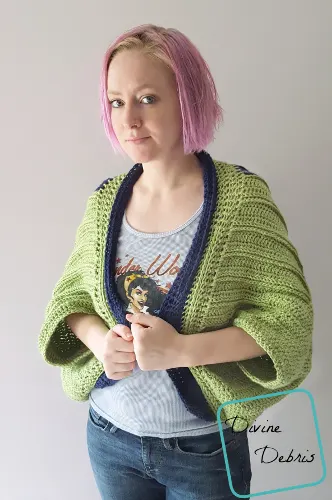
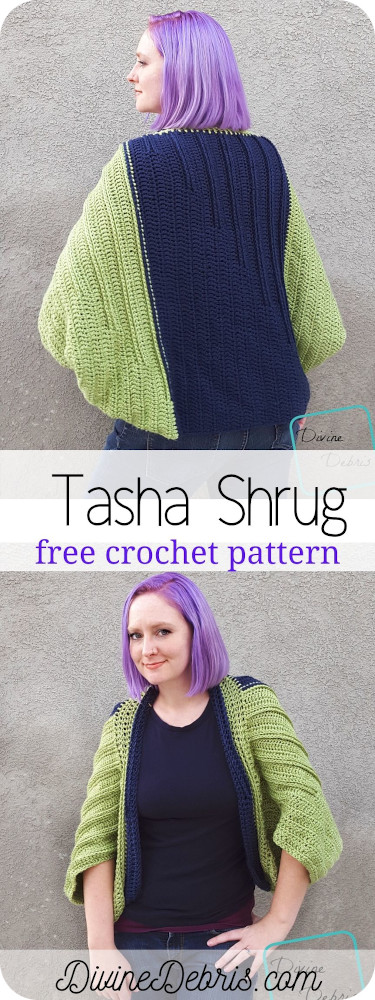
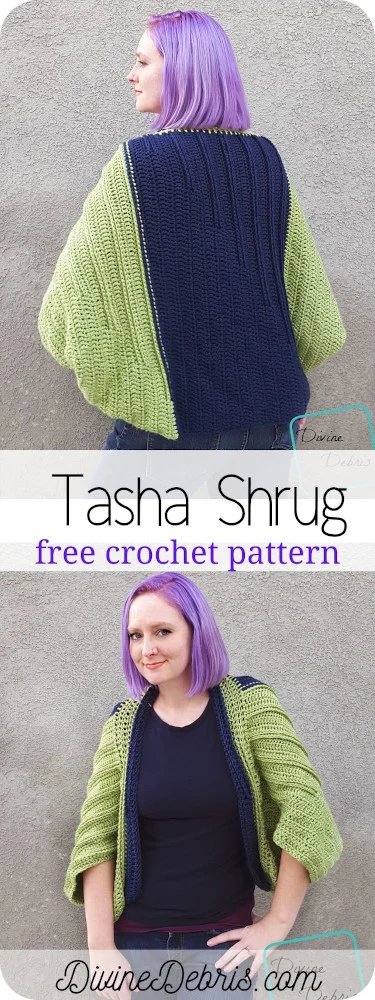
At the beginning of April I posted my Tasha Tunisian Shrug pattern, after I started experimenting with Tunisian hooks and got inspired to make a big and squishy shrug design. Now, I knew that Tunisian isn’t hugely popular (which is a shame, it’s so gorgeous!) and I had it in the back of my mind that I was going to make a version that was done in traditional crochet, just a bunch of DCs! Well, that time has finally come! I really, really hope you like it. It’s big and squishy like the Tunisian one (bigger actually!) and really easy to customize. I did two colors because I ran out of the pistachio and couldn’t find it anywhere, but I think it was a good thing because the dark blue really gives the shrug some personality. Don’t you think?
Now for the bad-ish news, May has 5 Tuesdays and I only wrote patterns for 4… so next week there won’t be a new pattern but I do have a giveaway that will be starting, so keep an eye out for that!
I hope you give this new design a shot and let me know what you think. It’s a fun, mindless, project you can complete while watching New Girl (or is that just me?)
To help me to create patterns week after week, please consider purchasing an ad-free pdf of this pattern in my Ravelry shop.

Thank you to all my Patreon supporters.
Materials
- US K (6.50 mm) crochet hook
- Aran/ medium/ size #4 weight yarn
- approx 19 – 21 oz/ 998 – 1103 yds
- 1 – 2 colors
- I used Caron Simply Soft
- Yarn needle
Gauge
- 15 dcs x 7 rows = 4″


Terms/ stitches
- RS: right side (side that faces out)
- Ch: chain
- St: stitch
- Dc: double crochet
- FPDC: front post double crochet
- BPDC: back post double crochet
Notes
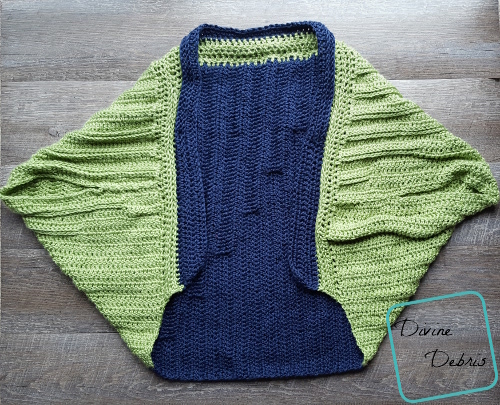
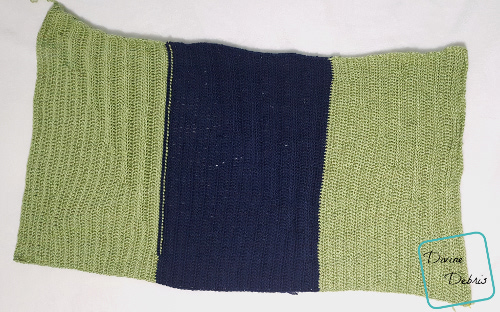
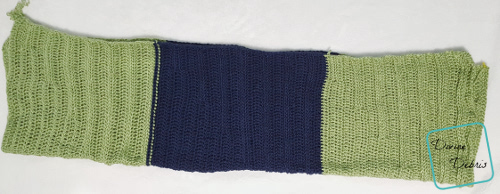
- This pattern is worked in 2 sections, in back and forth rows: the Main Body and the Lapel.
- The ch 3 at the beginning of the row does count as a stitch. Feel free to replace it with a chainless double crochet.
- 2 colors were used to make this design, feel free to use only 1.
- You will need to know how to create a slipknot on your hook for this pattern.
- The width measurement is from sleeve opening to sleeve opening. The height is measured from the bottom of the shrug to the where you attach the lapel.
- I crocheted the lapel along the side where the FPDC/ BPDC edge but you can do it along the dc edge if you’d prefer.
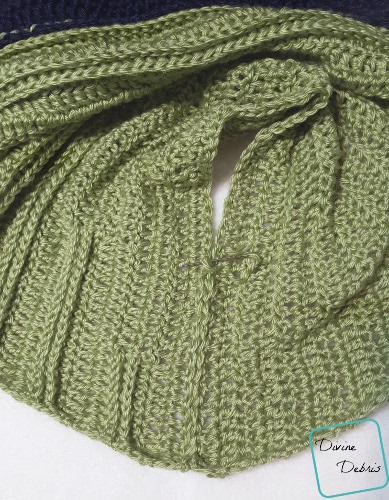
- In the photos: color A is green (Caron Simply Soft in Pistachio) and color B is blue (Caron Simply Soft in Dark Country Blue).
Finished measurements
| Small/ Medium Width: 37.5″ – 38″ Height: 20″ – 20.5″ Lapel: 3” in height | Large/ XL Width: 51″ – 51.5″ Height: 25″ – 25.5″ Lapel: 3” in height |
Pattern instructions
– Sm/ Md –
Main Body
(RS) Row 1: A: Ch 82, dc into the 3rd st from the hook (skipped sts count as dc) and into the next 78 sts – 80 dcs
Row 2: A: Ch 3 (counts as a dc here and throughout), turn, dc into the next 79 sts – 80 dcs
Row 3: A: Ch 3, bpdc around the next 69 sts, dc into the last 10 sts – 69 bpdc, 11 dcs
Row 4: A: Ch 3, turn, dc into the next 9 sts, fpdc dc around the next 69 sts, dc into the last st – 69 fpdcs, 11 dcs
Rows 5 – 6: A: Ch 3, turn, dc into the next 79 sts – 80 dcs
Row 7: A: Ch 3, bpdc around the next 59 sts, dc into the last 20 sts – 59 bpdc, 21 dcs
Row 8: A: Ch 3, turn, dc into the next 19 sts, fpdc dc around the next 59 sts, dc into the last st – 59 fpdcs, 21 dcs
Rows 9 – 10: A: Ch 3, turn, dc into the next 79 sts – 80 dcs
Row 11: A: Ch 3, bpdc around the next 49 sts, dc into the last 30 sts – 49 bpdc, 31 dcs
Row 12: A: Ch 3, turn, dc into the next 29 sts, fpdc dc around the next 49 sts, dc into the last st – 49 fpdcs, 31 dcs
Rows 13 – 14: A: Ch 3, turn, dc into the next 79 sts – 80 dcs
Row 15: A: Ch 3, bpdc around the next 39 sts, dc into the last 40 sts – 39 bpdc, 41 dcs
Row 16: A: Ch 3, turn, dc into the next 39 sts, fpdc dc around the next 69 sts, dc into the last st – 39 fpdcs, 41 dcs
Rows 17 – 18: A: Ch 3, turn, dc into the next 79 sts – 80 dcs
Row 19: A: Ch 3, bpdc around the next 29 sts, dc into the last 50 sts – 29 bpdc, 51 dcs
Row 20: A: Ch 3, turn, dc into the next 49 sts, fpdc dc around the next 29 sts, dc into the last st – 29 fpdcs, 51 dcs
Rows 21 – 22: A: Ch 3, turn, dc into the next 79 sts – 80 dcs
Row 23: A: Ch 3, bpdc around the next 19 sts, dc into the last 60 sts – 19 bpdc, 61 dcs
Row 24: A: Ch 3, turn, dc into the next 59 sts, fpdc dc around the next 19 sts, dc into the last st – 19 fpdcs, 61 dcs
Rows 25 – 26: A: Ch 3, turn, dc into the next 79 sts – 80 dcs
Row 27: A: Ch 3, bpdc around the next 9 sts, dc into the last 70 sts – 9 bpdc, 71 dcs
Row 28: A: Ch 3, turn, dc into the next 69 sts, fpdc dc around the next 9 sts, dc into the last st – 9 fpdcs, 71 dcs
Fasten off color A.
Rows 29 – 30: B: Ch 3, turn, dc into the next 79 sts – 80 dcs
Rows 31 – 58: Repeat rows 3 – 30 with color B.
Fasten off color B.
Rows 59 – 86: repeat rows 3 – 30 with color A.
Fasten off color A, weave in all your ends.
– Lg/ Xl –
Main Body
(RS) Row 1: A: Ch 102, dc into the 3rd st from the hook (skipped sts count as dc) and into the next 98 sts – 100 dcs
Row 2: A: Ch 3 (counts as a dc here and throughout), turn, dc into the next 99 sts – 100 dcs
Row 3: A: Ch 3, bpdc around the next 89 sts, dc into the last 10 sts – 89 bpdc, 11 dcs
Row 4: A: Ch 3, turn, dc into the next 9 sts, fpdc dc around the next 89 sts, dc into the last st – 89 fpdcs, 11 dcs
Rows 5 – 6: A: Ch 3, turn, dc into the next 99 sts – 100 dcs
Row 7: A: Ch 3, bpdc around the next 79 sts, dc into the last 20 sts – 79 bpdc, 21 dcs
Row 8: A: Ch 3, turn, dc into the next 19 sts, fpdc dc around the next 79 sts, dc into the last st – 79 fpdcs, 21 dcs
Rows 9 – 10: A: Ch 3, turn, dc into the next 99 sts – 100 dcs
Row 11: A: Ch 3, bpdc around the next 69 sts, dc into the last 30 sts – 69 bpdc, 31 dcs
Row 12: A: Ch 3, turn, dc into the next 29 sts, fpdc dc around the next 69 sts, dc into the last st – 69 fpdcs, 31 dcs
Rows 13 – 14: A: Ch 3, turn, dc into the next 99 sts – 100 dcs
Row 15: A: Ch 3, bpdc around the next 59 sts, dc into the last 40 sts – 59 bpdc, 41 dcs
Row 16: A: Ch 3, turn, dc into the next 39 sts, fpdc dc around the next 59 sts, dc into the last st – 59 fpdcs, 41 dcs
Rows 17 – 18: A: Ch 3, turn, dc into the next 99 sts – 100 dcs
Row 19: A: Ch 3, bpdc around the next 49 sts, dc into the last 50 sts – 49 bpdc, 51 dcs
Row 20: A: Ch 3, turn, dc into the next 49 sts, fpdc dc around the next 49 sts, dc into the last st – 49 fpdcs, 51 dcs
Rows 21 – 22: A: Ch 3, turn, dc into the next 99 sts – 100 dcs
Row 23: A: Ch 3, bpdc around the next 39 sts, dc into the last 60 sts – 39 bpdc, 61 dcs
Row 24: A: Ch 3, turn, dc into the next 59 sts, fpdc dc around the next 39 sts, dc into the last st – 39 fpdcs, 61 dcs
Rows 25 – 26: A: Ch 3, turn, dc into the next 99 sts – 100 dcs
Row 27: A: Ch 3, bpdc around the next 29 sts, dc into the last 70 sts – 29 bpdc, 71 dcs
Row 28: A: Ch 3, turn, dc into the next 69 sts, fpdc dc around the next 29 sts, dc into the last st – 29 fpdcs, 71 dcs
Rows 29 – 30: A: Ch 3, turn, dc into the next 99 sts – 100 dcs
Row 31: A: Ch 3, bpdc around the next 19 sts, dc into the last 80 sts – 19 bpdc, 81 dcs
Row 32: A: Ch 3, turn, dc into the next 79 sts, fpdc dc around the next 19 sts, dc into the last st – 19 fpdcs, 81 dcs
Rows 33 – 34: A: Ch 3, turn, dc into the next 99 sts – 100 dcs
Row 35: A: Ch 3, bpdc around the next 9 sts, dc into the last 90 sts – 9 bpdc, 91 dcs
Row 36: A: Ch 3, turn, dc into the next 89 sts, fpdc dc around the next 9 sts, dc into the last st – 9 fpdcs, 91 dcs
Rows 37 – 38: B: Ch 3, turn, dc into the next 99 sts – 100 dcs
Rows 39 – 74: Repeat rows 3 – 38 with color B.
Fasten off color B.
Rows 75 – 110: repeat rows 3 – 38 with color A.
Fasten off color A, weave in all your ends.
– Assembly –
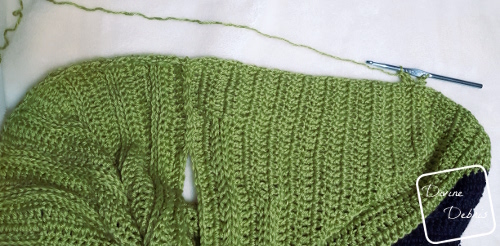
Fold the “Body” piece in half and sew together the first 15 sts for Small/Medium & 20 sts for Large/XL (working towards the fold) on rows 1 and 86 or 110. This creates your arm holes on either side of the body piece. You can stop here if you’re happy or add the “Lapel” if you’d like it to look like the one in the photos. The photos below show folding the “Body” portion in half and seaming up the ends to create arm holes.
– Lapel –
Note: the lapel does not go all the way around the opening.
Place a stitch marker 20 sts for Small/Medium & 30 sts for Large/XL to the right of the seam you created by sewing the ends together (or to the left if you’re left handed). Then create a slipknot on your hook and starting in the st you placed your stitch marker and then work specified sts as the instructions below describe per the size you’re making. I worked the lapel across the side that the FPDC/ BPDC are on so that the finished piece has a rain look to it, but you can do it along the other side if you would like the effect to be different, it won’t change the stitch counts for the “Lapel.”
Small/ Medium
Row 1: A: Dc once into the next 20 row ends (this is before the seam), dc once into the next 86 row ends, dc once into the next 20 row ends (this portion happens following the seam on the other side) – 126 dcs
Row 2: A: Ch 3, turn, dc into the next 125 sts – 126 dcs
Row 3: A: Ch 3, turn, BPDC around the next 39 sts, dc into the next 46 sts, BPDC around the next 39 sts, dc into the last st – 78 BPDCs, 48 dcs
Row 4: A: Ch 3, turn, FPDC around the next 39 sts, dc into the next 46 sts, FPDC around the next 39 sts, dc into the last st – 78 FPDCs, 48 dcs
Row 5: A: Ch 3, turn, dc into the next 125 sts – 126 dcs
Fasten off color A.
Row 6: B: Ch 3, turn, dc into the next 29 sts, BPDC into the next 66 sts, dc into the last 30 sts – 66 BPDCs, 60 dcs
Row 7: B: Ch 3, turn, dc into the next 29 sts, FPDC into the next 66 sts, dc into the last 30 sts – 66 FPDCs, 60 dcs
Row 8: B: Ch 3, turn, dc into the next 125 sts – 126 dcs
Fasten off, weave in all your ends.
Large/XL
Row 1: A: Dc once into the next 30 row ends (this is before the seam), dc once into the next 110 row ends, dc once into the next 30 row ends (this portion happens following the seam on the other side) – 170 dcs
Row 2: A: Ch 3, turn, dc into the next 169 sts – 170 dcs
Row 3: A: Ch 3, turn, BPDC around the next 49 sts, dc into the next 70 sts, BPDC around the next 49 sts, dc into the last st – 98 BPDCs, 72 dcs
Row 4: A: Ch 3, turn, FPDC around the next 49 sts, dc into the next 70 sts, FPDC around the next 49 sts, dc into the last st – 98 FPDCs, 72 dcs
Row 5: A: Ch 3, turn, dc into the next 169 sts – 170 dcs
Fasten off color A.
Row 6: B: Ch 3, turn, dc into the next 41 sts, BPDC into the next 86 sts, dc into the last 42 sts – 86 BPDCs, 84 dcs
Row 7: B: Ch 3, turn, dc into the next 41 sts, FPDC into the next 86 sts, dc into the last 42 sts – 86 FPDCs, 84 dcs
Row 8: B: Ch 3, turn, dc into the next 169 sts – 170 dcs
Fasten off, weave in all your ends.
Tada! There’s the traditional version of the Tasha Shrug that I really hope you will like!
Maria Torres
Friday 24th of January 2020
hello, so I was trying to add this to my Ravelry via the ravelry tab in the pattern and instead of taking me to this pattern, it took me to Apple necklace. I just thought you'd like to know
Divine Debris
Saturday 25th of January 2020
Oh, thank you. Must have been a glitch in the Matrix <3 but it seems to be better now :)
Deborah McGee Thurmond
Tuesday 22nd of May 2018
Love this and the color really rocks! Congrats!