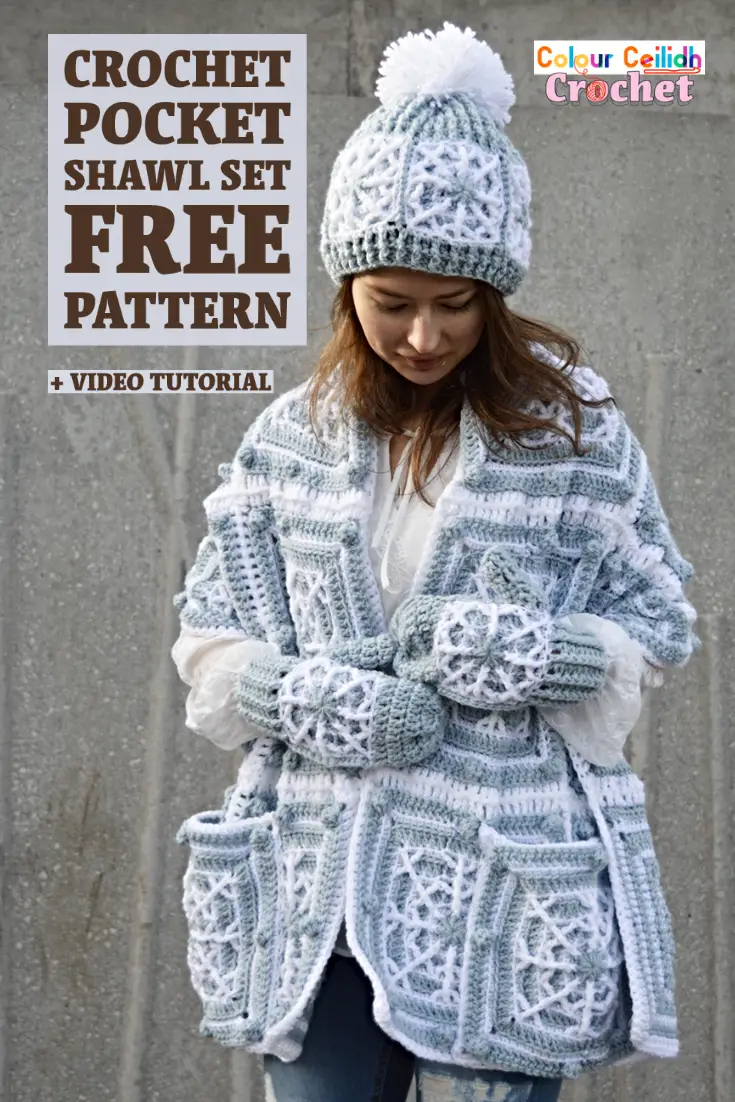
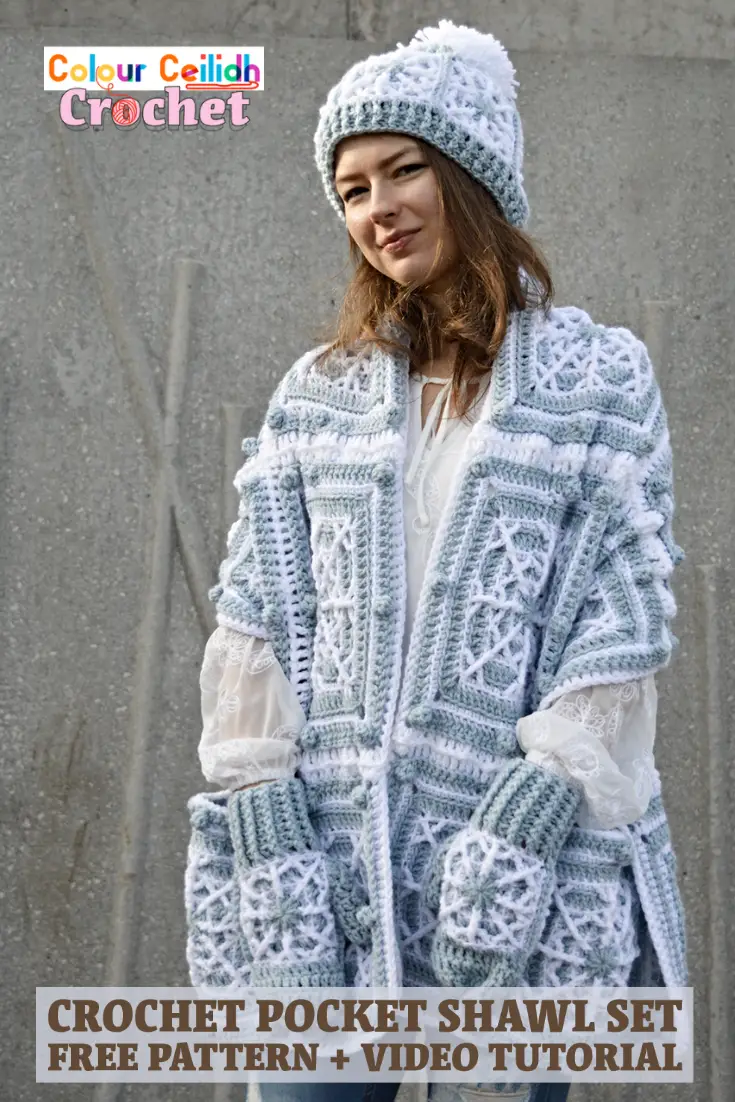
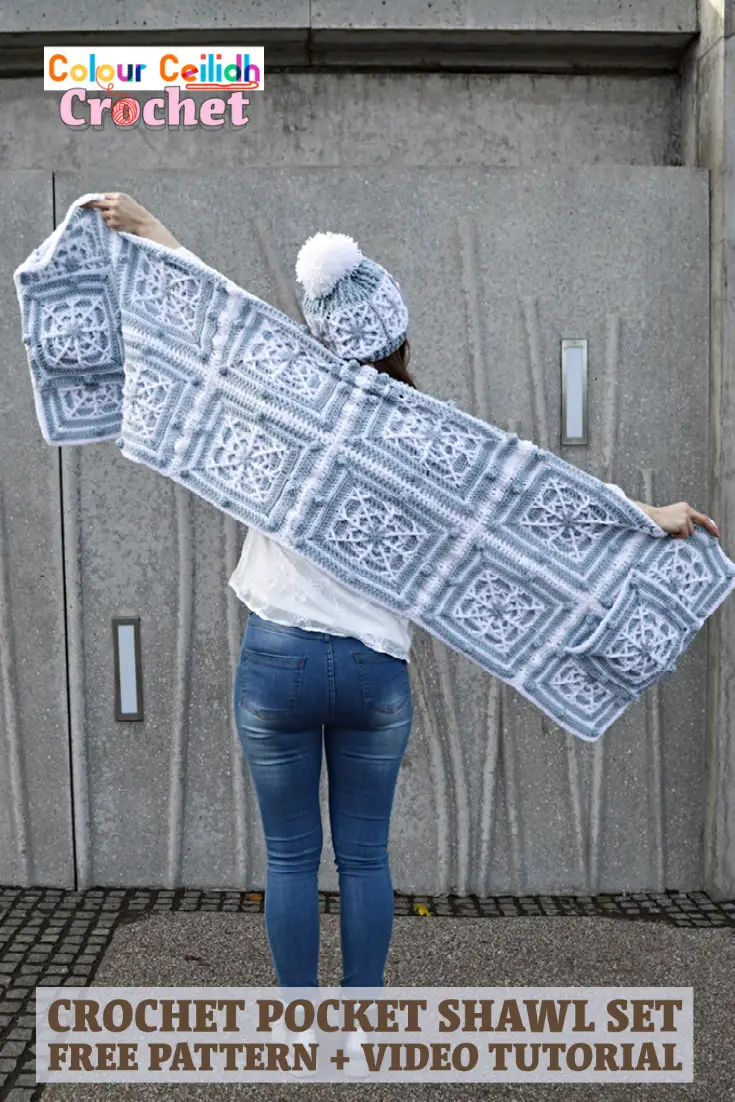
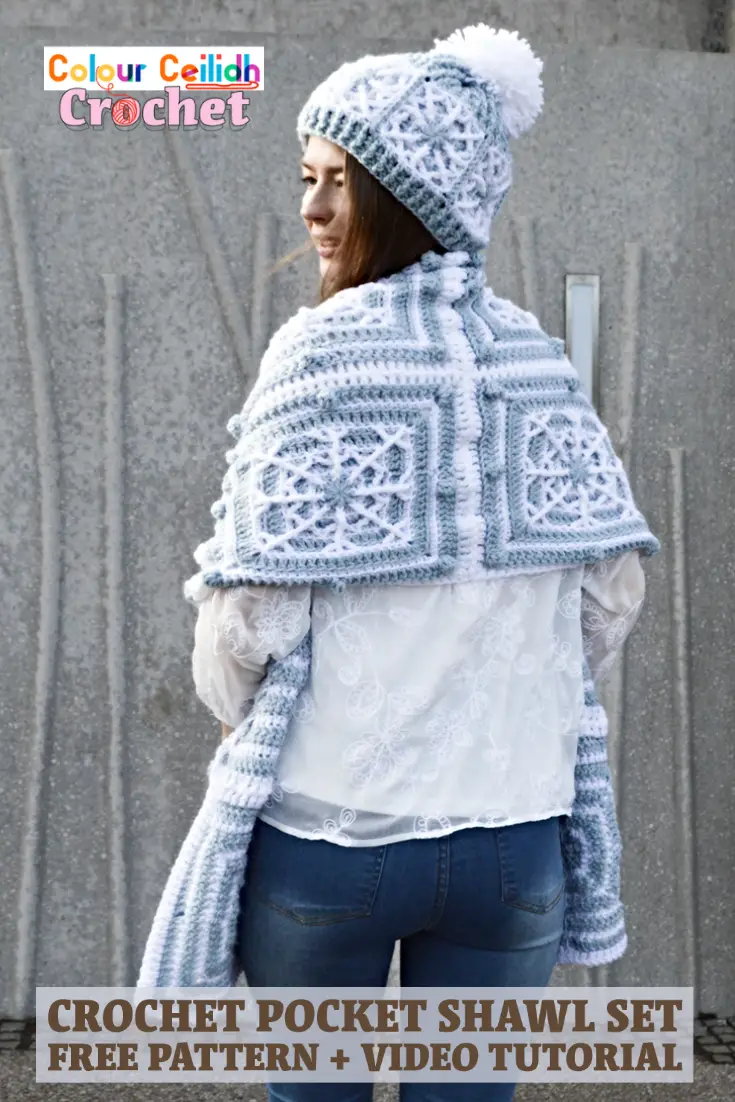
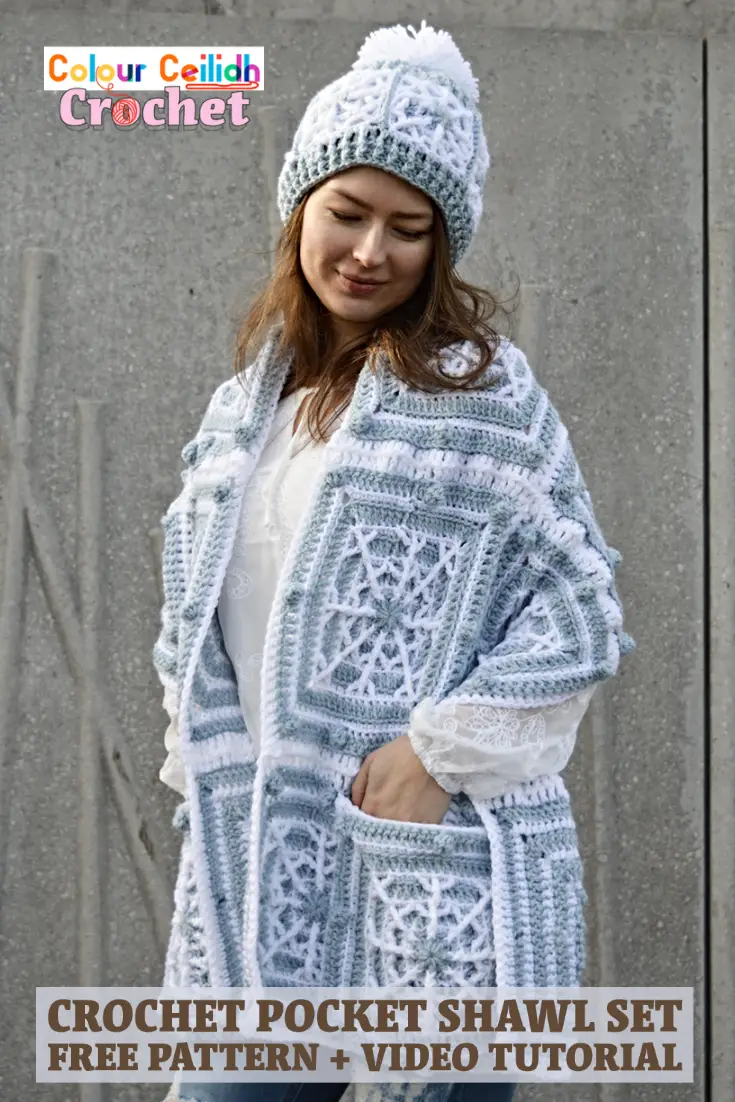
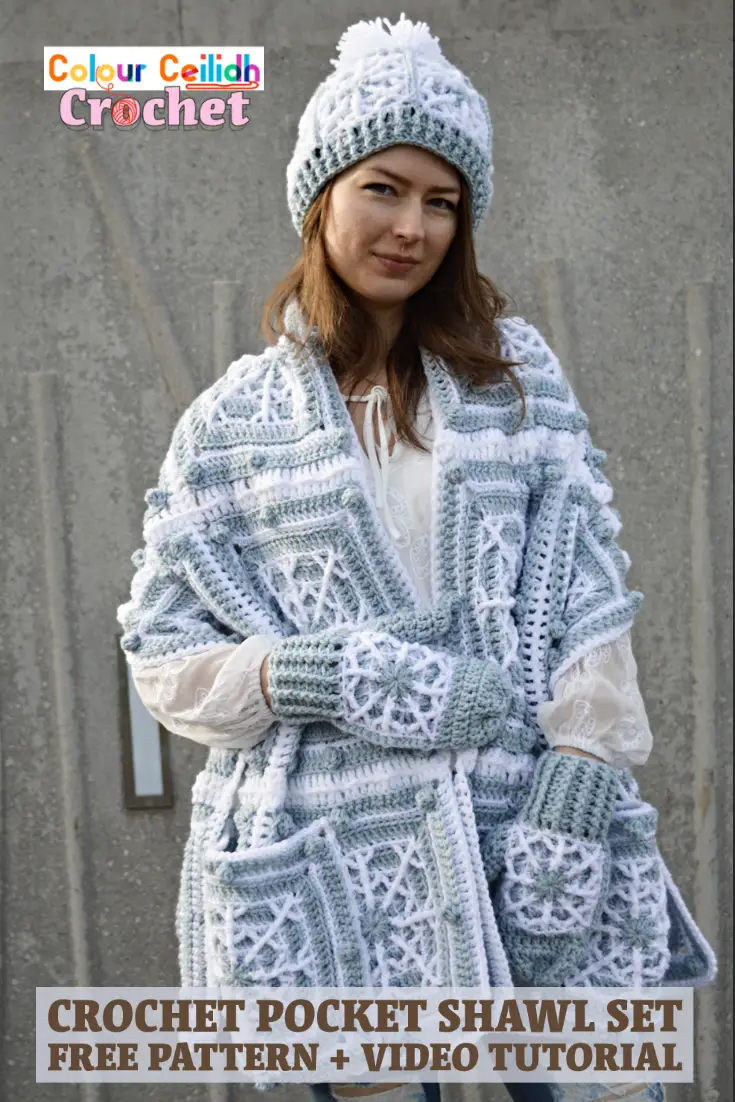
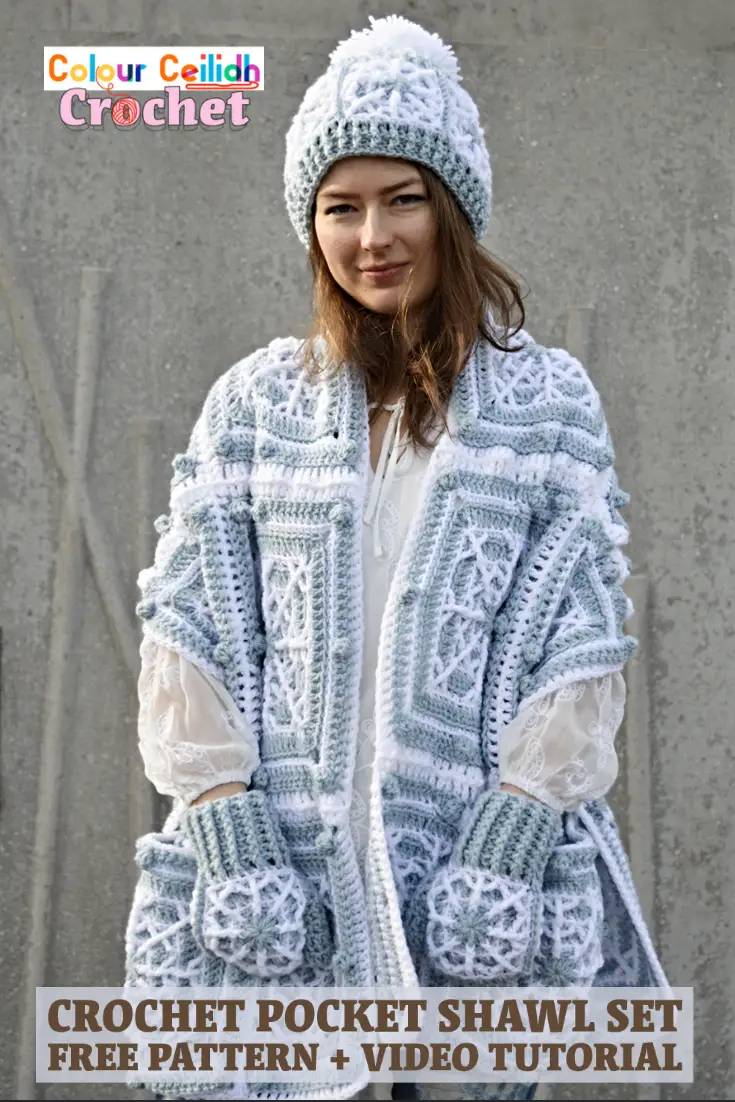
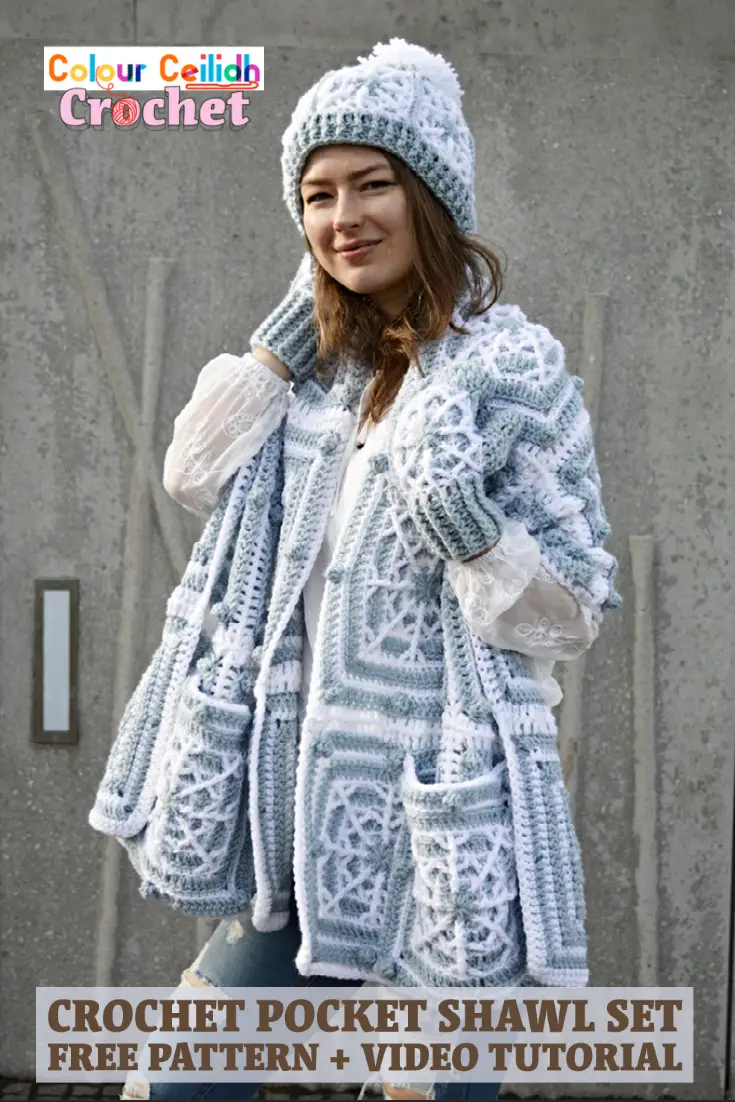
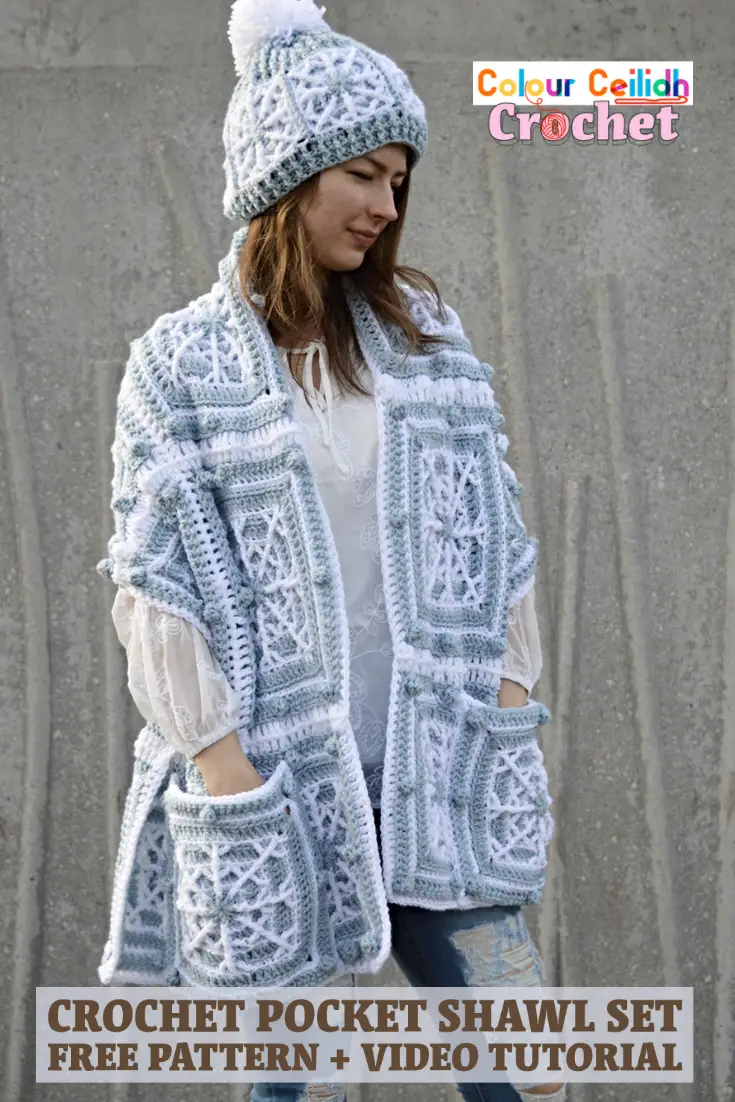
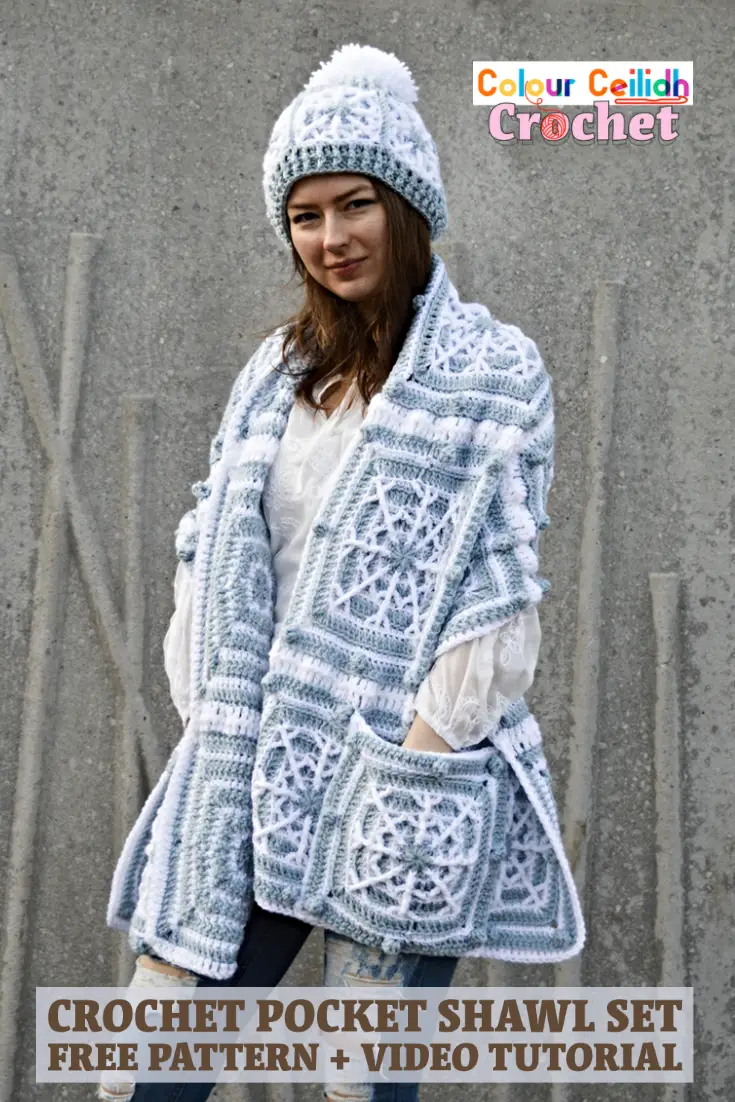
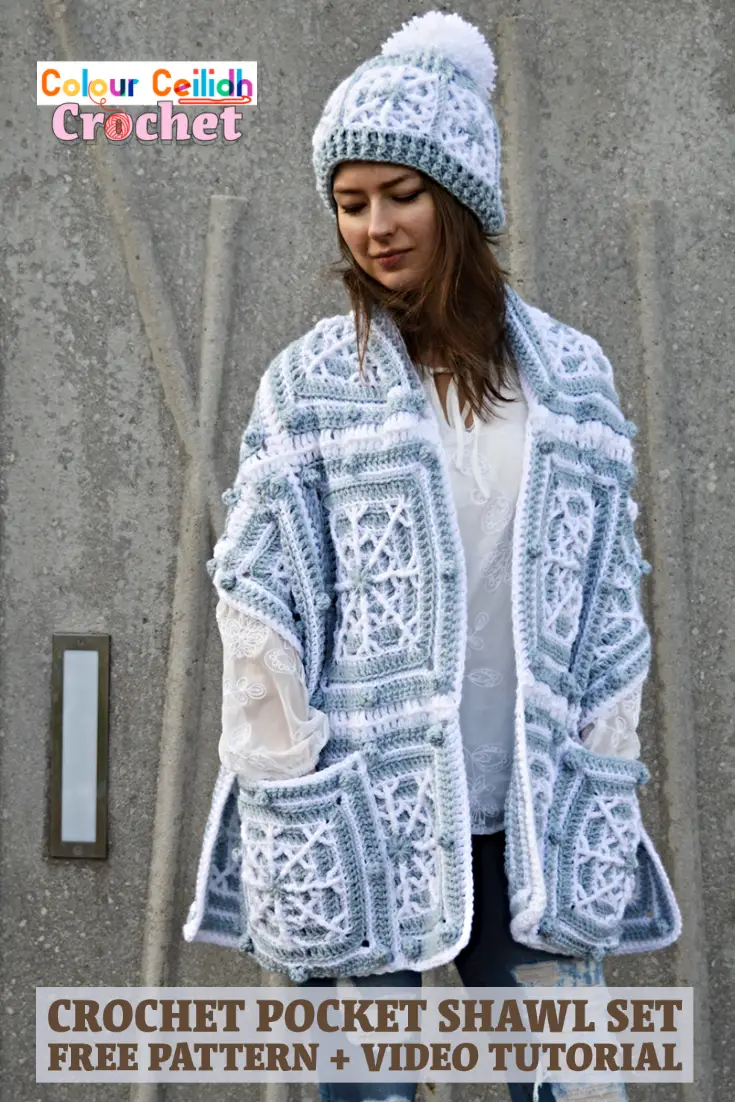
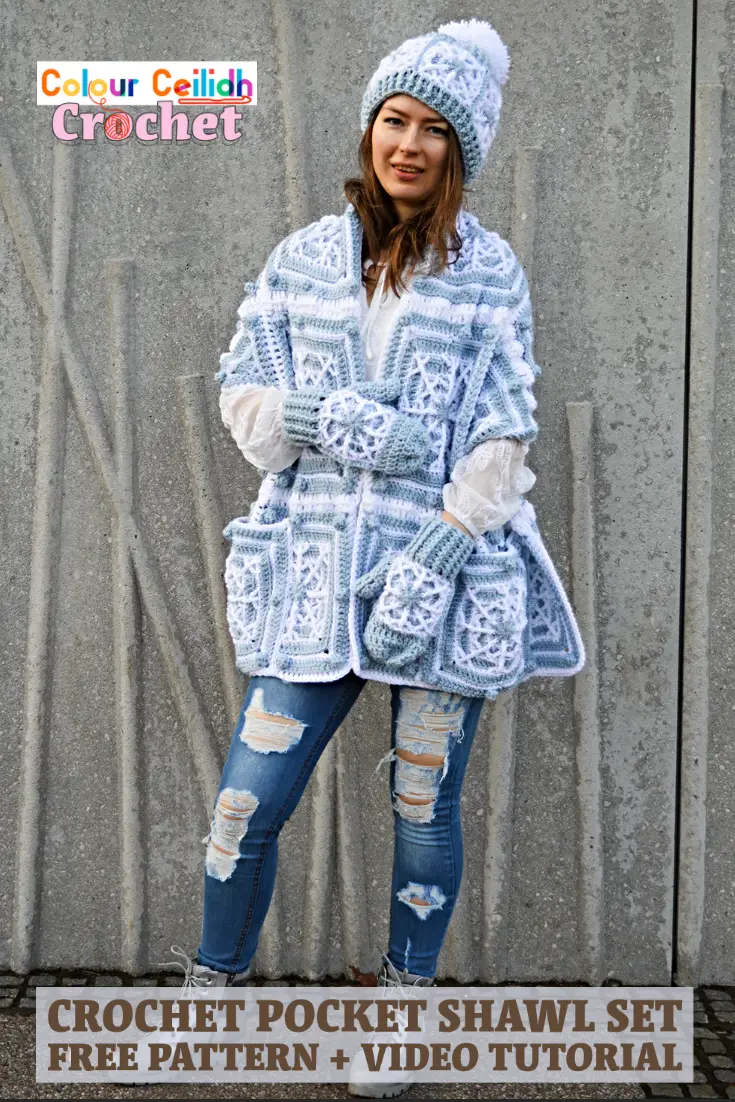
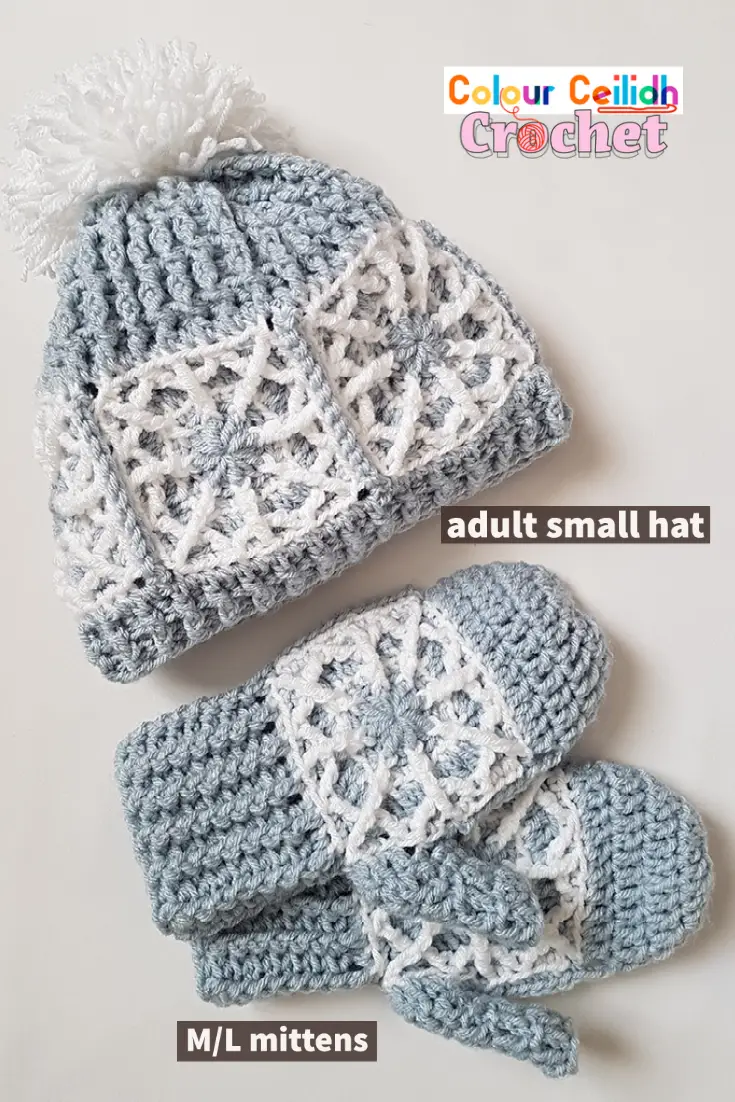
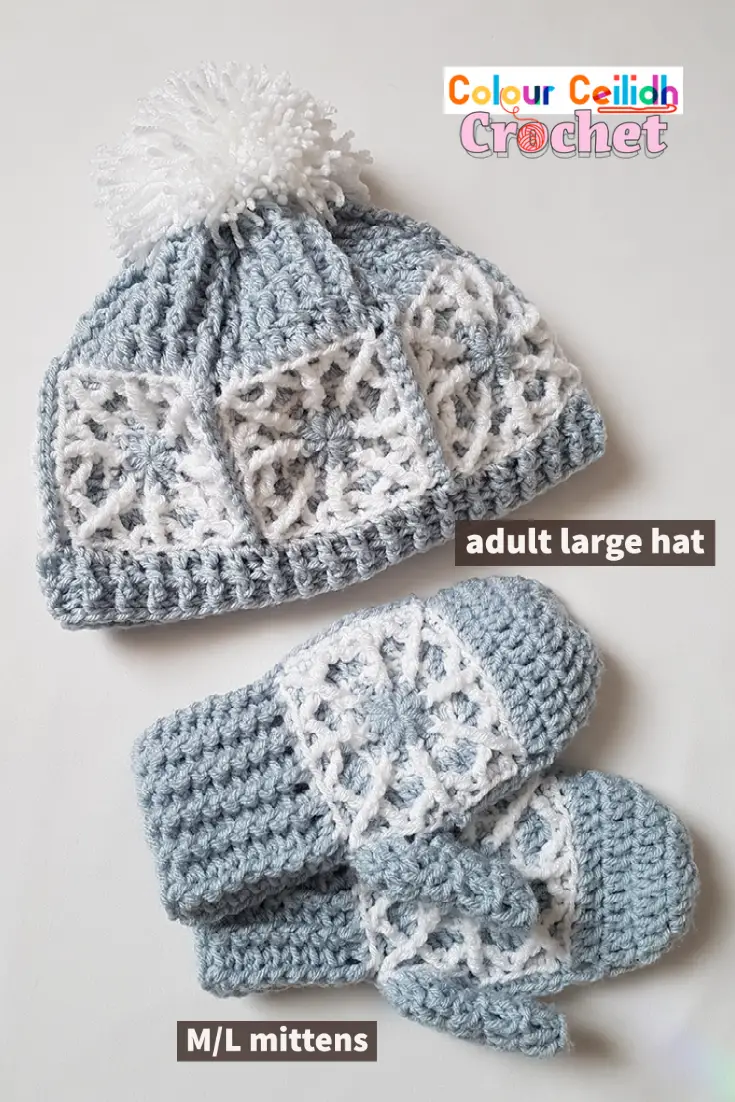
This Crochet Pocket Shawl Set Snowflake Free Pattern makes a perfect gift set. Made with a solid crochet snowflake motif it includes a hat and mittens to keep you warm and cozy in the winter.
You can also choose to use the solid snowflake motif as an afghan block and make a stunning winter blanket or a throw. Another idea is to make a crochet scarf!
This post contains affiliate links to products. I may receive a small commission for purchases made through these links.
The Yarn
I decided to try the popular Lion Brand Vanna’s Choice. It really does feel the way it looks in the pictures online. And it’s got the qualities I look for in yarn. It’s soft, light, fluffy and very “garmenty” lol! I mean it’s not just your blanket yarn, the kind that you make something with and put it away or use rarely. It’s the kind of yarn that you want to make things with to wear close to your body, and can’t seem to get enough of.
The Design
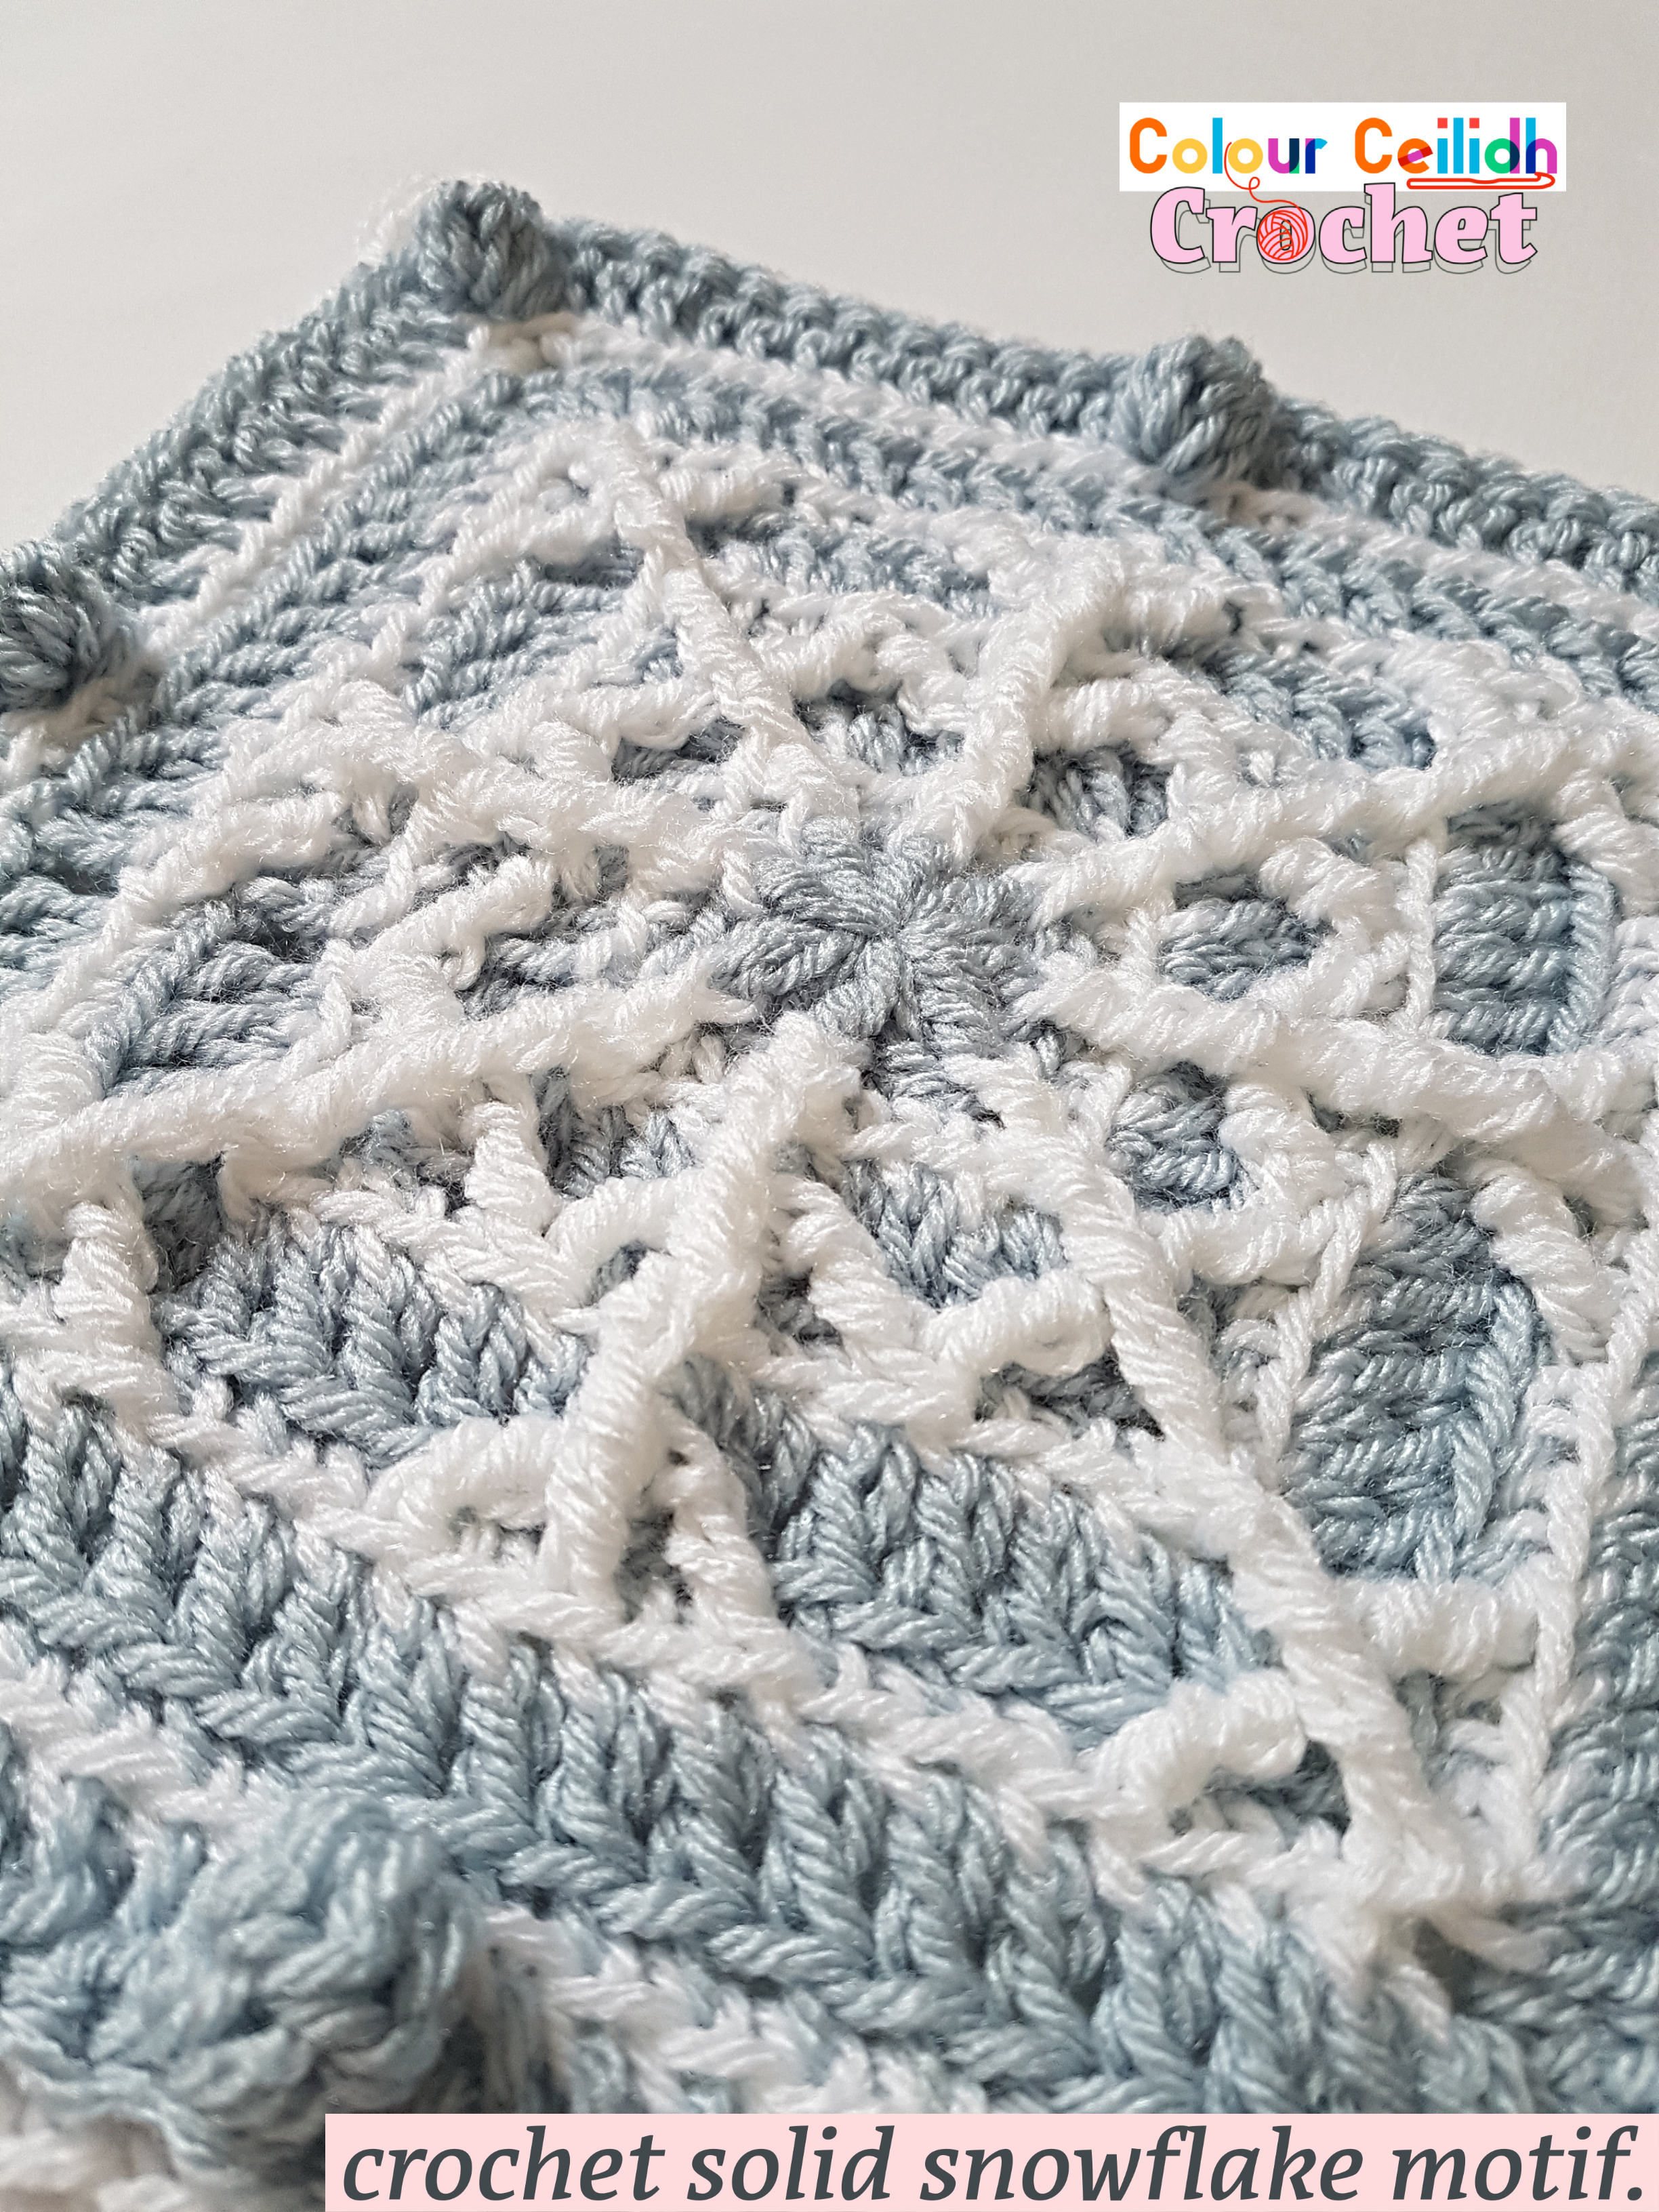
I really wanted to make something with a white snowflake in a blue background this winter. And I wanted it to be a solid design, not lacy. Also I wanted a simple yet effective design (my favourite kind!). And once again I couldn’t find anything I liked on the net…
And that is where you guys, the crochet community, came into play to help my thinking process. I noticed a few requests for crochet pocket shawls on Facebook. So I thought, why don’t I make one? I went and made one for the fall season, my easy beginner friendly crochet pocket shawl Autumn Berries.
And then I thought, why don’t I make a crochet pocket shawl with snowflakes for the winter? I need a warm wrap or an oversized scarf anyway… And wouldn’t it be great if I could make a set complete with a matching hat and mittens?.. As my ears and hands often get cold… Then I would be sorted this winter 🙂
I really wanted to make those clear snowflake lines that are a “+” and an “x” overlapped with each other, and those little “v’s” to decorate the lines. The motif came out pretty much the same way I used to draw snowflakes when I was little, which I’m very happy about.
I also added some bobbles around the edge to accentuate the beautiful straight lines of the snowflake.
The Stitches
This crochet snowflake motif uses mainly double crochet and single crochet stitches together with some front post stitches and a bobble here and there. The fourth round uses front post treble two together. The front posts come in two types, the treble and the double treble. And that’s about it in terms of difficulty! Like I said, I really wanted to make this as simple as possible.
There’s no shaping in the hat, it’s just a few motifs joined together with single crochet and a few rows of ribbing on the top and the bottom of the hat. (Oh I love how a few rows of ribbing can make my creations look so cool!)
The only shaping in the mitten going on is the double crochet three together in the finger. Once per finger.
Crochet Pocket Shawl Set Snowflake – Free Pattern
- PIN it for later.
- Add this pattern to your Ravelry queue.
- Ready to crochet but don’t want the ads in your way? PRINT it here*.
* – a lovingly made PRINT FRIENDLY version for a small fee.
Description
This crochet Snowflake pocket shawl set, free pattern includes the snowflake hat and a pair of mittens, all made with my solid non lacy snowflake motif for warmth. The hat is easily completed by adding some ribbing and a large pom pom after you join the motifs. And the mittens have an easy ribbed cuff, a double crochet top with no shaping and a double crochet finger with minimum shaping. The written pattern includes a video tutorial.
Sizes
The shawl is one size but quite large. It measures about 173 X 55 cm / 68.1 X 21.7 in.
The hat comes in adult small (for head circumference: 53 – 58.5 cm / 21 – 23 in) and adult large (for head circumference: 56 – 61 cm / 22 – 24 in)*.
The mittens are M/L. The model’s hand circumference is 7.5 in and the mittens feel quite roomy and comfortable inside.
Model wears one size pocket shawl, an adult large hat and M/L mittens. Model is 5’7 ft and the shoulder width is approx 14.5 in.
*I personally have my kids wear adult small sizes because I find kids’sizes are too small for them. They’re 5, 7 & 8 and their head circumference range is 52 -54 cm / 20.5 – 21.3 in.
Care Instructions
The Lion Brand Vanna’s Choice yarn is a 100% acrylic. It’s machine washable at 30 C / 86 F.
Pattern Notes
- Project difficulty: Intermediate but my video tutorial makes it easy!
- My bobbles naturally stick out to the back, so I turn the motif to make them and work into front loops instead of back loops. And then turn again when the row is finished. But if yours stick out to the front, then it’s even easier. You’ll stay on the same side without turning and work into back loops like in all other rows.
- Corner stitch: for example, if there are 3 double crochet stitches in the corner, the corner stitch will be the one in the middle.
- Mid row stitch: the stitch in the middle of the row. No need to count. Usually easy to find because the snowflake lines are pointing to it.
- There is a stitch count at the end of each round in brackets. Ch-3 and a bobble count as a stitch but ch-1 doesn’t.
- Bear with me if the pattern seems a tad strange in a couple of places. E.g. in round 2 there are all these stitches made in the same stitch. I’ve perfected this pattern over three attempts to solve problems like bulging and lines not meeting together. So this particular stitch has to be the corner stitch to solve that problem. (Both of the problems, actually!)
- The written instructions for the hat and the mittens are less formal and more descriptive as I found it easier to describe what I’m doing which I think makes it less complicated and not so “dry”.
- UPDATE (Feb 17 2021): rnd 10 stitch count was corrected from 120 to 112. Sorry for the inconvenience if you had purchased the pattern PDF before this date.
- Sourcing the yarn: Amazon, Lion Brand website, LoveCrafts, Deramores
No Tails Color Change, Only Two Tails Per Motif
If you’re worried about weaving in all those ends, don’t be. I’ve perfected a way to use the magic knot that easily gets rid of all the tails from color change between the rounds. So you’re left with just two tails per motif!
In the video for this pattern I briefly show you how to change color leaving no tails. You can find a more detailed tutorial and video here: No Tails Color Change In Crochet.
Snowflake Pocket Shawl Set Video Tutorial
This link takes you to my Youtube channel to view the video tutorial for this pattern:
Crochet Snowflake Pocket Shawl, Hat & Mittens
Materials
- Lion Brand Vanna’s Choice (4 / Medium / Aran weight, 100 g / 3.5 oz, 156 m / 170 yd, 100% acrylic). Pocket shawl: 5 skeins in Silver Blue, 4 skeins in White. Hat only: 2 skeins in Silver Blue, 1 skein in White. Mittens only: 2 skeins in Silver Blue, 1 Skein in White. Hat and mittens: 3 skeins in Silver Blue, 1 skein in White. Whole set: 8 skeins in Silver Blue, 5 skeins in White.
- Size J / 6 mm crochet hook.
- Scissors.
- Yarn needle.
Gauge
Four rounds of the solid snowflake motif measure about 10 cm / 4″. And the full ten rounds measure about 27 cm / 10.6″.
Abbreviations (US Terms)
- blo: back loop only
- BPdc: back post double crochet
- ch: chain
- dc: double crochet
- dc5tog: double crochet five together, or the bobble stitch. Work 5 double crochet stitches into the same stitch leaving the last loop of each on the hook. So yarn over, insert hook in the indicated stitch, yarn over and pull through, yarn over and pull through 2 loops and stop there. Repeat 4 more times. Yarn over and draw through all loops on hook
- flo: front loop only
- FPdc: front post double crochet
- FPdtr: front post double treble. As a reminder, yarn over 3 times
- FPtr: front post treble. As a reminder, yarn over 2 times
- FPtr2tog: front post treble two together. Partially work the first FPtr around the indicated post stopping at the last two loops on the hook. Work the second FPtr around the second indicated post until you have one loop for this FPtr left, and 3 loops on hook in total. Yarn over and pull through all 3 loops.
- rep: repeat
- sc: single crochet
- sl: slip
- sliding loop: magic loop, magic circle, adjustable loop, magic ring, adjustable ring, drawstring ring
- st: stitch
- t: turn
Pattern Overview
- The shawl: make a rectangle of 6 X 2 motifs (10 rounds each) joined together as you go. Make 2 more for pockets and stitch them on.
- The hat: make 5 (adult small) or 6 (adult large) motifs (4 rounds each), join them in a line with single crochet, add 3 rows of ribbing at the bottom and 8 rounds of ribbing at the top. Seam the side, close the opening at the top and attach a large pom pom.
- The mittens: make 4 motifs (4 rounds each). Take 2 motifs reverse sides touching on the inside. Join one full side with single crochet, make 8 rounds of ribbing for the cuff, join with single crochet from half way up on the other side, make 4 rows of double crochet for the top and close the opening. Make the finger. Repeat for the second mitten.
Pattern
This free pattern for the crochet Snowflake pocket shawl set is broken into the Solid Snowflake Motif, Snowflake Pocket Shawl, Snowflake Hat and Snowflake Mittens.
The following are the pattern repeats used throughout:
Snowflake corner sequence: Sc-blo in next st, (sc-blo, ch 1, FPdtr around last white corner post, ch 1, sc-blo) in next st, sc-blo in next st
Snowflake mid row sequence: Sc-blo in next st, FPdtr around last white mid row post, skip next st, sc-blo in next st
Start with Silver Blue and alternate with White in every round (so blue, white, blue, white…). The last round is White.
Solid Snowflake Motif
Begin with sliding loop.
Rnd1 Ch 3 (counts as st), 15 dc in ring; join with sl st to top of ch-3. (16 sts)
Rnd2 (Ch 1, sc-blo, ch 1, FPdc around post directly below, ch 1, sc-blo) in same st (corner made), *sc-blo in next st, FPdc around next post (skip crocheting into top of this dc), sc-blo in next st, (sc-blo, ch 1, FPdc around post directly below, ch 1, sc-blo) in next st; rep from * around; join with sl st to first sc-blo. (32 sts)
Rnd3 Ch 3 (counts as st), dc-blo in next st and every st, placing 3 dc-blo in every corner st; join with sl st to top of ch-3. (40 sts)
Rnd4 Ch 1, *FPtr2tog over mid row and corner posts from last rnd, skip 2 sts, snowflake corner sequence, FPtr2tog over corner and mid row posts from last rnd, skip 2 sts, snowflake mid row sequence; rep from *, join with sl st to top of first FPtr2tog. (48 sts)
Rnd5 Same as rnd3. (56 sts)
Rnd6 Ch 1, *FPtr around mid row post from last rnd, skip 1 st, sc-blo in next st two times, FPtr around corner post from last rnd, skip 1 st, snowflake corner sequence, FPtr around corner post, skip 1 st, sc-blo in next st 2 times, FPtr around mid row post from last rnd, skip 1 st, snowflake mid row sequence; rep from * around, join with sl st to top of first FPtr. (72 sts)
Rnd7 Same as rnd3. (80 sts)
Rnd8 Ch 1, sc-blo in same st and every st, placing 5 sc-blo in each corner st, t. (96 sts)
Rnd9 Ch 3, dc-flo in next st and every st except make dc5tog-flo in every mid row st and (dc-flo, dc5tog-flo, dc-flo) in every corner st, t. (104 sts)
Rnd10 Same as rnd3. Fasten off. (112 sts)
Snowflake Pocket Shawl
With your motifs you need to form a 6 X 2 rectangle. Make your first full motif (10 rounds). After that, make 9 rounds. Start and end your 10th round as usual but start joining in the corner when you have one full side left to do in the last round.
To Join As You Go
Make your first post in the corner. Remove hook and insert hook front to back through the space between 2nd and 3rd post of the motif you are joining to. Now pick up the loop, chain 1 and make the next post in the next stitch. Every time you complete a post, *remove hook and insert hook front to back through the corresponding symmetrical / mirror image space of the motif you are joining to. Pick up the loop and chain 1 to secure the join. Then make the next post in the next stich. Rep from *.
For more details, such as tackling corners, see the video!
Pockets
After you make your 6 X 2 rectangle, make 2 more motifs for the pockets as follows. Make 9 rounds as usual and make the 10th round the same as round 8 (stitch count in rnd 10 becomes 120). Fasten off. Then stitch them on the ends of the shawl. I positioned them in the centre.
Snowflake Hat
Make 5 (adult small) or 6 (adult large) motifs, 4 rounds each and fasten off. Now join them in a line (in other words, with your motifs make a 5 X 1 or a 6 X 1 rectangle) through back loops only with a single crochet in Silver Blue.
How To Join Squares With Single Crochet
To join new yarn for connecting your motifs with a single crochet, you can use the slip stitch method.
I joined yarn, then chained 1, then inserted hook through the back loops of the next stitch, made a single crochet in this and the next stitch until one full side was completed. And then I fastened off.
Add The Ribbing
Join Silver Blue with the slip stitch method in the top right corner of your hat rectangle, facing the right side. Chain 3 and make a double crochet back loop only in next stitch and each stich accross, turn. Chain 2, *front post double crochet around the next post, back post double crochet around the next post. Repeat from *, turn. Make the third row of ribbing the same way and match front with front and back with back posts. Fasten off and turn your rectangle upside down.
Still facing the right side, add 8 rows of ribbing at the top in the same way and fasten off.
Seam And Close The Opening
Take a yarn needle and seam the side of the hat (you might want to join the motifs with single crochet instead of seaming them and seam what’s left, for consistency). With the yarn needle weave it through the back loops of every second stitch of the last round at the top of the hat. Now pull by the yarn on the needle to close the opening and secure it.
Add A Large Pom Pom
I made the pom pom in White using these simple and quick instructions by the Pattern Paradise for a large pom pom. I used about 30 g of yarn. And I wrapped the yarn around a 4.8 ” / 12 cm wide piece of cardboard around 150 times.
Snowflake Mittens
Make 4 motifs, 4 rounds each, and fasten off.
Both mittens are made the same way.
Join The First Side Of Mitten
First, take 2 motifs and lay them on top of each other, reverse sides facing each other. We are joining one full side with single crochet and making the cuff without breaking the yarn. Join Silver Blue with the slip stitch join, insert hook through the corner (through all 4 loops). Yarn over and pull though all loops (or yarn over, pull through and make a slip stitch). Chain 1 and single crochet back loop only in the next stitch and every stitch, ending with a single crochet in the corner (through all 4 loops, so the stitches don’t overstretch as you wear the mitten). We completed the side of the mitten and now we’re making the cuff.
Make The Cuff
Chain 3 and start making a double crochet back loop only along the side of the first motif. Then when you reach the corner, yarn over and insert hook front to back through both loops of first motif’s corner and second motif’s corner and complete the double crochet. Continue making a double crochet back loop only on the second motif. Join with a slip stitch to the top of the chain-3. First round complete.
Chain 2, *front post double crochet around the next post, back post double crochet around the next post. Repeat from * around. Join with a slip stitch to the top of chain-2.
Repeat second round until you have 8 rounds of cuff in total, fasten off.
Join The Second Side Of The Mitten Half Way
With Silver Blue, slip stitch join at a half way or mid row point on the other side of the mitten (through 4 loops) to leave an opening for the thumb. Complete joining the side with single crochet through back loops. End with a single crochet in the corner (through all 4 loops).
Make The Top Of The Mitten
Without breaking the yarn, chain 3 and make a double crochet back loop only around the top of the mitten, except in the corner where you insert the hook front to back through both loops of the first corner and the secod corner so you have one post per both corners. Join with a slip stitch to the top of chain-3.
Make the second round the same but make regular double crochet stitches and crochet through both loops.
Repeat until you have 4 rounds in total. Close the opening the same way as for the hat.
Make The Thumb
Join Silver Blue with the slip stitch join. Locate the front post treble two together in the thumb opening. Insert the hook through the back loop of that stitch, chain 1 and single crochet back loop only in the same stitch and the next stitch. Insert hook front to back through both loops of the next stitch and again the next stitch and make a single crochet. Single crochet back loop only in the next stitch two times. Double crochet back loop only in the next stitch 3 times. Yarn over, insert hook front to back through both loops of the current motif’s corner and the other motif’s corner and make a double crochet. Double crochet back loop only in the next stitch three times. Join with a slip stitch in the first single crochet back loop only.
The second round is the same. Match single with single and double with double crochet stitches but crochet through both loops and make a double crochet 3 together over the 3rd, 4th and 5th double crochet stitches from the last round at the bottom of the thumb to get rid of the extra bulk.
For round three, make a single crochet for every single crochet and a double crochet for every double crochet and join with a slip stitch to the first single crochet.
In rounds four and five, make double crochet stitches in every stitch, fasten off. Close the opening the same way as with the hat.
More Ideas
This beautiful beginner friendly easy pocket shawl is by Crochet Dreamz. This Pine Gap pocket shawl by Stitching Together is made with modern granny squares. And this blocked puff stitch pocket shawl is by Crochething.
My crochet pocket shawl Autumn Berries was featured in 20 Crochet Pocket Shawls You’re Going to Want to Wear All Year Long by love. life. yarn.
Well Done!
I hope you enjoyed this free pattern for the Snowflake crochet pocket shawl set. What should I crochet next? See you in my next adventure!
Happy crocheting!
Justina