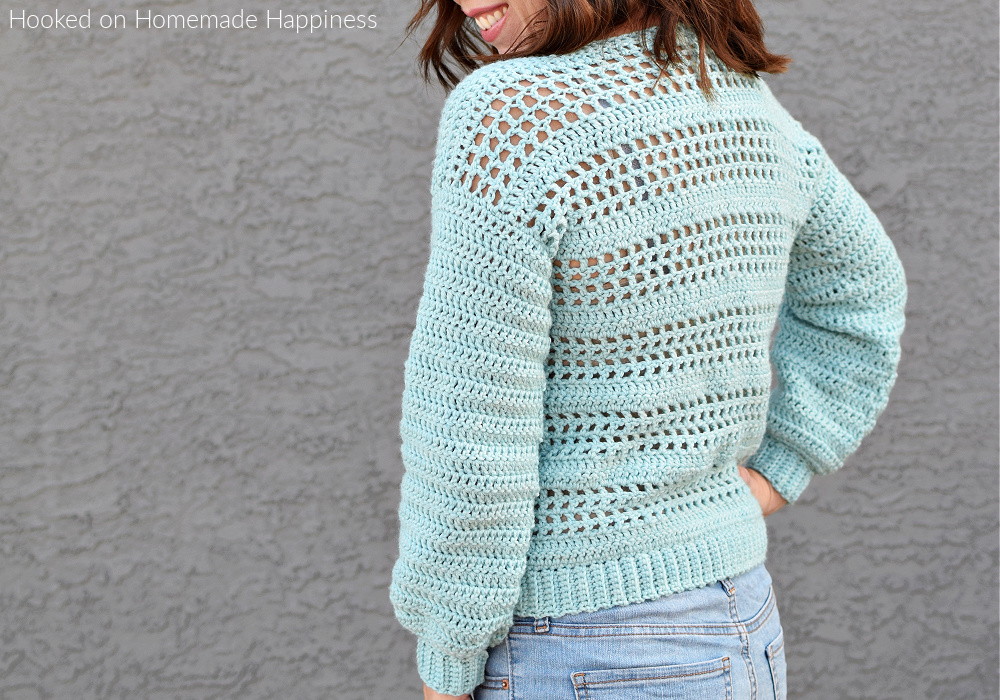
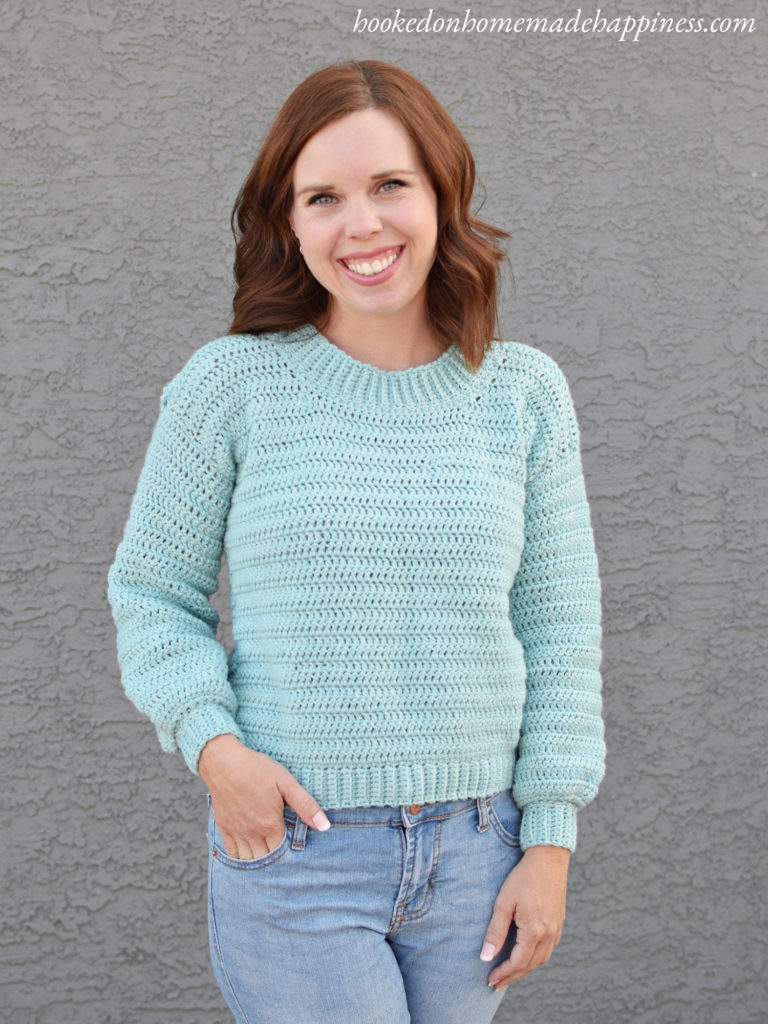
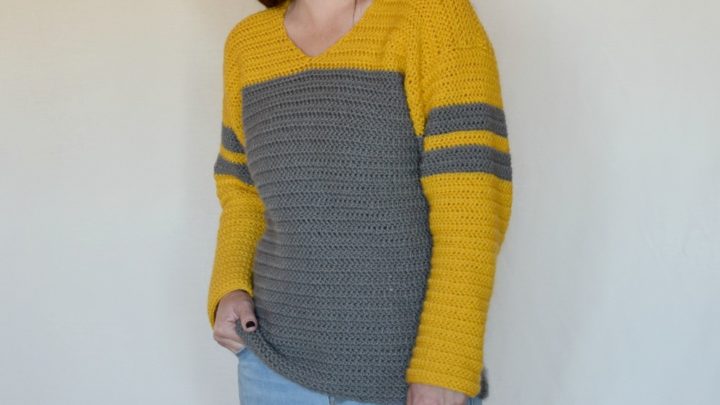
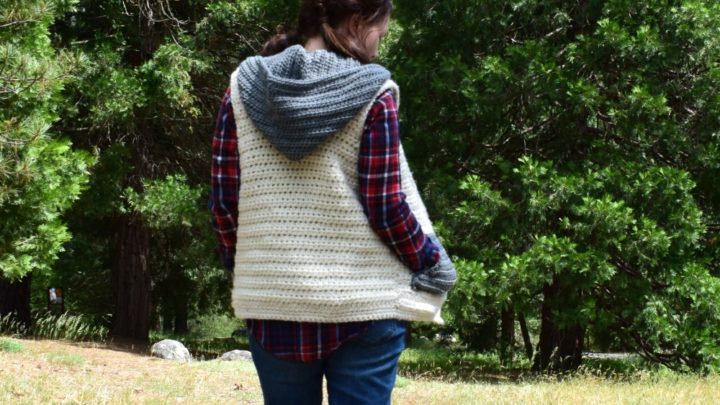
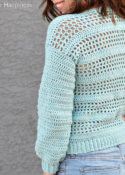
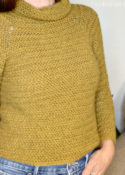
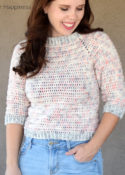
For this Simple Eyelet Sweater Crochet Pattern, there is a full video tutorial! The front of the sweater is a solid piece, made with all double crochet. The back has the open, see through look that is just so cute! I like to wear it with a brightly color tank top. Even just a sports bra would be adorable!
This pattern has been modified from the original version. You can find the original pattern linked HERE.
click here to pin for later >>>
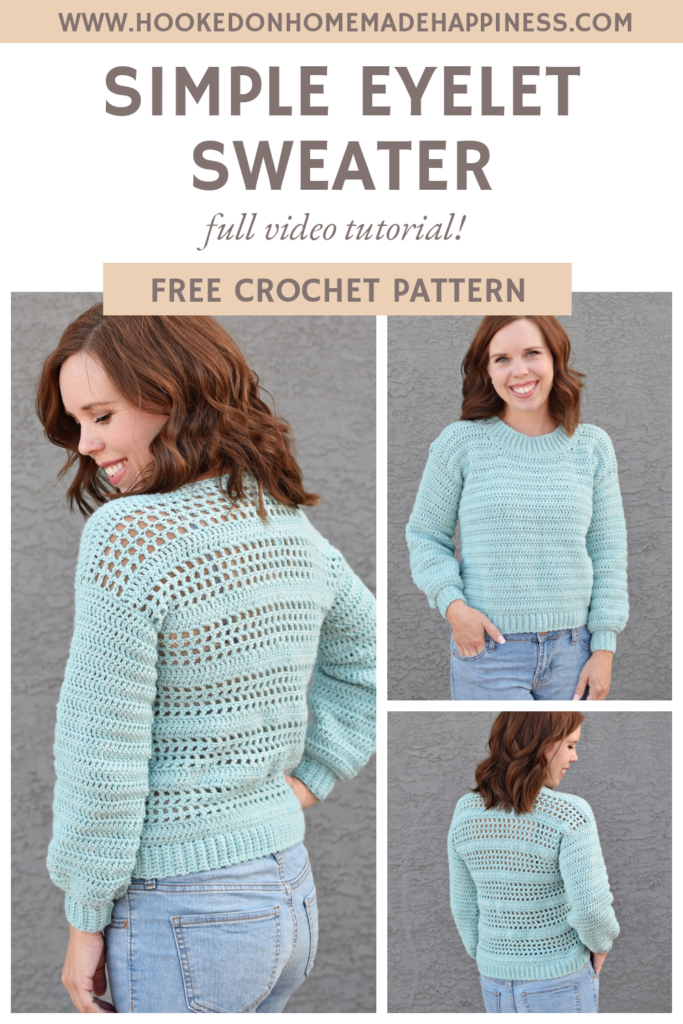
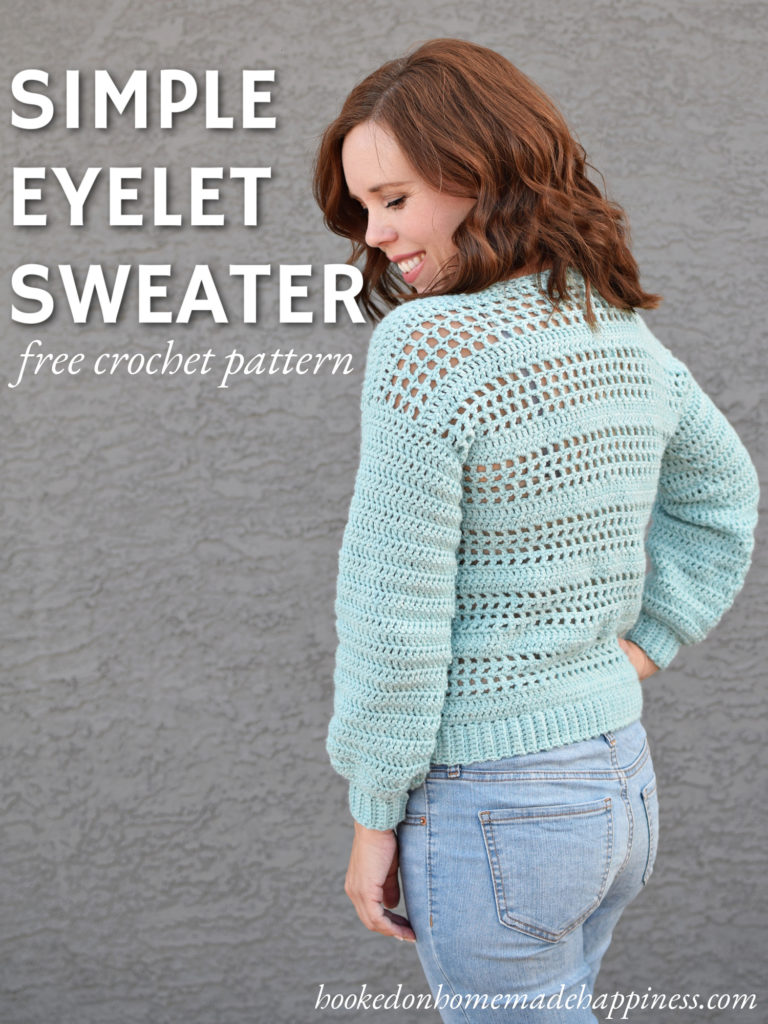
Simple Eyelet Sweater Crochet Pattern
Get the complete free pattern below or get the ad-free, printable PDF in my Ravelry Shop
PIN for later HERE
Add to your Ravelry Queue HERE
Materials
WeCrochet Swish Worsted in Wonderland Heather (9skeins/990yds for S, 10skeins/1,100yds for M, 11skeins/1,210yds for L, 12skeins/1,320yds for XL, 13skeins/1,430yds for 2X, 14skeins/1,540 yds for 3X)
H/5.0 mm hook
yarn needle
scissors
stitch markers
Level
intermediate
Pattern notes & stitches to know
ch – chain
sl st – slip stitch
sc – single crochet
sc blo – single crochet back loop only
dc – double crochet
dc2tog – double crochet 2 together
dc3tog – double crochet 3 together
sc2tog – single crochet 2 together
· written in US terms
· ch 1 does not count as sc
· ch 3 counts as dc
· ch 4 counts as dc + ch 1
· This sweater is made with 2 panels sewn together. Each panel starts at the bottom with the ribbed edging. Then the panels are sewn together across each shoulder and each side with a whip stitch.
Gauge: 14 dc x 9 rows = 4” x 4”
Sizes:
S, M, L, XL, 2X, 3X – The pattern is written in these sizes consecutively. Example, when the pattern gives the end of the row count as ((65, 79, 93) (107, 121, 135) dc) 65 is for S, 79 is M, 93 is L, 107 is XL, 121 is 2X, and 135 is 3X.
This sweater is classic fit with some positive ease.
Approx Finished Size:
Bust: S (34”) M (38”) L (42”) XL (46”) 2X (50”) 3X (54”)
Length: S (19”) M (19”) L (21.75”) XL (21.75”) 2X (24.5”) 3X (24.5”)
Armhole Depth: S (6.5”) M (7”) L (7.5”) XL (8”) 2X (8.5”) 3X (9”)
Sleeve Length (from round 1 of sleeve): S (16.5”) M (17”) L (17.5”) XL (18”) 2X (18.5”) 3X (19”)
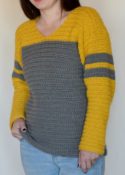
Size S pictured. I’m 5’0” with 34” bust.
SIMPLE EYELET SWEATER CROCHET PATTERN
>>>FULL VIDEO TUTORIAL<<<
BACK PANEL
Ch 9 (leave a long end for sewing)
Row 1: sc in 2nd ch from the hook and in each ch across (8 sc)
Row 2: ch 1, turn, sc in first stitch, sc blo in next 6, sc in last (8 sc)
Row 3 – Row (65, 79, 93) (107, 121, 135): repeat row 2 (8 sc)
The ribbing is the width of the sweater, easily adjust the width by adding or taking out rows. Make sure to have an odd number of rows
Now you will turn and work across the long edge of the ribbed band
Row 1: ch 1, sc evenly across working 1 sc in the end of each row ((65, 79, 93) (107, 121, 135) sc)
Row 2: ch 3, turn, dc in each stitch across ((65, 79, 93) (107, 121, 135) dc)
Row 3: ch 3, turn, dc in each stitch across ((65, 79, 93) (107, 121, 135) dc)
Row 4: ch 4, turn, skip 1 stitch, dc in next, *ch 1, skip 1 stitch, dc in next* repeat from * to * across ((33, 40, 47) (54, 61, 68) dc)
Row 5 – 7: ch 4, turn, skip ch-1 space, dc in dc, *ch 1, skip ch-1 space, dc in dc* repeat from * to * across ((33, 40, 47) (54, 61, 68) dc)
Row 8: ch 3, turn, *dc in ch-1 space, dc in dc* repeat from * to * across ((65, 79, 93) (107, 121, 135) dc)
Row 9: ch 3, turn, dc in each stitch across ((65, 79, 93) (107, 121, 135) dc)
Row 10 – Row (39, 39, 45) (45, 51, 51): repeat rows 4 – 9
Fasten off. Leave a long end for sewing.
FRONT PANEL
Ch 9 (leave a long end for sewing)
Row 1: sc in 2nd ch from the hook and in each ch across (8 sc)
Row 2: ch 1, turn, sc in first stitch, sc blo in next 6, sc in last (8 sc)
Row 3 – Row (65, 79, 93) (107, 121, 135): repeat row 2 (8 sc)
The ribbing is the width of the sweater, easily adjust the width by adding or taking out rows. Make sure to have an odd number of rows
Now you will turn and work across the long edge of the ribbed band
Row 1: ch 1, sc evenly across working 1 sc in the end of each row ((65, 79, 93) (107, 121, 135) sc)
Row 2 – Row (30, 30, 34) (34, 38, 38): ch 3, turn, dc in each stitch across ((65, 79, 93) (107, 121, 135) dc)
The neckline begins in the next row. Only work partway across
Row (31, 31, 35) (35, 39, 39): ch 3, turn, dc in (19, 23, 29) (33, 37, 41) stitches, dc3tog ((21, 25, 31) (35, 39, 43) dc)
Row (32, 32, 36) (36, 40, 40): ch 3, turn, dc2tog, dc in remaining stitches across ((20, 24, 30) (34, 38, 42) dc)
Row (33, 33, 37) (37, 41, 41): ch 3, turn, dc across to last 2 stitches, dc2tog ((19, 23, 29) (33, 37, 41) dc)
Row (34, 34, 38) (38, 42, 42) – Row (39, 39, 45) (45, 51, 51): ch 3, turn, dc in each stitch across ((19, 23, 29) (33, 37, 41) dc)
Fasten off. Leave a long end for sewing.
Lay front panel so the neckline just made lays on the right. Rejoin yarn on left side, (23, 27, 33) (37, 41, 45) stitches in from the left on Row (31, 31, 35) (35, 39, 39).
Row (31, 31, 35) (35, 39, 39):: ch 3, dc3tog, dc in remaining stitches across ((21, 25, 31) (35, 39, 43) dc)
Row (32, 32, 36) (36, 40, 40): ch 3, turn, dc in each stitch across to last 2 stitches, dc2tog ((20, 24, 30) (34, 38, 42) dc)
Row (33, 33, 37) (37, 41, 41): ch 3, turn, dc2tog, dc in remaining stitches across ((19, 23, 29) (33, 37, 41) dc)
Row (34, 34, 38) (38, 42, 42) – Row (39, 39, 45) (45, 51, 51): ch 3, turn, dc in each stitch across ((19, 23, 29) (33, 37, 41) dc)
COLLAR
Ch 1, turn, sl st in each stitch across so the yarn is on the inside of the neckline
Ch 1, sc along the inside of the neckline, working 2 sc in the side of each dc down the first side. Sc in each stitch across the bottom of the neckline. 2 sc in the side of each dc working up the side of the neckline.
ch 9
Row 1: sc in 2nd ch from the hook and across, join to sc in the sc row of the collar with sl st (8 sc)
Row 2: sl st to next stitch in the sc row of the collar, turn, sc in first stitch, sc blo in next 6, sc in last stitch (8 sc)
Row 3: ch 1, turn, sc in the first stitch, sc blo in next 6, sc in the last stitch, sl st to the next sc in the sc row of the collar (8 sc)
Repeat rows 2 & 3 until you work all the way around the collar.
Fasten off. Weave in the ends.
SEWING
Lay the front panel on top of the back. Sew the shoulders closed with whipstitch. Sew the sides closed leaving a (6.5”, 7”, 7.5”) (8”, 8.5”, 9”) space at the top for armholes.
Fasten off. Weave in the ends. Turn right side out.
SLEEVES
Join yarn to the bottom of an armhole
Round 1: ch 1, sc evenly around the armhole, join to first sc with sl st
Round 2: ch 3, turn, dc in each stitch around, join to first ch 3 with sl st
Round 3 – Round (30, 31, 32) (33, 34, 35): ch 3, turn, dc in each stitch around, join to first ch 3 with sl st
Or until desired sleeve length before the cuff
Round (31, 32, 33) (34, 35, 36): ch 1, turn, sc in each stitch around, join to first sc with sl st
Round (32, 33, 34) (35, 36, 37): ch 1, turn, sc2tog around, join to first sc with sl st
Round (33, 34, 35) (36, 37, 38): ch 1, turn, sc in each stitch around, join to first sc with sl st
CUFF
ch 9
Row 1: sc in 2nd ch from the hook and in each ch across, join to the last round of the sleeve with sl st (8 sc)
Row 2: sl st to next stitch in the last round of the sleeve, turn, sc in first stitch, sc blo in next 6, sc in last stitch (8 sc)
Row 3: ch 1, turn, sc in the first stitch, sc blo in next 6, sc in the last stitch, sl st to the last round of the sleeve (8 sc)
Repeat rows 2 & 3 until you work all the way around the sleeve. Sew the cuff closed with a whip stitch
Fasten off. Weave in the ends.
Repeat for other sleeve
Looking for more patterns? Follow me on Facebook, Instagram, and Pinterest! Please share a pic of your finished product with me. I’d love to see it!


I completely love this sweater ! But I don’t know if I will make it with two open sides or the open side on the front… Anyway, I’m gonna make it ! 🙂
Thanks!! Either way will be cute ?
Comment recevoir ou commander les tutos en français merci
jojonono2009@hotmail.fr
Recevoir le tuto ( explications) en français merci
Comment recevoir les explications en français svp ?
Is this written in English or US crochet terms
US
Im thinking of doing 2 sweaters, 1 with both sides like the front of this one, and 1 with both sides of the back of it,
Hi
I know this prob sounds stupid but I am new at crocheting and was just wondering- in this pattern The simple crochet sweater pattern, how come it only has 9 ch to cast on? Where does the rest of the width come from. Sorry so confused?
Hi! The sweater starts with the ribbing. After you do the ribbing it will turn and you’ll work across the long edge (this is the width). Hope that helps!!
the chain 9 is for the bottom ribbing, you’ll work the rest of the sweater using that entire length of that as your base. Hope I am wording that in a way that makes sense??
I LOVE the back and would like to add some type of detail to the front. Any suggestions?
Hi! You can do the same design for the front or a different variation of that 🙂
On the back panel, rows 4-11, what is the last stitch before you turn and chain? Is it the dc or the chain 1?
Would be very nice to make it open in the front. Thank you for the idea ?
?
I am doing one with the back design the same on both sides I love it xx
I have having trouble with the sleeves. They actually decrease on its own for some reason. The sleeve keeps getting smaller as I go on. When I join the end of the row to the previous DC, is this done in the hole made by the ch3 or is it joined going through the top stitch of the ch3?
Hi! Join to the top of the ch 3 🙂
I was thinking of doing that same thing, : )
TY LOVE THIS SWEATER!!!
Hi…. Can I get the instruccions by e’mail to how to make the sweater in spanish or video on youtube??
Hi! I don’t sorry!
Can u pls provide the tutorial of this sweater…my daughter likes so much …I want to make this… thanks
Hi! I just have the written tutorial right now 🙂
Thank you very much! ? Do have video tutorial?
Not right now, sorry!
Hi, i love u’r tunic! If u should post the crochet- along again, would you please send me a link for it? I would like to try it for my mom for mother’s day.. Thank u for u’r lovely pattern. Please confirm whether i am on u’r mailing list. ☺
I would love to make this pattern. please put me on the mailing list.
Hi Audrey! Here’s the link for my mailing list: https://www.subscribepage.com/hookedonhomemadenewsletter
Classy design and straightforward instructions.
Thank you so much!
Breann excited to make this for a Christmas present. If you don’t mind me asking how tall you are so I can judge the pattern. Thank you. Donna
I’m 5’0″ 🙂
Can you send this to me via video. I do better when I see it done step by step. Plus I am just a beginner.
Please.
Lucy
Hi, I don’t have a video tutorial available.
Part of crochet is learning to read patterns. It is not difficult if you take it slowly. I read how to do it in a book years ago but no there are also videos on youtube like this one
Hi! The top is beautiful. Will it be okay if I make the back similar to the front. So , repeat the front twice and join? Thanks.
Thank you! And yes, that would be super cute 🙂
Nederlands patroon graag
I have never made a jersey before so am chuffed with this one. Just finishing the sleeves. Put my own spin on it a bit by doing two pattern repeats of the back just above the chest. Love it. Thank you so much.
That sounds so cute!!
I so want to make this!!
I was thinking the same as others:
Do 2 of the back.
Maybe i will also do 2 of the front and do short sleeves!
The writing is easy to follow. This will be my first top and would be easy to embellish
So excited
Thank you!!
I made it with short sleeves because I just had 2skeins, but it works great. I really love your instructions so good explanation! Thanks for shearing
Awesome! I’m so glad you liked the pattern 🙂
Why does row 4-7 have [39dc] but when row 9 starts and repeats rows 4-7 but is says [45]
Hi, that’s the row number, not the stitch count 🙂
I love the look of this sweater and have now made a start on it. Very easy pattern to follow. I still haven’t made up my mind if I am going to do the front the same as the back. I have to tonight because I am almost finished the back. I would like the sleeves to be long. How do I go about doing that?? I am fairly new to crocheting so need a little help 🙂
Thank you! When you get to the last row of the sleeve, you can just continue that row until it’s the length you want 🙂
Thank you Breann for your quick reply 🙂
I am on to the sleeves and because I am making them longer (to the wrist) do I do more decreases along the way?? thanks 🙂
No, I don’t think you’ll need to decrease further.
Can you make it without the sleeves?
Sure!
I like this top very much. A “younger” would probably like it open on both sides wearing a tank etc. underneath as you’ve suggested. I’m going to make this for the early fall. Thanks for sharing your work!
Thank you!!
Love it! I initially came to check it out assuming the front and back were the same. I like the open, airy, look.
Hello,
Sorry for the silly question but what is the weight of the yarn used? Is it 4?
Hi! Yes a weight 4 🙂
Not a silly question….in the write up she calls it a “category 4” so from that I would say 4.
Hope this helps.
Thank you…
“The band is he width of your sweater.” [slaps forehead] Genius! That way I just keep going till it’s the length I need. Why didn’t I ever think of that before? And why have I not seen that in a pattern before? Speaking of patterns, I started to copy and paste the pattern from this page into a document to print, then decided to just buy it for $1.99. Well worth it. It’s laid out very nicely with photos. I would’ve have spent a lot more than $1.99 worth of my time copying and pasting. Appreciate it.
Please could you tell the equivalent yarn for a UK crocheter.
Aran weight yarn in uk…according to my google search! But 5mm hook is generally Aran so figure it’s a safe guess.
Hello, I love this pattern but am confused about rows 3,4, and 5 ending with a chain1. Then one is supposed to chain 4 for the tun. Doesn’t this become a chain 5 then? Please help me understand what I’m missing. Thanks.
Hi! You should end the row with a dc in the turning ch.
That was the most easy and well explained pattern I’ve ever came across. Thank u so much Breann 🙂
By the way I choose to make the front same as the back and with sorter sleeves.
Thank you so much!!
I Love your pattern ,so easy to understand, Thank you Breann
Thank you!
Thanks for the super easy pattern it was my first big crochet project and it turned out lovely. ?
Awesome!! Thank you ?
the width and length is that based from craft yarn council woman size chart? Also is the width size based all the way around or just the front or back base?
The width across the front when the piece is laying flat. The width and length is based on the finished piece and gauge.
Made this “Simple Crochet Sweater” as my very first sweater and the instructions are so wonderful. I made the pattern on the front and back AND made it open in the front. It’s so simple and easy, thank you Breann!
Thank you so much!!
I not sure how to comment, anyway, I like this top but wonder if I could do the closed pattern for both front and back?
Definitely! 🙂
Hi Claudia,
I am not good at altering patterns….could you tell me how you made this sweater with the open front. Thank-you.
Jeannie
Love this pattern! What adjustments would I need to make when using a category 3 weight yarn?
Hi! Thank you so much! When starting with the ribbing along the bottom, I would just keep going until it’s the measured width (make sure there are an odd number of rows). Hope this helps!
Hello! Beginner here. I love this sweater! I managed to make the back piece with no issues, but am now struggling with the simpler front (go figure!). Does the chain 3 count as a double crochet? I was counting it and was ending up short on stitches… now I’m not counting it and I have extra?? Any help is much appreciated!
Yes, the ch 3 counts as a dc 🙂
Thank you!!
I would like to make this open in front. What about the excess at the neck and how could I finish it down the front? would like it to have a v neck. TIA
Has anyone tried making the sleeves without the decreases? How does that look or turn out?
Thanks!
I’m a bit large but would really like to make this sweater! Could you give me instructions for a size 3X?
Hi! I would use a sweater you own and base the sizing off that. The sweater starts with the ribbing along the bottom. This is the width of your sweater. Make the ribbing until it’s the width you want (must be an odd number of rows) and then follow the pattern. I hope this helps!!
Hi,
Could you tell me if this is in US or UK crochet terminology?
Can’t wait to make it!
Thanks!
US
I love the sweater, but I prefer a v-neck. Can you adapt this one or do you have a similar pattern with a v-neck.
Hi! I don’t have a v neck sweater :/
Hi Breann I’m on rows 4-7 and it says to chain 4. That counts as a dc plus chain one. Then to skip a stitch. I’m having trouble making the 45 stitches if I don’t dc in the same stitch as the chain 4. What am I doing wrong.
Hi! How many dc are in your previous row counting the ch 3?
Also, when you ch 4 and skip 1, your first dc with be in the 3rd stitch of the row.
Alright, I totally fell in love with sweater and made it up just as the pattern is written in Caron Plum Perfect and got a purple tank top for underneath. Breann, talk about gorgeous, I was so excited to add it to my wardrobe!!!! Bad thing though, I showed it to one of my bosses wife today and she ordered one from me. Then I showed my daughter this evening and she took it from me!!!! Well back to the store for more yarn. As you can see this is really a big hit around here!
Yayyy!!! Thank you so much for your comment ❤
Breann, I’m just finishing up number 5 (the one for my self, 3 daughters and the boss’s wife)!!! So in 4 weeks I’ve managed to make this many. I would say this is a crochet record for me!!!
Hi Breann!
First off all thank you so much for this pattern. I really fell in love with the simplicity of it. However now i reached row 8 of the back part i am slightly confused what to do with the last sentence which says: ‘ch space across’ I made the DC in every stitch, but do i know just chain one to then start row 9? just skip a stitch do then start row 9? or something i am just totally missing out on?
Thanks in advance!
Hi! In the previous row (row 7) it’s all dc and ch spaces. Then row 8 it’s a solid dc row. Make sure to dc in each dc and ch from the previous row. Hope that helps!
Hi I love this pattern, do you think it would work in a super bulky yarn and if so what hook size would you recommend? I’m in the UK. Thank you.
Hi! With super bulky yarn you would probably use a N hook. Check the yarn label to see what they recommend. But the sweater will come out larger than worsted weight. Measure as you go to make sure the fit it good 🙂
Thanks for replying so quickly, I’ll give it a go and see what happens ☺
This was a very lovely pattern .Thanks for sharing.I made 2 short sleeves one with both sides as the front panel and another one following yours.both came out beautiful!!
Yay! Thank you 🙂
Hi!Lovely design! SimplE and easy to follow as well for a beginner. Can the sleeves have ribbing as well. If so how many rows would be required for medium size. How to get the same type of fall as you have shown in the picture.
Hi! Yes the sleeve can have ribbing. They can be done separately and then sewn on to the end. I would make them as long as needed to fit around your wrist 🙂
Thank You for your prompt reply dear. But as per your pattern, I think you had continued crocheting around the armhole. So in that case, the ribbing has to be done separately and attached right?
Yes. Like I said the ribbing will be done separately and then sewn to the end of the sleeve. I can’t give you an exact row count since I don’t know exactly how wide your sleeves are. I would match the length up the best you can to the end of the sleeve 🙂
Thank you once again. What other finishing do you recommend for the finishing for the long sleeve other than ribbing? Do you think using a mix of front and the back would affect the sizing of the sleeves?
Hi! Love this pattern. Do you think it can be made in 2 colours? I want to go the front in the grey and the back in alternating grey/pink!
I think that would be so cute! You can do the solid rows pink with the open rows gray (or the other way around) 🙂
Is this US or U.K. crochet terms ? Please
US
Great blog.
Hey, I have a question. If I do my sleeves, why do they look so funny to me? how many stitches do you have at the beginning when you kit start your sleeve? I made the size M for me. And I have 46 sticks (2 sticks per stitch, at the beginning and in the middle only 1 stick), which I process. What’s wrong with my sweater? The sleeves open like angel wings. Can you help me, pls? I hope u understand my Englisch ?☺️
Hi! I think 46 stitches around sounds about right. You can do less if you think they’re too big. As long as it evenly around 🙂
Ok, thank you very much. I‘ll try it ?☺️ Best regards, Amina ?
No. I just can not manage it. I am in despair now. I have 46 stitches here and the sleeve is getting wider and wider. Why? That does not look good. ??? can I send you a picture by email? So you look at this?
Yes, email me at hookedonhomemadehappiness@gmail.com. Do you have the same amount of stitches in each round? It should not be getting wider.
Ok. Thank you. You have a mail 🙂
I’m about half done with the front… a little late to compare to the finished back. I made the band the same width on both sides. However, the front so far is way wider and shorter when comparing to the back. I knew it would be a little wider due to the fact rows 4-7 of the back are tighter. But this seems way off. Is it gonna work out ok once the panels are stitched together, you think? Should I add extra rows to the front (it would mean adding about 7 extra rows).
Or should I do the same number of rows as back and just stretch it when stitching them together so that the front rows match up with the back rows? I hope I’m making sense… I don’t know how else to describe what I’m seeing.
I see a comment below that answers my question regarding the width of the front being greater… but still not sure about the length being so much different. Right now, I have 22 rows done on the front. When I hold it up to the back, I’ve only reached about row 15 of the back. Maybe that clarifies it a little bit?
Hm… you can try blocking it to see if that helps
I just kept going. Just stitched the panels together, lining up the rows and it worked just fine! Thank you! I love it so far… just gotta get the sleeves on!
And thanks to you- I just googled what blocking is (I’m new to crochet). Always love learning new things!! 😉
Hi Breann,
I would to make this as a cardigan with Premier Cotton #2……what size would I do? Plus I would like short sleeve to the elbows….would I just stop at the desired length?
Thank-you.
Jeannie
Hi! This sweater is really customizable. It starts with the ribbing across the bottom. I would make that the width you want (as long as it’s an odd number of rows) and then make it as tall as you want. You could use one of your sweaters from your closet for comparison 🙂 And yes, for the sleeves, just stop as desired length.
Thankyou for producing such a lovely garment, I have just finished it and it has turned out just like yours, so pleased considering it is my very first written pattern I have followed and also new to crocheting.
Wonderful! Thank you!
I’ve just completed row 4 for the back panel and now have 33 dc. For row 5, do I follow the pattern and dc , skip stitch and dc??? Wouldn’t this decrease my total # of stitch??? It looks like it’s decreasing in size…..
Hi! Yes, you repeat row 4. *skip 1 stitch (this is the ch stitch), then dc in the next (this is the dc stitch), ch 1*. You should end up with the same amount of stitches 🙂
Can you send me pattern for 3xl. Thank you
Hi! I will be updating this pattern very soon and will be adding size 3X
Hi Breann. Thank you for the darling pattern. I have made many scarves, hats and mittens but this is my first sweater. I finished the back and am two thirds done with the front which is turning out to be 2” wider than the back. I am wondering if it is the yarn stretching from going into every stitch adding more bulk to the rows. Any suggestions or am I going to have to rip it out and cut down the number of stitches in the rows to match the width of the back? Thank you, Angie
Hi! The back is narrower than the front because of the ch stitches 🙂 It shouldn’t be noticeable at all once it’s all sewn together.
Thank you!
I love love love this top. Have made the front panel the same as the back and am working on the sleeves now! The instructions are well written and very easy to follow. Thank you for the pattern.
Love this pattern. Made one change. I single crocheted down both sides and across the top and used mattress stitch to sew it together. It Worked out so well the sweater is now reversible.
I really enjoyed making this pattern. Next time I’ll try what others suggested and do the open work on both sides.
I made a Weasley Sweater!! Freehanding the “E” was definitely the hardest part, your pattern is easy to follow and a great base for the project. Thanks for making the pattern free! I can’t post a pic here but I messaged you on Insta.
Do you still have any of your hand-dyed yarn in Winterberry left? I really want 2 more skeins…..
I LOVE the colors, and am making this sweater for Mardi Gras – the colors are too perfect!
Any tips on how to make IT into a cardigan?
Can the pattern for the front, be divided into two pisces?
Hi! Sure! I think you could definitely do that 🙂
I tried… but could not figure out how to make the collar. IT should be a v-shape, now its just two loose flaps on each side ?
Hi! I would make the back from the pattern. And then for the open front of the cardigan, you can make 2 rectangles. Each half the size of the back. Then sew them on the shoulders and the sides. Hope that helps!
Hi Breann,
I am making your sweater pattern using Lion brand Wool Ease. This is the first sweater I’ve attempted and I’ve found your pattern instructions are very clear and easy to follow. It’s a joy to find a simple pattern that inspires success. I highly recommend this yarn because it is turning out beautiful with this pattern. Thank you so much, Susan.Susa
Yay! Thank you so much!!
I just finished the body and I’m a little hesitant to add the sleeves, because I tried it on, and it looks cute without them. Maybe I’ll make another one without sleeves.