

I have always loved Dr. Seuss. His books make me happy. I think his colorful and whimsical world have impacted my life and also my designs.
March 2nd is his birthday and in the past I have gone into schools to read to students and celebrate his happy day. I usually take some of my favorite books and each year I wish I had a Suess-ish tote to take them in.
I have whipped up a tote that holds a few books, tablet or even a small crochet project. It has wonky stripes.

I thought it could use a couple of pockets too.

I hope this inspires you to pick up a book and share some Seuss love with others. Reading is a gift of life, happiness, adventure and so much more.
Ready to Read Tote Pattern
An ad-free, downloadable PDF that includes all of the photos and instructions is available for a small fee: Ravelry Shop: Click HERE
Materials
- Yarn: worsted weight yarn
- Yarn used in main sample: Red Heart Super Saver Delft Blue (150 yards), Aruba Sea (125 yards), Black, Cherry Red, White
- Additional pocket: Orange – Red Heart Super Saver Pumpkin, Bright Yellow, Turqua, Carrot
- Crochet Hook: H (5mm)
- Notions: Yarn needle for weaving in ends, 2 small black buttons for eyes, sewing needle, black thread, small amount of stuffing for cat muzzle.
- Optional: Measuring tape, scissors
Measurements
- Size: 10” tall (without handle) x 8” wide
- Gauge: not necessary for this project
Tips
- Numbers at the beginning of each line may refer to steps and not indicate number of rows.
- Stitch count remains the same unless noted at end of row/round.
- If you have any questions about this pattern please contact [email protected].
Bag Directions
Color A: Delft Blue; Color B: Aruba Sea
1. Leave a long tail in the beginning for sewing the bottom seam when complete. With an H hook and color A yarn, ch 61, sc in 2nd ch from hook and in each ch across. Sl st in first st of row to join in a circle. Make sure row is not twisted. (60sts)
2. Ch 1, sc in same st, sc 9, hdc 10, dc 20, hdc 10, sc 10, sl st to join.
3-4. Repeat previous round.
5. Change to color B yarn. Ch 2, dc in same st, dc 9, hdc 10, sc 20, hdc 10, dc 10, sl st to join.
6-7. Repeat previous round.
8. Repeat steps 2-7 three more times for a total of 8 stripes from beginning edge.
9. Change to color A. Ch 1, sc in same st and in each st to end of round, sl st to join.
10-11. Repeat previous round.
Finish off and weave in ends.
Turn bag inside out. Flatten bag and line up bottom edge so beginning point is at one edge. With a yarn needle, use the beginning yarn tail to sew the bottom edges together. Turn right side out.
Handle
1. With an H hook and color A, ch 71, sc in 2nd ch from hook and in each ch across. (70sts)
2-6. Ch 1, turn, sc in each st to end of row.
7. This step is worked around the outer edge of the handle. Be careful to not work these stitches too snug.
Ch 1, sl st in same st. *Pivot to the left. Sl st across the short end of the handle, working (sl st, ch 1, sl st) in last st.
Pivot to the left. Sl st in each st until 1 st remains*, (sl st, ch 1, sl st) in last st. Repeat once, sl st in last st. Finish off, leaving a long yarn tail for for attaching to bag.
Lay handle on a flat surface and measure 4” from each end. Place a marker at each point. The edges of the remaining part of the handle, between the markings, will be stitched together to create a rounded, tube like handle.
Fold handle in half, matching long edges. With yarn needle and matching yarn, sew the edges together from each point (4” in from each end). Secure and finish off.
Place one handle end on the bag at one side overlapping the outer edge 1-2” down from the top edge. With yarn needle and matching yarn, securely sew the handle to the bag. Repeat for other end of handle.
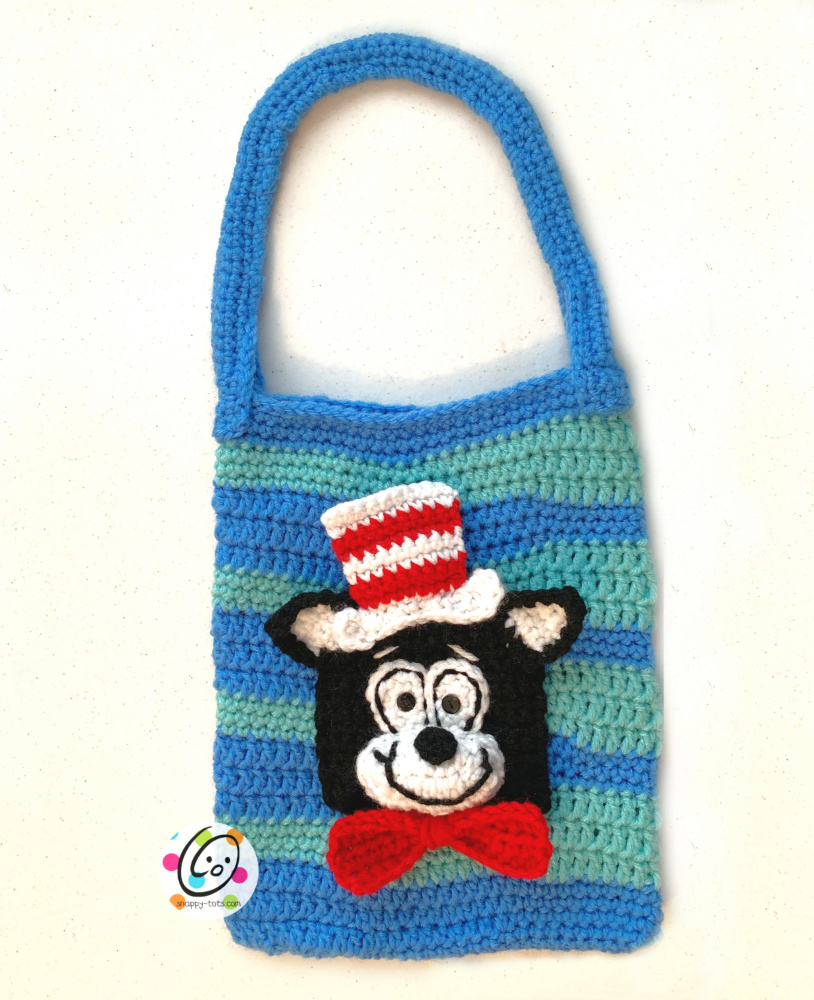
Applique/Pockets
Cat
1. With an H hook and black yarn, ch 16, sc in 2nd ch from hook and in each ch across. (15sts)
2. Ch 1, turn, sc in same st and in each st to end of row.
3. Repeat previous row for an additional 14 rows.
4. Ch 1, turn, sl st in next st and in each st to end of row. Finish off, leaving a long tail for sewing pocket to bag.
Set aside.
Cat Muzzle
1. With an H hook and white yarn, ch 8, hdc in 2nd ch from hook, hdc 5, 3hdc in last ch. Working in back loops of chain, hdc in each ch until 1 ch remains, 2hdc in last ch, sl st to join. (16sts)
2. Ch 2, 2hdc in same st, 2hdc in next st, hdc 4, 2hdc in each of the next 4 sts, hdc 4, 2hdc in next st, 2hdc in next st. Sl st to join. Finish off, leaving a long tail for sewing to pocket. (24sts)
Nose
1. With an H hook and black yarn, start with a magic circle of 4 sc sts (or preferred method for starting a circle of
4 sc sts), sl st to join. (4sts)
2. Ch 1, sl st in same st. This creates a small peak for the bottom point of the nose. Finish off, leaving a tail for sewing to muzzle.
With a yarn needle, use the yarn tail to sew the nose to the center top edge of the muzzle.
With a yarn needle and black yarn, stitch a smile to the muzzle.
Place the muzzle on the pocket to find placement. With a yarn needle, use the muzzle’s yarn tail to sew the muzzle to the bottom center of the pocket, stuffing the muzzle as you do.
Cat eyes (make 2)
1. With an H hook and white yarn, start with a magic circle of 6 sc sts (or preferred method for starting a circle of
6 sc sts), sl st to join. (6sts)
2. Ch 1, 2sc in each st to end of round, sl st to join. (12sts)
3. Hdc in next st, sl st in next st, (hdc, sl st) in next st. Finish off, leaving a long tail for sewing to the pocket.
With a yarn needle, use each yarn tail to sew the eyes to the center front of the pocket with the flat edge toward the muzzle.
With a sewing needle and black thread, sew a black button on top of each white eye piece for the pupils.
With a yarn needle and black yarn, add stitching the inner edge of each eye. See main photo.
With a yarn needle and white yarn, add a few sts above each eye for eyebrows.
Cat Ears (make 2)
1. With an H hook and white yarn, ch 4, sc in 2nd ch from hook, sc 2. (3sts)
2. Ch 1, turn, 2sc in same st, sc, 2sc in next st. (5sts)
3. Ch 1, turn, sc in each st to end of row.
4. Ch 1, turn, sc2tog, sc, sc2tog. (3sts)
5. Ch 1, turn, sc2tog, sl st. Finish off and weave in ends.
6. Attach black yarn to beginning st (first sc on step 1). Ch 1, sc 5 up side of ear, (sc, 2hdc, sc) in tip of ear, sc 5 down side of ear). Finish off, leaving a yarn tail for sewing to pocket.
With a yarn needle, use the yarn tails to sew the flat edge of each ear to the pocket piece. See main photo for placement.
Top Hat
This starts at the bottom edge of the hat.
1. With an H hook and white yarn, ch 15, 3hdc in 2nd ch from hook, sc 12, (3hdc, ch 1, sl st) in last ch. Working in
back loops of beginning ch, sc2tog, sl st 9, sc2tog. Finish off, leaving a yarn tail for sewing to pocket.
2. Attach red yarn to first of “sl st 9” section. Ch 1, sc in same st and in next 8sts. (9sts)
3. Ch 1, turn, sc in each st to end of row
4. Change to white yarn. Ch 1, turn, sc in same st and in next 8 sts.
5. Ch 1, turn, sc in each st to end of row.
6. Change to red yarn. Ch 1, turn, sc in same st and in next 8 sts.
7. Ch 1, turn, sc in each st to end of row.
8. Change to white yarn. Ch 1, turn, sc2tog, sc 5, sc2tog. (7sts)
9. Ch 1, turn, sc in each st to end of row. Finish off and weave in ends.
Cat Bow
1. With an H hook and red yarn, ch 15, hdc in 2nd ch from hook and in each ch across. (14sts)
2-3. Ch 2, turn, hdc in same st and in each st to end of row.
4. Ch 1, turn, sl st in next 6 sts. Finish off, leaving a long yarn tail for wrapping around middle of bow.
Wrap the yarn tail around the middle of the bow piece several times. Secure at the back of the bow. Use remaining tail to sew bow at bottom of muzzle.
Assembly
With a yarn needle, use the pocket’s yarn tail to sew the sides and bottom edge of the pocket to the center of one side of the bag.
With a yarn needle, use the hat’s yarn tail to sew the bottom edge of the small hat to the top of the pocket, above the eyebrows.

Orange Guy
1. With an H hook and orange yarn, ch 16, sc in 2nd ch from hook and in each ch across. (15sts)
2. Ch 1, turn, sc in same st and in each st to end of row.
3. Repeat previous row for an additional 14 rows.
4. Ch 1, turn, sl st in next st and in each st to end of row. Finish off, leaving a long tail for sewing pocket to bag.
Set aside.
Eyes (make 2)
1. With an H hook and white yarn, start with a magic circle of 6 sc sts (or preferred method for starting a circle of 6 sc sts), sl st to join. (6sts)
2. Ch 1, 2sc in each st to end of round, sl st to join. (12sts) Finish off, leaving a long tail for sewing to the pocket.
Blue eye piece (make 2)
With an H hook and blue yarn, create a magic circle of 4 sc sts (or preferred method for starting a circle of 4 sc sts), sl st to join. (6sts) Finish off, leaving a long tail for sewing to the eye.
With a yarn needle, use each yarn tail to sew one blue piece on top of each white eye piece.
With a yarn needle, use each yarn tail to sew the eyes to the center front of the pocket.
With a sewing needle and black thread, sew a black button on top of each blue eye piece.
Mustache
Cut 10 pieces of yellow yarn approximately 6” long. Use one of the pieces to wrap around the center of the other 9 pieces. Tie a knot and pull remaining yarn tails to the back side of the pocket. Tie a knot and secure yarn tails.
Pull each of the yarn pieces of the mustaches apart to create the frizzy mustache.
Nose
1. With an H hook and darker orange yarn, start with a magic circle of 5 sc sts (or preferred method for starting a circle of 5 sc sts), sl st to join. (5sts)
2. Ch 1, 2sc in each st to end of round, sl st to join. Finish off, leaving a tail for sewing in place.
With a yarn needle, use the yarn tail to sew the nose overlapping the center of the mustache.
Eyebrows (make 2)
With an H hook and yellow yarn, ch 5, sl st in the 2nd ch from hook and in each ch across. Finish off, leaving a yarn tail to sewing in place.
With a yarn needle, use each yarn tail to sew the eyebrows above the eyes.
Assembly
With a yarn needle, use the pocket’s yarn tail to sew the sides and bottom edge of the pocket to the center of one side of the bag.
Please Pin To Save For Later


