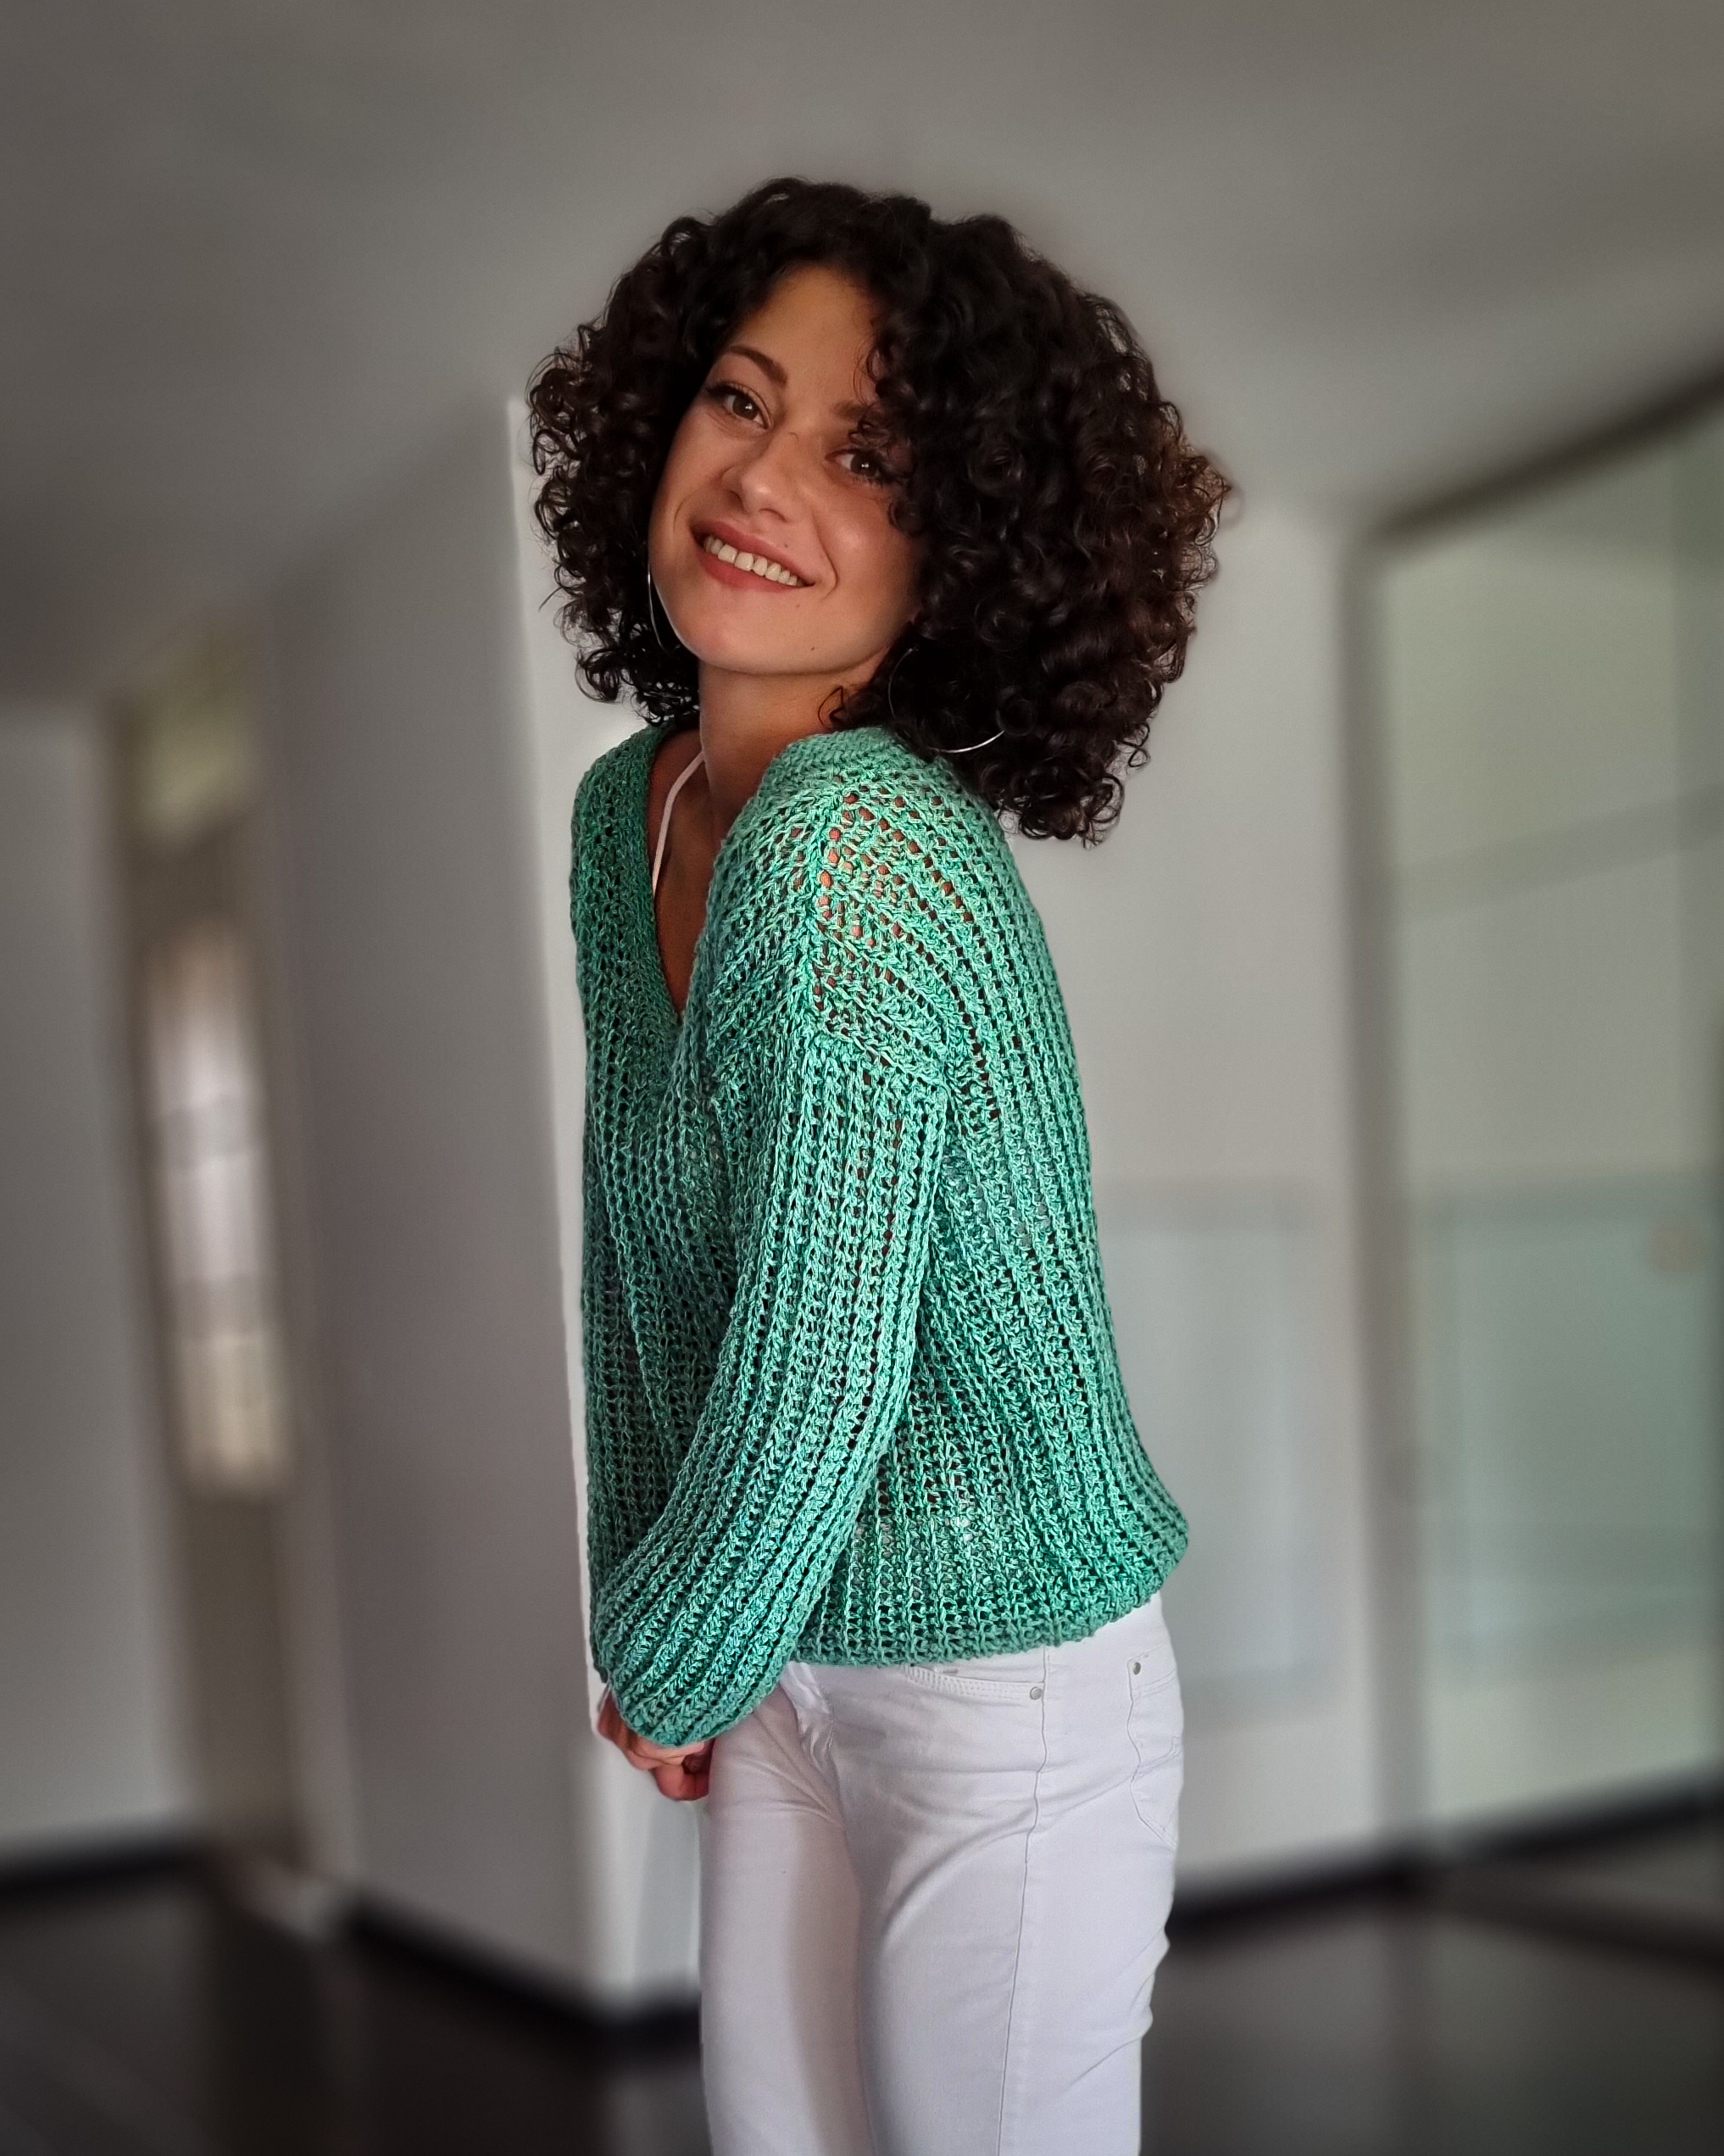
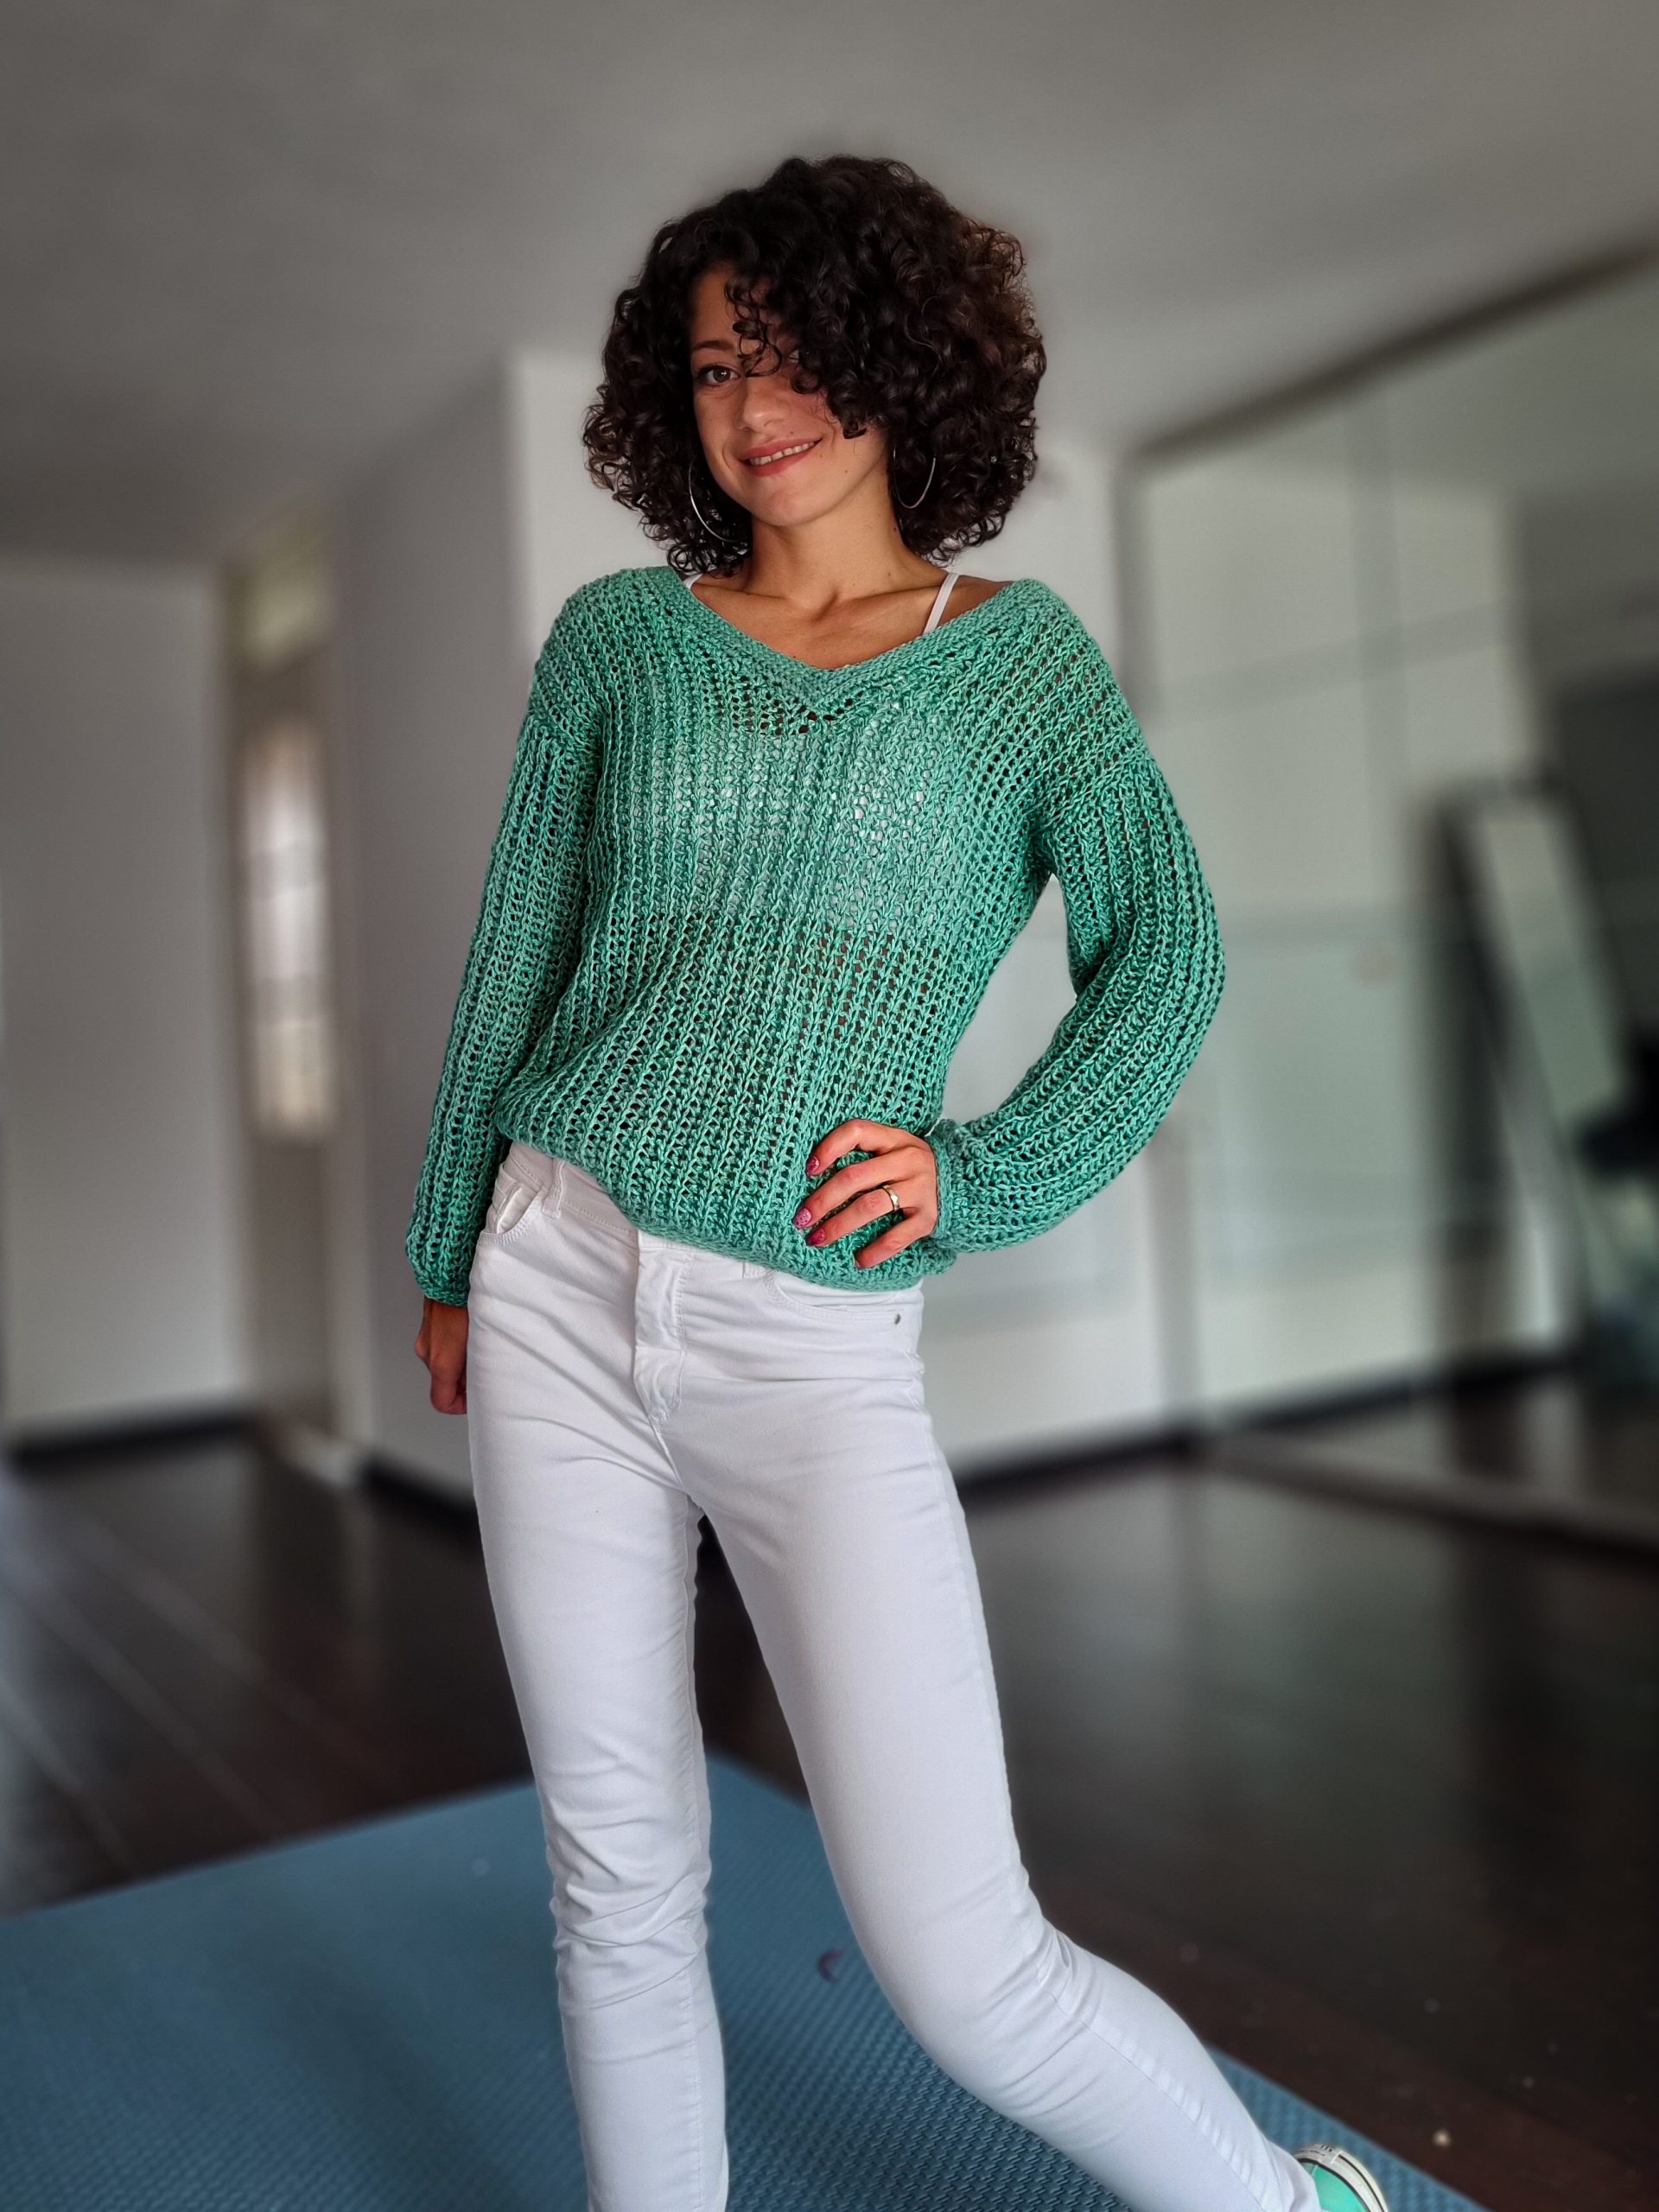
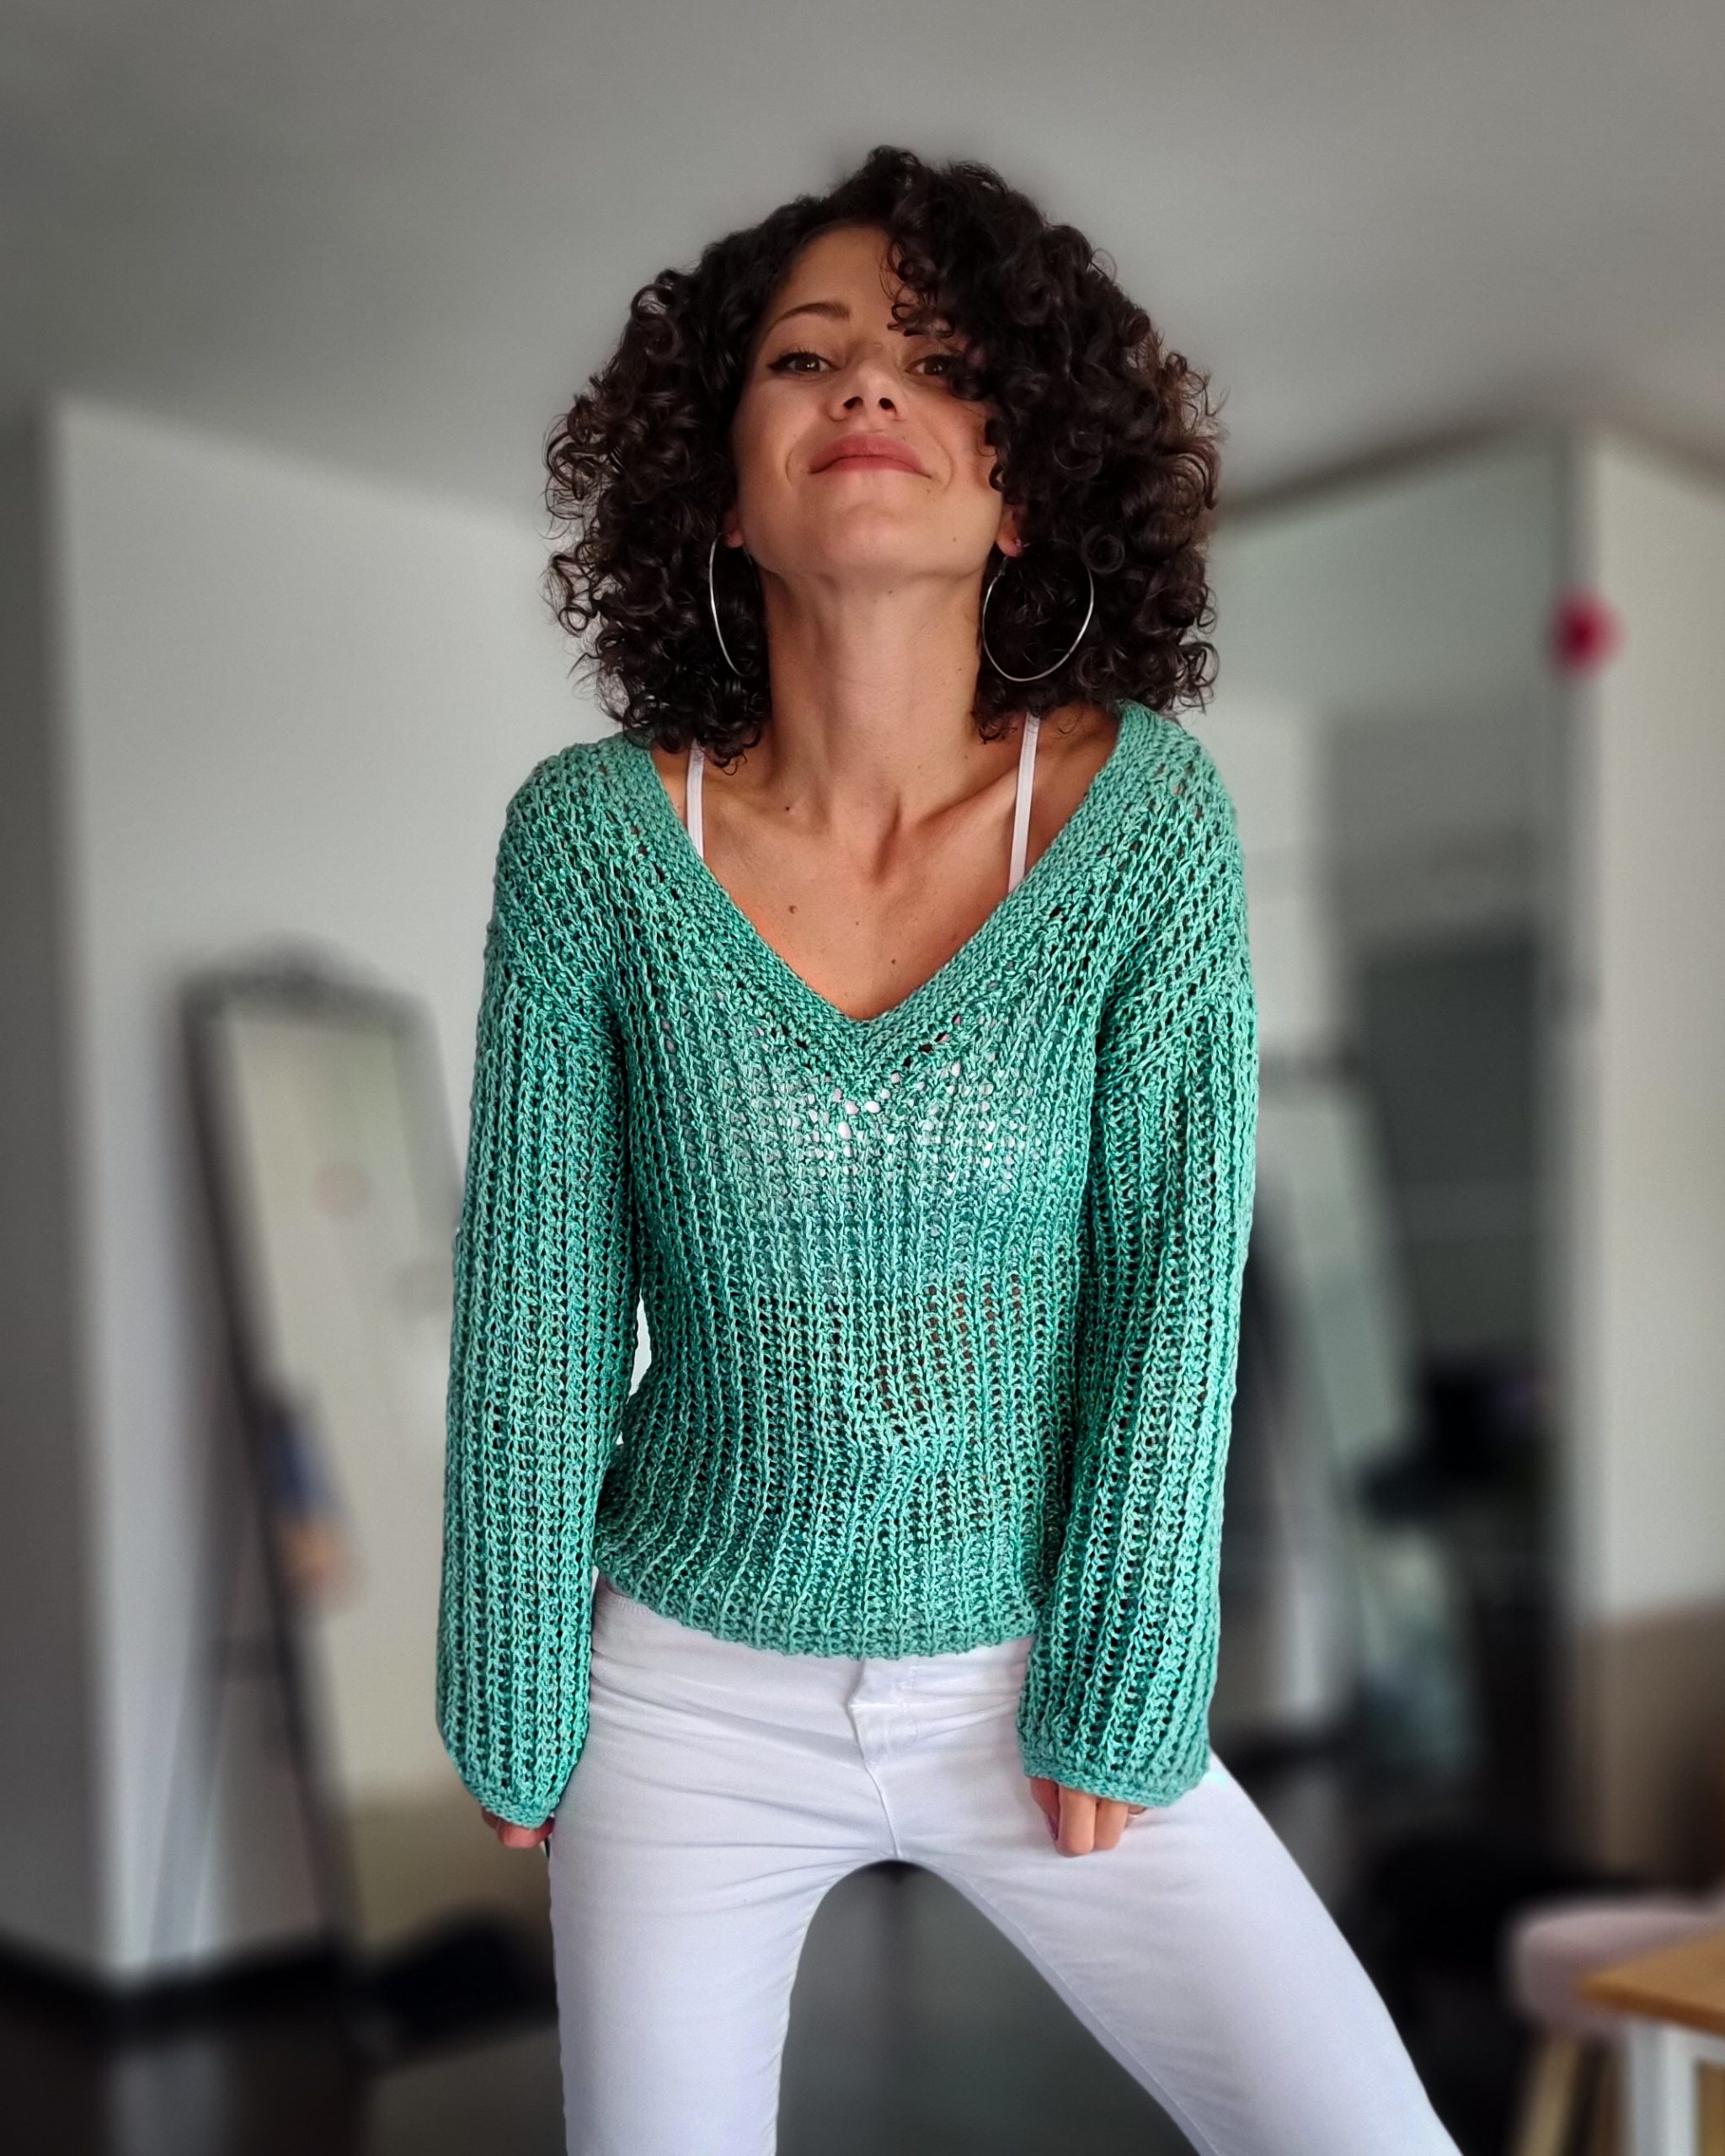
Finally, I am going to share with you my newest design, Porto Sweater.
I say “Finally” because I have had this design in mind for so long, and I am so happy I managed to make one.
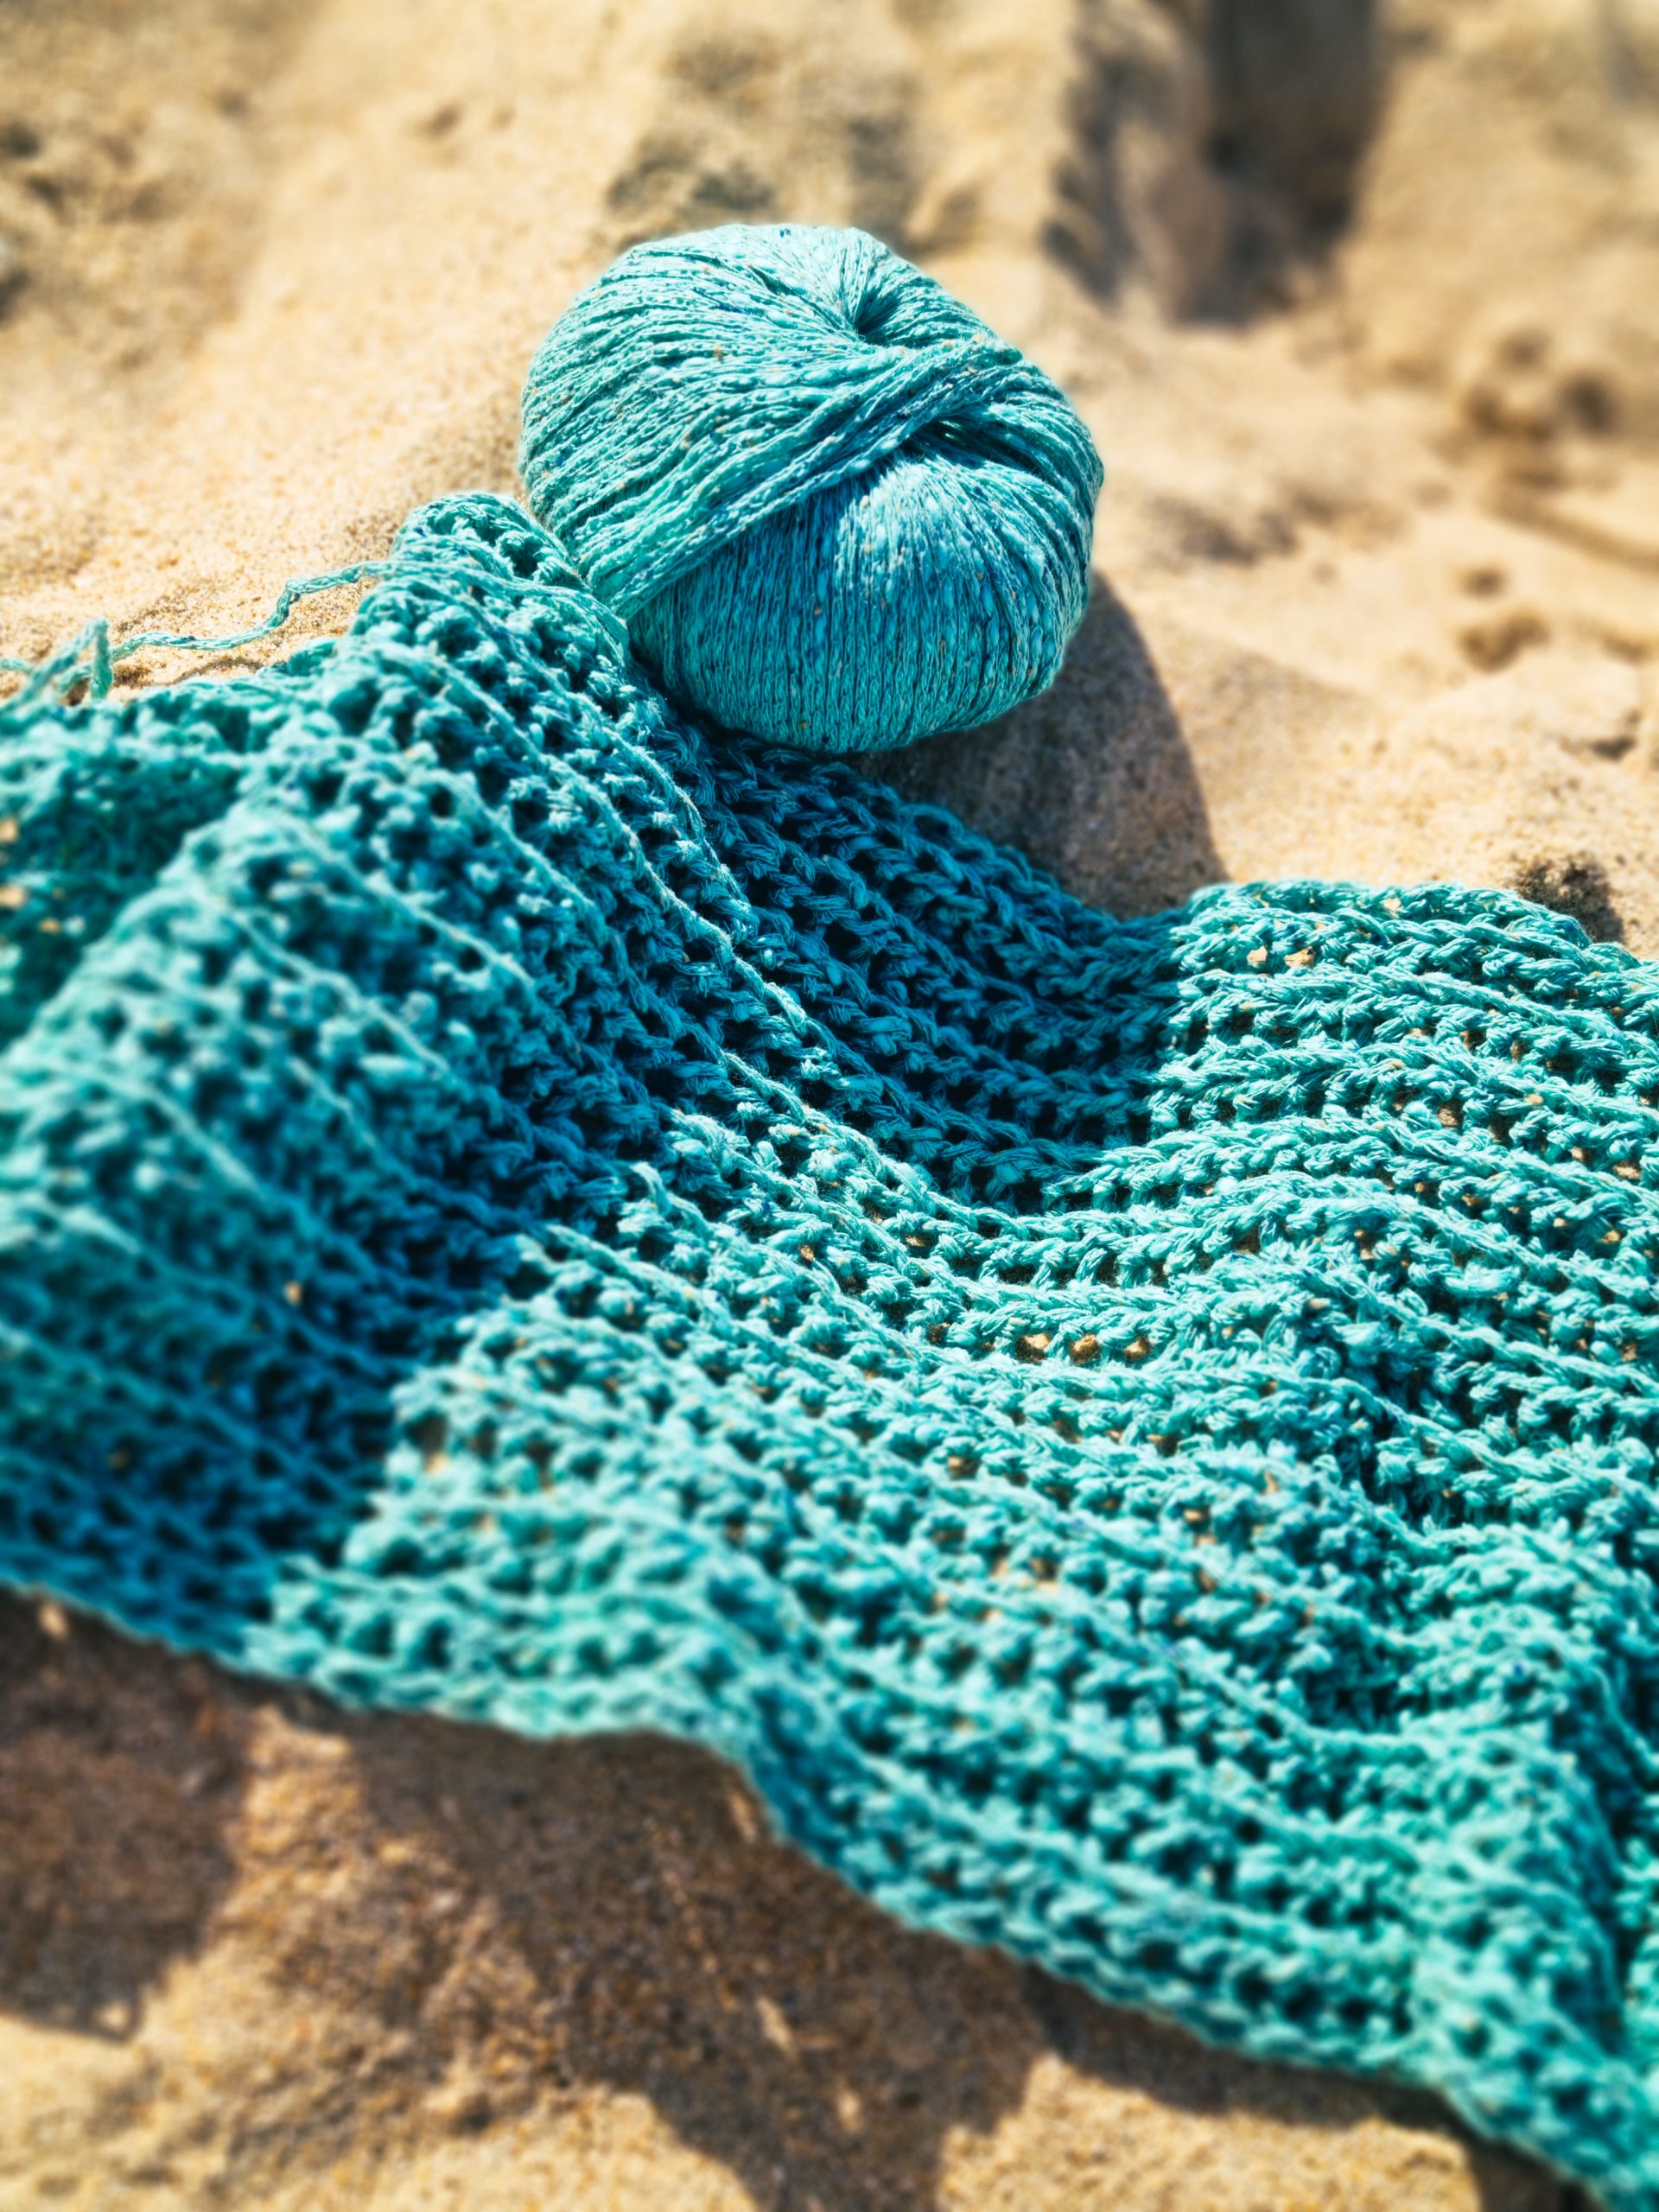
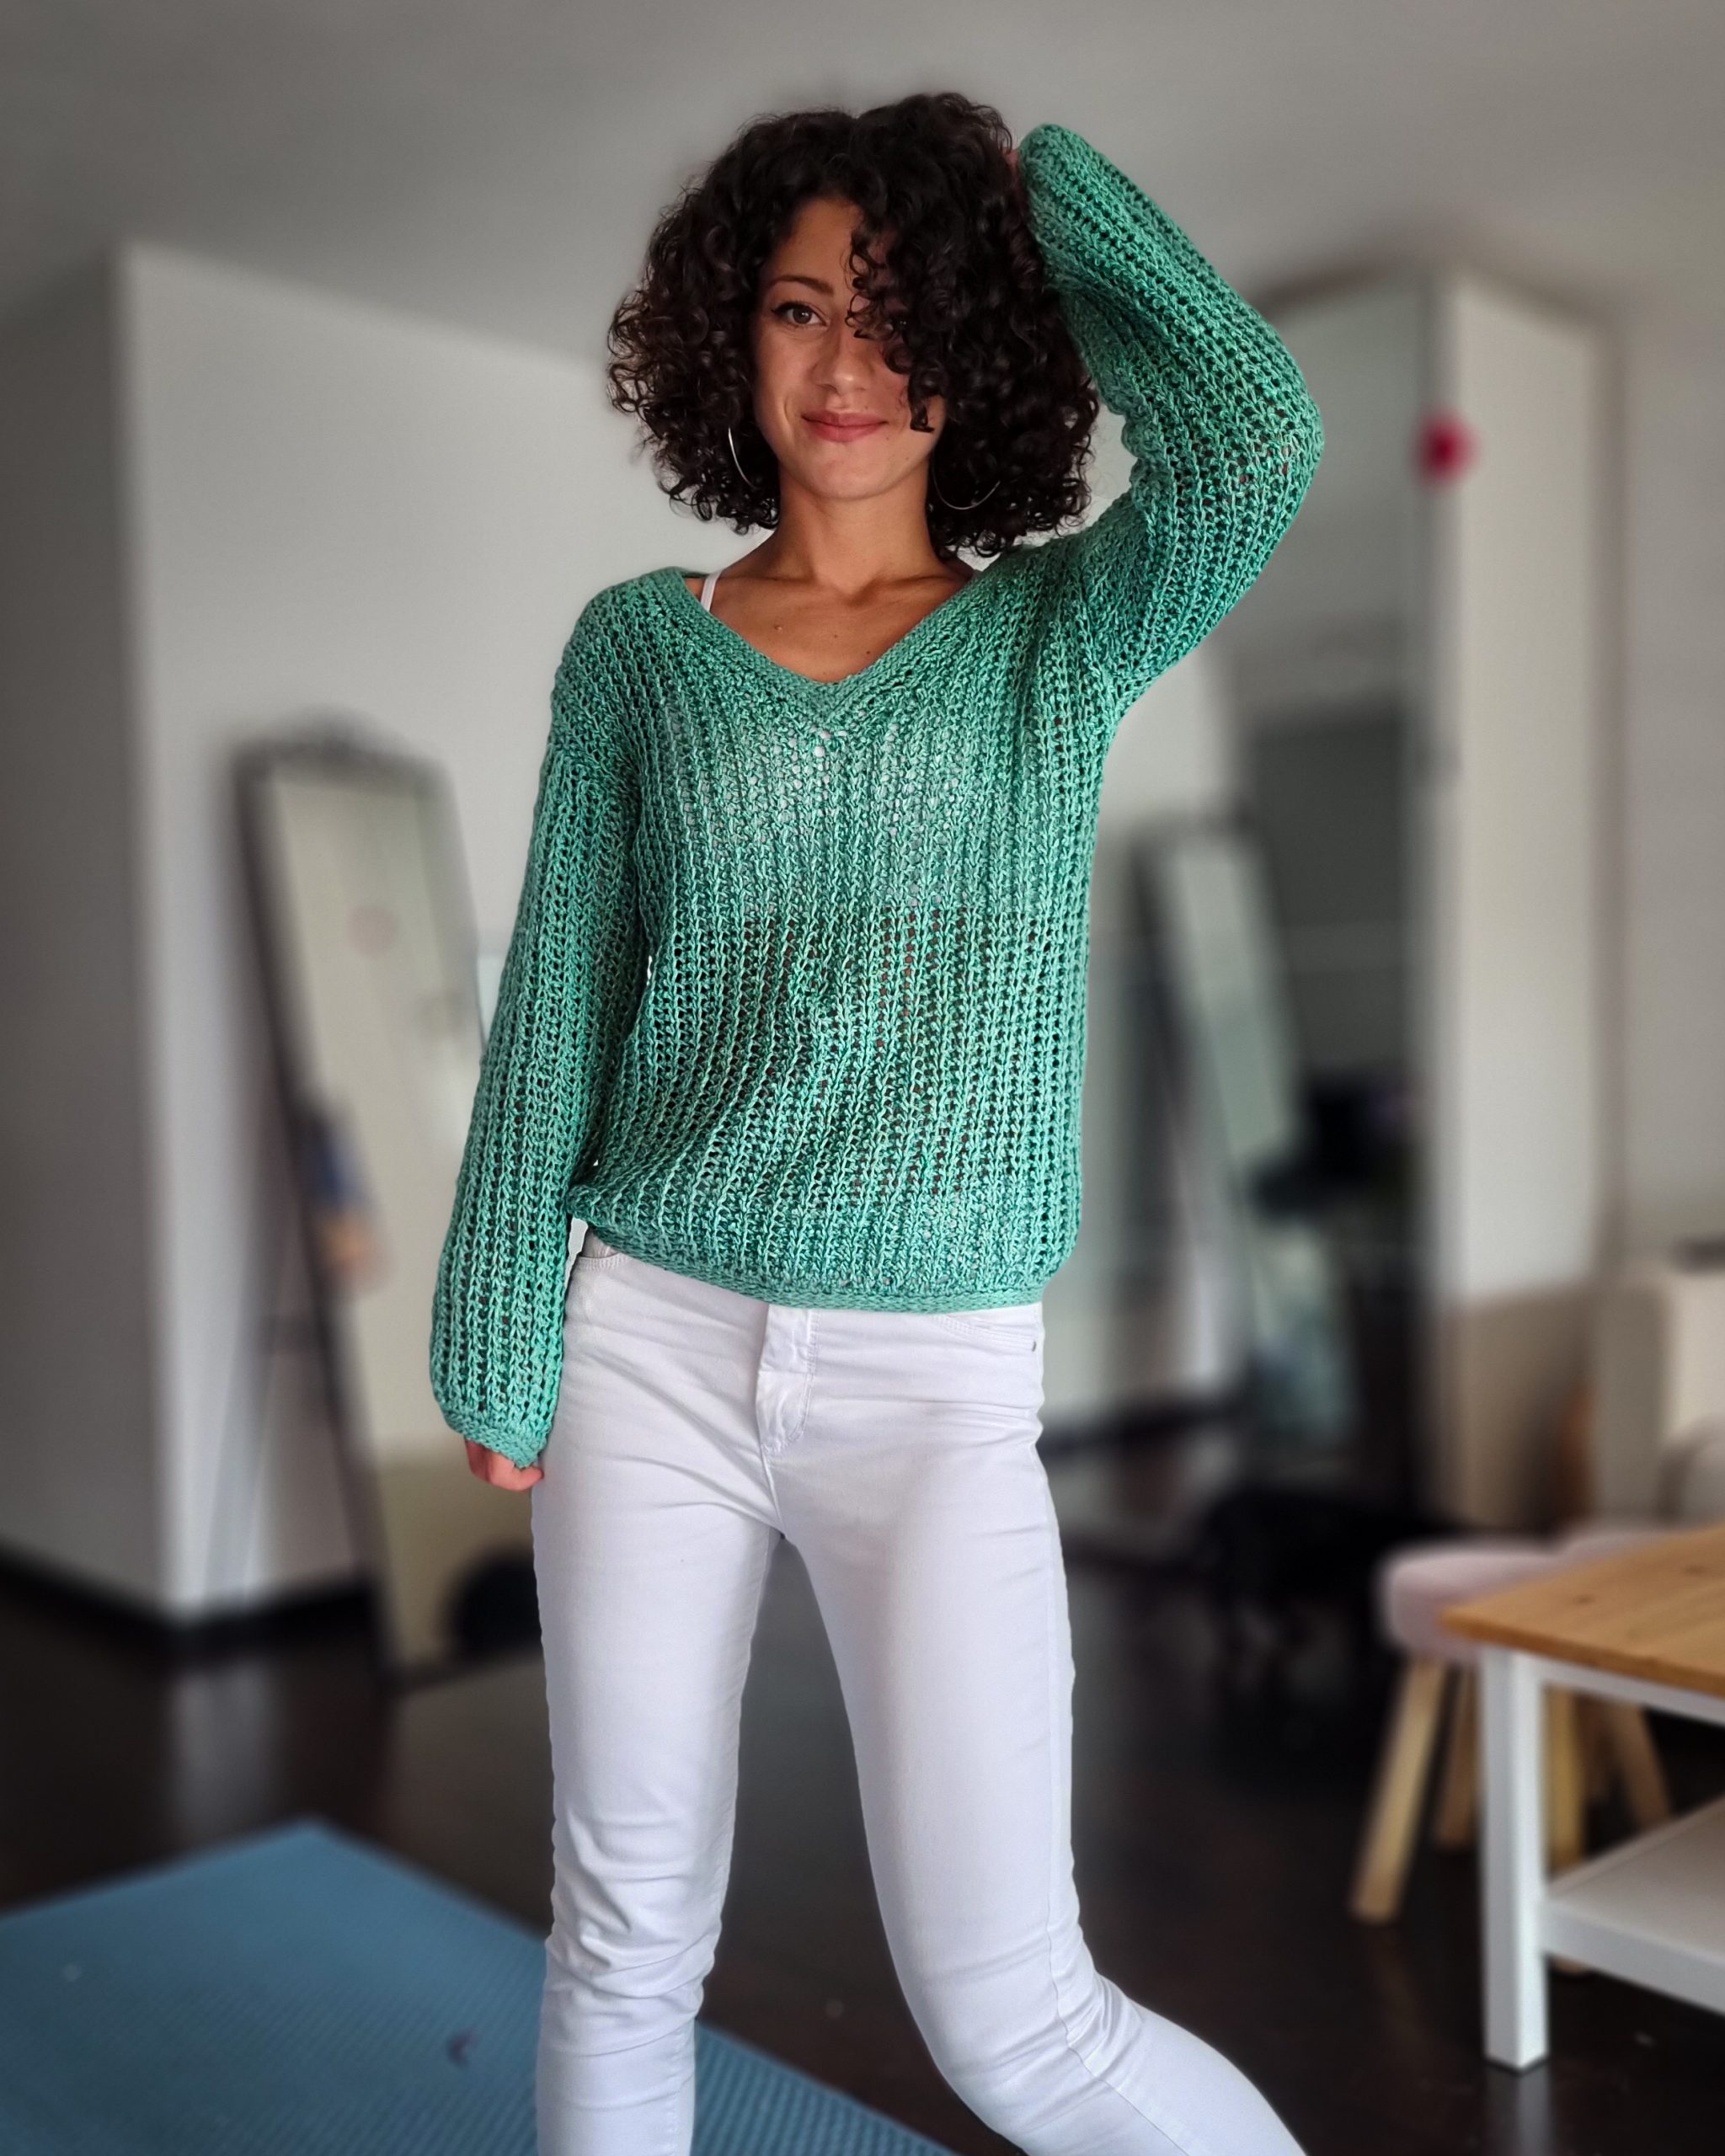
When Lang Yarns sent me this gorgeous Kimberley yarn to try it out, I knew that this was it! It was the perfect project to take with me on our vacation to Portugal. It was the first time we went there, and I was so in love that I decided to name my design “Porto Sweater.” It has so many nice memories in each stitch that I wanted to remember them when wearing this beautiful sweater.
Look how gorgeous is this yarn on the Portuguese Sand!!! 🙂
But let’s get back to work because this post is about sharing a crochet pattern with you and not my vacation experience.😁
You can Purchase the easily printable PDF pattern here:
MATERIALS
• Yarn: Worsted Weight yarn (Size 4, Medium)
o Cotton
o Cotton mix
• Crochet Hook:
o 6.5 mm crochet hook (I used Streamline Solar Flare By Furls)
o 4 mm crochet hook for edging (Odyssey Blue By Furls)
• yarn needle for weave in ends
• Stitch markers
• Scissors
NOTES ABOUT DESIGN
The Porto Sweater is the perfect design for transition into Fall. Is lightweight and with a beautiful drape and is easy to wear.
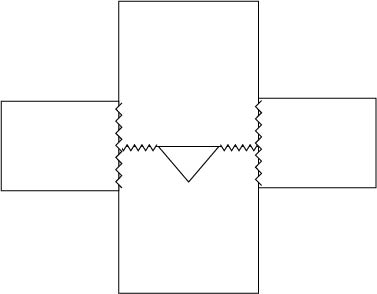
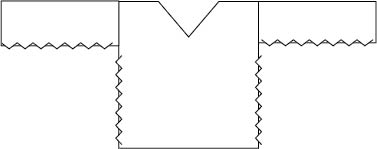
The sweater is worked in 4 panels, assembled at the end. The rows are worked vertically in double slip stitches to recreate the knitting look of the fisherman ribbing.
This Porto Sweater has a closer fit, with a positive ease of only 6 cm around Bust Circumference.
![]()
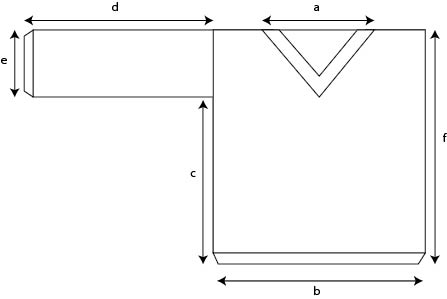
MEASUREMENTS AND SIZES
The Porto Sweater Pattern is available in 8 sizes, from Small up to 5X Large.
The model is 168 cm tall and wears size Small.
Neckline* a: 22 cm (22, 22, 22, 22, 22, 22, 22)
Bust width b: 47 cm (52, 57, 62, 67, 72, 77, 82)
Armpit Length c: 33 cm (33, 33, 33, 33, 33, 33, 33)
Sleeve length d: 42 cm (42, 44, 44, 45, 45, 46, 46)
Sleeve width e: 19 cm (22, 22, 25, 25, 28, 28, 28)
Length f: 52 cm (55, 55, 58, 58, 61, 61, 61)
*you can find in the pattern instructions on how to adjust the neckline width and depth.

How much yarn do you need?
I used:
Lang Yarns Kimberley in color Aqua (72)
Each ball has 50 grams and approximately 105 meters
For each size you will need:
9 (10, 11, 12, 13, 15, 15, 16) balls or
860 (1000, 1080, 1240, 1320, 1480, 1570, 1630) meters
ABBREVIATIONS
Ch – chain
Sc – single crochet
Dssblo – double slip stitch
Fhdc – foundation half double crochet
ss /ssblo- slip stitch /back loop only
ss2/3tog – 2/3 ss worked together
St(s) – stitch(es)
R – rounds
** – repeated section.
TENSION
Using 6.5 mm crochet hook in the Dss stitch pattern
13 sts = 10 cm
11 rows = 10cm
PATTERN NOTES
Work all pieces flat; turn after each row.
Work 1ch before starting a row 1ch does not count as first st.
Work the first and last st in a row through both loops, not only the back loop.
If you want to adjust the length, start with more stitches; if you want to adjust the width, work more rows.
How to adjust the neckline:
- Use the back panel as a reference
- Measure the desired width of your neckline and see how many rows you will need; it is important to be an even number.
- Calculate how many rows remain for shoulders.
- measure your desired neckline depth and see how many sts do you need to
- calculate how many rows do you have for the half of the neckline width
- knowing how many sts you will need to decrease for the neckline (neckline depth) and how many rows you have in neckline half-width, you can calculate how many sts/rows you will need to decrease.
decreases are made at every 2 rows
For example:
neckline half-width = 12 rows
neckline depth = 21 sts
6 decreases to make: 21/6 = 3.5 which I rounded at 3 decreases of 3 sts and 3 Dec of 4 sts.
You can purchase the easily printable PDF pattern here:
INSTRUCTIONS
numbers for sizes M, L, XL, XXL, 3XL, 4XL, and 5XL are written between brackets; if not pattern applies for all sizes.
BACK PANEL
Start: ch68 (72, 72, 76, 76, 80, 80, 80) sts
R1: 1ch, 1dss in each st until the end of the row. 1ch and turn.
R2: 1dss in the first st, 1dssblo in each of the next sts except the last 1, 1dss in the last st. 1ch and turn
Rep. R2 until you have in total 52 (58, 64, 68, 74, 80, 86, 90) rows.
Fasten off.
FRONT PANEL
Follow the instructions in the PATTERN NOTES section in case you want to adjust the neckline.
The pattern is written per section (right shoulder, neckline, left shoulder), but work for the front panel in one single piece:
You can see below a chart which shows the decreases.
Right Shoulder
Start: ch68 (72, 72, 76, 76, 80, 80, 80) sts
R1: 1ch, 1dss in each st until the end of the row. 1ch and turn.
R2: 1dss in the first st, 1dssblo in each of the next sts except the last 1, 1dss in the last st. 1ch and turn
Rep. R2 until you have in total 14 (17, 20, 22, 25, 28, 31, 33) rows.
Neckline
R1:1dss in the first st, 1dssblo in next sts except the last 3, 1ch and turn.
R2: 1dss in the first st, 1dssblo in each of the next sts, 1dss in the last st.
R3: 1dss in the first st, 1dssblo in the next sts, except the last 4sts. 1ch and turn.
R4: Rep. R2
Rep R1 to R4 2 more times, up to R12
R13: 1dss in the first st, 1dssblo in next sts, 1dss in the last st, 1ch and turn
R14: rep. R13
R15: 1dss in the first st, 1dssblo in the next st until the end of the row, 4fhdc. 1ch and turn
R16: 1dss in first st, 1dssblo in next sts, 1dss in the last st.
R17:1dss in the first st, 1dssblo in next st until the end of the row, 3fhdc. 1ch and turn
R18: Rep.R16
Rep R15 to R18 2 more times up to R24.
Left shoulder
R1:1dss in the first st, 1dssblo in each of the next sts except the last 1, 1dss in the last st. 1ch and turn
*Rep. R1 until you have in total 14 (17, 20, 22, 25, 28, 31, 33) rows.
Fasten off
*you should have for the front panel the same number of rows as for the back panel

SLEEVES
Start: ch54 (54, 56, 56, 58, 58, 60, 60) sts
R1: 1ch, 1dss in each st until the end of the row. 1ch and turn.
R2: 1dss in the first st, 1dssblo in each of the next sts except the last 1, 1dss in the last st. 1ch and turn
Rep. R2 until you have in total 42 (48, 48, 56, 56, 62, 62, 62) rows.
Fasten off.
ASSEMBLING
Step 1: Lay front and back panel, facing the right side, shoulders next to shoulder, and stitch the shoulder’s stitches.
Step 2: Lay the sleeves facing the right side next to the armhole section of the back and front panel. Make sure that half number of sleeve’s rows are next to the back panel and the other half next to the front panel. Use st markers to mark the sts for the armhole that needs to be stitch with the sleeve, keeping your gauge proportion: 25 (28, 28, 33, 33, 37, 37, 37) sts on the front panel and the same number of the back panel. (counting from the shoulder seam)
Step 3: Fold the entire piece in half and stitch the side edges (from the cuff to the bottom or reverse)
EDGING
Neckline Edging
Use the 6.5 mm crochet hook only for the first row, then switch to a 4 mm crochet hook.
On the first row, work 1st (sc) into each side row.
Work in the round and turn after each round.
When working over the short rows (decreases and increases) to pass the “stairs”, work 1st into the side of the last st, and one into the next st (sc2tog).
Into the “valley” of the neckline you have 4 rows, equivalent with 4 sts; work these 4 sts 2 by 2 (sc2tog and sc2tog).
R1: using a 6.5 mm crochet hook
Rejoin yarn in middle back, 1ch, 1sc in the same st, 1sc in each of the next sts until the shoulder seam, 1sc into the next 3 sts, [sc2tog (1 leg into the side of the last st, and one into the next st), 1sc in next 3sts, sc2tog, 1sc in next 2 sts, sc2tog] 2 times, sc2tog, 1sc in next 4sts, sc2tog, sc2tog, 1sc in next 4sts, [sc2tog, 1sc in next 2sts, sc2tog, 1sc in next 3sts] 2 times, sc2tog, 1sc in next 2sts, 1sc in the rest of the sts until the end of the round. Close the round with an ss into the first sc.
R2: Switch to a 4 mm crochet hook
1ch, [1ssblo in next st, 2ssblo in next st] until the shoulder seam, 2ssblo in each st until the “valley”, ssblo2tog, 2ssblo in each st until the shoulder seam, [1ssblo in next st, 2ssblo in next st] until the end of the round. Close the round with ss into the first ch. 1ch and turn
R3: 1ssblo in each st until you have 1 st left before the “ valley” decrease, ssblo3tog, 1ssblo in each st until the end of the round. Close the round with an ss into the first ch and turn.
Rep. R3 until the neckline edging has the desired width or until you have 9 rounds.
Sleeves and Bottom Edging
Use 4mm crochet hook.
Work 1st into each side row for the first row.
Work in rounds; turn after each round.
R1: 1ch, 1sc in each st around, ss with the first sc. 1ch, turn
R2: 1ssblo in each st around, ss with the first ch. 1ch and turn.
Rep. R2 until you have desired width or until you have 7 rows in total.
TO FINISH
Weave in all looser ends and block to measurements.
And that was it with this Porto Sweater. I hope you like it and can’t wait to see yours. 😊
You can Purchase the easily printable PDF pattern here:


Comments are closed.