


INTRODUCING
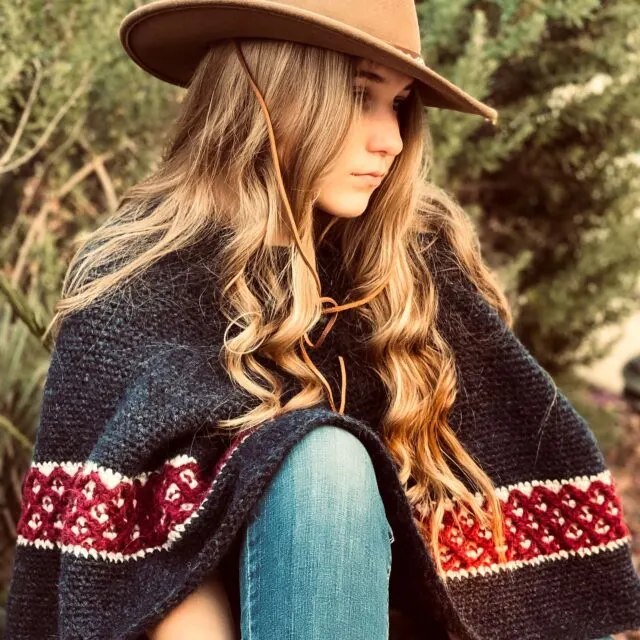
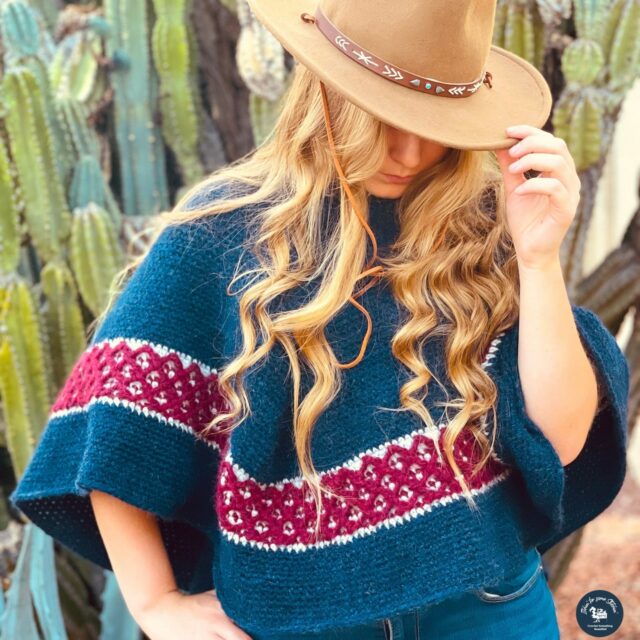
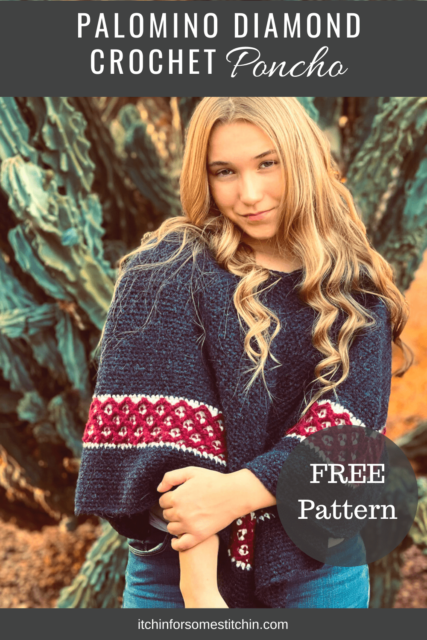
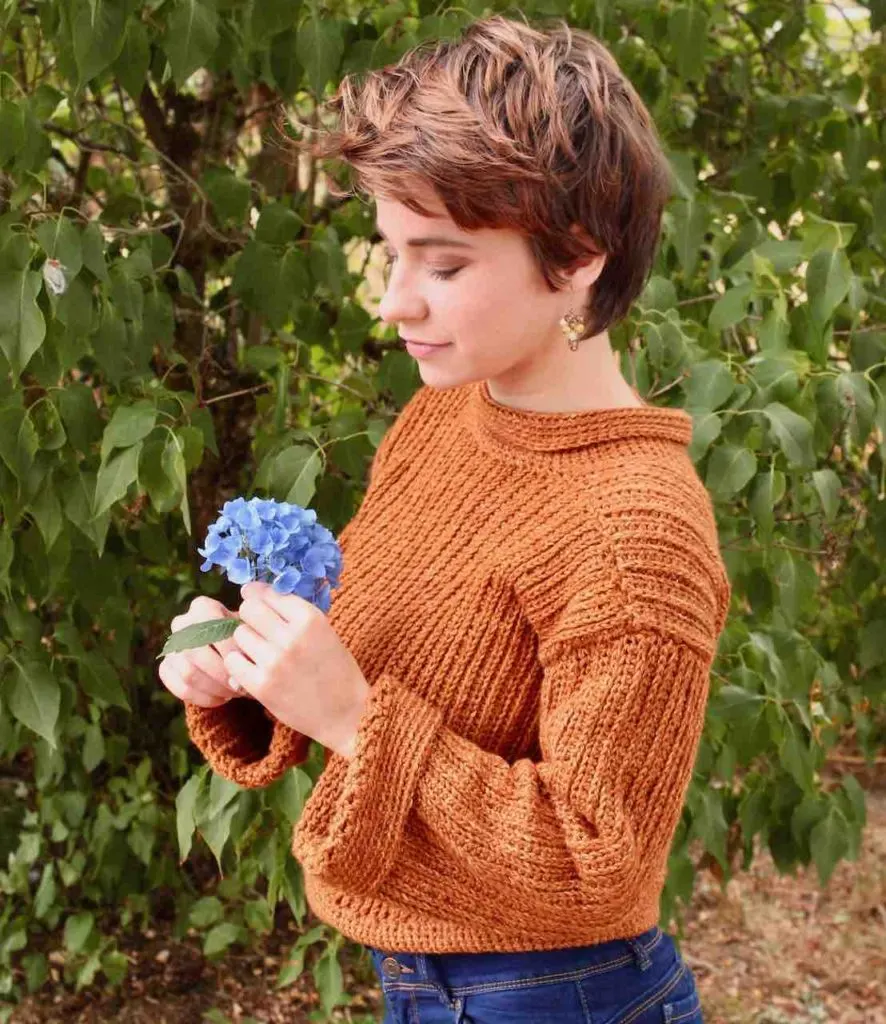
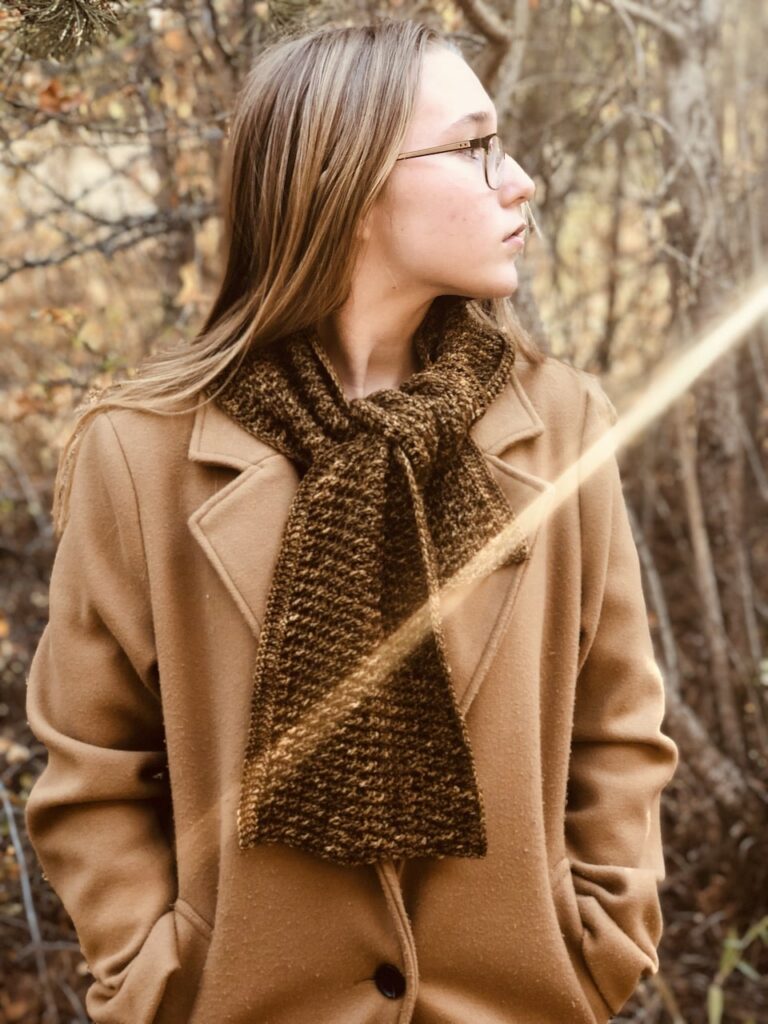
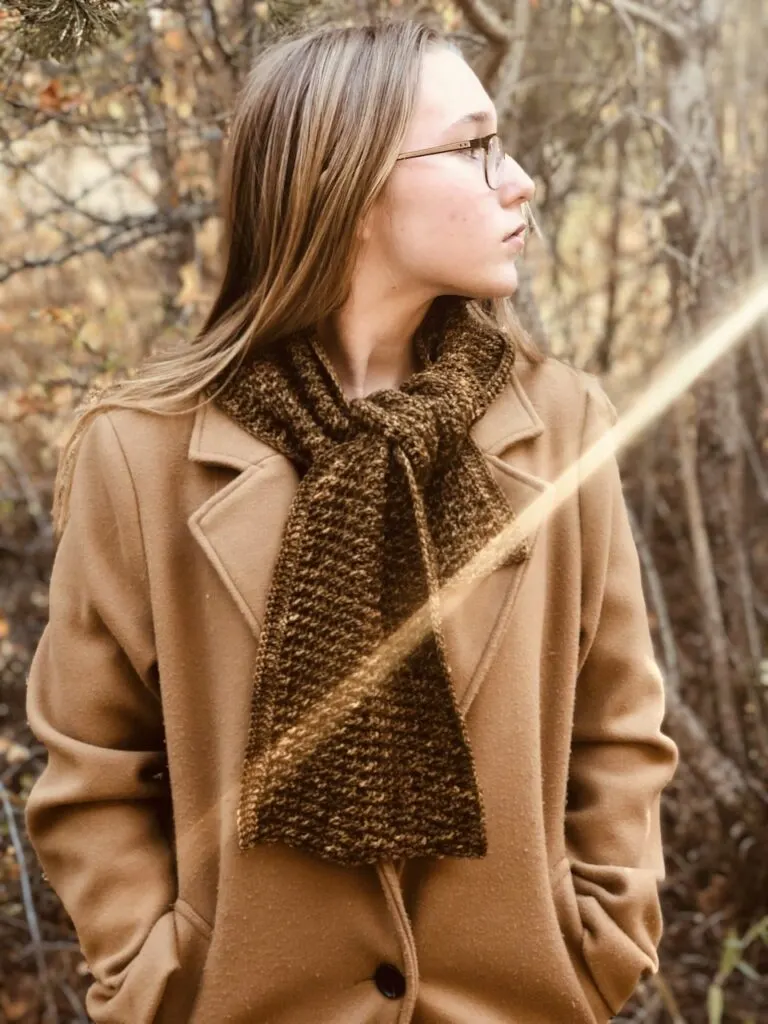
The Palomino Diamond Poncho
Drape yourself in warmth, luxury, and style. Designed using the most basic of crochet stitches accented by a gorgeous diamond trellis pattern, the Palomino Diamond Poncho is the perfect fall to winter statement piece. Simple, yet elegant, this lovely poncho is sure to become a wardrobe favorite!
About Palomino
Difficulty Level
This is a level 3 – Intermediate Pattern.
Gauge
13 stitches and 15 rows = 4-inches in single crochet using 6.5mm crochet hook.
Finished Dimensions/Sizing
Pattern is made based on the Crafty Yarn Council’s women size standards for each size listed in the chart below:
- All measurements are approximate, measured flat pre-wear, and are provided in inches and centimeters and designed to fit women’s sizes according to the Average Body Measurements Chart below.
- Please be sure to take your own body measurements and let those measurements serve as your guide.
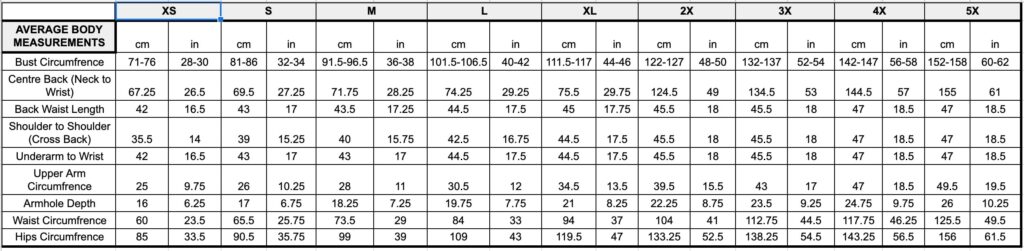

All sizes: 17.5 – 18 inches length from neck to point.
XS – 3X: 27 inches on each side of the midpoint for a total of 54 inches at the widest (bottom) part of the poncho.
4X – 5X: 27.5 – 28 inches inches on each side of the midpoint for a total of 55 – 56 inches at the widest (bottom) part of the poncho.
Abbreviations
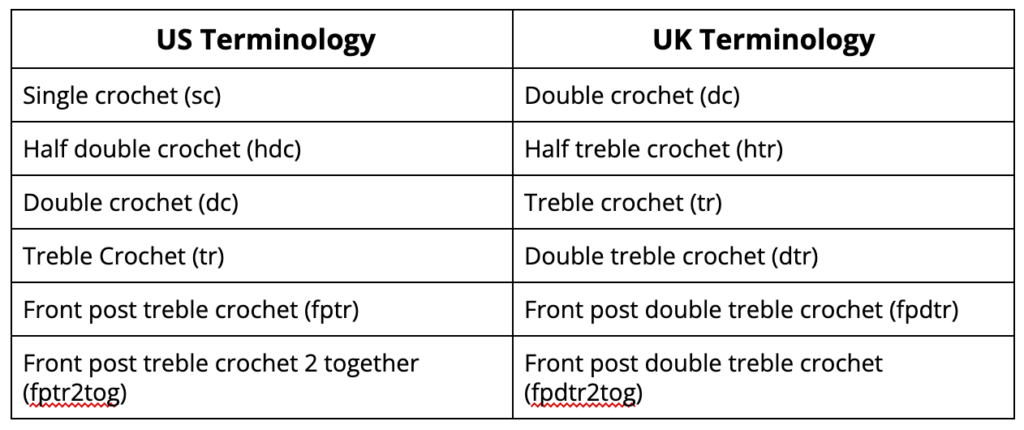
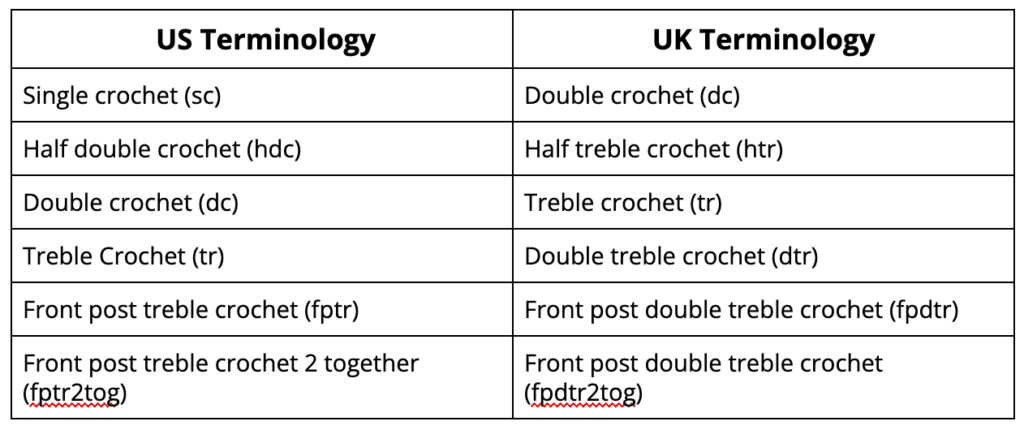
This pattern is written in US terminology.
- Stitch/es (st/sts)
- Skip (sk)
- Slip st (slp-st)
- Chain stitch (ch/chs)
- Single crochet (sc)
- Half Double crochet (hdc)
- Double crochet (dc)
- Treble Crochet (tr)
- Front Post Treble Crochet (fptr)
- Front Post Treble Crochet 2 Together (fptrc2tog)
- Yarn Over (YO)
- Back Post only (bpo)
- Back Loop only (blo)
- Front Loop only (flo)
- Single crochet 2 together (sc2tog)
- Single crochet 3 together (sc3tog)
- *____* Repeat indicated instructions
Special Stitches:
**The following special stitches are made in the same way as a standard treble crochet (tr) stitch except that you are working around a post in the previous row rather than working into the top of the stitch.
- Front post treble crochet (fptr) – Yarn over hook twice. Insert hook about the post indicated by the pattern. Yarn over and draw up a loop (4 loops on hook). *Yarn over, draw through 2 loops, repeat from * two more times until one loop remains on the hook.
- Front Post Treble Crochet 2 Together (fptr2tog) – This makes a V-shaped stitch in front of the work with the two arms of the V being worked around the posts of the stitches 2 rows below. All the V’s worked side by side make one half of the diamond pattern. Work the first row of fptrc2tog as follows:
- Yarn over hook twice, insert hook horizontally (from front to back to front again) behind the “post” of the sc st indicated (in this case it will be the post just worked by the previous post st)
- Yarn over the hook and draw up a loop (4 loops on hook). *Yarn over hook, draw through 2 loops, repeat from *, 2 loops left on hook (one arm of the V made).
- Yarn over hook twice, skip 3 sc posts, insert hook horizontally behind the next post. Yarn over the hook and draw up a loop (5 loops on hook). *Yarn over hook, draw through 2 loops, repeat from *, 3 loops left on the hook. Yarn over hook, draw through all three loops.
- There will be an “unworked” stitch left in the row below (behind the newly made fptr2tog stitch).
The remaining fptr2tog stitches of the first row using the stitch are worked the same way – with the first arm of the V worked around the same post as the last arm of the previous stitch. After the first row using this stitch the fptr2tog stitch is worked around the top of the previous fptr2tog stitches rather than the sc posts.
US/UK Conversion Chart
Materials Needed
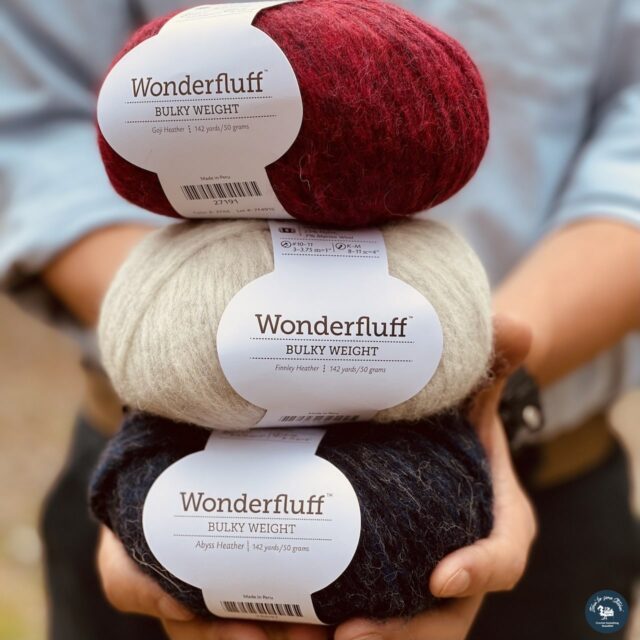
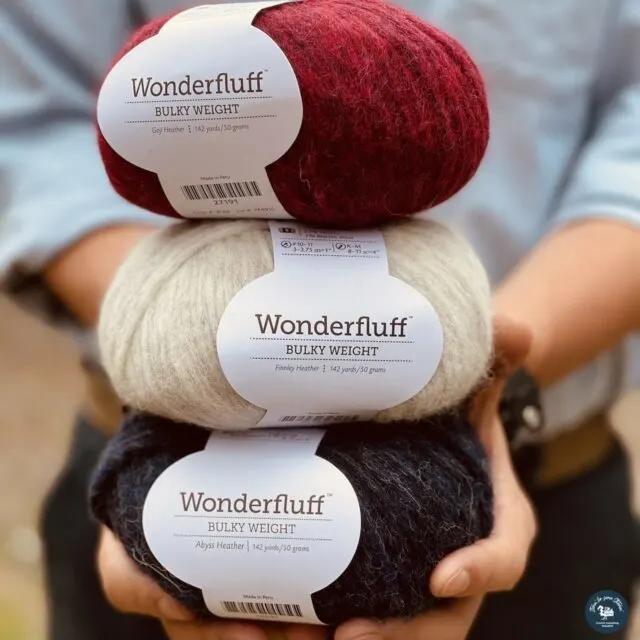
- KnitPicks Wonderfluff 70% Baby Alpaca/23% Nylon/7% Merino from We Crochet, bulky weight #5, 142 yards / 50 grams per ball, 3 colors: A = Abyss Heather, B = Goji Heather, C = Finnley Heather.
Total yardage: 1420 yards / 1298 meters to 2698 yards / 2467 meters.
XS – S
- A – Abyss Heather – 6 to 7 balls = 852 yards / 779 meters to 994 yards / 909 meters.
- B – Finnley Heather – 2 balls = 284 yards / 260 meters.
- C – Goji Heather – 2 balls = 284 yards / 260 meters.
M – L
- A – Abyss Heather – 7 to 8 balls = 994 yards / 909 meters to 1136 yards / 1039 meters.
- B – Finnley Heather – 2 balls = 284 yards / 260 meters.
- C – Goji Heather – 3 balls = 426 yards / 390 meters.
XL – 3X
- A – Abyss Heather – 8 to 9 balls = 1136 yards / 1039 meters to 1278 yards / 1169 meters.
- B – Finnley Heather – 3 balls = 426 yards / 390 meters.
- C – Goji Heather – 4 balls = 568 yards / 519 meters.
4X – 5X
- A – Abyss Heather – 9 to 10 balls = 1278 yards / 1169 meters to 1420 yards / 1298 meters.
- B – Finnley Heather – 3 to 4 balls = 260 yards / 390 meters to 568 yards / 519 meters.
- C – Goji Heather – 4 to 5 balls = 568 yards / 519 meters to 710 yards / 649 meters.
- Crochet Hook size K / 10.5 6.50mm or whatever hook is necessary to obtain the correct gauge.
- Measuring tape
- Stitch markers (optional)
- Scissors
- Tapestry needle for weaving in ends
Inspiration
I wanted something warm & flowy with a touch of elegance. Wonderfluff yarn & the gorgeous Diamond Trellis accent on this poncho were the perfect choices!’

Prefer a PDF?
This pattern is available as a large print, ad-free, printable PDF pattern.
Get it in these places:
Studio Crochet
The PDF version of the Palomino Diamond Poncho is currently available in the Studio Crochet, Issue 1 – Luxury Edition.
Digital Magazine includes:
- Seven stunning crochet designs
- Simple Tutorials
- Informative articles


Yarn Details
The concept behind the Palomino Diamond Poncho was luxury.
I wanted a design that was warm and luxurious – something you’d love to wear every year when the cold weather rolls in.
Once I had my pattern in mind, it was a matter of picking out the softest, most splendid bulky yarn I could find.
I had never used KnitPicks Wonderfluff before, but I had heard good things about it and decided to give it a try.
And I have to tell you, it did not disappoint!
After working with this yarn it has seriously become my absolute favorite bulky weight yarn.
I love it so much, in fact, that I purchase a bunch from the new Wonderfluff Ombré line and I simply cannot wait to use it!
It’s soft and thick, and yet, keeps. a very delicate and rich feel.
You can purchase it via my affiliate link below.
Yarn Alternatives
- Any Bulky weight #5 yarn
- Plymouth Yarn Aireado
- Wool and the Gang Feeling Good Yarn.

Join the Newsletter!
Subscribe to get our latest content by email & receive a Ravelry coupon code for a FREE crochet PDF pattern of your choice!
Pattern Notes:
Read all pattern notes, instructions, and other provided details carefully before starting the project to make sure you understand everything. It could save you hours & a lot of headaches!
- Before you start, go through the pattern and highlight/mark the stitch and row counts that correspond to the size you are making (this will make your life much easier!).
- Make a swatch that measures at least 10 x 10 cm / 4 x 4 inches using the stitch provided under the Gauge Section. If your swatch matches the gauge, then you are all set to start the project. If the gauge is wrong, you might need to change your crochet hook – increase your hook size if your stitches are smaller & decrease your hook size if your stitches are larger.
- All measurements given are unblocked and measured flat pre-wear and pre-seaming as fabric pieces may stretch during/after blocking, wearing, and seaming.
- Provided measurements are as exact as possible, but are given as approximates. This is because yarn variances, crochet tension & individual technique might give variations in the result, which changes from person to person
- This poncho is designed to be worn wide on the shoulders with the points toward the middle of the body – an inverted triangle shape.
- The poncho may not lay flat & will take on a more circular shape.
- When changing colors, you can either cut or carry the yarn through, whichever is your preference.
- The beginning and ending parts of this pattern are worked in continuous rounds. There will be NO joining at the end of each round, or turning and chaining for those rounds. Only the diamond section will be slp-st to close, but not turning.
- Instructions are given for the smallest size, with larger sizes in brackets ( ).
- Stitch counts are given in [ ] at the end of each row. If no stitch count is given, then the count is the same as the previous row.
- Care Instructions: Hand wash & lay flat to dry.
Love Pinterest?
I do!
PIN this pattern to your Pinterest boards for later.
You can also follow all my boards!

Let’s Get Crafty!
Looking for lots of crafty inspiration, tips, tutorials, and a great crochet community? Join my Facebook group!
**THIS IS AN ORIGINAL PATTERN. Please see my Copyright Statement for details.
Instructions
ALL SIZES: XS (S, M, L, XL, 2X, 3X, 4X, 5X)
First Section
Using color A – Ch 76, (76, 100, 100, 106, 106, 106, 114, 114), ss first and last chs together to form a large ring. Do not twist while forming the ring.
Round 1 (RS): Sc into the next 22, (22, 28, 28, 30, 30, 30, 32, 32) chs {creates BACK}, work 2 sc in the next ch {forms corner 1},sc in the next 14, (14, 20, 20, 21, 21, 21, 23, 23) chs {creates RIGHT shoulder}, work 2 sc in the next ch {forms corner 2}, sc into the next 22, (22, 28, 28, 30, 30, 30, 32, 32) chs {creates FRONT}, work 2 sc in the next ch {forms corner 3}, sc in the next 14, (14, 20, 20, 21, 21, 21, 23, 23) {creates LEFT shoulder}, work 2 sc in the last ch {forms corner 4}. [80, (80, 104, 104, 110, 110, 110), 118, 118) sc sts.]
Round 2: Crochet in continuous rounds; Sc in each of the next 23, (23, 29, 29, 31, 31, 31, 33, 33) sc (up to corner 1), work 2 sc in the next sc, sc in each of the next 15, (15, 21, 21, 22, 22, 22, 24, 24) sc (up to corner 2), work 2 sc in the next sc, sc in each of the next 23, (23, 29, 29, 31, 31, 31, 33, 33) sc (up to corner 3), work 2 sc in the next sc, sc in each of the next 15, (15, 21, 21, 22), 22, 22, 24), 24) sc (up to corner 4), work 2 sc in the next sc. [84, (84, 108, 108, 114, 114, 114, 122, 122) sc sts.]
Top Tips
- After each round, the stitch count for each section BACK, RIGHT SHOULDER, FRONT, LEFT SHOULDER will increase by 1, thus causing the overall stitch count to increase by 4.
- Place a stitch marker in the second sc of each corner increase to help keep proper stitch count
Repeat Round 2 through Round 50 for XS – 3X and Round 51 for 4X – 5X, be sure to keep an accurate stitch.
The FINAL stitch count for each section once each round has been completed is 276, (276, 300, 300, 306, 306, 306, 318, 318).
Diamond Section
Round 1: Change to color B. Sc in each sc around, ss to close the rnd. [276, (276, 300, 300, 306, 306, 306, 318, 318)].
Adjustments:
If you would like a longer poncho, BEFORE Round 1 of Diamond Section AND using color A, *sc in each stitch around crocheting continuously*. Repeat from * to * to your desired length then move on to the instructions.
Round 2: Ch3(does not count as a st),dc in each st around, ss to top of ch 3 to close. [276, (276, 300, 300, 306, 306, 306, 318, 318)].
- Mark the first dc (the one directly to the left of the closing ss) with a stitch marker.
- *Skip 3 dc sts and place a st maker in the next st*. Repeat from * to * around. There should be 3 dc sts between every stitch marker to include the first and last stitch markers.
This section (Rounds 1- now) should be approximately 9.5 to 10 inches long.
See Diamond Trellis in the Round Tutorial for step by step instructions of the diamond stitch that follows:
Round 3: Change to color C, Ch1 (does not count as a st), fptr around the post of the 3rd sc (directly beneath the 3rd dc of Rnd 1 to the left of the st marker – (See Images 1 – 3) in Rnd 50. *Sc in the 3 dc sts between the 2 st markers (See Images 4 -5), fptr2tog (See Images 6 – 8), sc in the 3 dc between the 2 st markers (See Image 9), fptr2tog around the same sc post used in the last post work of the last fptr2tog st (See Images 10 -11)*
Repeat from * to * around. Should end by meeting up with the first inverted triangle, ss to close (in the stitch with the first st marker – See Images 12 – 13).
Diamond Trellis in the Round Tutorial
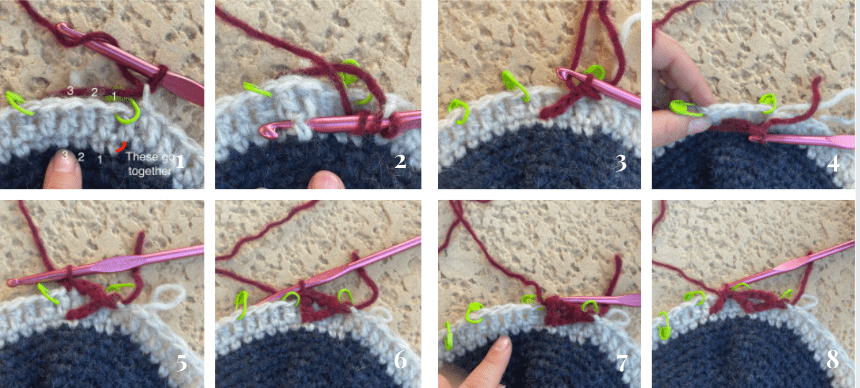
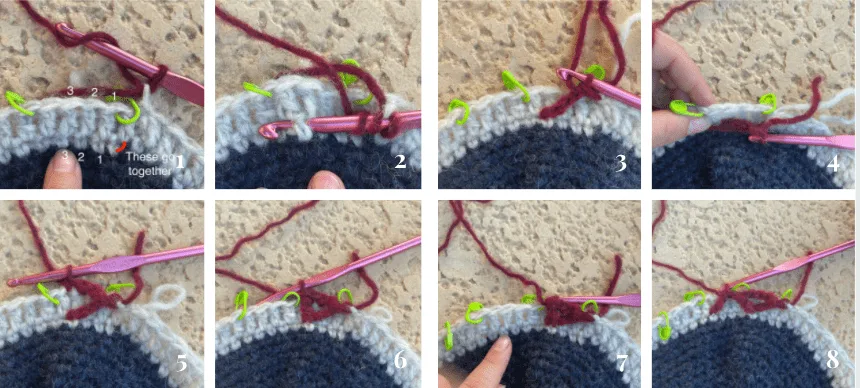
Step 1. ch1 (does not count as a st)
Step 2. fptr around the post of the 3rd sc (directly beneath the 3rd dc of Rnd 51 to the left of the st marker
Step 3. complete the fptr stitch
Step 4. now locate the next 3 sts of previous round (between the 2 stitch markers shown)
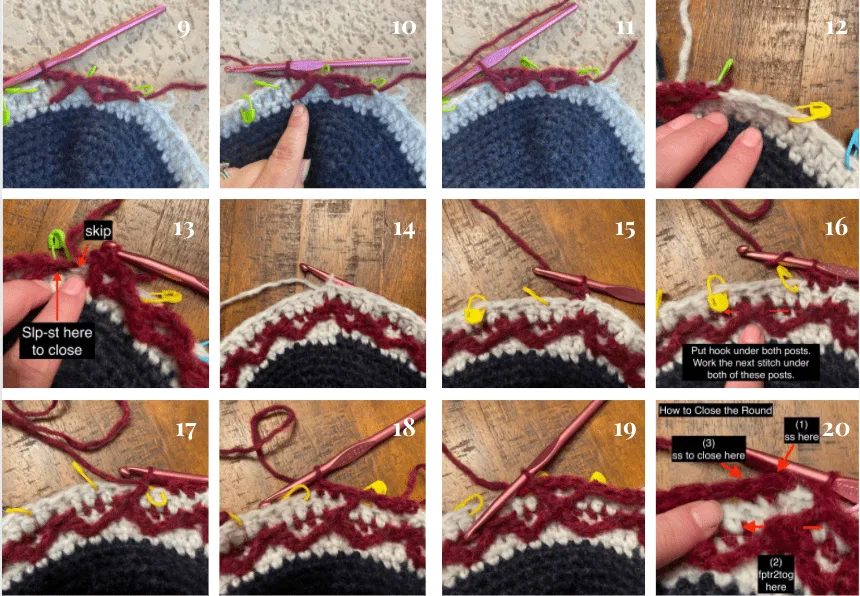
Diamond Trellis in the Round Tutorial Continued
Step 5. sc in the 3 dc sts between the 2 st markers
Step 6. fptr2tog by starting a fptr around the fptr just made
Step 7. skip next 3 sts as shown here
Step 8. complete fptr2tog around next sc

Step 9. sc in the 3 dc between the 2 st markers
Step 10. fptr around the same sc post used in the last post work of the last fptr2tog st
Step 11. complete the stitch
Step 12. repeat previous steps until you meet the first inverted triangle you made
Step 13. ss in first st to join the round
Step 14. change color, ch3 (does not count as a st), dc in each st around, ss to the top ch of the chain 3 to close
Step 15. change color, ch1 (does not count at a st)
Step 16. sc into the next 2 dc and take note of placement for next st
Step 17. ptr2tog around the tops of the post sts in Round 1 of Diamond Section (directly below the middle dc of the 3 dcs between the st markers)
Step 18. sc in each of the 3 dc between the st markers
Step 19. repeat Steps 17 and 18 around the round
Step 20. ss into the second sc of the round to close
Final Section
Round 1 : Change to color B. Ch1 (does not count as a st), sc in each st around, ss to close. [276, (276, 300, 300, 306, 306, 306, 318, 318)].
Round 2: Change to color A. Crochet in continuous rounds; Sc in each of the next 73, (73, 78, 78, 81, 81, 81, 84, 84) sc (up to corner 1), work 2 sc in the next sc, sc in each of the next 65, (65, 70, 70, 72, 72, 72, 75, 75) sc (up to corner 2), work 2 sc in the next sc, sc in each of the next 73, (73, 78, 78, 81, 81, 81, 84, 84) sc (up to corner 3), work 2 sc in the next sc, sc in each of the next 65, (65, 70, 70, 72, 72, 72, 75, 75) sc (up to corner 4), work 2 sc in the next sc. [280, (280, 304, 304, 310, 310, 310), 322, 322) sc sts.]
After each round, the stitch count for each section BACK, RIGHT SHOULDER, FRONT, LEFT SHOULDER will increase by 1, thus causing the overall stitch count to increase by 4.
Rounds 3-30: Repeat Round 2 for 28 more rounds.
Adjustments:
To make the poncho longer, repeat Round 2 to your desired length. However, this will also make the poncho wider at the bottom.
Finishing
Bind off and weave in ends.
Collar Adjustments
To make the collar more narrow and sit higher on your shoulders, attach yarn to any corner on the collar with a ss- mark with a stitch marker, *sc in each st around, but sc2tog in each of the four corners*.
Repeat from * to * crocheting continuously for two more rounds.
Once back at the stitch marker at the end of round three, continue to *sc around, but sc3tog in each corner*, Repeat from * to * crocheting continuously for two more rounds.
Continue single crocheting around and either sc2tog or sc3tog in each corner until you have reached your desired neckline.
Bind off and weave in ends.
Other Patterns I Love & You Will too!
Emelita Twist


Ribbed Sweater

Alpine Ridges
Thank you for coming to my blog! By sharing my content and/or making a purchase you are making it possible for me to continue producing and sharing free content for everyone to enjoy. I sincerely appreciate your support!
Until next time… Happy Crocheting!


Please Share!
Alexandra
Sunday 6th of February 2022
Beautiful poncho! I really love the textured stripe in there.
Itchin4Stitchin
Sunday 6th of February 2022
Hi Alexandra,
Thank you so much! I truly appreciate that!
Sincerely,
RaeLynn
Pamela Thomas
Thursday 6th of January 2022
I think this is a beautiful pattern but I am an XL and using the yarn suggested would cost me $285 - $304 to make. How can people afford these projects???
Itchin4Stitchin
Sunday 9th of January 2022
Hi Pamela,
That is a very good and valid question! Firstly, I do offer yarn alternatives in my patterns and you can easily find yarn substitutions by searching the internet. I am sure you will find several options to suit your budget.
This poncho was designed specifically for the first edition of the digital magazine, Studio Crochet, which centered around luxury. So, I did choose a high quality, luxury yarn for the project, but as I said, there are many other yarn choices. For this project I would suggest trying any #5 bulky weight yarn that is your preference and see if you can match gauge. If so, it should be acceptable to use for this project.
Best wishes,
RaeLynn