
Morrigan Tee – Free Crochet Top Pattern
The Morrigan Tee – Free Crochet Top Pattern is copyrighted by I Need It Crochet. You may not copy, share, change, or sell the pattern itself. Also, you may not claim this pattern as your own. All pictures contained in this pattern fall under the copyright and may not be used.
Finished items made from the Morrigan Tee – Free Crochet Top Pattern belong to you, and you may do what you wish with them. If you choose to sell them on Etsy, I would very much appreciate it if you credited me as the pattern designer.


Or… Just scroll down to see it for free!
While you’re here…
Do you love finding beautiful and exciting new crochet patterns? Do you love using the free pattern versions on blogs like mine? Then why not sign up for my newsletter? I promise to only send you an email when I have something new and exciting to tell you. Like when I come up with new tips and tricks, stitch tutorials, roundups… and of course new patterns! Just add your name and email to the form below and hit subscribe. And don’t forget to check your email and verify your subscription!
[rainmaker_form id=”1806″]
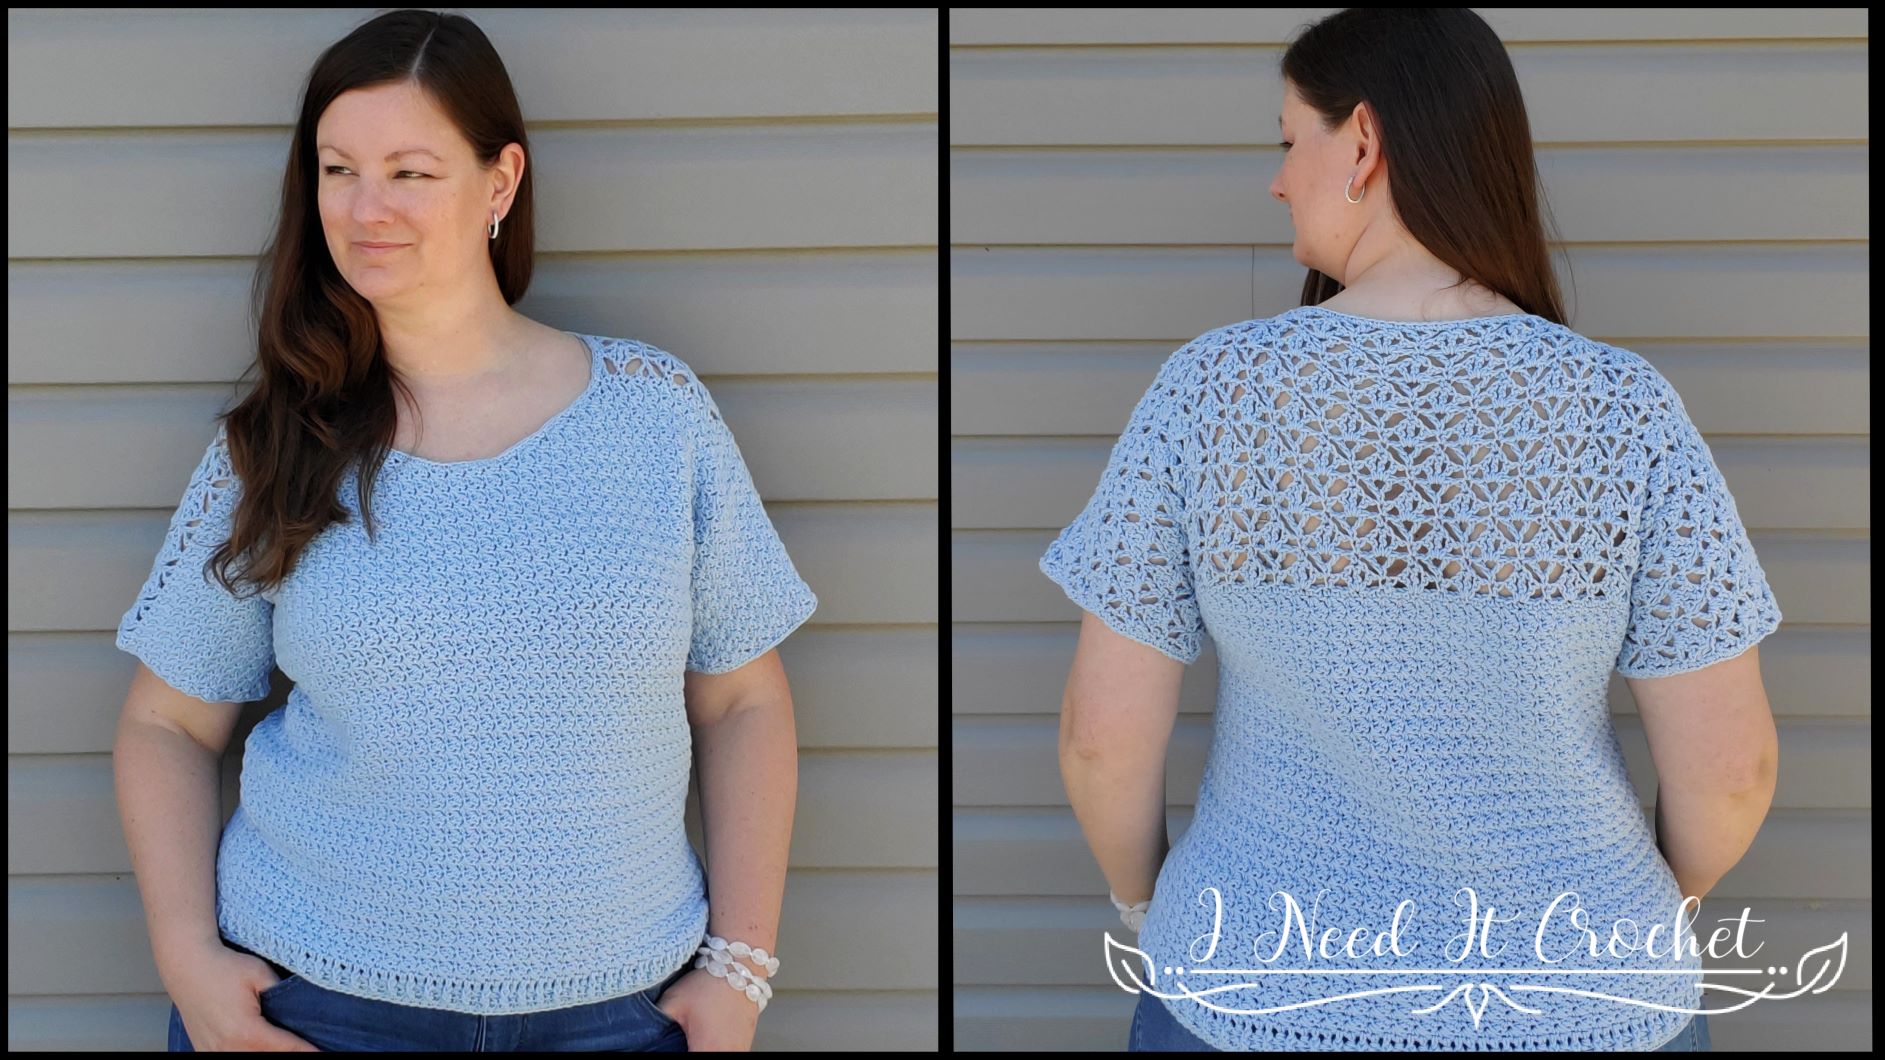
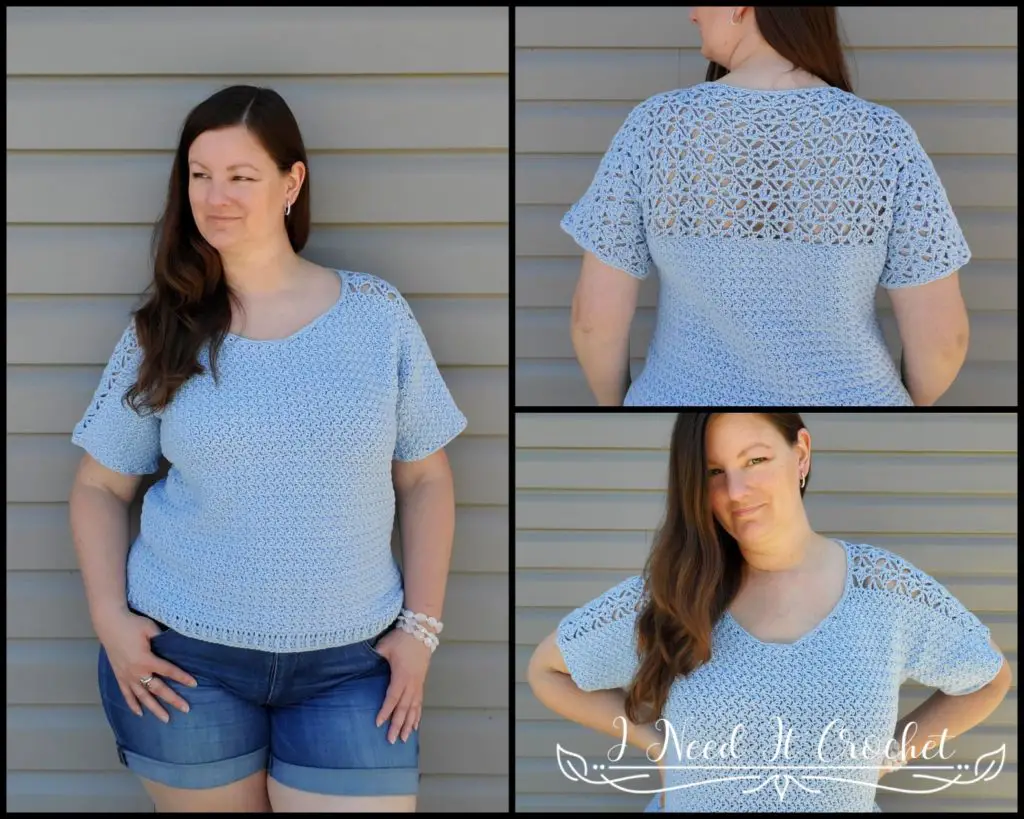
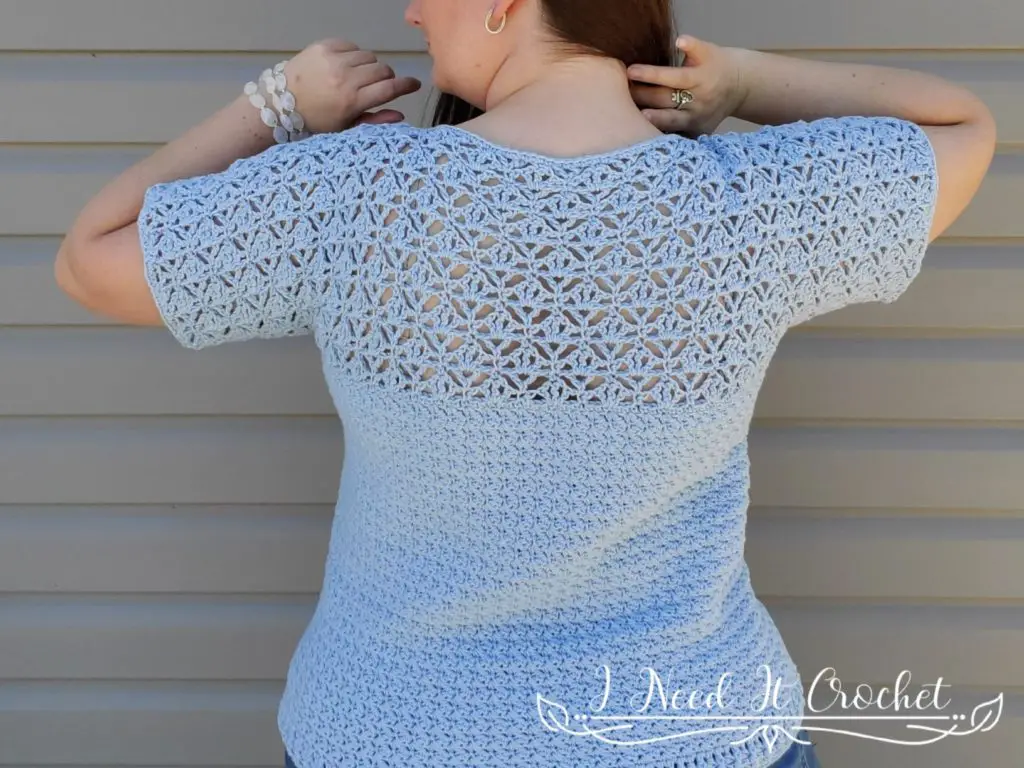
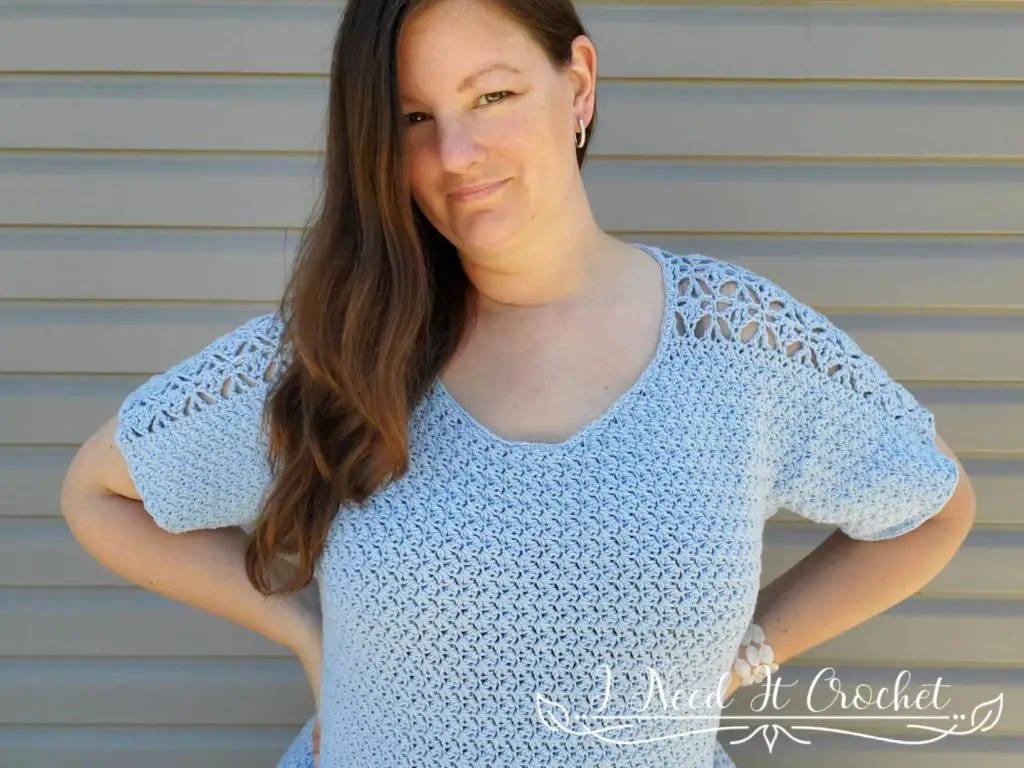
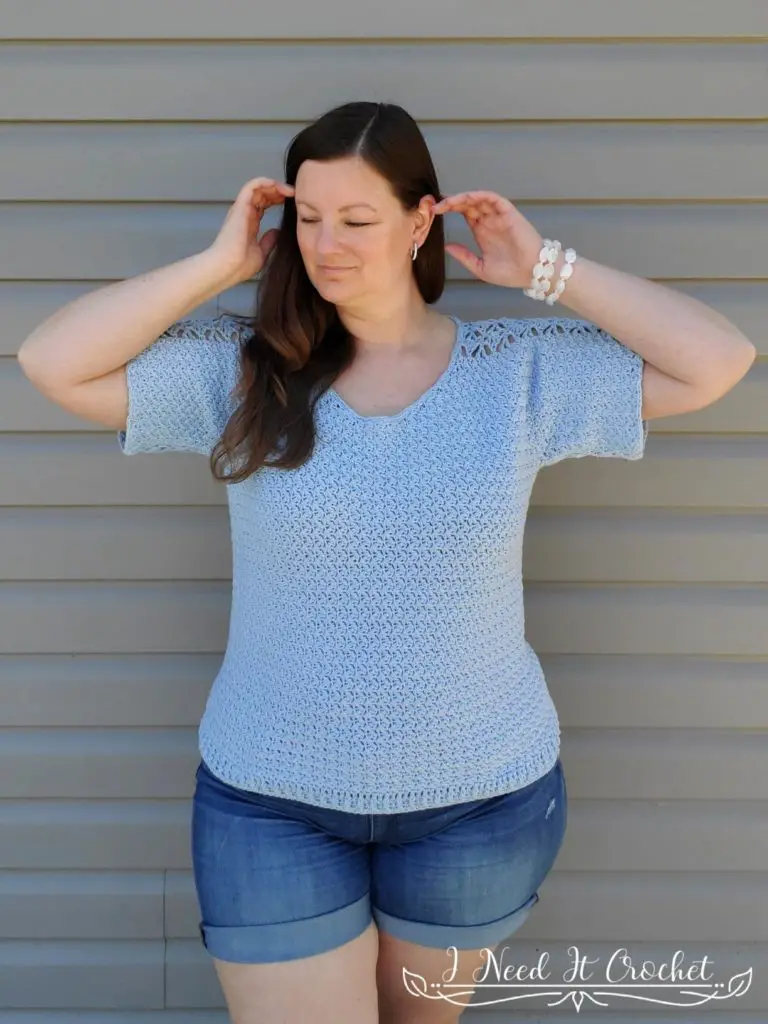
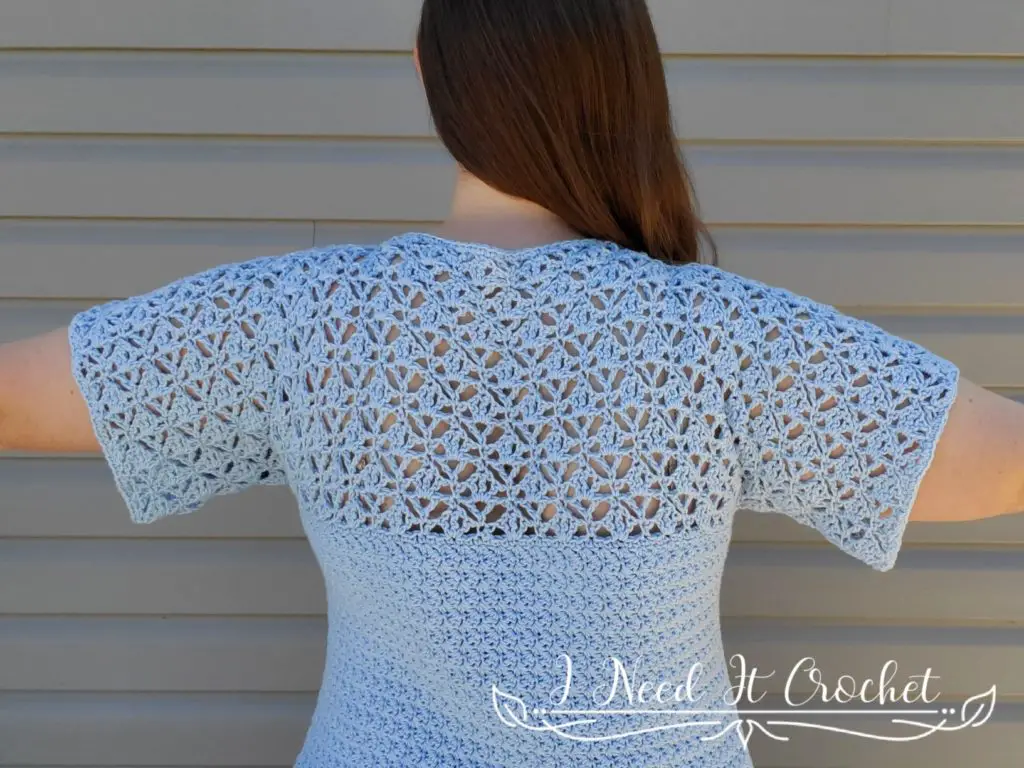
I find myself inspired by classic lace patterns usually found in books or on the internet. As soon as I saw a picture of the crowfoot lattice, I knew it would make a beautiful addition to this top. Using the suzette stitch to create the main fabric, the final combination resulted in a beautiful, light tee that doesn’t require a camisole underneath. You can wear it with your favourite skirt or shorts or throw it on as an extra layer to a summer dress. This top is the perfect addition to your summer wardrobe.
How to Crochet the Morrigan Tee – Free Crochet Top Pattern
Finished Sizes:
Instructions given to fit size X-small; changes for small, medium, large, X-large, 2X-large, 3X-large, 4X-large and 5X-large are in ()
XS (S, M, L, XL, 2XL, 3XL, 4XL, 5XL)
Body Circumference: 28” (32”, 36”, 40”, 44”, 48”, 52”, 56”, 60”)
Finished Length: Customizable.
Arm Circumference: Each size may choose whichever arm circumference they like from the following options: 10 ½” (12 ½”, 14 ½”, 16 ½” 18 ½”, 20 ½”, 22 ½”, 24 ½”, 26 ½”)
Gauge:
See gauge swatch instructions below. Be sure to always check your gauge. It will save you much time and heartache.
Materials:
I used Premier Yarns Cotton Fair, which is a 52% Cotton, 48% Acrylic, #2 Fine weight yarn.
Any yarn of similar weight would work.
Approximately 1000 (1100, 1200, 1300, 1400, 1500, 1600, 1700, 1800) yds.
5mm Hook
Stitch Markers
Yarn Needle
Scissors
Measuring Tape
Abbreviations:
RS = Right Side
WS = Wrong Side
Sk = Skip
St = Stitch
Ss = Slip Stitch
Ch = Chain
Sc = Single Crochet
Dc = Double Crochet
Tr = Treble Crochet
Notes:
Ch1 at the beginning of a row is never considered a stitch.
Ch3 at the beginning of a row is considered a dc.
Ch4 at the beginning of a row is considered a tr.
The model above (that’s me) has a 41” bust and is wearing a size L.
Choose your size according to your largest measurement (bust/waist) and how you would like the top to fit. For a close-fitting top, choose the size closest to your largest measurement. For a loose top, choose a size 2-3” larger.
Gauge Swatch
- Ch 16. (Sc, dc) in 2nd ch from hook. *Sk 1 ch, (sc, dc) in next ch.** Repeat from * to ** until all chs have been worked. Turn. – 16 st
- Ch1. Sk 1st st, (sc, dc) in next st. *Sk next st, (sc, dc) in next st ** Repeat from * to ** across. Turn. – 16 st
Repeat row 2 until you have a total of 12 rows. Your swatch should measure 4” W x 4” H.
Morrigan Tee – Free Crochet Top Pattern
Instructions
This design is nearly seamless. The only sewing to be done is the underarms. The sleeves and upper body are all one piece. We will begin by making the lace panel on the back from the bottom up. Then, we will create the front starting at the neckline and continuing until the front is the same length as the back. Next, we will seam the bottoms of the sleeves, rejoin our yarn, and work on the lower body in the round. Finally, we will add the bottom trim and finish off the sleeves and neck edges.
Upper Back
With a 5mm hook (or the hook used to obtain gauge)
- (Right Side) Ch 93 (105, 111, 123, 123, 135, 141, 153, 153). Sc in 2nd ch from hook and each ch across. Turn. – 92 (104, 110, 122, 122, 134, 140, 152, 152) st
- Ch5. Dc in 1st st (counts as a tr, ch1, dc in 1 st). *Ch1, sk 2 sts, sc in next st. Ch1, sk 2 sts, (dc, ch1, tr, ch1, dc) in next st.** Repeat from * to ** over next 36 (42, 48, 54, 54, 60, 66, 72, 72) sts. Sk 2 sts, ch1, sc2tog over next 2 sts. *Ch1, sk 2 sts, (dc, ch1, tr, ch1, dc) in next st. Sk 2 sts, ch1, sc in next st.** Repeat from * to ** until there are only 3 sts left unworked. Ch1, sk 2 sts, (dc, ch1, tr) in last st (see Figure 1 for an example of what this row looks like). Turn. – check st count in next row
Note: You may have noticed that I don’t specify a stitch count on the even numbered rows. Due to the nature of the pattern, the stitch count will appear inflated on these rows, so I chose to leave them off to reduce confusion. If you are inclined to count your stitches, It is best to do so on the odd numbered rows.
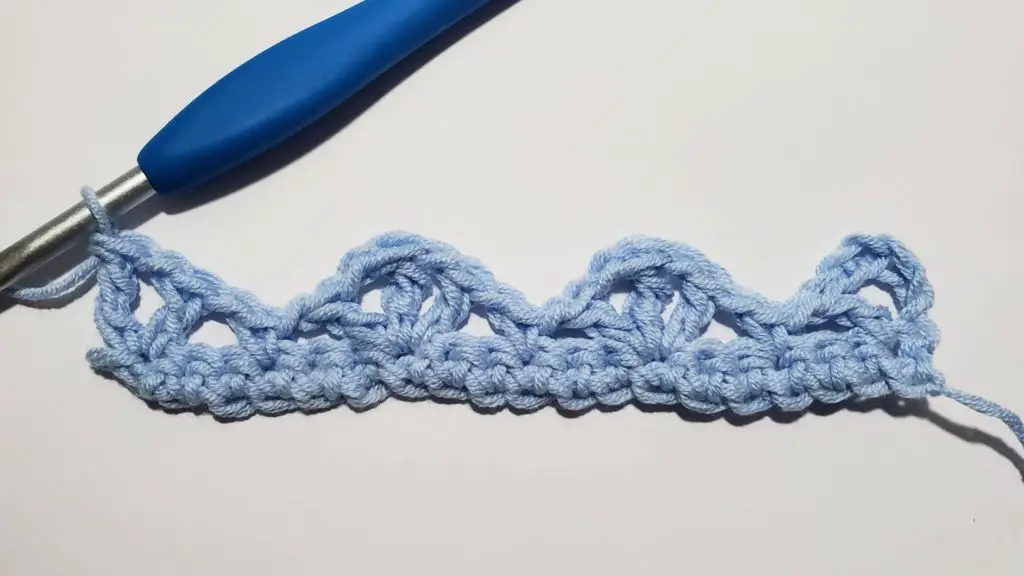
Figure 1
- Ch1. Sc in 1st st. Ch1, sk 3 sts, (tr, ch1, dc in the side of the tr just made (Note that this dc does not go into the same st as the tr. It goes into the bottom 2 loops of the tr you just made. See Figures 2 & 3 for example)). *Ch1, sk 3 sts, Sc in next st. Ch1, sk 3 sts, (tr, ch1, dc in the side of the tr just made).** Repeat from * to ** until there are only 4 sts left unworked. Ch1, sk 3 sts, sc in 4th ch of ch5 (see Figure 4 for an example of what this row looks like). Turn. – 91 (103, 109, 121, 121, 133, 139, 151, 151) st
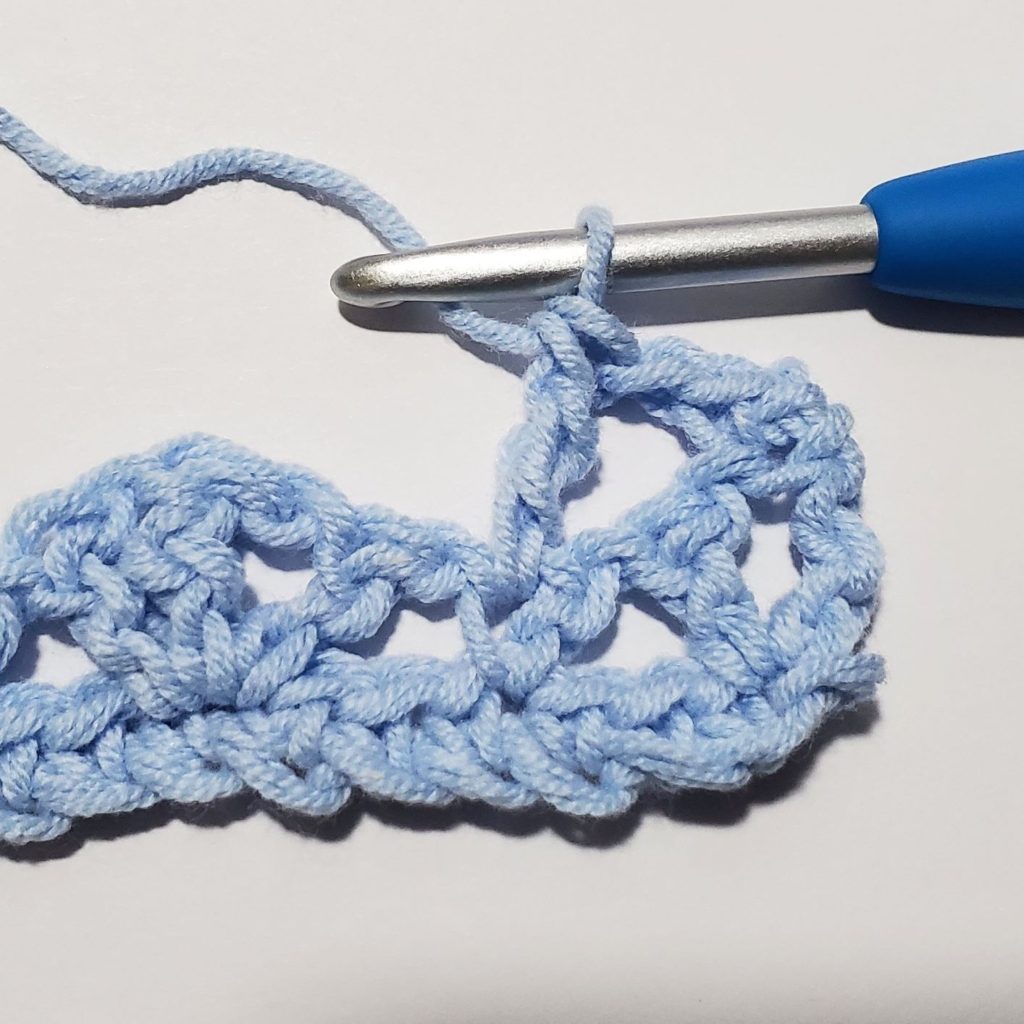
Figure 2
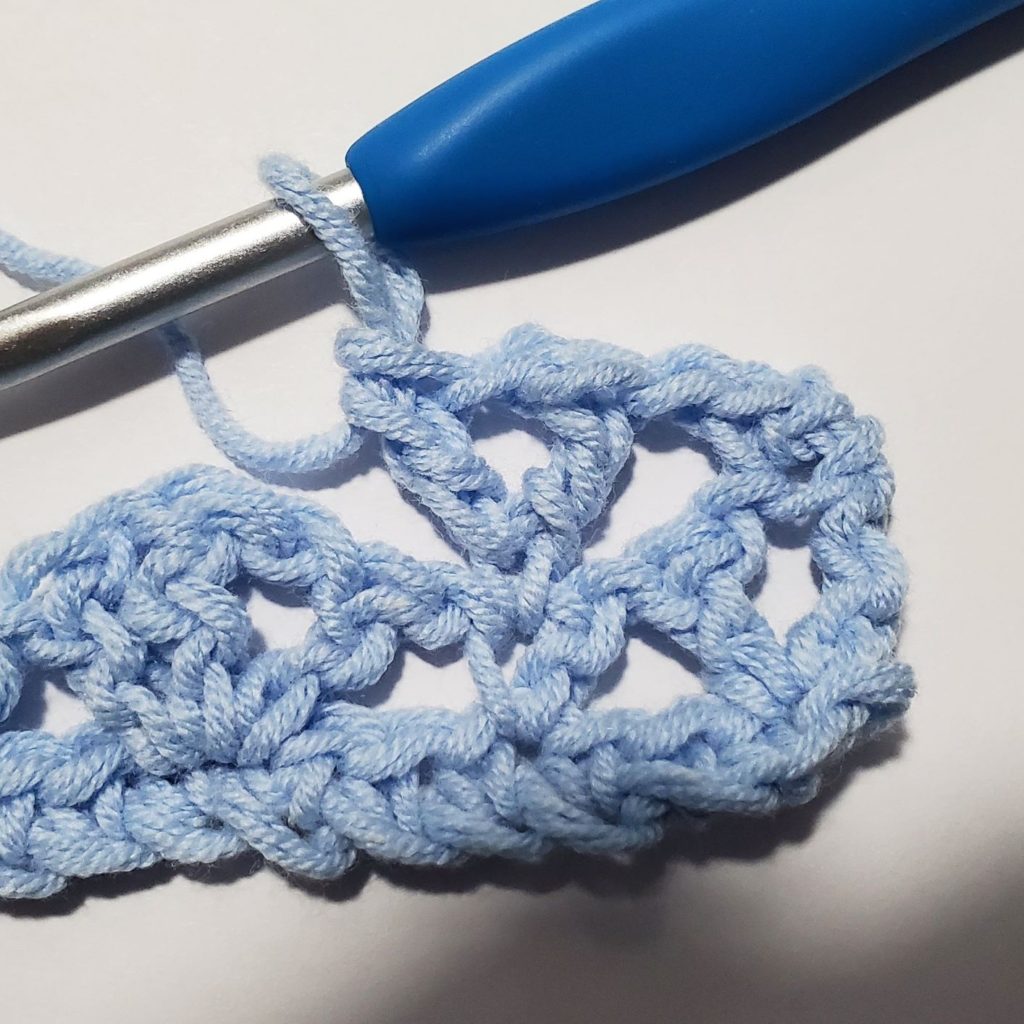
Figure 3

Figure 4
- Ch1. sc in 1st st. *Ch1, sk 2 sts, (dc, ch1, tr, ch1, dc) in next ch1 sp. Ch1, sk 2 sts, sc in next st.** Repeat from * to ** across (see Figure 5 for an example of what this row looks like). Turn. – check st count in next row
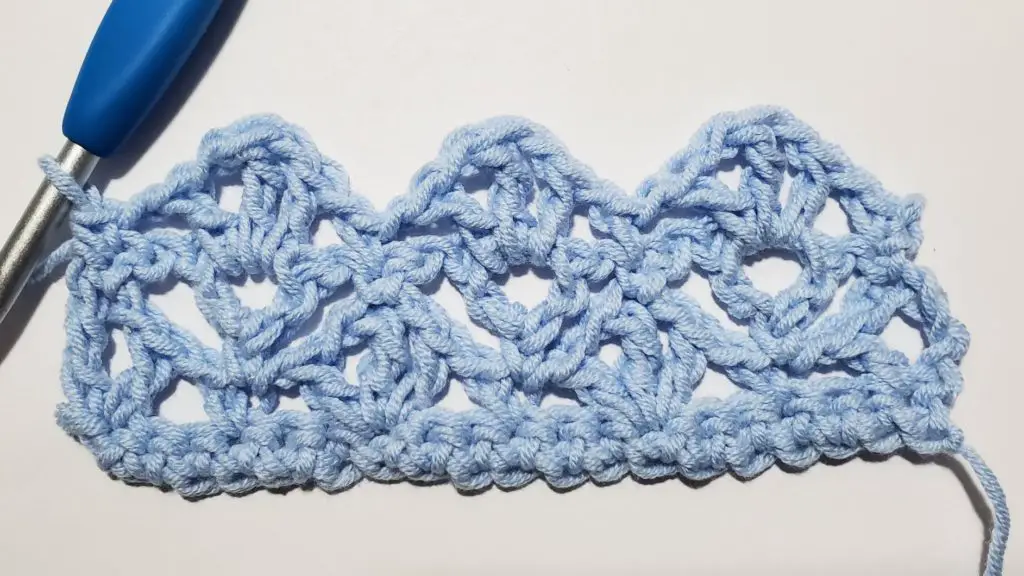
Figure 5
- Ch4. Dc in 4th ch from hook (counts as a tr with a dc in the side of the tr just made). Ch1, sk 3 sts, sc in next st. *Ch1, sk 3 sts, (tr, ch1, dc in the side of the tr just made). Ch1, sk 3 sts, sc in next st.** Repeat from * to ** until there are only 4 sts left unworked. Ch1, sk 3 sts, (tr, dc in the side of the tr just made) in last st (see Figure 6 for an example of what this row looks like). Turn. – 91 (103, 109, 121, 121, 133, 139, 151, 151) st

Figure 6
- Ch5. Dc in 1st st (counts as tr, ch1 dc in 1 st). Ch1, sk 2 sts, sc in next st. *Ch1, sk 2 sts, (dc, ch1, tr, ch1, dc) in next ch1 sp. Ch1, sk 2 sts, sc in next st.** Repeat from * to ** until there are only 3 sts left unworked. Ch1, sk 2 sts, (dc, ch1, tr) in last st (see Figure 7 for an example of what this row looks like). Turn. – check st count in next row
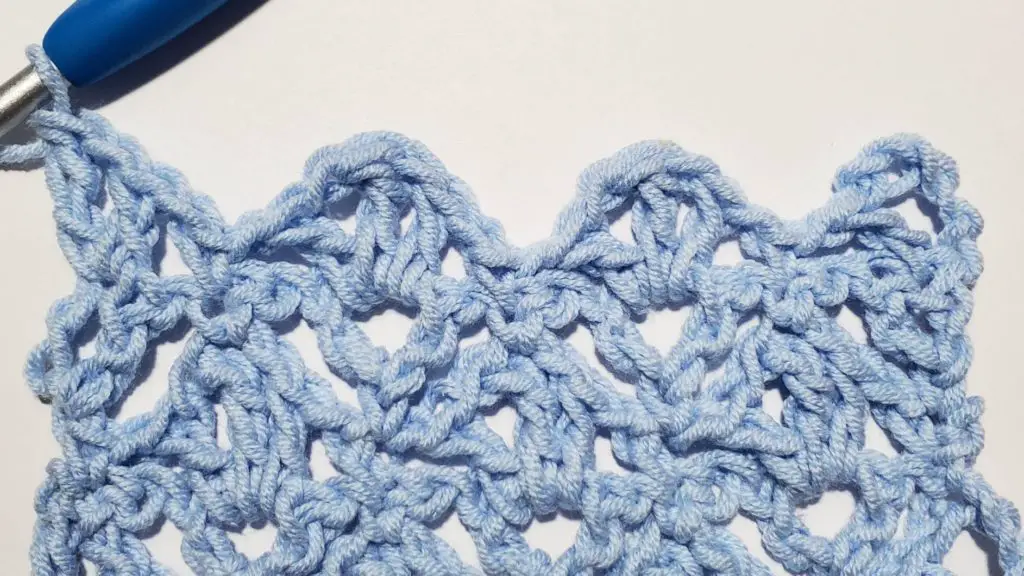
Figure 7
Repeat rows 3 – 6 until you have a total of 11 (13, 15, 17, 19, 21, 23, 25, 27) rows (based on your chosen sleeve circumference). Your height should now be approximately half of your sleeve circumference. (Note: Some yarns may require blocking before the lace holds its shape to the proper size. ) For reference the full sleeve circumferences are 10 ½” (12 ½”, 14 ½”, 16 ½”, 18 ½”, 20 ½”, 22 ½”, 24 ½”, 26 ½”). You can choose whatever sleeve size you want, regardless of body size. Do not bind off.
Measurement check: At this point your project should be approximately 23” (26”, 27 ½”, 30 ½”, 30 ½”, 33 ½”, 35”, 38”, 38”) wide (depending on your body size), and 5 ⅓” (6 ¼”, 7 ¼”, 8 ¼”, 9 ¼”, 10 ¼”, 11 ¼”, 12 ¼”, 13 ¼”) high (depending on your sleeve size). As noted above, lace can be finicky and may require blocking to hold its shape to the proper size.
Morrigan Tee – Free Crochet Top Pattern
Upper Front
Now we will begin shaping the neck. Begin by placing stitch markers 31 (37, 37, 43, 43, 49, 49, 55, 55) sts from each end of your last row (see example in Figure 8). You should have 29 (29, 35, 35, 35, 35, 41, 41, 41) sts left between the stitch markers.
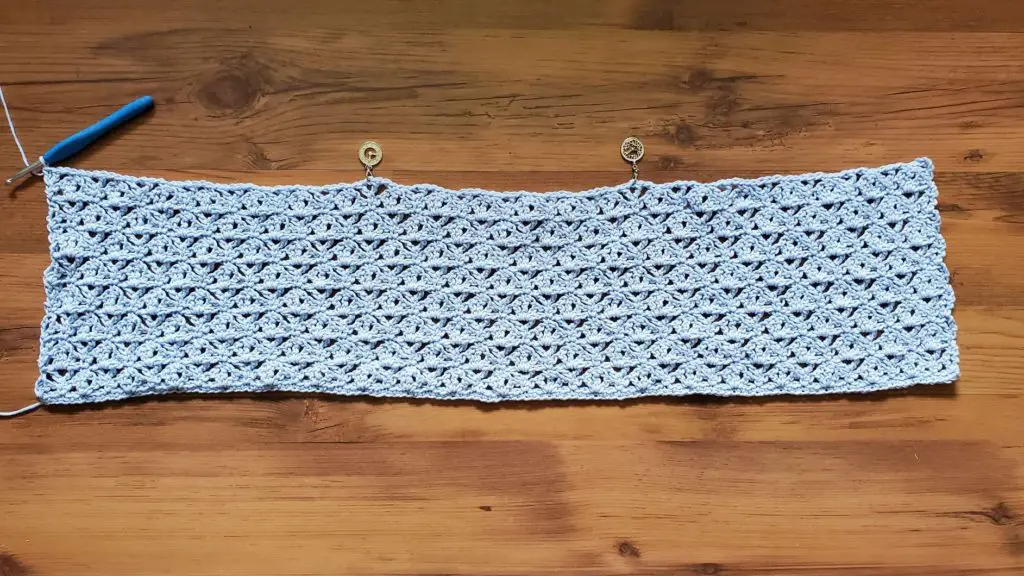
Figure 8
Left Shoulder
I have numbered the rows below to correspond with the lace rows on the Upper Back. If you finished the Upper back on a repeat of row 3, you will begin with row 4 below. If you finished on a repeat of row 5, you will begin with row 6 below. Once you finish row 6, begin working at row 3. You will only work a total of 4 rows.
- Ch1. Sc in 1st st. Ch1, sk 3 sts, (tr, ch1, dc in the side of the tr just made (see figures 2 & 3 for example)). *Ch1, sk 3 sts, Sc in next st. Ch1, sk 3 sts, (tr, ch1, dc in the side of the tr just made).** Repeat from * to ** until there are only 4 sts left unworked. Ch1, sk 3 sts, sc in last st. Turn. – 31 (37, 37, 43, 43, 49, 49, 55, 55) st
- Ch1. sc in 1st st. *Ch1, sk 2 sts, (dc, ch1, tr, ch1, dc) in next ch1 sp. Ch1, sk 2 sts, sc in next st.** Repeat from * to ** until there are only 5 sts left before the st marker/last st. Ch1, sk 2 sts, (dc, ch1, tr, ch1, dc) in next ch1 sp. Ch1, sk 2 sts, sc in st marker/last st. Turn. – check st count in next row
- Ch4. Dc in 4th ch from hook (counts as a tr with a dc in the side of the tr just made). Ch1, sk 3 sts, sc in next st. *Ch1, sk 3 sts, (tr, ch1, dc in the side of the tr just made). Ch1, sk 3 sts, sc in next st.** Repeat from * to ** until there are only 4 sts left unworked. Ch1, sk 3 sts, (tr, dc in the side of the tr just made) in last st. Turn. – 31 (37, 37, 43, 43, 49, 49, 55, 55) st
- Ch5. Dc in 1st st (counts as tr, ch1 dc in 1 st). Ch1, sk 2 sts, sc in next st. *Ch1, sk 2 sts, (dc, ch1, tr, ch1, dc) in next ch1 sp. Ch1, sk 2 sts, sc in next st.** Repeat from * to ** until there are only 2 sts left before the st marker/last st. Ch1, sk 2 sts, (dc, ch1, tr) in the st marker/last st. Turn. – check st count in next row
Once you have completed 4 of the rows above, begin at row 1 below. We will now be increasing sts on one end of the row. Be sure to pay attention to your stitch counts. Placing stitch markers at the beginning and end of each row may help.
- Ch1. Sc in 1st st and each st across. Turn. – 31 (37, 37, 43, 43, 49, 49, 55, 55) st
- Ch3. (Sc, dc) in 1st st. *Sk 1 st, (sc, dc) in next st.** Repeat from * to ** across. Turn. – 33 (39, 39, 45, 45, 51, 51, 57, 57) st
- Ch1. Sk 1st st, (sc, dc) in next st. *Sk 1 st, (sc, dc) in next st.** Repeat from * to ** until there is only 1 st left unworked. (Sc, 2dc) in last st. Turn. – 35 (41, 41, 47, 47, 53, 53, 59, 59) st
- Repeat row 2. – 37 (43, 43, 49, 49, 55, 55, 61, 61) st
- Repeat row 3. – 39 (45, 45, 51, 51, 57, 57, 63, 63) st
- Repeat row 2. – 41 (47, 47, 53, 53, 59, 59, 65, 65) st
- Repeat row 3. – 43 (49, 49, 55, 55, 61, 61, 67, 67) st
Sizes XS & S only: Ch6, bind off. Skip rows 8 – 9 and continue to instructions below.
- Repeat row 2. – n/a (n/a, 51, 57, 57, 63, 63, 69, 69) st
Sizes M, L, XL, & 2X only: Bind off. Skip row 9 and continue to instructions below.
- Repeat row 3. – n/a (n/a, n/a, n/a, n/a, n/a, 65, 71, 71) st
Sizes 3X, 4X, & 5X only: Ch10, bind off.
Your project should now look similar to Figure 9. You may or may not have a chain at the end of your last row.
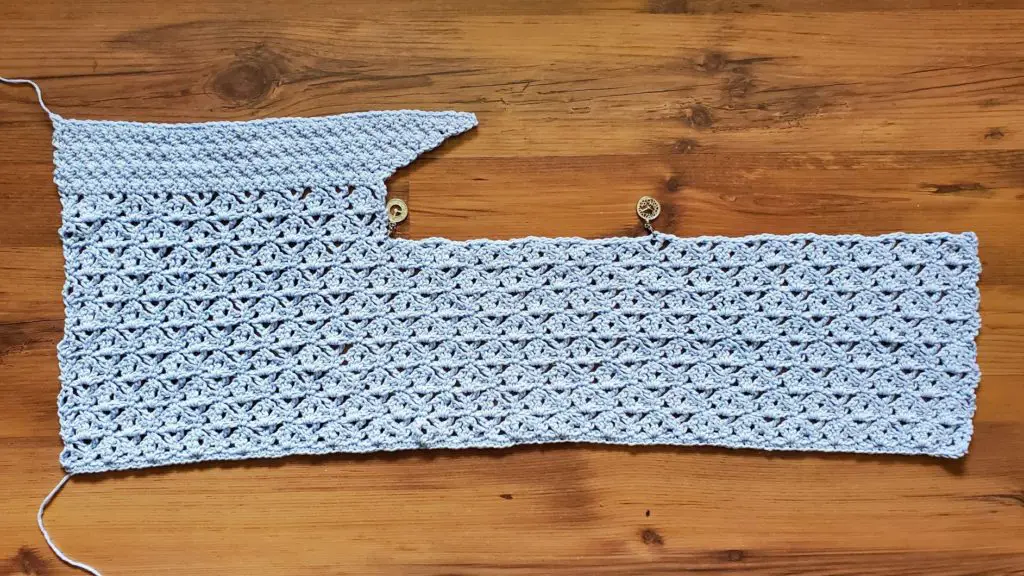
Figure 9
Right Shoulder
I have numbered the rows below to correspond with the lace rows on the Upper Back. If you finished the Upper back on a repeat of row 3, you will begin with row 4 below. If you finished on a repeat of row 5, you will begin with row 6 below. Once you finish row 6, begin working at row 3. You will only work a total of 4 rows.
With the wrong side facing you, join your yarn in the other stitch marker.
- Ch1. Sc in 1st st. Ch1, sk 3 sts, (tr, ch1, dc in the side of the tr just made (see figures 2 & 3 for example)). *Ch1, sk 3 sts, Sc in next st. Ch1, sk 3 sts, (tr, ch1, dc in the side of the tr just made).** Repeat from * to ** until there are only 4 sts left unworked. Ch1, sk 3 sts, sc in last st. Turn. – 31 (37, 37, 43, 43, 49, 49, 55, 55) st
- Ch1. sc in 1st st. *Ch1, sk 2 sts, (dc, ch1, tr, ch1, dc) in next ch1 sp. Ch1, sk 2 sts, sc in next st.** Repeat from * to ** across. Turn. – check st count in next row
- Ch4. Dc in 4th ch from hook (counts as a tr with a dc in the side of the tr just made). Ch1, sk 3 sts, sc in next st. *Ch1, sk 3 sts, (tr, ch1, dc in the side of the tr just made). Ch1, sk 3 sts, sc in next st.** Repeat from * to ** until there are only 4 sts left unworked. Ch1, sk 3 sts, (tr, dc in the side of the tr just made) in last st. Turn. – 31 (37, 37, 43, 43, 49, 49, 55, 55) st
- Ch5. Dc in 1st st (counts as tr, ch1 dc in 1 st). Ch1, sk 2 sts, sc in next st. *Ch1, sk 2 sts, (dc, ch1, tr, ch1, dc) in next ch1 sp. Ch1, sk 2 sts, sc in next st.** Repeat from * to ** until there are only 3 sts left unworked. Ch1, sk 2 sts, (dc, ch1, tr) in the last st. Turn. – check st count in next row
Once you have completed 4 of the rows above, begin at row 1 below. We will now be increasing sts on one end of the row. Be sure to pay attention to your stitch counts. Placing stitch markers at the beginning and end of each row may help.
- Ch1. Sc in 1st st and each st across. Turn. – 31 (37, 37, 43, 43, 49, 49, 55, 55) st
- Ch1. Sk 1st st, (sc, dc) in next st. *Sk 1 st, (sc, dc) in next st.** Repeat fromm * to ** until there is only 1 st left unworked. (Sc, 2dc) in last st. Turn. – 33 (39, 39, 45, 45, 51, 51, 57, 57) st
- Ch3. (Sc, dc) in 1st st. *Sk 1 st, (sc, dc) in next st.** Repeat from * to ** across. Turn. – 35 (41, 41, 47, 47, 53, 53, 59, 59) st
- Repeat row 2. – 37 (43, 43, 49, 49, 55, 55, 61, 61) st
- Repeat row 3. – 39 (45, 45, 51, 51, 57, 57, 63, 63) st
- Repeat row 2. – 41 (47, 47, 53, 53, 59, 59, 65, 65) st
- Repeat row 3. – 43 (49, 49, 55, 55, 61, 61, 67, 67) st
Sizes XS & S only: Bind off. Skip rows 8 – 9 and continue to instructions below.
- Repeat row 2. – n/a (n/a, 51, 57, 57, 63, 63, 69, 69) st
Sizes M, L, XL, & 2X only: Ch8, bind off. Skip row 9 and continue to instructions below.
- Repeat row 3. – n/a (n/a, n/a, n/a, n/a, n/a, 65, 71, 71) st
Sizes 3X, 4X, & 5X only: Bind off.
Morrigan Tee – Free Crochet Top Pattern
Upper Front Continued
Using the tail end, join your chain to the first stitch of the other side of the neck hole (See Figure 10).
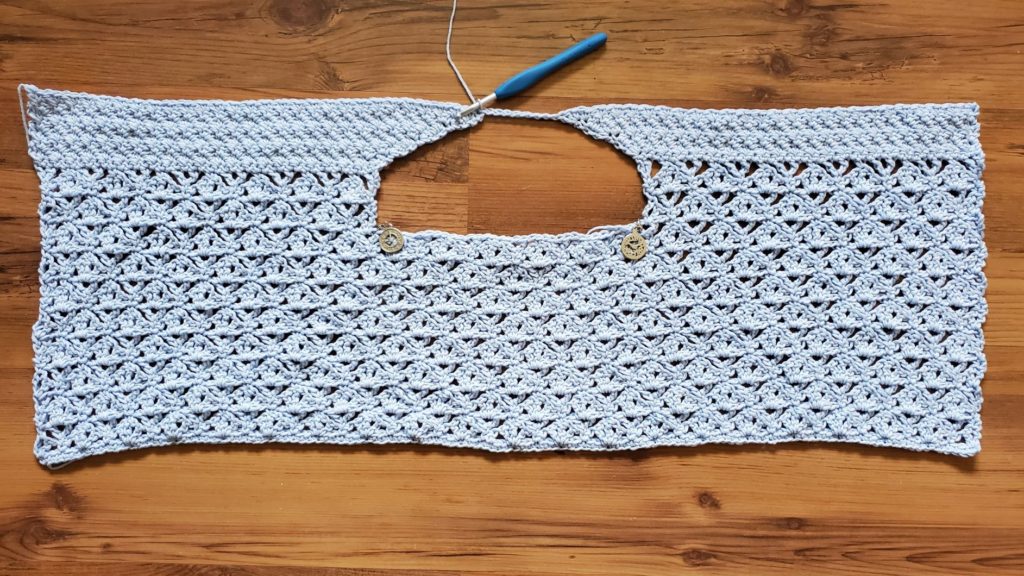
Figure 10
With the RS (RS, WS, WS, WS, WS, RS, RS, RS) facing you, join your yarn in the first stitch.
- Ch1. Sk 1st st, (sc, dc) in next st. *Sk 1 st, (sc, dc) in next st.** Repeat from * to ** across. Turn. – 92 (104, 110, 122, 122, 134, 140, 152, 152) st
Repeat row 1 until you have a total of 11 (15, 17, 19, 23, 25, 27, 29, 33) rows (based on your chosen sleeve circumference) counting from the sc row after the last lace row. Bind off. Note: Your project should still be approximately 23” (26”, 27 ½”, 30 ½”, 30 ½”, 33 ½”, 35”, 38”, 38”) wide, depending on your body size. If your work is a different width, you may have fallen off of gauge. You may want to pull your work back and try a different hook size.
Your project should now look similar to Figure 11. Fold it in half with the right sides together like you see in Figure 12. Whip stitch the first and last rows of your project together using 18 (20, 19, 21, 17, 19, 18, 20, 16) sts from each end. This is the underarm. You should have 112 (128, 144, 160, 176, 192, 208, 224, 240) sts open in the middle.
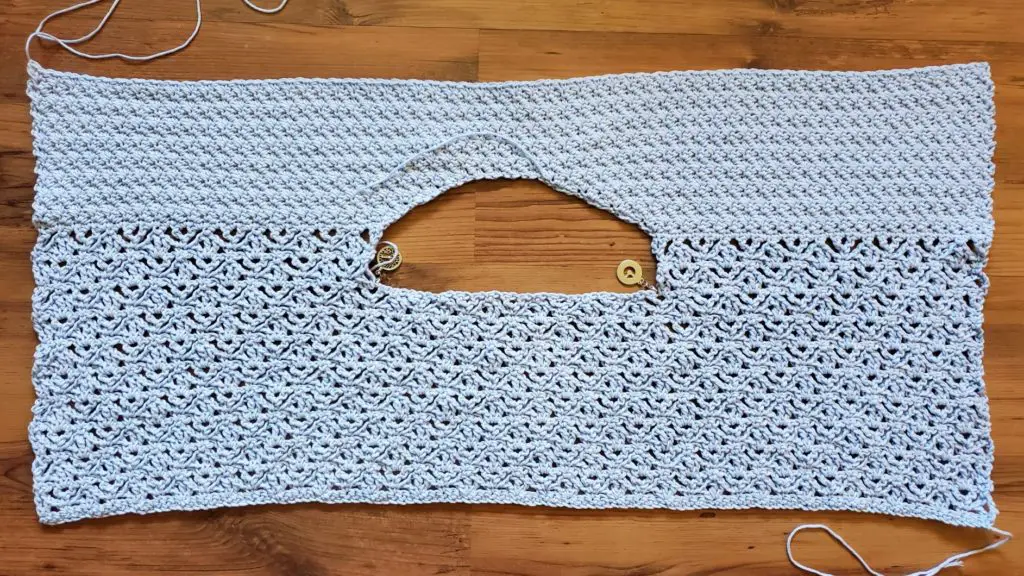
Figure 11
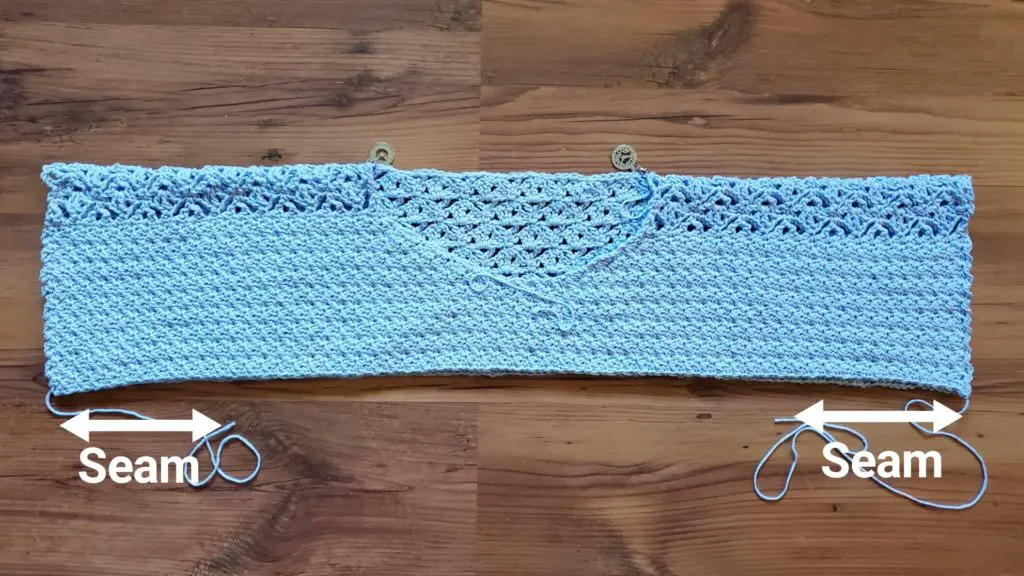
Figure 12
Lower Body
With the RS facing you, join your yarn near one of the seams in a sc stitch.
- Ch1. (Sc, dc) in 1st st. Sk 1 st. *(Sc, dc) in next st. Sk 1 st.** Repeat from * to ** around. Ss to join to 1st st. Turn. – 112 (128, 144, 160, 176, 192, 208, 224, 240) st
Repeat row 1 until you have achieved the desired length minus 1”. Be sure that the last row is worked with the right side facing you. Then, turn your work so the wrong side is facing you before moving on to the bottom band. Note: Once you have worked 4 – 6 rounds, it would be wise to check that you are achieving the proper bust size. For reference, you want your bust to be 28” (32”, 36”, 40”, 44”, 48”, 52”, 56”, 60”) around.
Bottom Band
- Ch3. Dc in next st and each st around. Ss to join to 1st st. Turn. – 112 (128, 144, 160, 176, 192, 208, 224, 240) st
- Ch2. Fpdc around 1st st, bpdc around next st. *Fpdc around next st, bpdc around next st.** Repeat from * to ** around. Ss to join to 1st st. Turn. – 112 (128, 144, 160, 176, 192, 208, 224, 240) st
- Ch2. Bpdc around 1st st, fpdc around next st. *Bpdc around next st, fpdc around next st.** Repeat from * to ** around. SS to join to 1st st. Turn. – 112 (128, 144, 160, 176, 192, 208, 224, 240) st
- Ch1. Sc in 1st st and each st around. Ss to join to 1st st. Bind off. – 112 (128, 144, 160, 176, 192, 208, 224, 240) st
Sleeve Edges
We will finish off the sleeves with a simple sc border. The final stitch count here doesn’t matter much. What is important is that the edge looks even. Keep in mind that some yarns require blocking for the lace to spread out, so your lace may end up bigger than it currently looks. You may consider blocking before you add the sleeve and neck edges. With the right side facing you, attach your yarn near the bottom edge of your sleeve.
- Ch1. Work sc sts around the edge of the sleeve in the following manner:
– 1 sc in the end of each sc.
– 2 sc in the end of each dc.
– 3 sc in the end of each tr.
Neck Edge
The neck edge will be worked similarly to the sleeve edges. With the right side facing you, attach your yarn at the back of the neck.
- Ch1. Work sc sts around the edge of the sleeve in the following manner:
– 1 sc in each st/ch sp.
– 1 sc in the end of each sc.
– 2 sc in the end of each dc.
– 3 sc in the end of each tr.
Weave in your ends, and you’re done!
I hope you love your new crochet summer top, and I look forward to seeing all of your beautiful pictures on Ravelry!
If you’d like to know when I post new patterns and tutorials, head on over to my Facebook and Instagram and give me a like and a follow!
If you enjoyed The Hilo Tunic – Free Crochet Top Pattern, you may want to check out my other designs!
And If you haven’t already, don’t forget to subscribe to my newsletter.
[rainmaker_form id=”1806″]
Morrigan Tee – Free Crochet Top Pattern
And until next time… Happy Hooking! 😉
