Kevin's cowl
17.Feb.21 / Kirsten BalleringCreate a colourful and comfortable cowl with the puffy V-stitch! The stitch is perfect for winter, and the end result is easy to master for beginners.
Materials and preparation
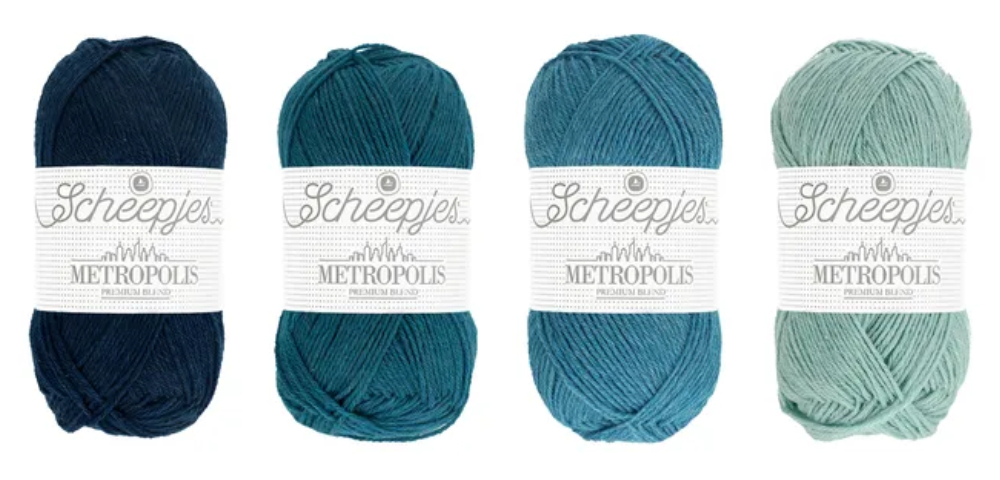
Yarn
- Colour A: 007 Philadelphia x 1 ball
- Colour B: 010 Ankara x 1 ball
- Colour C: 014 Lahore x 1 ball
- Colour D: 019 Marseille x 1 ball
- Sewing needle
Shop the yarn!
Find your Scheepjes Metropolis at your local retailer, or online via:
Crochet hook
4.0mm (US size G/6)
Measurements
27cm (10.7in) in height, 127cm (50in) in circumference (~40cm (15.8in) in height when double wrapped).
Gauge/tension
7 V-sts and 8 rows measure 10 x 10cm (4x4in). Because this pattern is mostly blocked in width, the final height of the cowl is slightly less than what should be expected based on un-blocked gauge.
Notes
- The stitch multiple for this pattern is 3+1. Use a multiple of 3 + 1 stitch for the starting chain if you want to alter the size.
Abbreviations (US Terms)
- ch: chain
- dc: double crochet
- dc2tog: double crochet 2 stitches together
- dc4tog: double crochet 4 stitches together
- dc4tog with 2 skipped sts: double crochet 4 stitches together with 2 skipped stitches: (yarn over, insert hook in st, yarn over, pull up loop, yarn over, pull through first 2 loops on hook) twice in same st, skip 2 sts, (yarn over, insert hook in st, yarn over, pull up loop, yarn over, pull through first 2 loops on hook) twice in next st, yarn over, pull through all loops on hook
- RS: right side
- sp: space
- ss: slip stitch
- st(s): stitch(es)
- WS: wrong side
Repeat formats
- (…) once/twice/3x Crochet the instructions between brackets the total number of times indicated.
- […] Indicates the amount of stitches at the end of a row or round.
Techniques
Puffy V stitch
The puffy V stitch is quite an easy once you've got the first row sorted. It consists of four double crochets that are double crocheted together in the same stitch with a bit of space in between, creating the legs of the V. This sounds complicated but if you do it step by step, it's easy! Let me show you how.
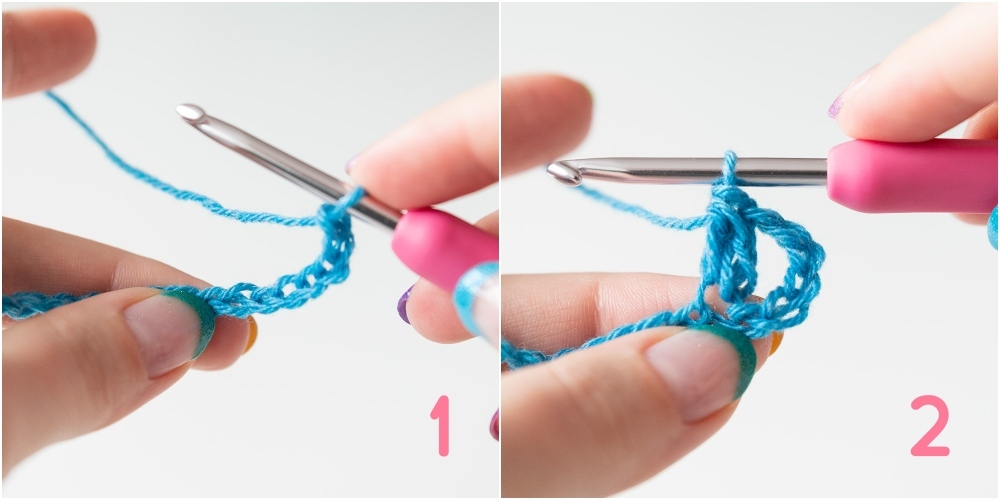
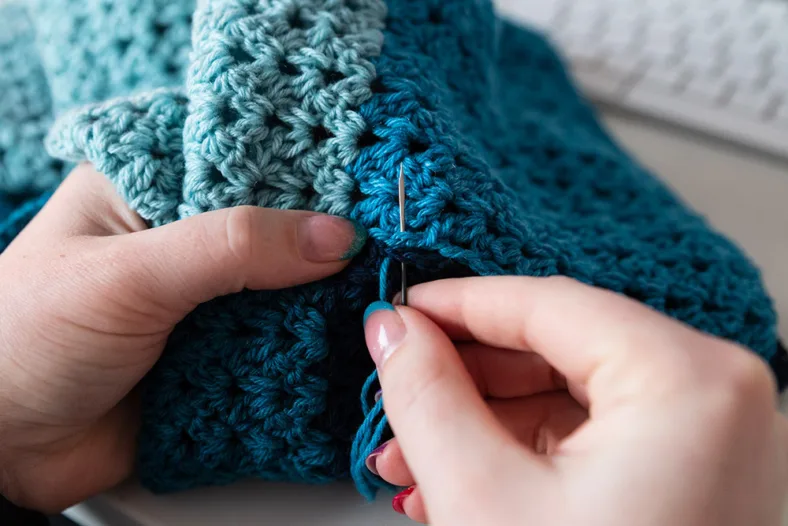
To start, crochet your starting number of chains. Ch3 as per instructions in the first row. You're now going to count back to the 7th ch from your hook. That's the stitch you're going to work in (photo 1).
The first and last 'V' of each row are half V's (so with just one leg). To make this work a dc2tog: (yarn over, insert hook in st, yarn over, pull up loop, yarn over, pull through first 2 loops on hook) two times in the same st, yarn over once more, and pull through all loops on hook. This completes your dc2tog and should now look like photo 2.
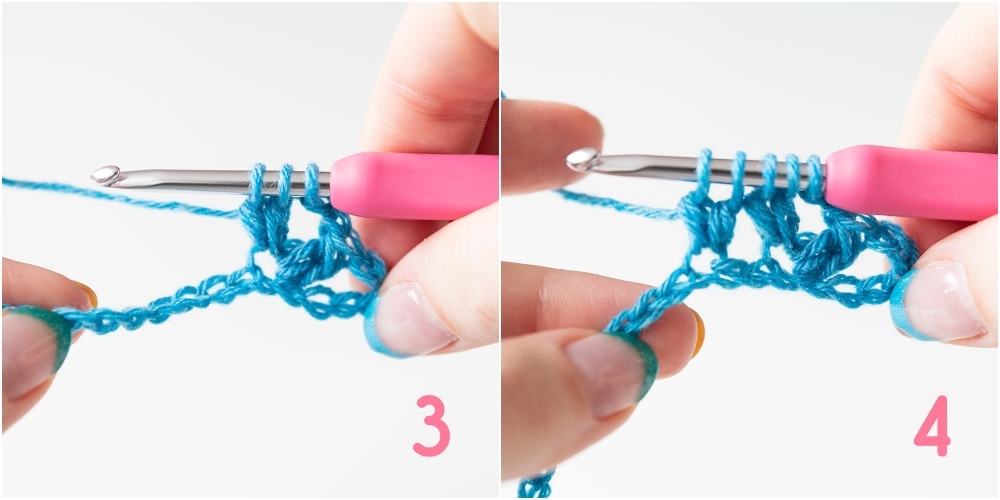
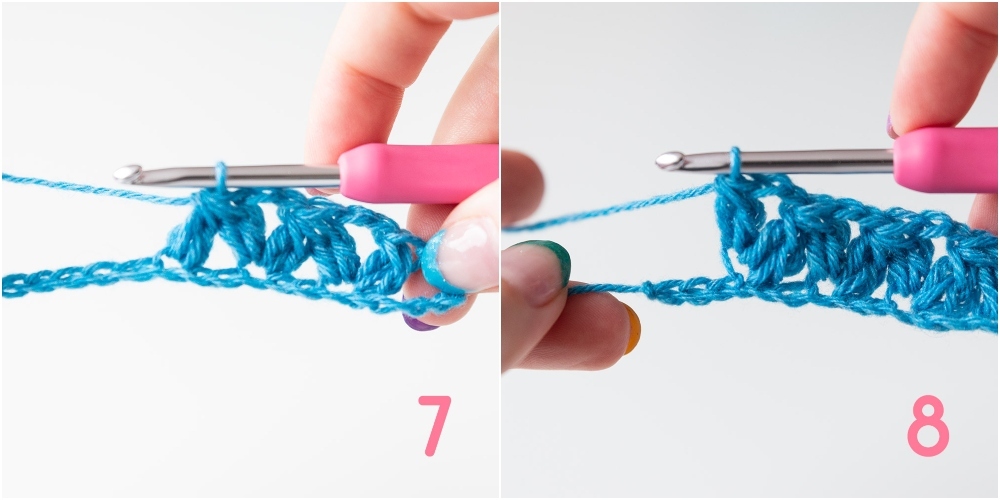
Ch2. Now, start making a dc2tog in the same st as your previous dc2tog: (yarn over, insert hook in st, yarn over, pull up loop, yarn over, pull through first 2 loops on hook) two times in the same st (photo 3). Now, skip two sts and repeat the instructions between brackets two times in the next st. You should now have four loops on your hook (photo 4). Yarn over, and pull through all loops on hook (photo 5). This I what I call a 'dc4tog with 2 skipped sts' in the pattern. It's the basic stitch repeat for the V-stitch.
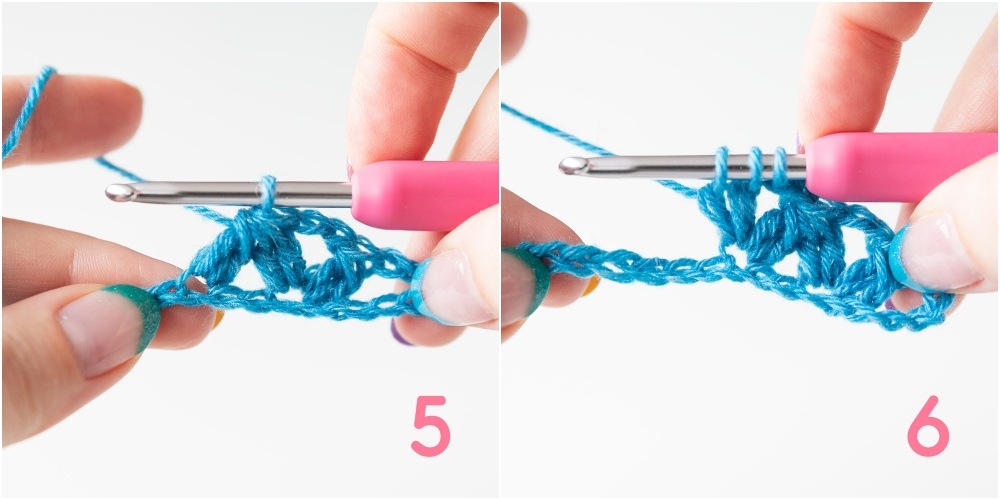
After this, it's more or less just repeating this action. Ch2, make a half dc2tog in the same st as your previous dc4tog-leg, skip 2 sts and make the next half dc2tog leg, yarn over and pull through all loops (photo 6-7). Do this until there are three chains left on your beginning chain. Ch2, make a dc2tog (photo 8), skip 2 sts and make a dc in the final st.
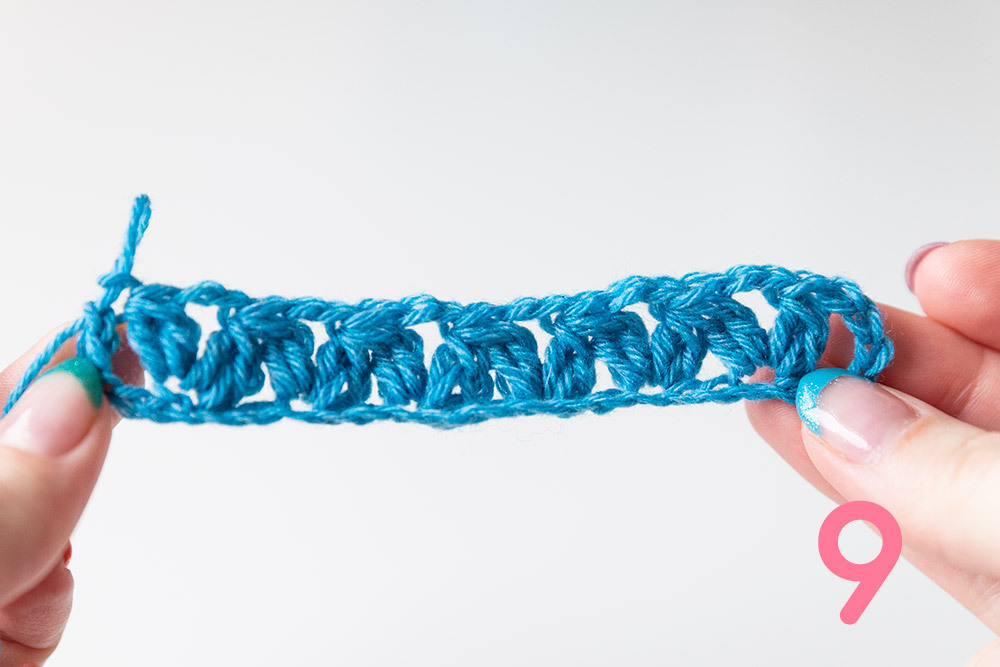
This is your first row (photo 9). See that it starts and ends with half a V, and that each V consists of two legs in two different stitch repeats?
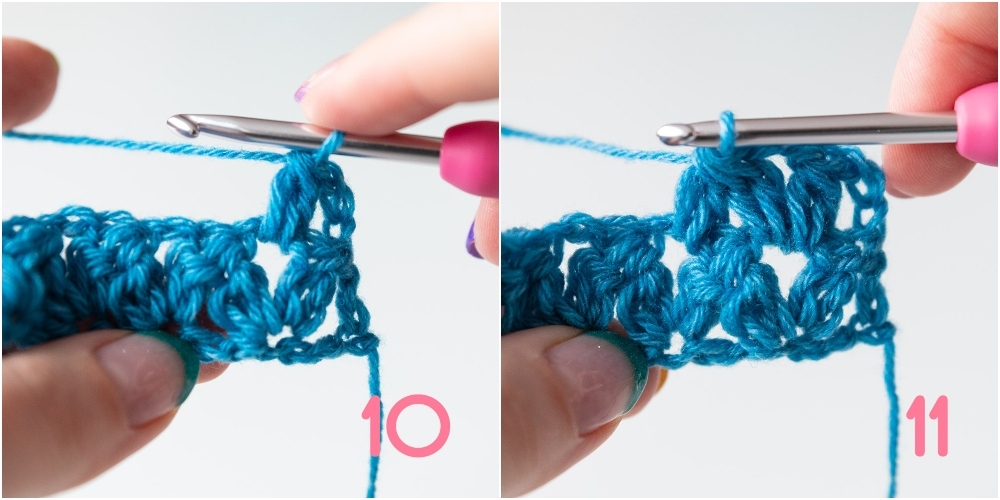
Ch3 to start your second row. Make a dc2tog to create your first half V (photo 10), ch2 and then work a dc4tog on both sides of the previous row's V (photo 11). The V's should perfectly align.
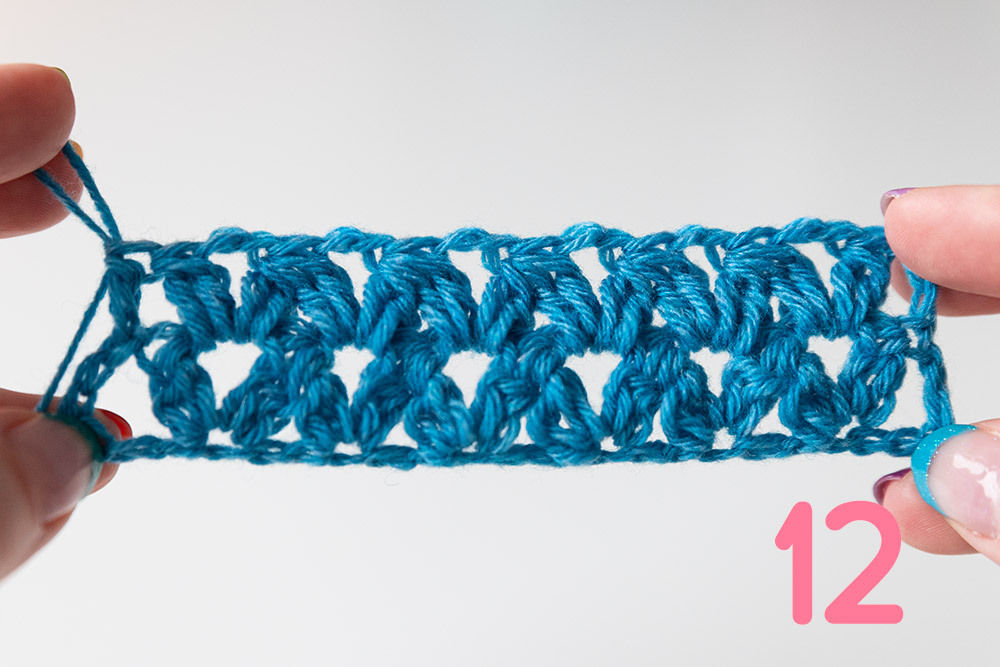
Continue working a ch2 and dc4togs on both sides of the previous row's V's until you've crocheted around the final complete V. make a dc2tog in the same space, and finally work 1dc in the top ch of the ch3 you started your previous row with (photo 12). That's all!
Crochet pattern
Cowl (first half)
With Colour A, ch124.
Row 1 (RS) Ch3 (counts as first dc), dc2tog in 7th st from hook, (ch2, dc4tog with 2 skipped sts) 39x, dc2tog in same st as last dc2tog in dc4tog, skip 2 sts, 1dc in last st, turn. [39 dc4togs with 2 skipped sts, 2 dc2togs, 2dc]
Row 2 (WS) Ch3 (counts as first dc), dc2tog in sp between dc2tog and dc4tog of previous row, (ch2, dc4tog in same and next sp) 39x, dc2tog in same sp as last dc2tog, 1dc in last st, turn. [39 dc4togs, 2 dc2togs, 2dc]
Rows 3-11 Repeat Row 2. Cut yarn, leave a long end for sewing later.
Join Colour B with a ss in last st.
Rows 12-22 Repeat Row 2. Cut yarn, leave a long end for sewing.
Cowl (second half)
Repeat the instructions for the first half with Colour C instead of Colour A, and Colour D instead of Colour B. Cut yarn, leave a long end for sewing.
Assembly
I recommend blocking both halves to size first, as that makes assembly much easier. Block each half to approximately 27cm (10.7in) in height and 65cm (25.6in) in length. When the cowl halves have been blocked, position them side by side with RS facing, making Colour A match up with Colour C as in the graphic below.
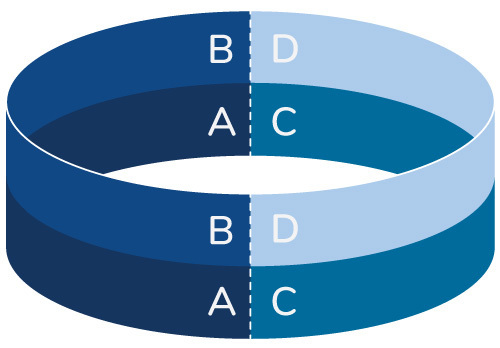
Using the yarn end of either Colour A or C and a sharp needle to sew the dc's and chains on both edges together. Once you've reached the halfway point where the colours change, fasten off the yarn end and use either the yarn end of Colour B or D to continue the seam. Fasten off. Repeat this for the other side to close the cowl.
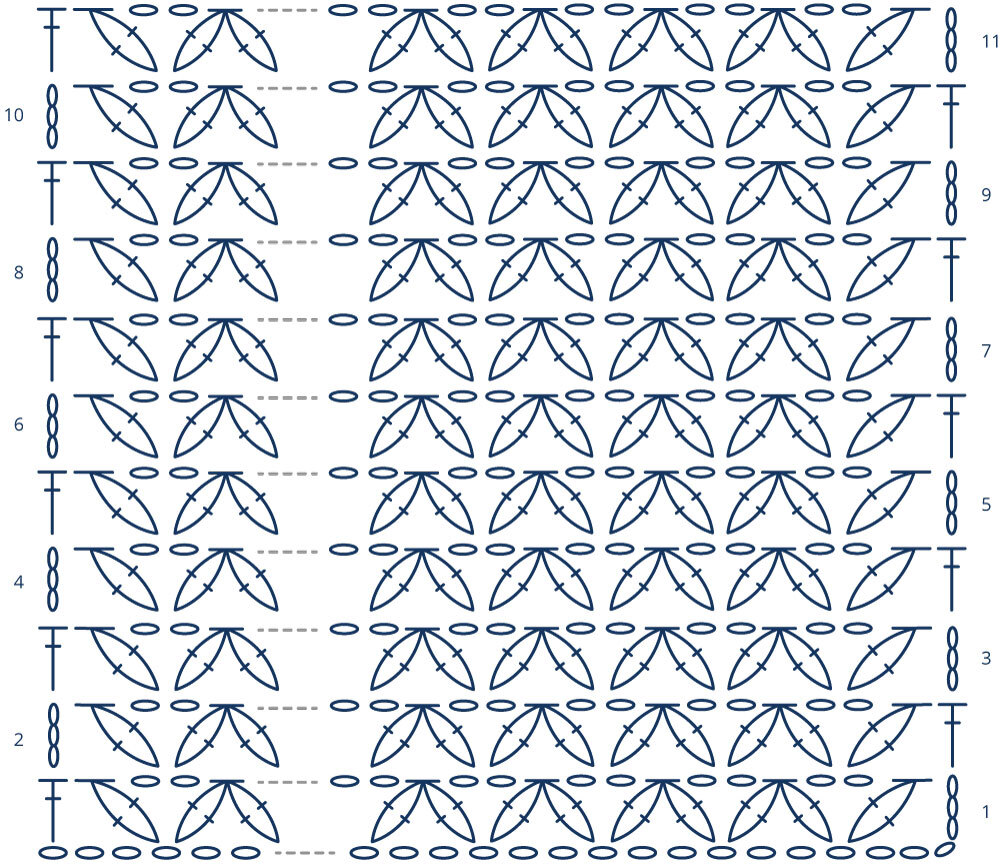
Diagram
Crochet diagram Cowl
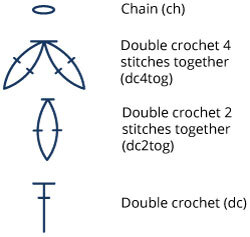
Key (US terms)


Comments