07 1 / 2015
Hockey Skates

I think it’s a general rule that small things are just cuter (kawaii). Things like small teddy bears, baby shoes, or in this case, tiny hockey skates! My friend who loves hockey, asked me to make a pair of hockey skates he could hang over his rear-view mirror. And I made his idea into a reality! I had so much fun making this pattern!
Materials:
- 3.5mm hook
- medium weight yarn in black, white, and grey
- poly fill stuffing
Skate: done in JOINING ROUNDS
In black
1) ch 9. Starting in the second ch from the hook, 2hdc, 1hdc in the next 5sts, 2hdc, 3dc, 2hdc, 1hdc in the next 5 sts, 2hdc (21)
2) 2hdc, 2hdc, 1hdc in the next 6sts, 1dc, 2dc, 2dc, 2dc, 2dc, 1dc, 1hdc in the next 6sts, 2hdc (28)
3) 2hdc, 2hdc, 2hdc, 2hdc, 1hdc in the next 7sts, 1dc, 2dc, 2dc, 2dc, 2dc, 2dc, 2dc, 1dc, 1hdc in the next 8sts, 2hdc (39)
4) In back loops only, 1hdc in each st (39)
5) 1hdc in each st (39)
6) 1hdc in the next 18sts, *1hdc dec, 1hdc* x5, 1hdc in the next 6sts (34)
7) 1hdc in the next 15sts, 1hdc dec x7, 1hdc in the next 5sts (27)
8) 1hdc in the next 14sts, 1hdc dec. ch 1 turn. (15) now work in rounds
9) 1hdc dec, 1hdc in the next 15sts, 1hdc dec (17)
10) 1hdc dec, 1hdc in the next 13sts, 1hdc dec (15)
11) 1hdc dec, 1hdc in the next 11sts, 1hdc dec (13) Fasten off and weave in the end
Back Flap:
In black
1) starting on top of row 11, skip 4 sts, 1sc in the next 5 sts (5) ch 1 to turn
2) 1sc in the next 5 sts (5) Fasten off and weave in the ends

Tongue:
In black
1) ch 4. Starting in the second ch from the hook, 1hdc in each ch (3) ch 1 to turn
Rows 2-9) 1hdc in each stitch (3) ch 1 to turn. Sc around the edge. Fasten off and leave a tail for sewing
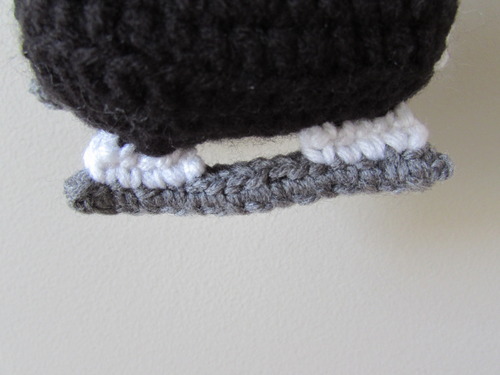
Blade: make 2
In grey
1) ch 17
2) Starting in the second ch from the hook, 1sc in each ch (16). Fasten off and leave a tail for sewing.
In white 1sc in sts 2-5, and 12-15
Sew the 2 blades together.

Top:
In black
1) ch 2. 6hdc in the first ch (6)
2) inc around (12)
3) *inc, 1hdc* around (18) Fasten off and leave a tail for sewing. Stuff the skate (not too firmly or it will loose it’s shape), then sew the top inside the skate.

Sew the blade onto the bottom of the skate
Have I ever talked about how I dislike hand sewing? The laces were pretty tough for me to do! Since I never lace skates, my hockey loving friend had to help me out!
Since these skates were to hang over a car mirror, I made sure the ends of the laces were very long! I cut a 60cm piece of white yarn for the laces.

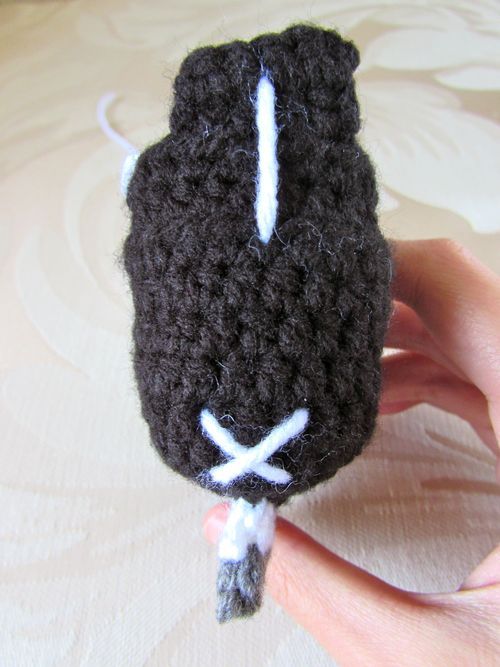
I sewed markings on the back of the skate too! I did a little X shape at the heel, and a line from the back flap to the middle of the skate. I also sewed markings on the side of the skate. The markings were between rows 5 and 8, and were 5 stitches long.
I made 2 skates in total, making a happy pair! I knotted the ends of the laces together so they can hang happily in my friends’ car.
I think if I were to take out the stuffing (and the top), the hockey skates would make really cute baby shoes! I will save this idea for the future! And maybe a little hockey jersey…
Happy crocheting!

Please use this pattern for personal use only. Do not claim this pattern as your own or sell items made from this pattern. If you want to share this pattern, link it to Stitch-em. Do not reprint this pattern on your website. Thanks!
 sprucetreesandcoffee liked this
 - sprucetreesandcoffee reblogged this from stitchem
crochettomdog reblogged this from stitchem
 sweetcindy202-blog liked this
  biddycruz-blog liked this
 sweetbella017 liked this
lovelymanni-blog liked this
 madeleinepond liked this
 devodeboer liked this
can-you-please-not-thanks-blog liked this
letthenightcomefaster liked this
 jaruwajee liked this
 meekmes liked this
ingrid0460 reblogged this from stitchem
sament liked this
 fraggle-spooky-rockerrr reblogged this from stitchem
 - fraggle-spooky-rockerrr liked this
hikernotafighter liked this
kandafort liked this
crochetmelovely liked this
willythedi liked this
ams73-blog liked this
holly2ells-blog-blog liked this
chashikuro liked this
thecrochetgeek reblogged this from stitchem
live-love-irishdance reblogged this from stitchem
stitchem posted this