
Harold Cardigan
Time for some crochet love. After releasing two chunky knit cardigan designs in 2017 (the Oxford Boyfriend Cardigan and the Cliffside Cardigan), I have been itching to work up an equally exciting crochet number for those of you who don’t knit. I knew I wanted it to be easy to make and easy to wear, but with a few little details that made it special and unique. Enter the Harold Cardigan. The free instructions can be found below, or you can purchase an ad-free, printable PDF here. You can also scoop up the yarn kit with everything you need to complete the project from Lion Brand here.
Bust out some grandpa style in this beauty! The classic shawl collar is the perfect compliment to this boxy silhouette and the toggle button adds even more timeless charm.
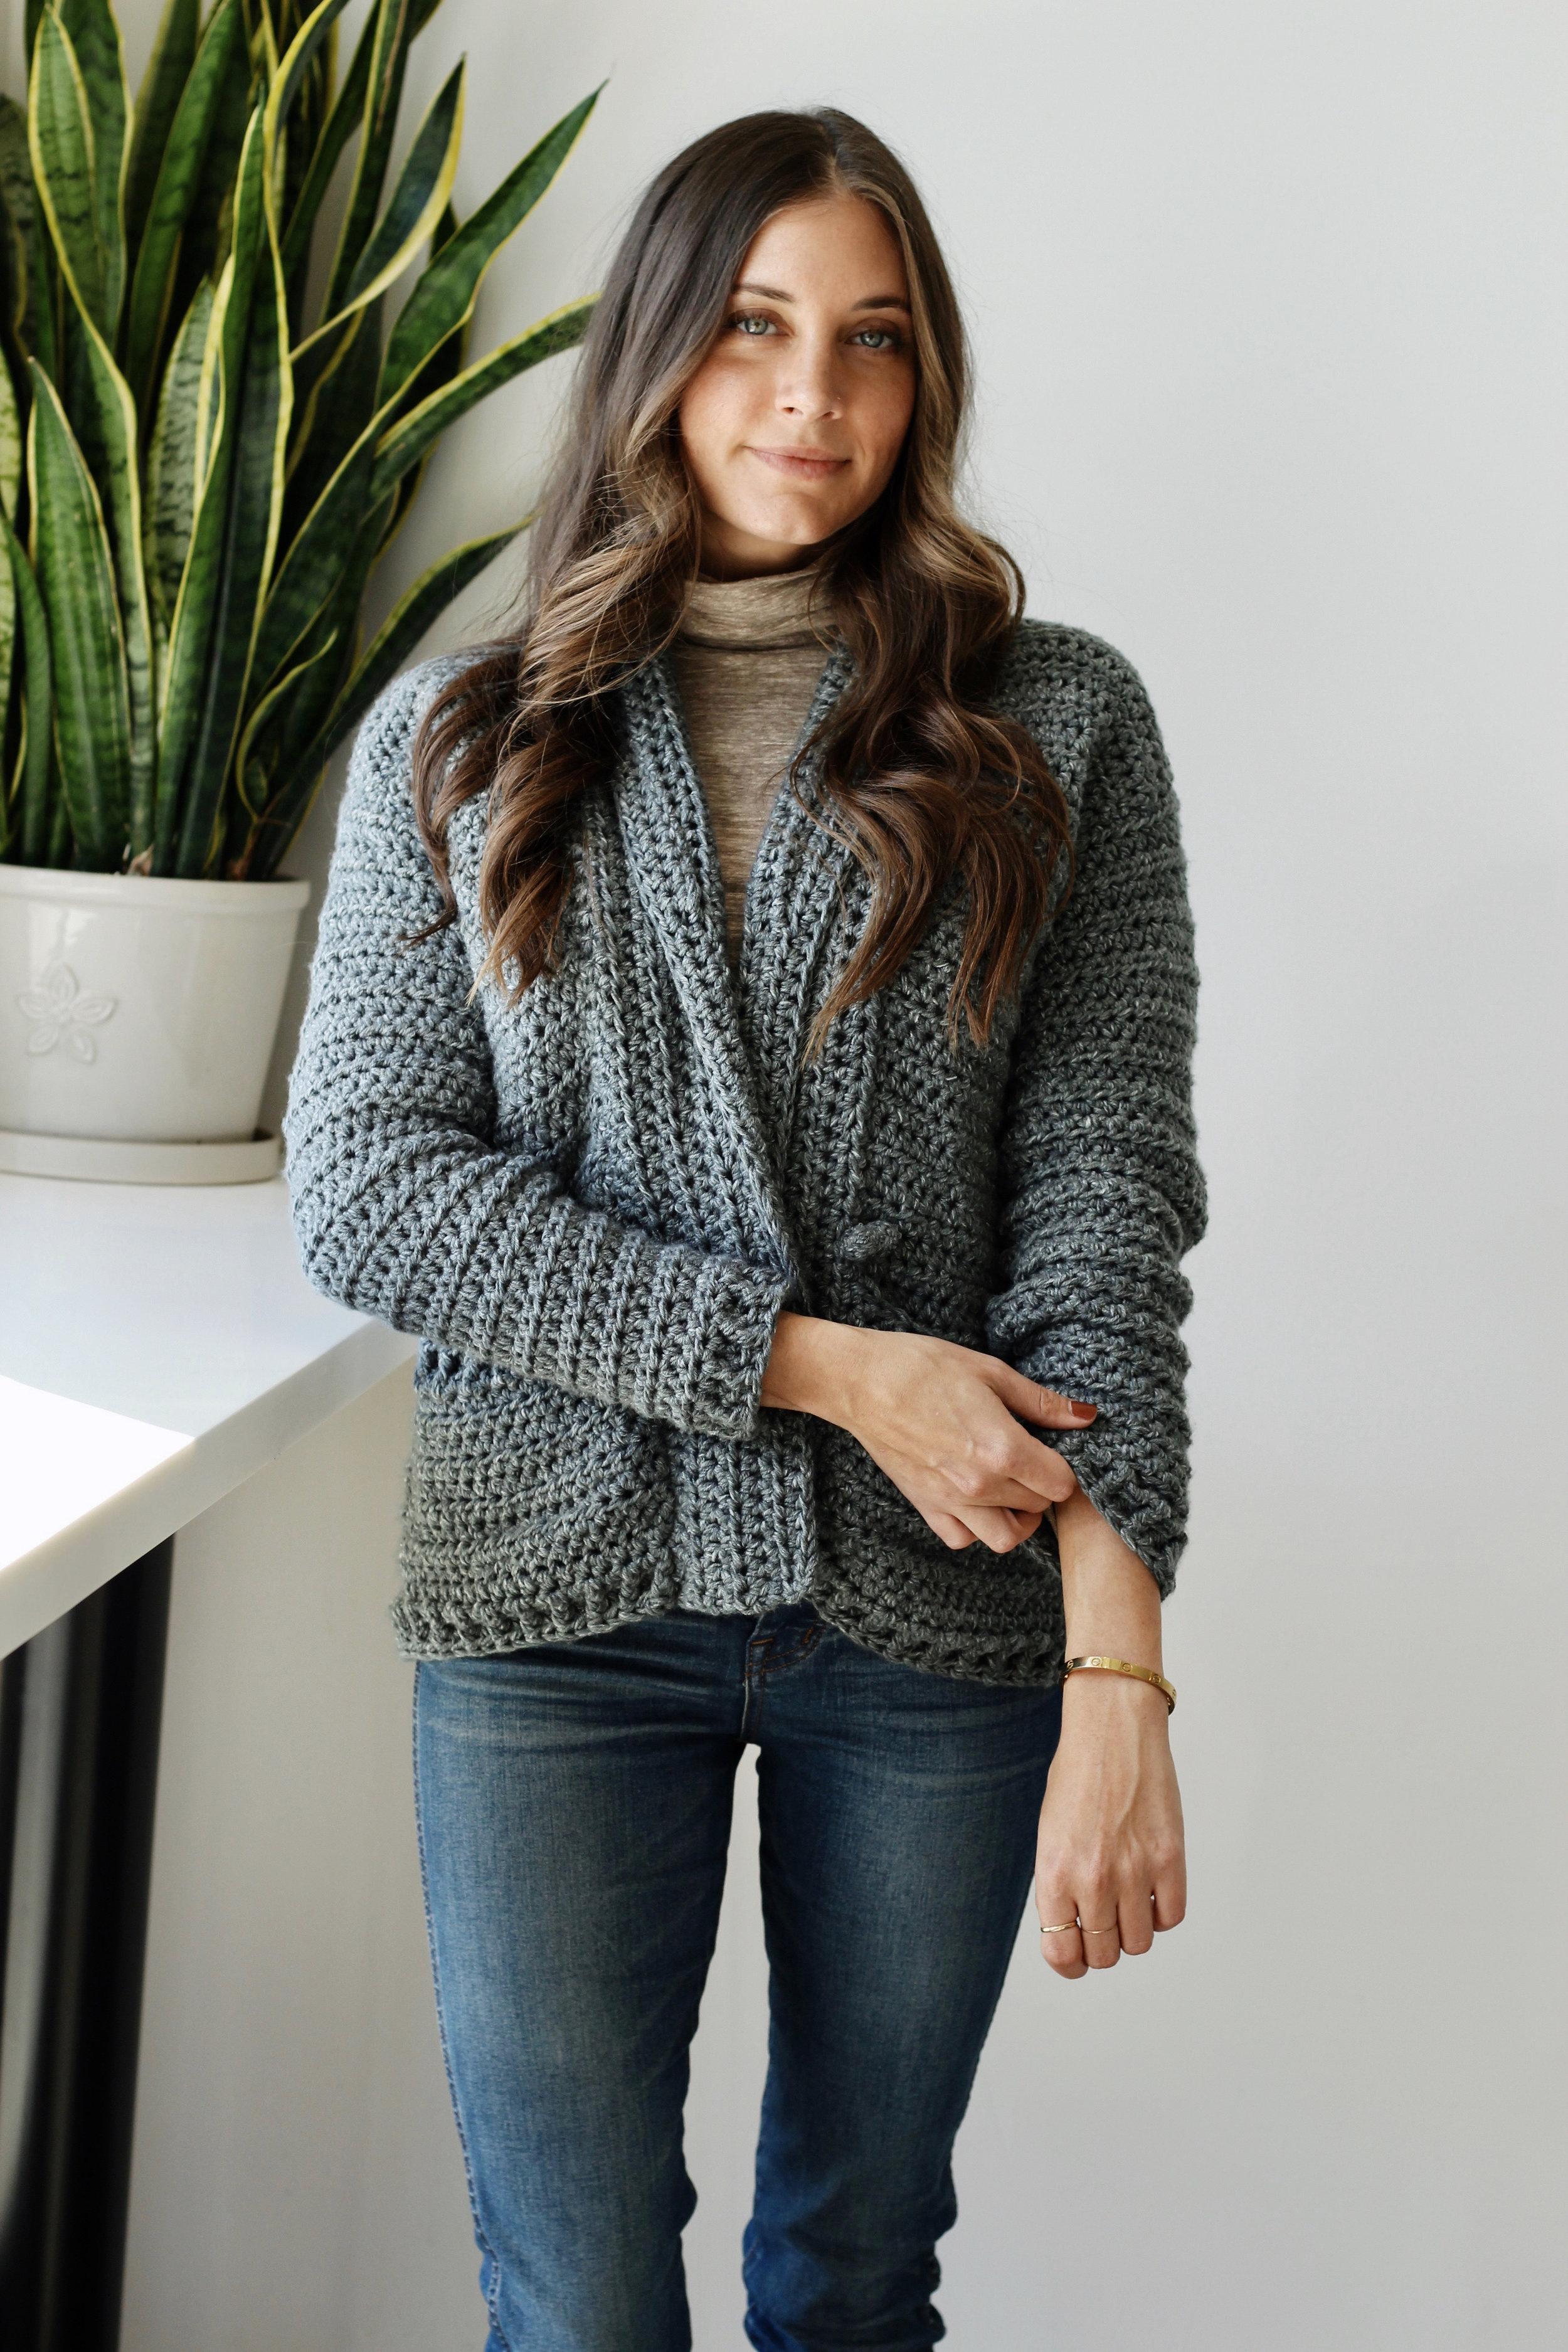
I fell in love with Lion Brand Jeans yarn last year, and when I set out to design Harold I immediately thought of the softness and light marled look it gives fabric. It was the perfect choice for this cardigan, and I chose to double it up to make the resulting material extra chunky.

This is an intermediate level crochet pattern and the techniques involved are single crochet, half double crochet, double crochet, slip stitch, back post half double crochet, front post half double crochet, half double crochet 2 together, working flat in back and forth rows, and working in the round.
MATERIALS:
9 (11, 14) skeins Lion Brand Jeans in Vintage
Size US L/11 (8mm) crochet hook
Size US H/8 (5mm) crochet hook
Tapestry needle
FINISHED SIZE:
Width across back: 21”/53cm (XS/S), 24”/61cm (M/L), 28”/71cm (XL/XXL)
Length: 22.5”/57cm (XS/S), 24”/61cm (M/L), 26”/66cm (XL/XXL)
Sleeve length: 20”/51cm (XS/S), 21”/53cm (M/L, XL/XXL)
*Cardigan is pictured in size XS/S
GAUGE:
10 sts x 8 rows = 4”/10cm in half double crochet
ABBREVIATIONS:
*All Two of Wands patterns are written in standard US terms
Bphdc – back post half double crochet
Ch – chain
Dc – double crochet
Fphdc – front post half double crochet
Hdc – half double crochet
Hdc2tog – half double crochet 2 together
Rep – repeat
RS – right side
Sc – single crochet
Sk – skip
Sl st – slip stitch
St(s) – stitch(es)
STITCH EXPLANATION:
Back post half double crochet (bphdc) - Yarn over, insert hook from back to front to back around post of corresponding stitch below, yarn over and pull up loop, yarn over and draw through all 3 loops on hook.
Front post half double crochet (fphdc) - Yarn over, insert hook from front to back to front around post of corresponding stitch below, yarn over and pull up loop, yarn over and draw through all 3 loops on hook.
Half double crochet 2 together (hdc2tog) - Yarn over, insert hook into stitch, pull up loop (3 loops on hook), yarn over, insert hook into next st, pull up loop (5 loops on hook), yarn over and draw through all 5 loops on hook.
Note: Pattern is worked from the bottom up for back and two fronts and from the top down for sleeves. Bottom edging is worked once cardigan is seamed. Shawl collar is worked separately in two pieces and sewn on. With the exception of the toggle button and closure, two strands of yarn are held together throughout – reach into center of ball and pull out inner end and hold together with outer end. The ch 2 at the beginning of each row does not count as a stitch. Pattern is written in three sizes: XS/S (M/L, XL/XXL).
Back:
With two strands of yarn held together and larger hook, ch 56 (62, 72).
Row 1: Starting in 3rd ch from hook, hdc across row. (54, 60, 70 sts)
Row 2: Ch 2 (does not count as st here and throughout), hdc across row.
Rep row 2 until work measures 13.5”/34cm (14”/36cm, 14.5”/37cm).
Shape armholes:
Break yarn, sk 4 (5, 6) sts, and rejoin yarn in the 5th (6th, 7th) st.
Next row: Ch 2, and starting in same st as join, hdc 46 (50, 58) sts, turn. (46, 50, 58 sts)
Next row: Ch 2, hdc across row.
Rep last row until armholes measure 7”/18cm (8”/20cm, 9.5”/24cm).
Shape shoulders and neckline:
Next row: Ch 1, sc 3 (4, 5), hdc to last 3 (4, 5) sts, sc to end of row.
Next row: Sl st 3 (4, 5), sc 3 (4, 5), hdc 8 (8, 9), dc 2 (2, 2) break yarn, sk 14 (14, 16), rejoin yarn in next st, ch 3 and starting in same st as join, dc 2 (2, 2), hdc 8 (8, 9), sc 3 (4, 5), sl st 3 (4, 5).
Pocket lining (make 2):
Ch 16.
Row 1: Starting in 3rd ch from hook, hdc across row. (14 sts)
Rows 2-10: Ch 2, hdc across row.
Set linings aside.
Front Left:
Ch 22 (25, 29).
Row 1 (RS): Starting in 3rd ch from hook, hdc across row. (20, 23, 27 sts)
Size XS/S and M/L only:
Rows 2-10: Ch 2, hdc across row.
Size XL/XXL only:
Rows 2-12: Ch 2, hdc across row.
All sizes:
Pockets:
Next row (RS): Ch 2, hdc 4 (5, 7), (fphdc 1, hdc 1) 7 times, hdc to end of row.
Next row: Ch 2, hdc 2 (4, 6), (hdc 1, bphdc 1) 7 times, hdc to end of row.
Next row (RS): Ch 2, hdc 4 (5, 7), pick up one pocket lining and hdc across the top row of it, sk 14 sts on the body, hdc last 2 (4, 6) sts of body.
Next row: Ch 2, hdc across row.
Rep last row until work measures 13.5”/34cm (14”/36cm, 14.5”/37cm), ending with a wrong side row.
Shape armholes:
Break yarn, sk 4 (5, 6) sts, and rejoin yarn in the 5th (6th, 7th) st.
Next row (RS): Ch 2, and starting in same st as join, hdc across row. (16, 18, 21 sts)
Next row: Ch 2, hdc across row.
Rep last row until armholes measure 7”/18cm (8”/20cm, 9.5”/24cm), ending with a wrong side row.
Shape shoulders:
Next row (RS): Ch 1, sc 3 (4, 5), hdc to end of row.
Next row: Ch 3 and starting in 1st st, dc 2 (2, 2), hdc 8 (8, 9), sc 3 (4, 5), sl st 3 (4, 5).
Front Right:
Ch 22 (25, 29).
Row 1 (RS): Starting in 3rd ch from hook, hdc across row. (20, 23, 27 sts)
Size XS/S and M/L only:
Rows 2-10: Ch 2, hdc across row.
Size XL/XXL only:
Rows 2-12: Ch 2, hdc across row.
All sizes:
Pockets:
Next row (RS): Ch 2, hdc 2 (4, 6), (fphdc 1, hdc 1) 7 times, hdc to end of row.
Next row: Ch 2, hdc 4 (5, 7), (hdc 1, bphdc 1) 7 times, hdc to end of row.
Next row (RS): Ch 2, hdc 2 (4, 6), pick up second pocket lining and hdc across the top row of it, sk 14 sts on the body, hdc last 4 (5, 7) sts of body.
Next row: Ch 2, hdc across row.
Rep last row until work measures 13.5”/34cm (14”/36cm, 14.5”/37cm), ending with a wrong side row.
Shape armholes:
Next row (RS): Ch 2, hdc to last 4 (5, 6) sts, turn. (16, 18, 21 sts)
Next row: Ch 2, hdc across row.
Rep last row until armholes measure 7”/18cm (8”/20cm, 9.5”/24cm), ending with a wrong side row.
Shape shoulders:
Next row (RS): Ch 2, hdc to last 3 (4, 5) sts, sc to end of row.
Next row: Sl st 3 (4, 5), sc 3 (4, 5), hdc 8 (8, 9), dc 2 (2, 2).
Sleeves (make 2):
Ch 38 (42, 50).
Row 1: Starting in 3rd ch from hook, hdc across row. (36, 40, 48 sts)
Rows 2-4: Ch 2, hdc across row.
Row 5: Ch 1, hdc 1, hdc2tog, hdc to last 3 sts, hdc2tog, hdc 1. (34, 38, 46 sts)
Rows 6-8: Ch 2, hdc across row.
Row 9: Ch 1, hdc 1, hdc2tog, hdc to last 3 sts, hdc2tog, hdc 1. (32, 36, 44 sts)
Rows 10-25: Rep rows 6-9. (24, 28, 36 sts)
Size XL/XXL only:
Rows 26-29: Rep rows 6-9. (34 sts)
All sizes:
Next row: Ch 2, hdc across row.
Rep last row until sleeve measures 19.5”/50cm (20”/51cm, 20.5”/52cm).
Next row (RS): Ch 2, *fphdc 1, hdc 1, rep from * across row.
Next row: Ch 2, *hdc 1, bphdc 1, rep from * across row.
Construction:
With wrong sides facing, seam front pieces to back at shoulders. With front/back pieces lying open and unfolded at the shoulders, seam the top of each sleeve first at the horizontal underarm, then up and around the shoulder, then at the underarm on the other side.
Fold sweater at shoulders and seam up each side to the underarm and then down the length of the sleeve.
Seam pocket linings to interior of center front pieces.
Secure and weave in all ends.
Bottom Edge:
With right side facing, join yarn to center front corner of front left piece.
Row 1 (RS): Ch 2, and starting in same st as join, hdc an ODD number of sts evenly around bottom edge of cardigan to center front corner of front right piece, turn.
Row 2: Ch 2, hdc across row.
Row 3: Ch 2, hdc 1, *fphdc 1, hdc 1, rep from * across row.
Row 4: Ch 2, hdc 1, *bphdc 1, hdc 1, rep from * across row.
Collar (make 2):
Ch 65 (69, 75).
Row 1: Starting in 3rd ch from hook hdc across row. (63, 67, 73 sts)
Rows 2-5: Ch 2, hdc across row.
Row 6: Ch 2, hdc 46 (48, 52), sc 5, sl st 1, turn. (52, 54, 58 sts)
Row 7: Sl st 2, sc 8, hdc to end of row.
Row 8: Ch 2, hdc 36 (38, 42), sc 5, sl st 1, turn. (42, 44, 48 sts)
Row 9: Sl st 2, sc 8, hdc to end of row.
Row 10: Ch 2, hdc 26 (28, 32), sc 5, sl st 1, turn. (32, 34, 38 sts)
Row 11: Sl st 2, sc 8, hdc to end of row.
Row 12: Ch 2, hdc down entire length of collar, going into each hdc, then sc, then sl st, then hdc, sc, sl st, and so on. (63, 67, 73 sts)
Row 13: Ch 2, hdc across row.
Seam wider ends of collar together. Line up center back seam of collar to middle of center back neck of cardigan. With wrong side of collar facing the right side of cardigan, seam long straight edge of collar to cardigan along center front edges and back neck, stretching the collar to ease the two together evenly.
Toggle Button + Closure:
With one strand and smaller hook, ch 3. In 3rd ch from hook, dc 6. Join in the round and working in a spiral (do not join or turn at the end of each round), sc around twice. Dc around once, stuff the toggle with scrap yarn of the same color, break yarn and thread through each stitch with tapestry needle, pulling to close like a drawstring. Use tails to attach toggle button vertically to left front piece just above the pocket and along the seam where collar meets the body. Secure and weave in ends.
With one strand and smaller hook, ch for 2”/5cm. Tie ends together to form a loop, and use ends to attach loop closure to right front piece at the same distance from the bottom edge as the toggle button but 1”/2.5cm in from the edge of the collar.
Secure and weave in all ends.
Purchase the printable, ad-free pattern here.
Purchase the kit from Lion Brand Yarn here.
Don't forget to share your projects made using Two of Wands patterns on Instagram with the hashtag #crewofwands to get featured on my page and be in the running for monthly pattern giveaways!
Check out the #crewofwands community page here.
The patterns and photographs of items on this site are the property of Two of Wands and are for personal, non-commercial use only. These patterns files are protected by US copyright, and you may not distribute or sell them electronically or physically.
Small batch sales of finished pieces made from these patterns are permitted, but seller must use their own photographs and credit must be given to Two of Wands as the designer.