
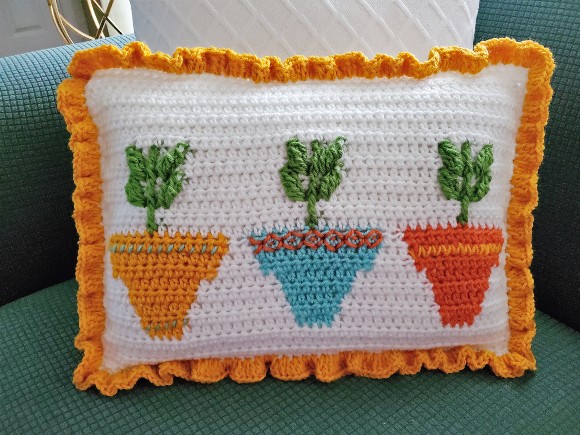
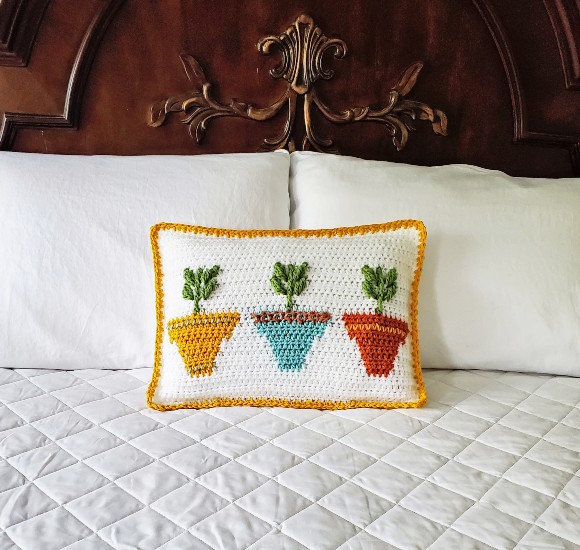
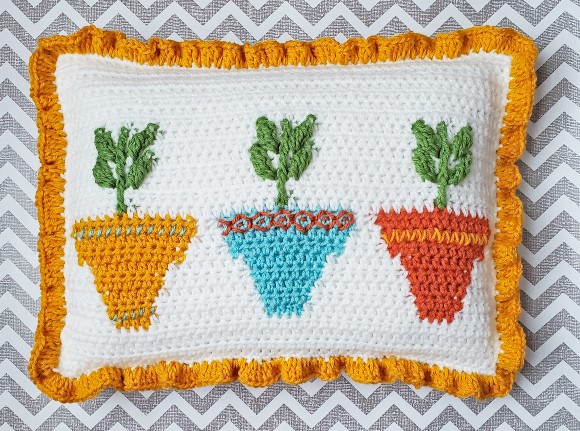
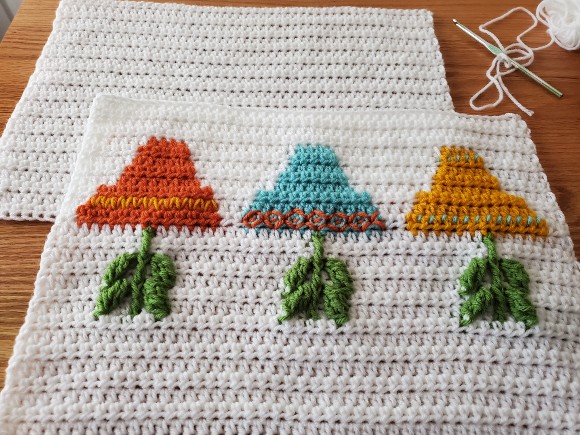
The Happy Little Plant Pillow is a free crochet pattern for plant lovers! Whether your thumb is green (or brown like mine), this pillow will add a pop of color and life to any room. The color work is achieved using the intarsia technique, but what makes this pattern really pop is the use of front post stitch clusters to create the effect of raised leaves climbing from colorful flower pots. If you are interested in learning this technique, I encourage you to give this pattern a try. I have included photos to help you along the way!
This project uses #4 worsted weight yarn in a variety of colors. Although I list below the exact colors that I used, this project would be a fantastic way to use your scrap yarn because you do not need a full skein of anything but the main color (white). To finish, I have provided two options: a simple border and a ruffled border. You choose!
The free crochet pattern is below, or you may purchase a print-optimized, ad-free PDF.
Check out my other FREE pillow patterns!
PIN for later!
ADD this pattern to your Ravelry queue!
Disclaimer: This post contains affiliate links. When you purchase something using these links a small amount of the sales price goes to me to help keep this site and the patterns on it free. You do not pay any extra for the item you purchase.
Difficulty: Intermediate
You will need to know how to crochet front post stitches, how to change colors, and how to sew 2 panels together.
Happy Little Plant Pillow
Materials Used:
- Main Color (MC): Red Heart Super Saver in White – 1 skein (364 yds/333 m)
- Color A: Red Heart Super Saver in Carrot – 8 yds/7.32 m to make one bobbin, plus an additional 3 yds/2.74 m for embellishments
- Color B: Red Heart Super Saver in Aruba Sea – 8 yds/7.32 m to make one bobbin, plus an additional 3 yds/2.74 m for embellishments
- Color C: Red Heart Super Saver in Gold – 8 yds/7.32 m to make one bobbin, plus an additional 3 yds/2.74 m for embellishments and an additional 17.5 yds/16 m for the simple border option OR an additional 62 yds/56.7 m for the ruffled border option
- Color D: Red Heart Super Saver in Spring Green – 11 yds/10.06 m – divide into 3 equal lengths to make 3 bobbins
- Size 5.50 mm crochet hook
- Tapestry needle for weaving in ends
- 12″ x 16″ pillow form
Abbreviations:
ch(s) = chain(s)
st(s) = stitch(es)
sl st = slip stitch
hdc = half double crochet
FPtr = front post triple crochet
FP3-tr cluster = front post 3-triple crochet cluster
RS = right side
WS = wrong side
American crochet terms used throughout
Special Stitch:
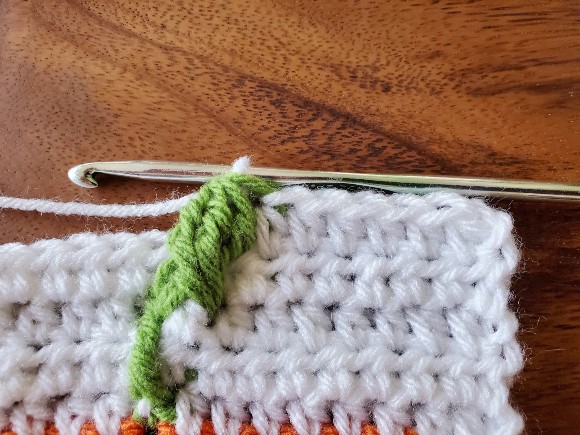
Fp3-tr cluster:
Yarn over twice, pull up a loop, draw through 2 loops, yarn over, draw through 2 loops (2 loops on hook), yarn over twice, pull up a loop, draw through 2 loops, yarn over, draw through 2 loops (3 loops on hook), yarn over twice, pull up a loop, draw through 2 loops, yarn over, draw through 2 loops (4 loops on hook), yarn over and draw through all 4 loops.
Gauge:
4″ x 4″ = 12 hdc, 9 rows
Finished Size Approximately:
12″ x 16″
Notes:
Ch 1 does not count as a hdc.
You will find it easier to work with bobbins as pictured below.
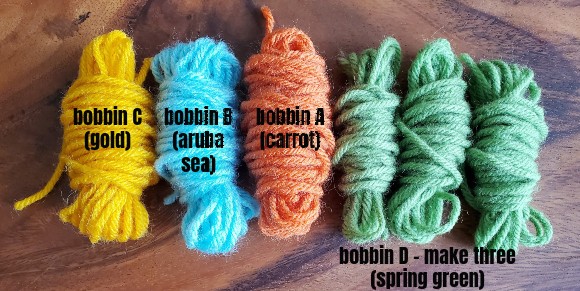
I listed the amount of yarn needed for each bobbin in the materials section above. Do not fasten off until you have worked the entire color section corresponding to each bobbin.
When working RS rows, drop any color not in use behind your work.
When working WS rows, drop any color not in use in front of your work.
Instructions:
FRONT PANEL:
Row 1 (RS):
With MC, ch 49, hdc in 3rd ch from hook and in each ch across, turn. (47 sts)
Rows 2-4:
With MC, ch 1, hdc in each st across, turn. (47 sts)
Row 5:
With MC, ch 1 and hdc in each of the first 6 sts, with bobbin A hdc in each of the next 4 sts, with MC hdc in each of the next 11 sts, with bobbin B hdc in each of the next 4 sts, with MC hdc in each of the next 11 sts, with bobbin C hdc in each of the next 4 sts, with MC hdc in each of the last 7 sts, turn. (47 sts)
Row 6:
With MC, ch 1 and hdc in each of the first 6 sts, with C hdc in each of the next 5 sts, with MC hdc in each of the next 10 sts, with B hdc in each of the next 5 sts, with MC hdc in each of the next 10 sts, with A hdc in each of the next 5 sts, with MC hdc in each of the last 6 sts, turn. (47 sts)
Row 7:
With MC, ch 1 and hdc in each of the first 5 sts, with A hdc in each of the next 6 sts, with MC hdc in each of the next 9 sts, with B hdc in each of the next 6 sts, with MC hdc in each of the next 9 sts, with C hdc in each of the next 6 sts, with MC hdc in each of the last 6 sts, turn. (47 sts)
Row 8:
With MC, ch 1 and hdc in each of the first 5 sts, with C hdc in each of the next 7 sts, with MC hdc in each of the next 8 sts, with B hdc in each of the next 7 sts, with MC hdc in each of the next 8 sts, with A hdc in each of the next 7 sts, with MC hdc in each of the last 5 sts, turn. (47 sts)
Row 9:
With MC, ch 1 and hdc in each of the first 4 sts, with A hdc in each of the next 8 sts, with MC hdc in each of the next 7 sts, with B hdc in each of the next 8 sts, with MC hdc in each of the next 7 sts, with C hdc in each of the next 8 sts, with MC hdc in each of the last 5 sts, turn. (47 sts)
Row 10:
With MC, ch 1 and hdc in each of the first 3 sts, with C hdc in each of the next 11 sts, with MC hdc in each of the next 4 sts, with B hdc in each of the next 11 sts, with MC hdc in each of the next 4 sts, with A hdc in each of the next 11 sts, with MC hdc in each of the last 3 sts, turn. (47 sts)
Row 11:
With MC, ch 1 and hdc in each of the first 2 sts, with A hdc in each of the next 12 sts, with MC hdc in each of the next 3 sts, with B hdc in each of the next 12 sts, with MC hdc in each of the next 3 sts, with C hdc in each of the next 12 sts, with MC hdc in each of the last 3 sts, turn. (47 sts)
Row 12:
With MC, ch 1 and hdc in each of the first 2 sts, with C hdc in each of the next 13 sts, with MC hdc in each of the next 2 sts, with B hdc in each of the next 13 sts, with MC hdc in each of the next 2 sts, with A hdc in each of the next 13 sts, with MC hdc in each of the last 2 sts, turn. (47 sts)
Row 13:
With MC ch 1 and hdc in each of the first 8 sts, with 1st bobbin of D hdc in the next st, with MC hdc in each of the next 14 sts, with 2nd bobbin of D hdc in the next st, with MC hdc in each of the next 14 sts, with 3rd bobbin of D hdc in the next st, with MC hdc in each of the last 8 sts, turn. (47 sts)
Row 14:
With MC, ch 1 and hdc in each st across, turn. (47 sts)
Row 15:
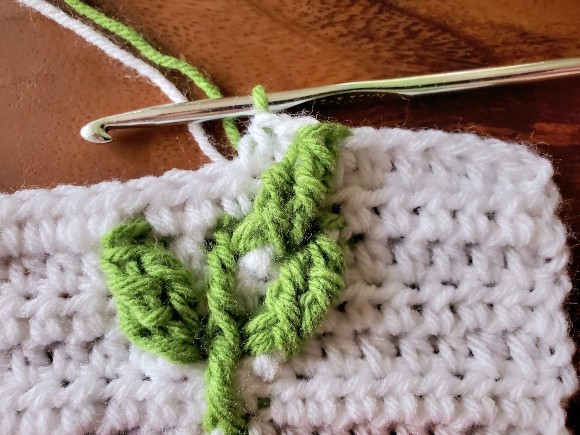
With MC, ch 1 and hdc in each of the first 8 sts, with D FPtr in the next st 2 rows below,
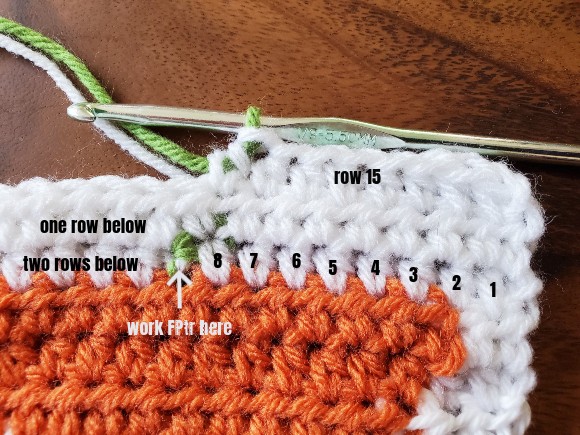
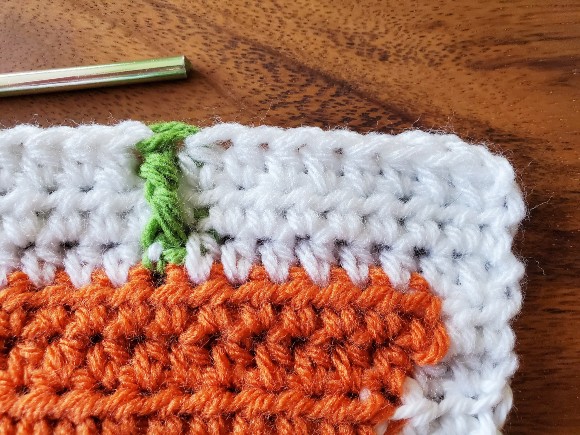
skip the st behind the FPtr just made, with MC hdc in each of the next 14 sts, with D FPtr in the next st 2 rows below,

skip the st behind the FPtr just made, with MC hdc in each of the next 14 sts, with D FPtr in the next st 2 rows below, skip the st behind the FPtr just made, with MC hdc in each of the last 8 sts, turn.
Row 16:
Repeat row 14.
Row 17:
Using MC, ch 1 and hdc in each of the first 6 sts, skip next st,
*with D FP3-tr cluster in next st 2 rows below,
using MC hdc in skipped st and in next st,
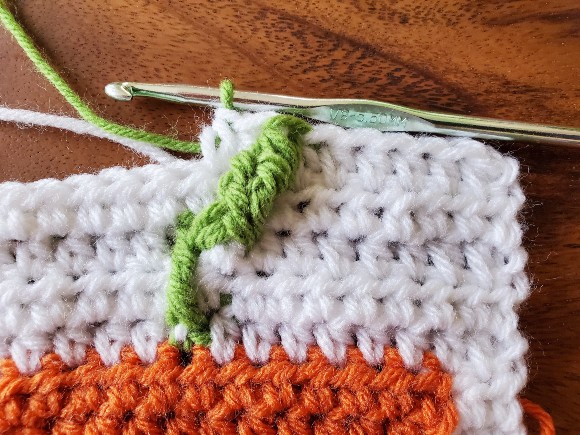
with D FPtr in next st 2 rows below, skip the st behind the FPtr just made,

using MC hdc in each of the next 2 sts,
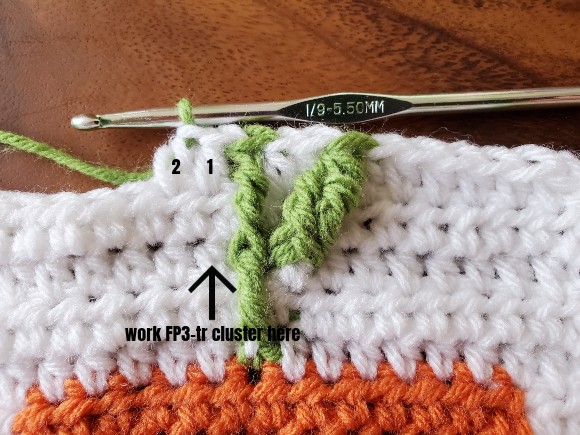
with D FP3-tr cluster in the st immediately to the left of the last FPtr 2 rows below,**
using MC hdc in each of the next 10 sts, skip next st,
repeat from * to **,
using MC hdc in each of the next 10 sts, skip next st,
repeat from * to **,
with MC hdc in each of the last 6 sts, turn.
Row 18:
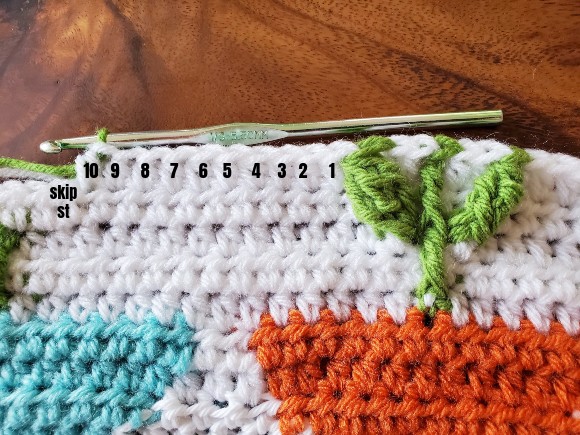
With MC, ch 1 and hdc in each st across, turn. (47 sts) **Note: Do not hdc in the tops of the clusters from the row below! Remember that there were 6 sts leading up to the first cluster, 5 sts in between clusters, 10 sts after the next cluster, 5 sts in between clusters, 10 sts after the next cluster, 5 sts in between clusters, and 6 sts after the next cluster. Make sure your stitch count for this row is 47 sts.
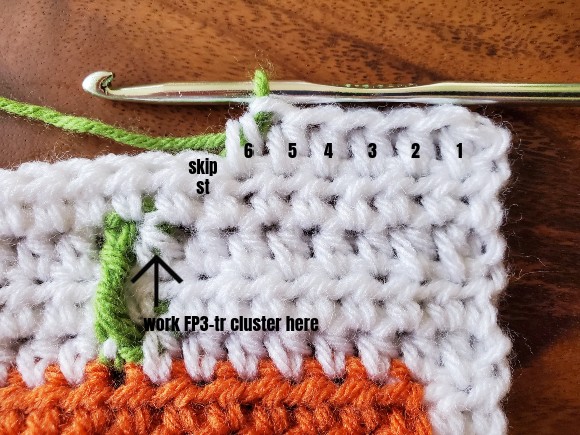
Row 19:
Using MC, ch 1 and hdc in each of the first 6 sts, skip next st,
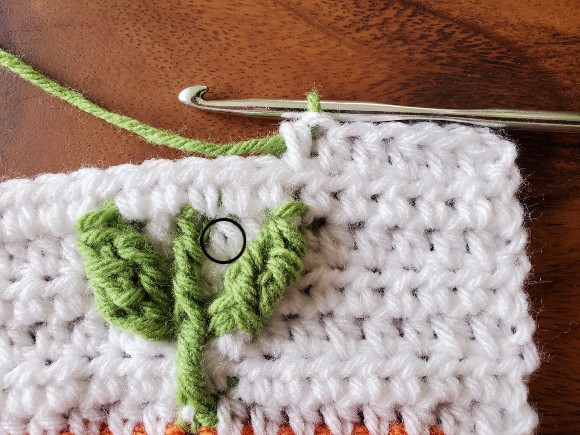
*with D FP3-tr cluster in next st 2 rows below (marked with a circle in the photo below),
using MC hdc in skipped st and in next st,
with D FPtr in next st 2 rows below, skip the st behind the FPtr just made,
using MC hdc in each of the next 2 sts,
with D FP3-tr cluster in the st immediately to the left of the last FPtr 2 rows below (marked with a circle in the photo below),**
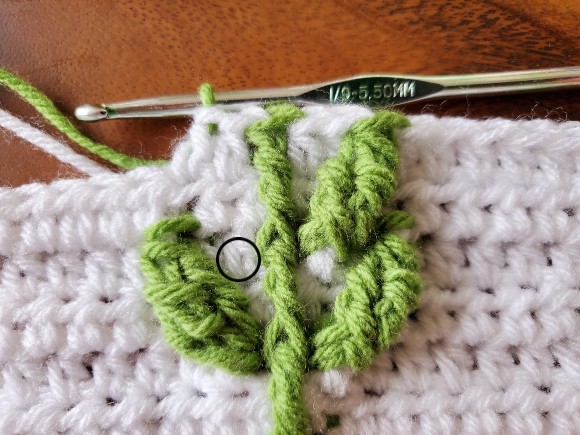
using MC hdc in each of the next 10 sts, skip next st,
repeat from * to **,
using MC hdc in each of the next 10 sts, skip next st,
repeat from * to **,
with MC hdc in each of the last 6 sts, turn.
Row 20:
Repeat row 18.
Rows 21-27:
Repeat row 14.
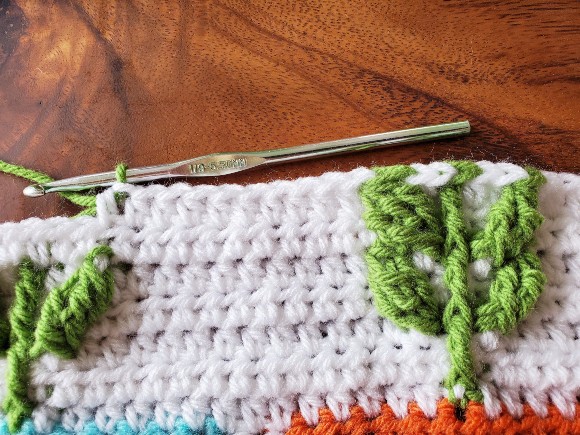
Fasten off and weave in ends.
BACK PANEL:
Row 1 (RS):
With MC, ch 49, hdc in 3rd ch from hook and in each st across, turn. (47 sts)
Rows 2-27:
With MC, ch 1 and hdc in each st across, turn. (47 sts)
Fasten off and weave in ends.
To Embellish the Flower Pots:
Thread a suitable length of yarn on a tapestry needle, and sew various designs in various colors on the flower pots. Using B, I worked a row of slash marks at the top and bottom of the gold pot. Then with A, I made a diamond design at the top of the center pot. Finally, using C, I worked a row of V’s at the top of the carrot pot.
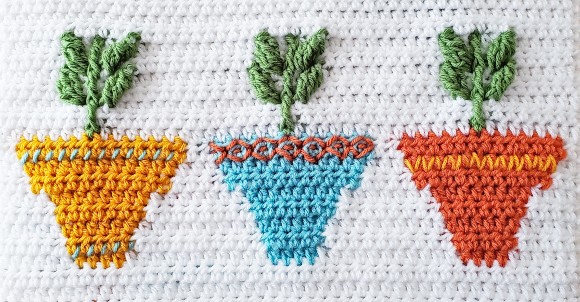
Don’t feel constrained to mimic my design, however. This is the point where you can really get creative! If you are brave enough to tackle words, I think it would be cute to label each pot with the name of the plant “growing” inside!
To Assemble:
Lay the front panel on top of the back panel, with RS facing out and WS facing in.
With the design facing you and upside down, re-attach MC in the upper right-hand corner.

Ch 1 and sc in each of the first 12 sts, connecting the 2 panels together. Then, sc in each of the next 23 sts on the front panel only (skipping the next 23 sts on the back panel), leaving the 2 panels disconnected in the middle so that you will have an opening in the bottom of the pillow to insert the pillow form. Now, sc in the final 12 sts, connecting the 2 panels together. Ch 1 to turn the corner, and continue working sc evenly around the other sides of the pillow, connecting the 2 panels together, and chaining 1 to turn the corners.
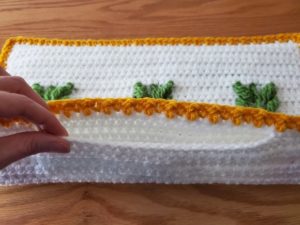
With C, complete another round of edging. For the simple border option, I alternated dc’s and sc’s in each st (working 2 sts in each corner). For the ruffled border option, I alternated 3 dc’s and 2dc’s in each st.
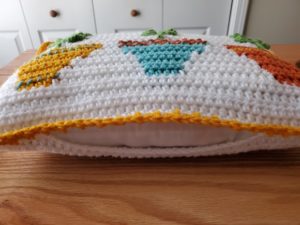
Fasten off and weave in all ends. Insert the pillow form in the opening on the bottom side of the pillow.
Want to be notified when I post new crochet patterns?
Join Me on Social Media
If you make the Happy Little Plant Pillow, I’d love to see a picture of it when you’re done. You can tag me @cashmeredandelions on Instagram!
You can also follow me on Pinterest, Instagram and Ravelry for more beautiful crochet patterns.