***You can purchase an INEXPENSIVE AD-FREE PDF of this pattern on Etsy HERE and on LoveCrochet HERE! This beautifully formatted PDF includes the step-by-step pictures and is a total of 6 pages including the cover page! It is important that you follow along with my step-by-step blog post HERE to see more detailed photos and the step-by-step making of this poncho! You can also purchase a kit HERE on the Lion Brand Yarn website that includes the pattern and all the yarn needed to make this poncho!
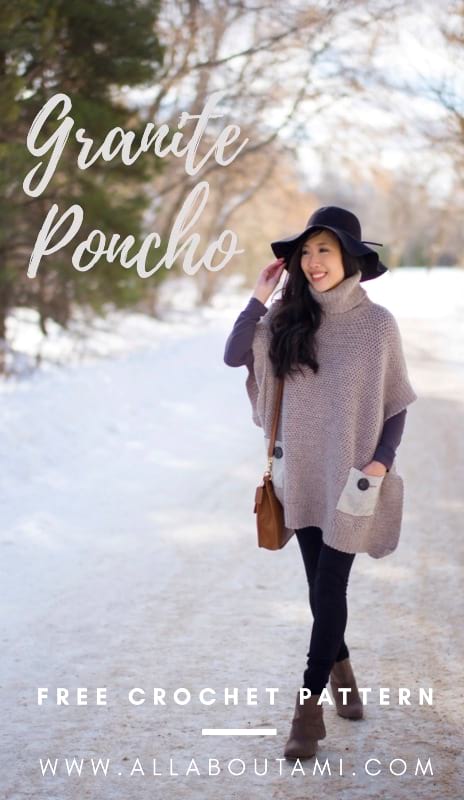
Crochet this stylish Granite Poncho that requires no increasing or decreasing using the relaxing granite stitch! With the turtleneck, chic fabric pockets and alpaca blend yarn, this poncho is the perfect cozy layering piece for the transitional weather!
![]()
Materials:
- Touch of Alpaca by Lion Brand Yarn in “Taupe” – worsted (level 4) – see below for approximate yardage and number of skeins required; KIT available HERE!
- Clover Amour 6.5 mm hook (for body panels) and 5 mm hook (for ribbing and turtleneck)
- Clover lock ring stitch markers
- Yarn needle
- Fabric, two large buttons and embroidery floss for pockets (optional)
Finished Dimensions:
XS/Small: 31″ wide, 27.5″ long
Medium/Large: 35″ wide, 28.5″ long
XL/XXL: 39″ wide, 29.5″ long
Approximate Yardage/Number of Skeins Required:
- XS/S: 8 skeins, ~ 800 g
- M/L: 10 skeins, ~ 930 g
- XL/XXL: 11 skeins, ~ 1070 g
Gauge:
Using 6.5 mm hook (for body panels): If starting with Chain 19, 10 sc with 9 ch 1 spaces and 15 rows = 4″
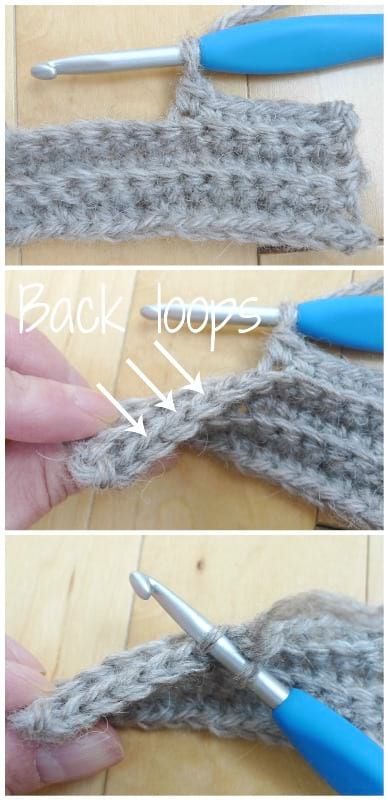
Using 5 mm hook (for ribbing): 14 sc in back loops only = 3″ across and 4 rows = 1″
Notes:
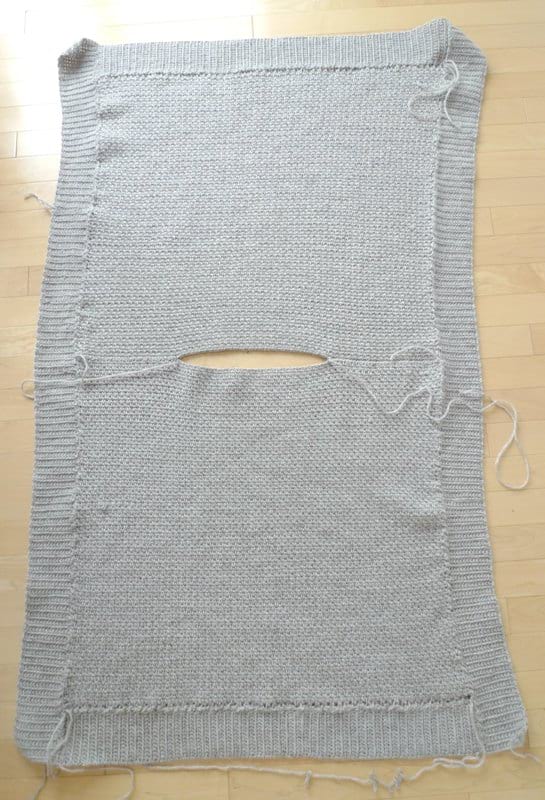
- Two rectangular body panels are created using the granite stitch. The bottom ribbing is then attached to the bottom of both body panels. The top of the body panels (shoulders) are seamed together, leaving a neck hole. Side ribbing is attached to the sides of both body panels, and a turtleneck is attached to the neck hole. Optional pockets and buttons are added at the end.
- If you are unfamiliar with the granite stitch, please reference my Granite Cape pattern HERE that includes a step-by-step picture tutorial!
- Adjust length of bottom and side ribbing as needed (measure to your body panels) and use numbers as rough guideline.
- Instead of having to seam the bottom ribbing to the body panels, you could start off with the bottom ribbing and then work a series of slip stitches along the length of the bottom ribbing (picking up number of stitches required for body panels). Then, you could start the body panel pattern working with the granite stitch using the series of slip stitches as your initial chain stitches.
- Be sure to block your pieces to get them to lie flat and to get better drape.
- To make your poncho wider, increase the number of initial chains of the body panels (keep it an odd number). To make your poncho narrower, decrease the number of initial chains.
- To make your poncho longer, increase the number of rows of the body panels. To make your poncho shorter, decrease the number of rows of the body panels.
- For reference, I am wearing the size XS/Small and I am 5’6! Adjust the length of your poncho (number of rows of body panels) to your liking depending on your height.
- For all sizes, the ribbing width stays the same while the length of the ribbing changes. The body panels change in width and length. The turtleneck remains the same, but adjust as needed (increase the number of rows to make the turtleneck wider).
- Ideally, you want your poncho to have enough width so that the sides hit right around or past your elbows, so keep this in mind when you are sizing, blocking and stretching out your piece!
- This poncho could be used as a nursing cover or could expand with your baby bump during pregnancy!
- As a styling tip, you could cinch the poncho it at the waist with a skinny belt to give more definition and shaping. See pictures of the poncho styled this way towards the end of this post!
![]()
**Body Panels (make 2):
Using 6.5 mm hook, chain 117 (137, 157 – use an odd number of stitches).
Row 1: Sc in the 3rd ch from the hook, *ch 1, skip 1 ch, sc in the next ch* until end. (59 sc and 58 chain 1 spaces for XS/S)
R2: Ch 2, turn. Sc in the next ch 1 space. *Ch 1, sc in the next ch 1 sp* until end, finishing with a sc in the last chain sp at the start of previous row.
R3-93 (97, 101): Repeat Row 2.
For size XS/S, my resulting body panel measured 24.5″ long and 25″ wide after stretching and blocking. M/L would measure approximately 25.5″ long x 29″ wide. XL/XXL would measure approximately 26.5″ long x 33″ wide.
Watch this video below to see a demonstration of the granite stitch in my Granite Cardigan design:
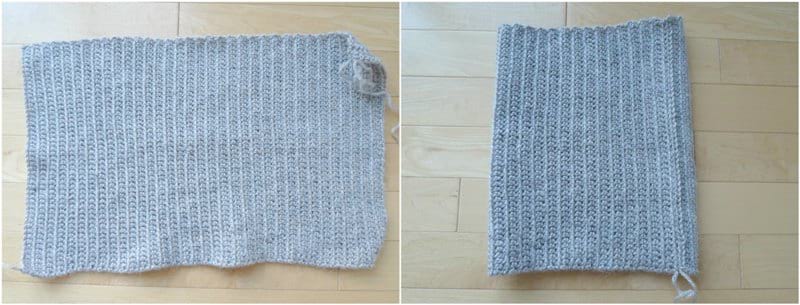
**Bottom Ribbing (make 2):
{Measures approximately 3″ in width}
Using a 5 mm hook,
Chain 15
Round 1: In back loops only, Sc 1 in second chain from hook and in each chain across (14 sc).
R2-100 (116, 132): Chain 1, turn. In back loops only, Sc 1 in second chain from hook and in each chain across (14 sc).
Measure your bottom ribbing against the body panel to make sure the length matches and adjust as needed. Whip stitch the ribbing onto the bottom of the body panels. Whip stitch the top of the body panels (shoulders) together, leaving a 9.5″ gap (adjust number based on your preference and neck size) where the turtleneck will be later attached.
**Side Ribbing (make 2):
{Measures approximately 3″ in width}
Using a 5 mm hook,
Chain 15
Round 1: In back loops only, Sc 1 in second chain from hook and in each chain across (14 sc).
R2-220 (228, 236) : Chain 1, turn. In back loops only, Sc 1 in second chain from hook and in each chain across (14 sc).
Measure your side ribbing along the edges of both body panels (the side ribbing will go up one side of the front body panel and down the other side of the back body panel). Adjust as needed (add or decrease rows to ribbing). Whip stitch the side ribbing to the side edges of the body panels.
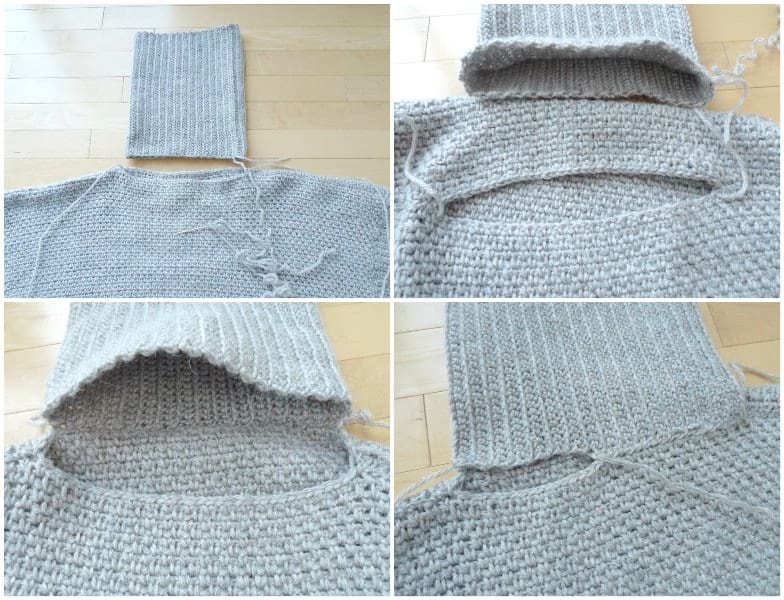
**Turtleneck (make 1):
Using a 5 mm hook,
Chain 51
Round 1: In back loops only, Sc 1 in second chain from hook and in each chain across (50 sc).
R2-68 (add more rows as needed): Chain 1, turn. In back loops only, Sc 1 in second chain from hook and in each chain across (50 sc).
Measure piece around neck to make sure size is comfortable. Whip stitch length of piece around the neck hole at the top of the body panels, forming a circle. Fold turtleneck down in half when wearing it.
Seam sides:
Measure 7.5″ (8.5″, 9.5″) from the bottom and place stitch marker on inner edge of side ribbing. Measure 4″ above this first stitch marker and place second stitch marker. {Adjust measurements as needed depending on how large you want the arm holes to be.} Seam both sides together with running stitch along inner edge of side ribbing. Fasten off and weave in end. Repeat on other side.
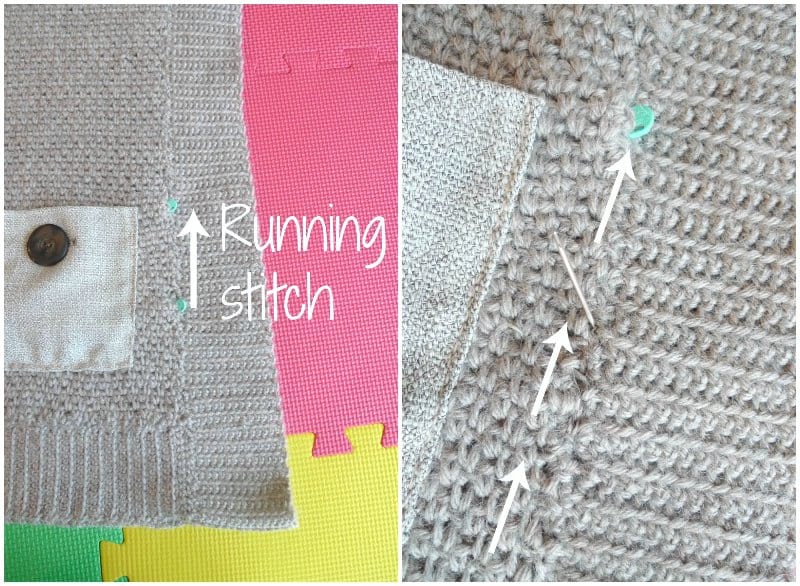
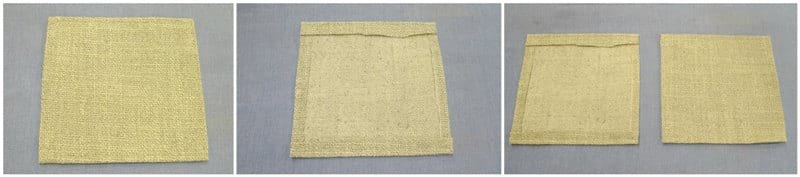
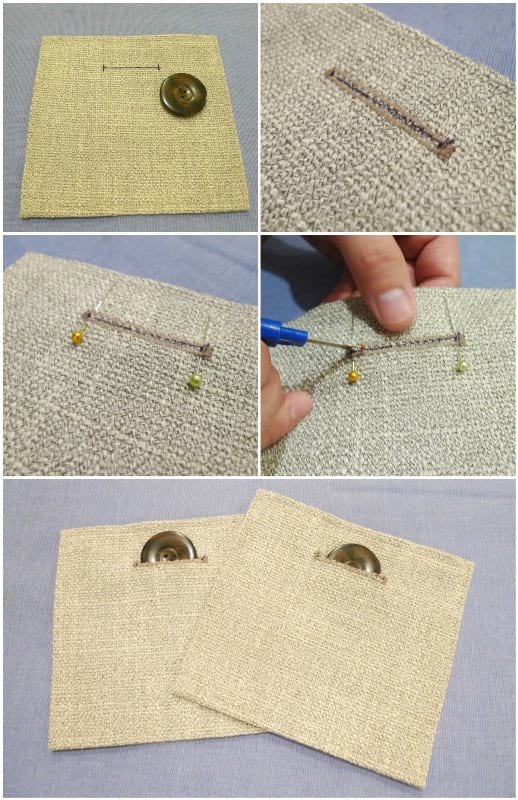
Pockets (optional):
Cut two pockets out of fabric measuring 6″ x 6″ leaving a 1/4″ seam allowance. Create button holes about 1.25″ below top edge of pocket. Sew pockets 1.25″ from side edge and 2″ from bottom edge. Sew large buttons into appropriate spots. Alternatively, sew buttons onto pockets for decorative purpose.
If you would like to add crochet pockets, start with an initial chain of 29 and work the granite stitch for approximately 23 rows.
![]()
Here are some more photos of the completed Granite Poncho from different angles!
![]()
I love the length and how you can wear this over leggings!
![]()
This is such a chic layering piece for the transitional weather!
Styling Tip: Cinch the poncho in at the waist with a skinny belt for more shaping and definition!
![]()
Thank you for checking out my Granite Poncho pattern! If you love the granite stitch as much as I do, don’t forget to check out my Granite Cape pattern HERE and my Granite Cardigan pattern HERE!
![]()
{This post is sponsored by Lion Brand Yarn! I’ve loved working with their yarn throughout the years and I’m thrilled that I get to collaborate with them every month!}

This pattern is an original pattern by Stephanie Lau of All About Ami. Please do not claim this pattern as your own. If you wish to share this pattern, you may link to this pattern but please do not reprint it on your site. You may keep a copy for your own personal use but please DO NOT sell the pattern or distribute it.
You may sell products made from this pattern but please clearly credit the design to me, Stephanie Lau of All About Ami, and provide a link to my blog www.AllAboutAmi.com. Permission is NOT granted for mass production or factory manufacturing of any kind. Thank you for being respectful and for your understanding!