This post contains affiliate links. Click to see full details of my Privacy Policy.
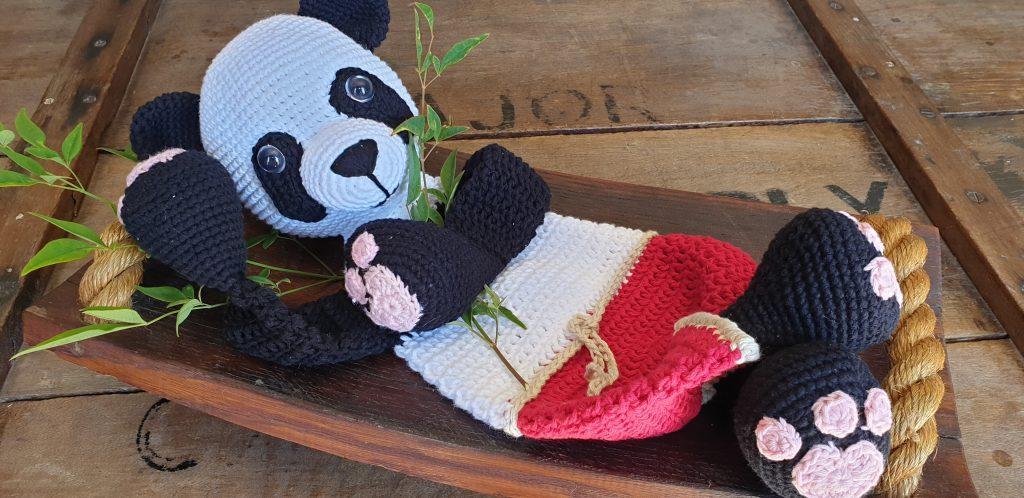
Welcoming Melanie Grobler from @mandmcrochetdesigns to the blog with this adoptable crochet giant panda. Fun fact, Pandas are my all-time favourite animal! They’re just SO cute! Crochet pandas are popular among both children and adults and can make excellent gifts or decorations for panda lovers. Melanie has put together this gorgeous Melly Teddy Ragdoll Giant Panda Bear pattern for you so please make sure you credit and tag her if you make this pattern, keep reading for all the details!
“As this is a guest post, Bella Coco Crochet is unable to answer any queries. If you have a question, please contact the designer directly and they will be happy to help you.”
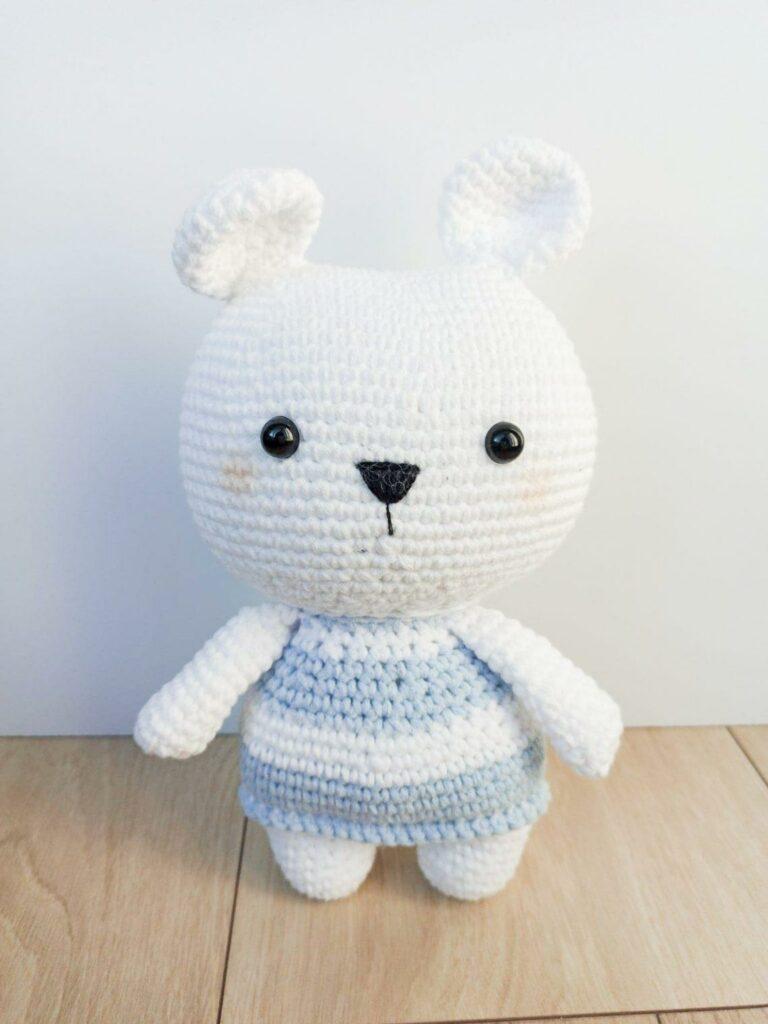
what is amigurumi?
Amigurumi is a Japanese art form of creating small crocheted or knitted stuffed toys, dolls or figurines. The word “amigurumi” comes from the Japanese words “ami”, meaning crocheted or knitted, and “nuigurumi”, meaning stuffed doll. The art of making amigurumi involves using simple crochet techniques to create small and detailed shapes, which are then stuffed with fiberfill to create cute and often whimsical characters.
Worked typically in the round and are made with a combination of basic stitches such as double crochet and slip stitch. Amigurumi has become increasingly popular in recent years, with crafters around the world sharing patterns and designs to create their own unique amigurumi creations.
amigurumi patterns
If you love amigurumi why not check out these adorable patterns available on the blog and get inspired for your next make.


Materials and Tools needed
- Yarn: 60g Vinnis Colours Nikkim DK 100% cotton (A) White #598, 85 g Vinnis Colours Nikkim DK 100% cotton (B) Black #560, 10 g Vinnis Colours Nikkim DK 100% cotton (C) Ballet Pink #522, 25 g Vinnis Colours Nikkim DK 100% cotton (D) Blue Red #562, 10 g Vinnis Colours Nikkim DK 100% cotton (E) Sand #578
- Hook: 3.5mm
- Stuffing: (approximately 100g)
- Black embroidery thread: for the muzzle and mouth
- Pink embroidery thread: for the little tongue
- Safety Eyes: 1 pair of 12mm
- Darning Needle
- Scissors
pattern Notes and gauge
- You are welcome to make the pattern in any yarn however depending on the yarn and your tension the size of the finished item may vary from mine.
- Written in US terms.
- Crochet skill level: beginner friendly.
- See helpful tips in italics throughout this post.
- Do not over stuff the hands, feet and head – think “squishy”.
- Use your stitch marker by placing in the last stitch of the completed round to keep track of rows when working in the round.
- I use the invisible single crochet decrease technique to make my single crochet two together. This technique makes the decrease much less visible.
gauge
- Amigurumi gauge: 5 rounds = 4.5 cm / 1.6 inches in diameter.
- Finished length: 35 cm / 14 inches

Crochet Terms and Abbreviations
Chain(s): ch(s): Yarn over, pull through
Back Loop Only: BLO: Insert hook into the back loop of the stitch
Crab Stitch / Reverse Single Crochet: crab st(s) – find out how to do the crab stitch here
Double Crochet(s): dc(s): Insert hook into stitch, yarn over, pull up a loop, yarn over, pull through two loops, yarn over, pull through two loops.
Front Loop Only: FLO: Insert hook into the front loop of the stitch only
Half Double Crochet(s): hdc(s): Insert hook into stitch, yarn over, pull up a loop, yarn over, pull through three loops.
Invisible single crochet two together: Inv sc2tog(s): Insert hook into the front loop only of the next two stitches, yarn over, pull through two loops on your hooks, yarn over, pull through 2 loops on your hook.
Single Crochet Increase: inc(s): Make two single crochet stitches into same stitch space.
Magic circle(s):mc(s): learn how to create a Magic Circle
Needle Join: nj(s): When you have finished your last stitch, do not join instead cut the yarn and pull it right through the last stitch. Using a needle, insert into both loops of the first actual stitch of the same round or row. Go back into the back loop only of the last stitch of the round or row, and gently tighten the join, and it will form a “loop” on top of the stitch and look just like a regular stitch.
Repeat: rep(s): Repeat the stitches between *.* the required number of times.
Single Crochet: sc(s): Insert hook into stitch, yarn over, pull up a loop, yarn over, pull through two loops.
Single crochet two together: sc2tog(s): Insert hook into stitch and pull up a loop, insert hook into the next stitch and pull up a loop. Yarn over and pull through all 3 loops on hook – this is a way to decrease your stitch count.
Slip Stitch(s): ss(s): Insert hook, yarn over, pull through both stitch and loop on hook.
Space(s): sp(s): The space between the stitches.
Stitches: st(s): The stitch itself.
Unsure of the differences between UK and US terms? Need a refresher on how to do your stitches? In my ‘How to crochet: A handy reference guide’ EBook I help you with all of these terms and you can always have them to hand! You will also get exclusive access to free video instructions. You can find my EBook HERE.
giant crochet panda Pattern
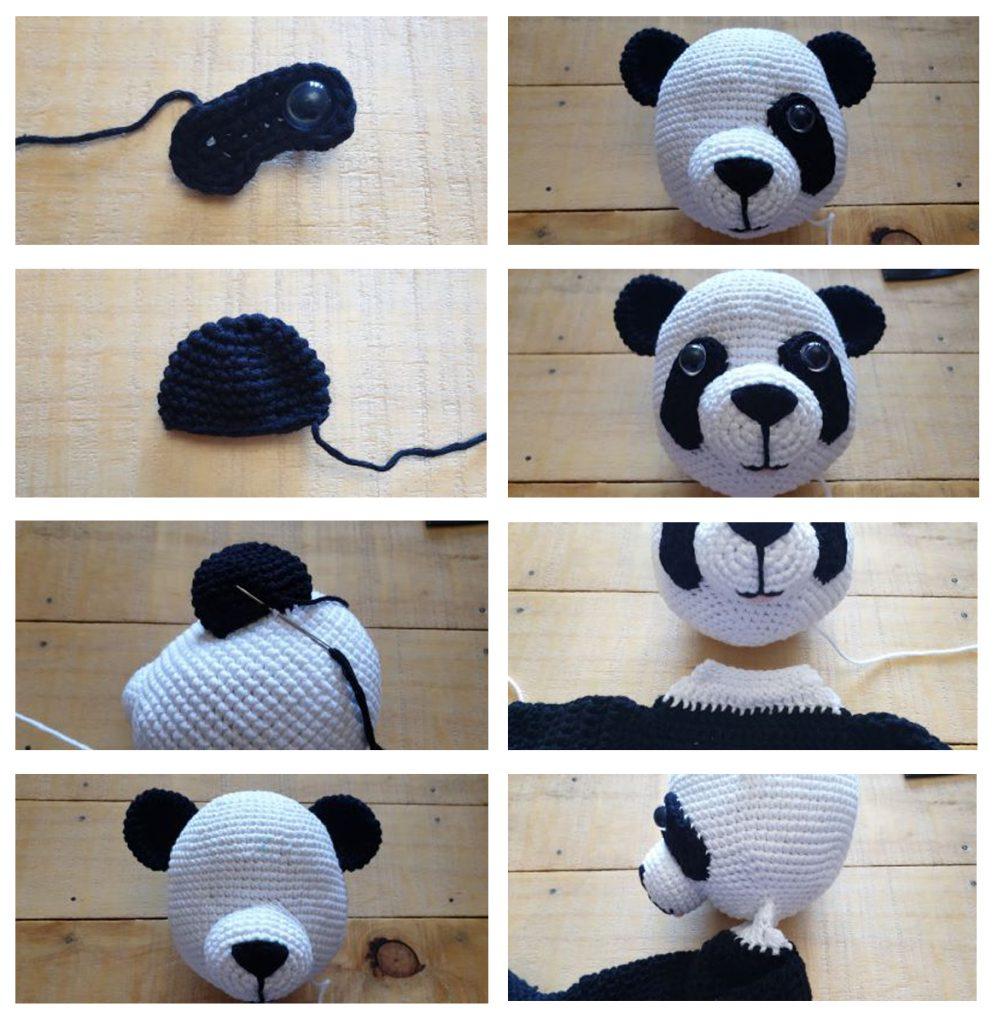
HEAD
Lightly stuffed and worked in the round, using colour (A) make a mc.
Helpful hint: move the stitch marker and place in the last stitch of each row and this will help keep your stitch count correct and help with row counting, and because we are working quite tightly in the round, I weave my beginning tail in whilst working round 2.
- Round 1: Ch 1, sc 6 into mc, place stitch marker in 6th sc and continue to work in the round (6 sc).
- Round 2: Sc 2 into each st (12 sc).
- Round 3: *Sc 2 into next st, sc into next st* rep *.* 5 more times (18 sc).
- Round 4: *Sc 2 into next st, sc into next 2 sts* rep *.* 5 more times (24 sc).
- Round 5: *Sc 2 into next st, sc into next 3 sts* rep *.* 5 more times (30 sc).
- Round 6: *Sc 2 into next st, sc into next 4 sts* rep *.* 5 more times (36 sc).
- Round 7: *Sc 2 into next st, sc into next 5 sts* rep *.* 5 more times (42 sc).
- Round 8: *Sc 2 into next st, sc into next 6 sts* rep *.* 5 more times (48 sc).
- Round 9: *Sc 2 into next st, sc into next 7 sts* rep *.* 5 more times (54 sc).
- Round 10: Sc into next 54 sts (54 sc).
- Round 11: *Sc 2 into next st, sc into next 8 sts* rep *.* 5 more times (60 sc).
- Round 12: Sc into next 60 sts (60 sc).
- Round 13: *Sc 2 into next st, sc into next 9 sts* rep *.* 5 more times (66 sc).
- Round 14: Sc into next 66 sts (66 sc).
- Round 15: *Sc 2 into next st, sc into next 10 sts* rep *.* 5 more times (72 sc).
- Round 16: Sc into next 72 sts (72 sc).
- Round 17 – 27: Repeat round 16 (72 sc).
Helpful hint: I prefer to use the invisible single crochet decrease technique (inv sc2tog), but you can use which ever decrease you are comfortable with.
Round 28: *Sc2tog, sc into next 2 sts*, rep *.* 17 more times (54 sc).
Helpful hint: you can stuff the head now, and then just add more before you close off before the last round, the head should be firm, but not hard, think “squishy”.
- Round 29: *Sc2tog, sc into next 4 sts*, rep *list.* 8 more times (45 sc).
- Round 30: *Sc2tog, sc into next 3 sts*, rep *.* 8 more times (36 sc).
- Round 31: *Sc2tog, sc into next 2 sts*, rep *.* 8 more times (27 sc).
- Round 32: *Sc2tog, sc into next st*, rep *.* 8 more times (18 sc).
- Round 33: *Sc2tog*, rep *.* 8 more times (9 sc), cut long tail, ss through all 9 sts, pull tight and weave in ends.
MUZZLE: Make 1 – worked in the round, using colour (A) make a mc.
- Round 1: Ch 1, sc 6 into mc, place stitch marker in 6th sc and continue to work in the round (6 sc).
- Round 2: *Make 4 sc into next st, make sc into next 2 sts*, rep 1 more time (12 sc).
- Round 3: Sc into next st, [inc, inc, inc], sc into next 3 sts, [inc, inc, inc], sc into next 2 sts (18 sc).
- Round 4: Sc into next 2 sts, [inc, inc, inc], sc into next 6 sts, [inc, inc, inc], sc into next 4 sts (24 sc).
- Round 5: Sc into next 3 sts, *[inc, sc into next st]*, rep *.* 2 more times, sc into next 6 sts, *[inc, sc into next st]*, rep *.* 2 more times, sc into next 3 sts (30 sc).
- Round 6: Sc into next 30 sts (30 sc).
- Round 7 – 9: Repeat round 6 (30 sc), cut yarn leaving a long tail.
Helpful hint: we will lightly stuff the nose and attach to the head at the end of the pattern, we will also embroider a nose and little tongue once the nose is attached to the head.
FRONT PAWS: Make two – lightly stuffed and worked in the round, using colour (B) yarn make a mc.
- Round 1: Ch 1, sc 8 into mc, place st marker into 8th sc and continue to work in the round (8 sc).
- Round 2: Sc 2 into each st (16 sc).
- Round 3: *Sc 2 into next st, sc into next st*, rep *.* 7 more times (24 sc).
- Round 4: *Sc 2 into next st, sc into next 2 sts*, rep *.* 7 more times (32 sc).
- Round 5: Sc into next 15 sts, [inc, inc], sc into next 15 sts (34 sc).
- Round 6: Sc into next 13 sts, [inc, sc into next st, inc], sc into next 2 sts, [inc, sc into next st, inc], sc into next 13 sts (38 sc).
- Round 7: work into the BLO for this round. Sc into next 38 sts (38 sc BLO).
- Round 8: Sc into next 18 sts, [inc, inc], sc into next 18 sts (40 sc).
- Round 9: Sc into next 40 sts (40 sc).
- Round 10: Repeat round 9 (40 sc).
- Round 11: Sc into next 16 sts, *sc2tog*, rep *.* 3 more times, sc into next 16 sts (36 sc).
- Round 12: Sc into next 36 sts (36 sc).
- Round 13: Sc into next 14 sts, *sc2tog*, rep *.* 3 more times, sc into next 14 sts (32 sc).
- Round 14: Sc into next 32 sts (32 sc).
- Round 15: Sc into next 10 sts, *sc2tog*, rep *.* 5 more times, sc into next 10 sts (26 sc).
- Round 16: Sc into next 8 sts, *sc2tog*, rep *.* 4 more times, sc into next 8 sts (21 sc).
- Round 17: Sc into next 8 sts, *sc2tog*, rep *.* 2 more times, sc into next 7 sts (18 sc).
- Round 18: Sc into next 18 sts (18 sc).
- Round 19 – 20: Repeat round 18 (18 sc).
Helpful hint: at the end of round 20, ss into next st, cut yarn, leaving 20cm tail (to stitch stuffing into hand) and leave the tail on the outside of the hand (this makes stitching the stuffing into the hand easier). We are going to do this after a few rounds of the next section.
Using colour (B), join yarn with a ss into the last single crochet from round 20.
Round 21: Ch 1 and dc into same st, dc into the next 17 sts, ss into 1st dc (18 dc).
Helpful hint: the chain 1 stitch does not count as a stitch.
Round 22: Ch 1, dc into same st, dc into next 17 sts, ss into 1st dc (18 dc).
Round 23-28: Repeat round 22.
Helpful hint: lightly stuff the hands, think squishy, then using the long tail left from the “hand” section stitch the “wrist” closed, securing the stuffing into the hand, the arm is not stuffed, cut yarn, weave in ends.
Round 29: Ch 1, sc into same st, sc into next 17 sts, ss into 1st st, then slip stitch the opening closed, cut yarn leaving a long tail to stitch to body.
Helpful hint: slip stitch the arm opening closed, after you have stuffed and stitched the hand. I do this as it looks neater when we attach the arms to the body later, make sure that your seam is on the inside of the arm, that way you won’t really see it.
BACK PAWS: Make two – lightly stuffed and worked in the round, using colour (B) yarn make a mc.
- Round 1: Ch 1, sc 8 into mc, place st marker into 8th sc and continue to work in the round (8 sc).
- Round 2: Sc 2 into each st (16 sc).
- Round 3: *Sc 2 into next st, sc into next st*, rep *.* 7 more times (24 sc).
- Round 4: *Sc 2 into next st, sc into next 2 sts*, rep *.* 7 more times (32 sc).
- Round 5: Sc into next 15 sts, [inc, inc], sc into next 15 sts (34 sc).
- Round 6: Sc into next 13 sts, [inc, sc into next st, inc], sc into next 2 sts, [inc, sc into next st, inc], sc into next 13 sts (38 sc).
- Round 7: work into the BLO for this round. Sc into next 38 sts (38 sc BLO).
- Round 8: Sc into next 18 sts, [inc, inc], sc into next 18 sts (40 sc).
- Round 9: Sc into next 40 sts (40 sc).
- Round 10 – 11: Repeat round 9 (40 sc).
- Round 12: Sc into next 16 sts, *sc2tog*, rep *.* 3 more times, sc into next 16 sts (36 sc).
- Round 13: Sc into next 36 sts (36 sc).
- Round 14: Sc into next 14 sts, *sc2tog*, rep *.* 3 more times, sc into next 14 sts (32 sc).
- Round 15: Sc into next 32 sts (32 sc).
- Round 16: Sc into next 10 sts, *sc2tog*, rep *.* 5 more times, sc into next 10 sts (26 sc).
- Round 17: Sc into next 10 sts, *sc2tog*, rep *.* 2 more times, sc into next 10 sts (23 sc).
- Round 18: Sc into next 23 sts (23 sc).
- Round 19 – 22: Repeat round 18 (23 sc).
- Round 23: Sc into next 23 sts, then sc into the next 5 to 8 sts (the reason for this is so that you get to the “side” of the ankle, which makes it neater and easier when you slip stitch it together, the foot should be facing up), lightly stuff the foot, think squishy, and then slip stitch the opening closed, cut yarn, and weave in the ends.
PAW PADS: Make 4 – using colour (C) yarn make a mc.
- Round 1: Ch 1 (does not count as a st), sc 11 into mc, ss into 1st sc (11 sc).
- Round 2: Ch 3 (counts as 1st dc), dc into same st, dc 3 into next st, hdc into next st, sc into next 2 sts, hdc into next st (bottom of heart), sc into next 2 sts, hdc into next st, dc 3 into next st, dc into next st, ch 3, cut yarn, leaving 20 cm tail to use to stitch to the paws, ss into same sp of last dc just made (this will give you a nice heart shape) (2 x ch 3, 3 x hdc, 8 x dc, 4 x sc).
TOES: Make 12 – worked in the round using colour (C) yarn make a mc.

- Round 1: Ch 1, sc 3, hdc 3, sc 3 into the mc, ss into 1st sc (6 sc, 3 hdc), cut yarn leaving a long tail to stitch to the feet and hands.
Helpful hint: we will stitch the paw pads and toes onto the paws at the end of the pattern.
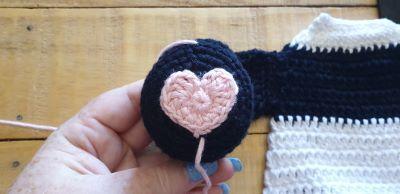
EYE PATCHES: Make two, using colour (B) yarn chain 9.
- Round 1: Sc 3 into 2nd ch from hook, sc into next 6 ch, sc 3 into last ch [turn work slightly to work down the opposite side of the chain], sc into next 6 ch, ss into 1st sc (18 sc).
- Round 2: Ch 1, *sc 2 into next st*, rep *.* 1 more time, [2 hdc, 2 dc] into next st, sk next st, ss into next 4 sts, sk next st, [2 dc, 2 hdc] into next st, *sc 2 into next st*, rep *.* 1 more time, sc into next 6 sts, ss into 1st sc (4 ss, 14 sc, 4 hdc, 4 dc), cut yarn leaving a long tail to attach the eye patches to the head.
Helpful hint: if you have large “holes” along the chain, especially where you have made 3 single crochet stitches at each end, then go down a hook size. We will stitch the eye patches onto the head in at the end of the pattern.
EARS: Make two – worked in the round, using colour (B) yarn make a mc.
- Round 1: Ch 1, sc 8 into mc, place st marker into 8th sc and continue to work in the round (8 sc).
- Round 2: Sc 2 into each st (16 sc).
- Round 3: *Sc 2 into next st, sc into next st*, rep *.* 7 more times (24 sc).
- Round 4: Sc into next 24 sts (24 sc).
- Round 5: Repeat round 4 (24 sc).
- Round 6: *Sc 2 into next st, sc into next 5 sts*, rep *.* 3 more times (28 sc).
- Round 7: Sc into next 28 sts (28 sc).
- Round 8: Repeat round 7 (28 sc).
- Round 9: *Sc2tog, sc into next 2 sts*, rep *.* 6 more times (21 sc), ss into next st, ss the bottom of the ears together, cut yarn, leaving a long tail to use to stitch to the head.
Helpful hint: we will stitch the ears onto the head in at the end of the pattern.
TAIL: Make 1 – not stuffed, using colour (A) make a mc.
- Round 1: Ch 1, then make 10 dc’s into the mc, ss into 1st dc (10 dc).
- Round 2: Ch 1, *make 2 dc’s into st, dc into next st*, rep *.* 4 more times, ss into 1st dc (15 dc).
- Round 3: Ch 1, dc into same st, dc into next 14 sts (15 dc).
- Round 4: Repeat round 3 (15 dc).
- Round 5: *Sc2tog, sc into next st*, rep *.* 4 more times, ss into 1st sc (10 sc), ss the opening together, cut yarn, leaving a long tail to use to attach the tail to the body.
Helpful hint: we will stitch the tail onto the back of the body at the pattern.
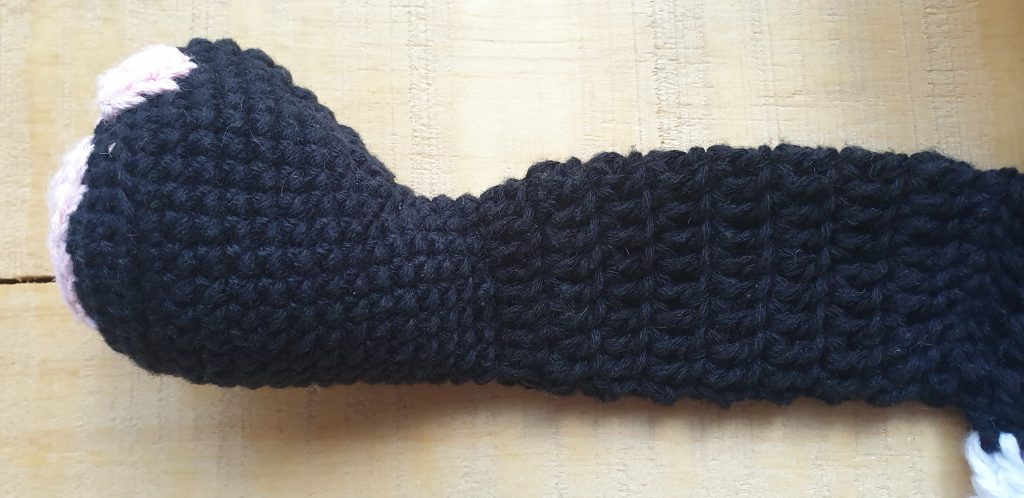
BODY: Not stuffed, using colour (A) yarn chain 32 and ss into the first chain to make a circle.

Helpful hint: the chain 1 at the beginning of each row does not count as a stitch, but it is important to make the chain 1, and you will see why as we go along – it makes a nice straight seam – make the chain 1 loose otherwise the seam will “pull” up on this side.
- Round 1: Ch 1, dc into same ch, dc 14, 3 dc into next ch, dc 15, 3 dc into next ch, ss into 1st dc (36 dc), cut yarn, make a nj, and weave in ends.
Helpful hint: change to colour (B).
- Round 2: Join new yarn into 1st dc from previous round, ch 1, dc into same st, dc 16, 2 dc into next st, dc 17, 2 dc into next st, ss into 1st dc (38 dc).
- Round 3: Ch 1, dc into same st, dc 17, 2 dc into next st, dc 18, 2 dc into next st, ss into 1st dc (40 dc).
- Round 4: Ch 1, dc into same st, dc 18, 2 dc into next st, dc 19, 2 dc into next st, ss into 1st dc (42 dc)
- Round 5: Ch 1, dc into same st, dc 19, 2 dc into next st, dc 20, 2 dc into next st, ss into 1st dc (44 dc).
- Round 6: Ch 1, dc into same st, dc 20, 2 dc into next st, dc 21, 2 dc into next st, ss into 1st dc (46 dc), cut yarn, make a nj, and weave in ends.
Helpful hint: change to colour (A).
- Round 7: Join new yarn into 1st dc from previous round, ch 1, dc into same st, dc 21, 2 dc into next st, dc 22, 2 dc into next st, ss into 1st dc (48 dc).
- Round 8: Ch 1, dc into same st, dc 22, 2 dc into next st, dc 23, 2 dc into next st, ss into 1st dc (50 dc).
- Round 9: Ch 1, dc into same st, dc 23, 2 dc into next st, dc 24, 2 dc into next st, ss into 1st dc (52 dc).
- Round 10: Ch 1, dc into same st, dc 24, 2 dc into next st, dc 25, 2 dc into next st, ss into 1st dc (54 dc).
- Round 11: Ch 1, dc into same st, dc 25, 2 dc into next st, dc 26, 2 dc into next st, ss into 1st dc (56 dc).
- Round 12: Ch 1, dc into same st, dc 26, 2 dc into next st, dc 27, 2 dc into next st, ss into 1st dc (58 dc).
- Round 13: Ch 1, dc into same st, dc 27, 2 dc into next st, dc 28, 2 dc into next st, ss into 1st dc (60 dc), cut yarn, make a nj, and weave in ends.
TAI CHI PANTS
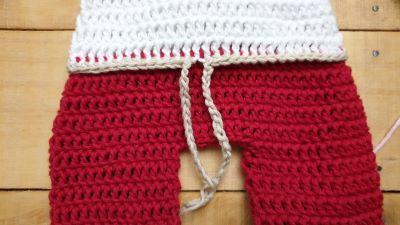
Helpful hint: change to colour (D).
- Round 14: work in the BLO for this round. Join new yarn into 1st dc from previous round, ch 1, dc into same st, dc 28, 2 dc into next st, dc 29, 2 dc into next st, ss into 1st dc (62 dc BLO).
- Round 15:Ch 1, dc into same st, dc 29, 2 dc into next st, dc 30, 2 dc into next st, ss into 1st dc (64 dc).
- Round 16: Ch 1, dc into same st, dc 30, 2 dc into next st, dc 31, 2 dc into next st, ss into 1st dc (66 dc).
- Round 17: Ch 1, dc into same st, dc 31, 2 dc into next st, dc 32, 2 dc into next st, ss into 1st dc (68 dc).
- Round 18: Ch 1, dc into same st, dc 32, 2 dc into next st, dc 33, 2 dc into next st, ss into 1st dc (70 dc).
FIRST LEG
- Round 19: Ch 1, dc into same st, dc 13, skip 42, dc 14, ss into 1st dc (28 dc).
- Round 20 – 23: Ch 1, dc into same st, dc 27, ss into 1st dc (28 dc), cut yarn, make a nj, and weave in ends.
Helpful hint: change to colour (E).
- Round 24: Join new yarn into 1st dc from previous round, sc into next 28 sts (28 sc).
- Round 25: Ch 1, crab stitch into the same st, crab stitch into next 27 sts, ss into 1st crab st (28 crab sts), cut yarn leaving a 15cm tail to use later when we attach the leg at the end of the pattern.
SECOND LEG
Helpful hint: skip 7 stitches from round 18 after the first leg, join yarn (D) to the 8th double crochet with a slip stitch, leave a long tail which you will use to stitch the opening between the legs at the end of the pattern.
- Round 19: Ch 1, dc into same st, dc 27, ss into dc (28 dc).
- Round 20 – 23: Ch 1, dc into same st, dc 27, ss into 1st dc (28 dc), cut yarn, make a nj, and weave in ends.
Helpful hint: change to colour (E).
- Round 24: Join new yarn into 1st dc from previous round, sc into next 28 sts (28 sc).
- Round 25: Ch 1, crab stitch into the same st, crab stitch into next 27 sts, ss into 1st crab st (28 crab sts), cut yarn leaving a 15cm tail to use later when we attach the leg.
pin for later
BELT: Using colour (E) yarn, chain 20 sts, then sc along the FLO of round 14 (62 sc), then chain 20, cut yarn.
Helpful hint: this is the belt for the tai chi pants, you can pull the ends of the chain’s nice and tight and cut off, or weave in the ends, then make a knot using the chained ties – belt done.
NECK: Using colour (A) join yarn to round 1 of the body with a slip stitch.
Helpful hint: join yarn at one side of the neck at the top of the opening (where we are going to attach the head).
- Round 1: Ch 1, sc into same st, sc 31 along the neck ch, ss into 1st sc (32 sc)
- Round 2: Ch 1, *sc2tog, sc into next 2 sts*, rep *.* 7 more times (24 sc), ss the neck closed, cut yarn leaving a long tail to use to attach the head to the body.
BRINGING YOUR crochet giant panda to life
You have made all the different body parts and motifs, now to bring your Melly Teddy to life. Although you do not need to follow my instructions exactly, this is just the way I like to put mine together, so these are a suggestion only – the idea is to have FUN with the design, use your imagination and make Melly Teddy Ragdoll unique.
ATTACHING THE ARMS, PAW PADS & TOES
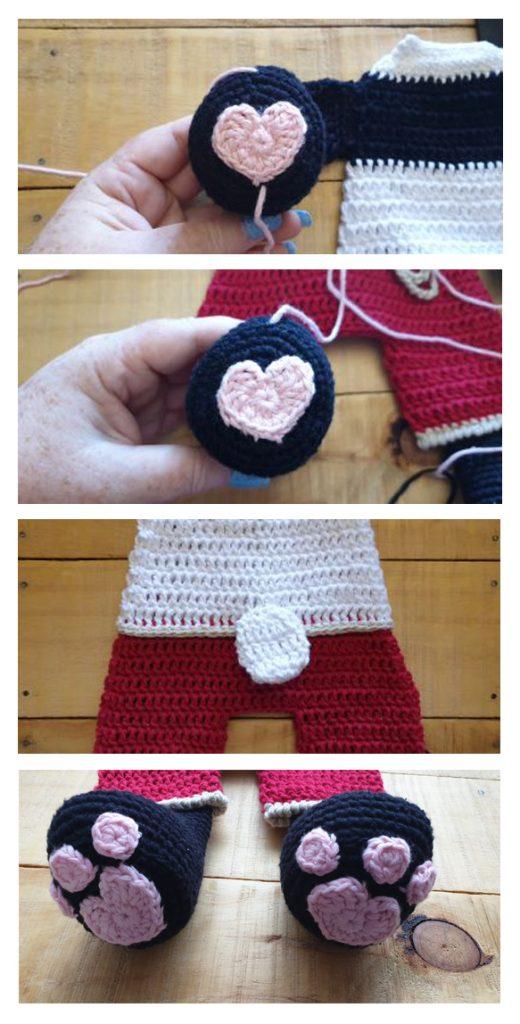
Lay the body flat and place each arm on either side of the top of the body and slip stitch the arms to the body, cut yarn and weave in ends. I have attached the arms between round 2 and 6 of the top of the body, which should be over the black section of the body. Slip stitch the pads and toes to the bottom of the hands.
ATTACHING THE PAWS, PAW PADS, TOES & TAIL

Lay the body flat and using the yarn used to make the pants slip stitch the space at the bottom of the body between the legs, cut yarn and weave in ends. Then place the feet in the middle of each of the leg part of the pants, using the yarn from the pants slip stitch the legs to the pants inserting the top two rows of the legs in between pants, cut yarn, and weave in ends. Slip stitch the pads and toes to the bottom of the feet.
Attach the tail to the back using slip stitch – I placed the tail just above the belt on the last row of the white part of the body, in the centre.
ATTACHING THE MUZZLE, TOUNGE, NOSE, EYE PATCHES, EYES & EARS

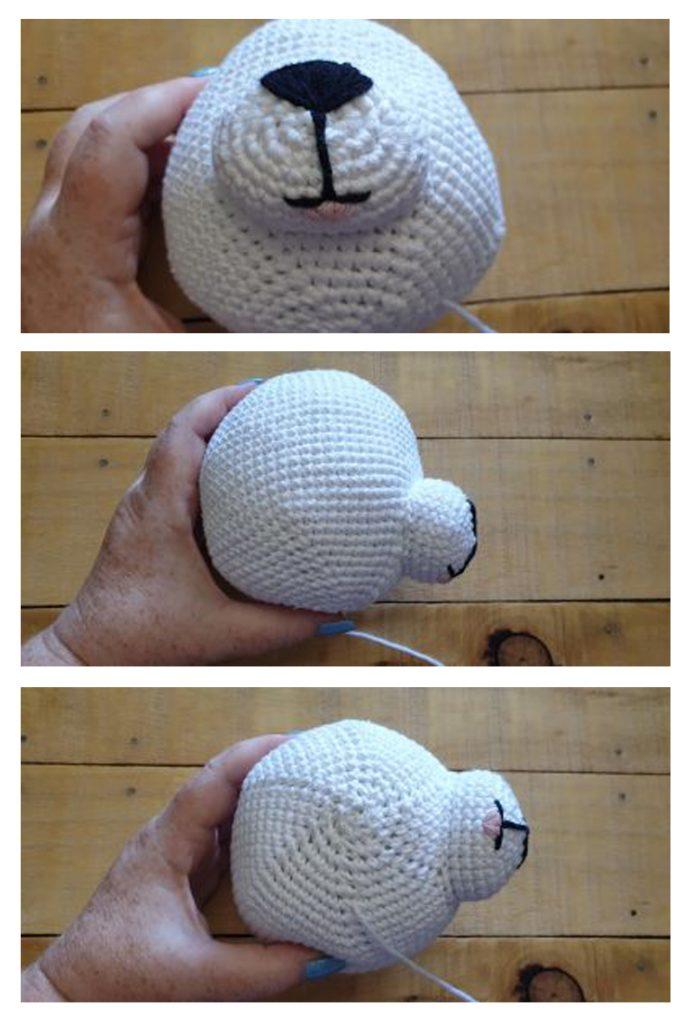
I use a disappearing ink marker to mark where I want to place the muzzle and the ears. Lightly stuff the muzzle and slip stitch it to the head – I placed mine between round 22 and round 31 (counting from the top of the head), cut yarn and weave in ends. I used black yarn to embroider a nose, but you can use a safety nose if you prefer – just add it to the muzzle before you stitch it to the head. I also added a little pink tongue, which is optional.
Insert the safety eye into middle of either one of the “circles” and then slip stitched each eye patch to the face, stitching the patch to either side of the muzzle.
When you attach the ears, I attached between row 8 and row 17 (counting from the top), approximately 32 stitches apart from the bottom of one ear to the bottom of the other ear (the widest part of the head).
ATTACHING THE HEAD
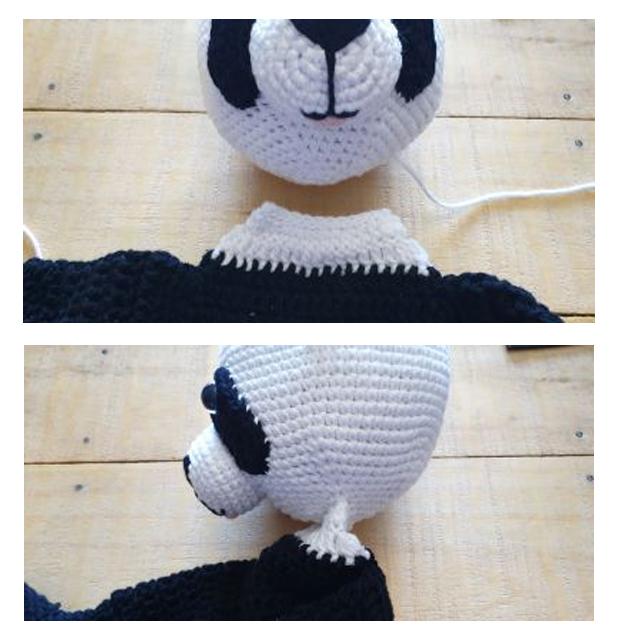
This is my favourite part. I like to add the head last, because this is the most important join, and this is the last thing you do before your Melly Teddy Ragdoll comes to life. I use a disappearing ink marker to mark where I want my head to be placed, you can use stitch markers or pins, to help you.
Slip stitch the neck opening, like you did the arms and the feet, then lie your body flat, and make sure that the middle of the head is exactly joined to the middle of the body, otherwise it will look funny, and lie skew. Then slip stitch the body to the head, on both sides, cut yarn and weave in.
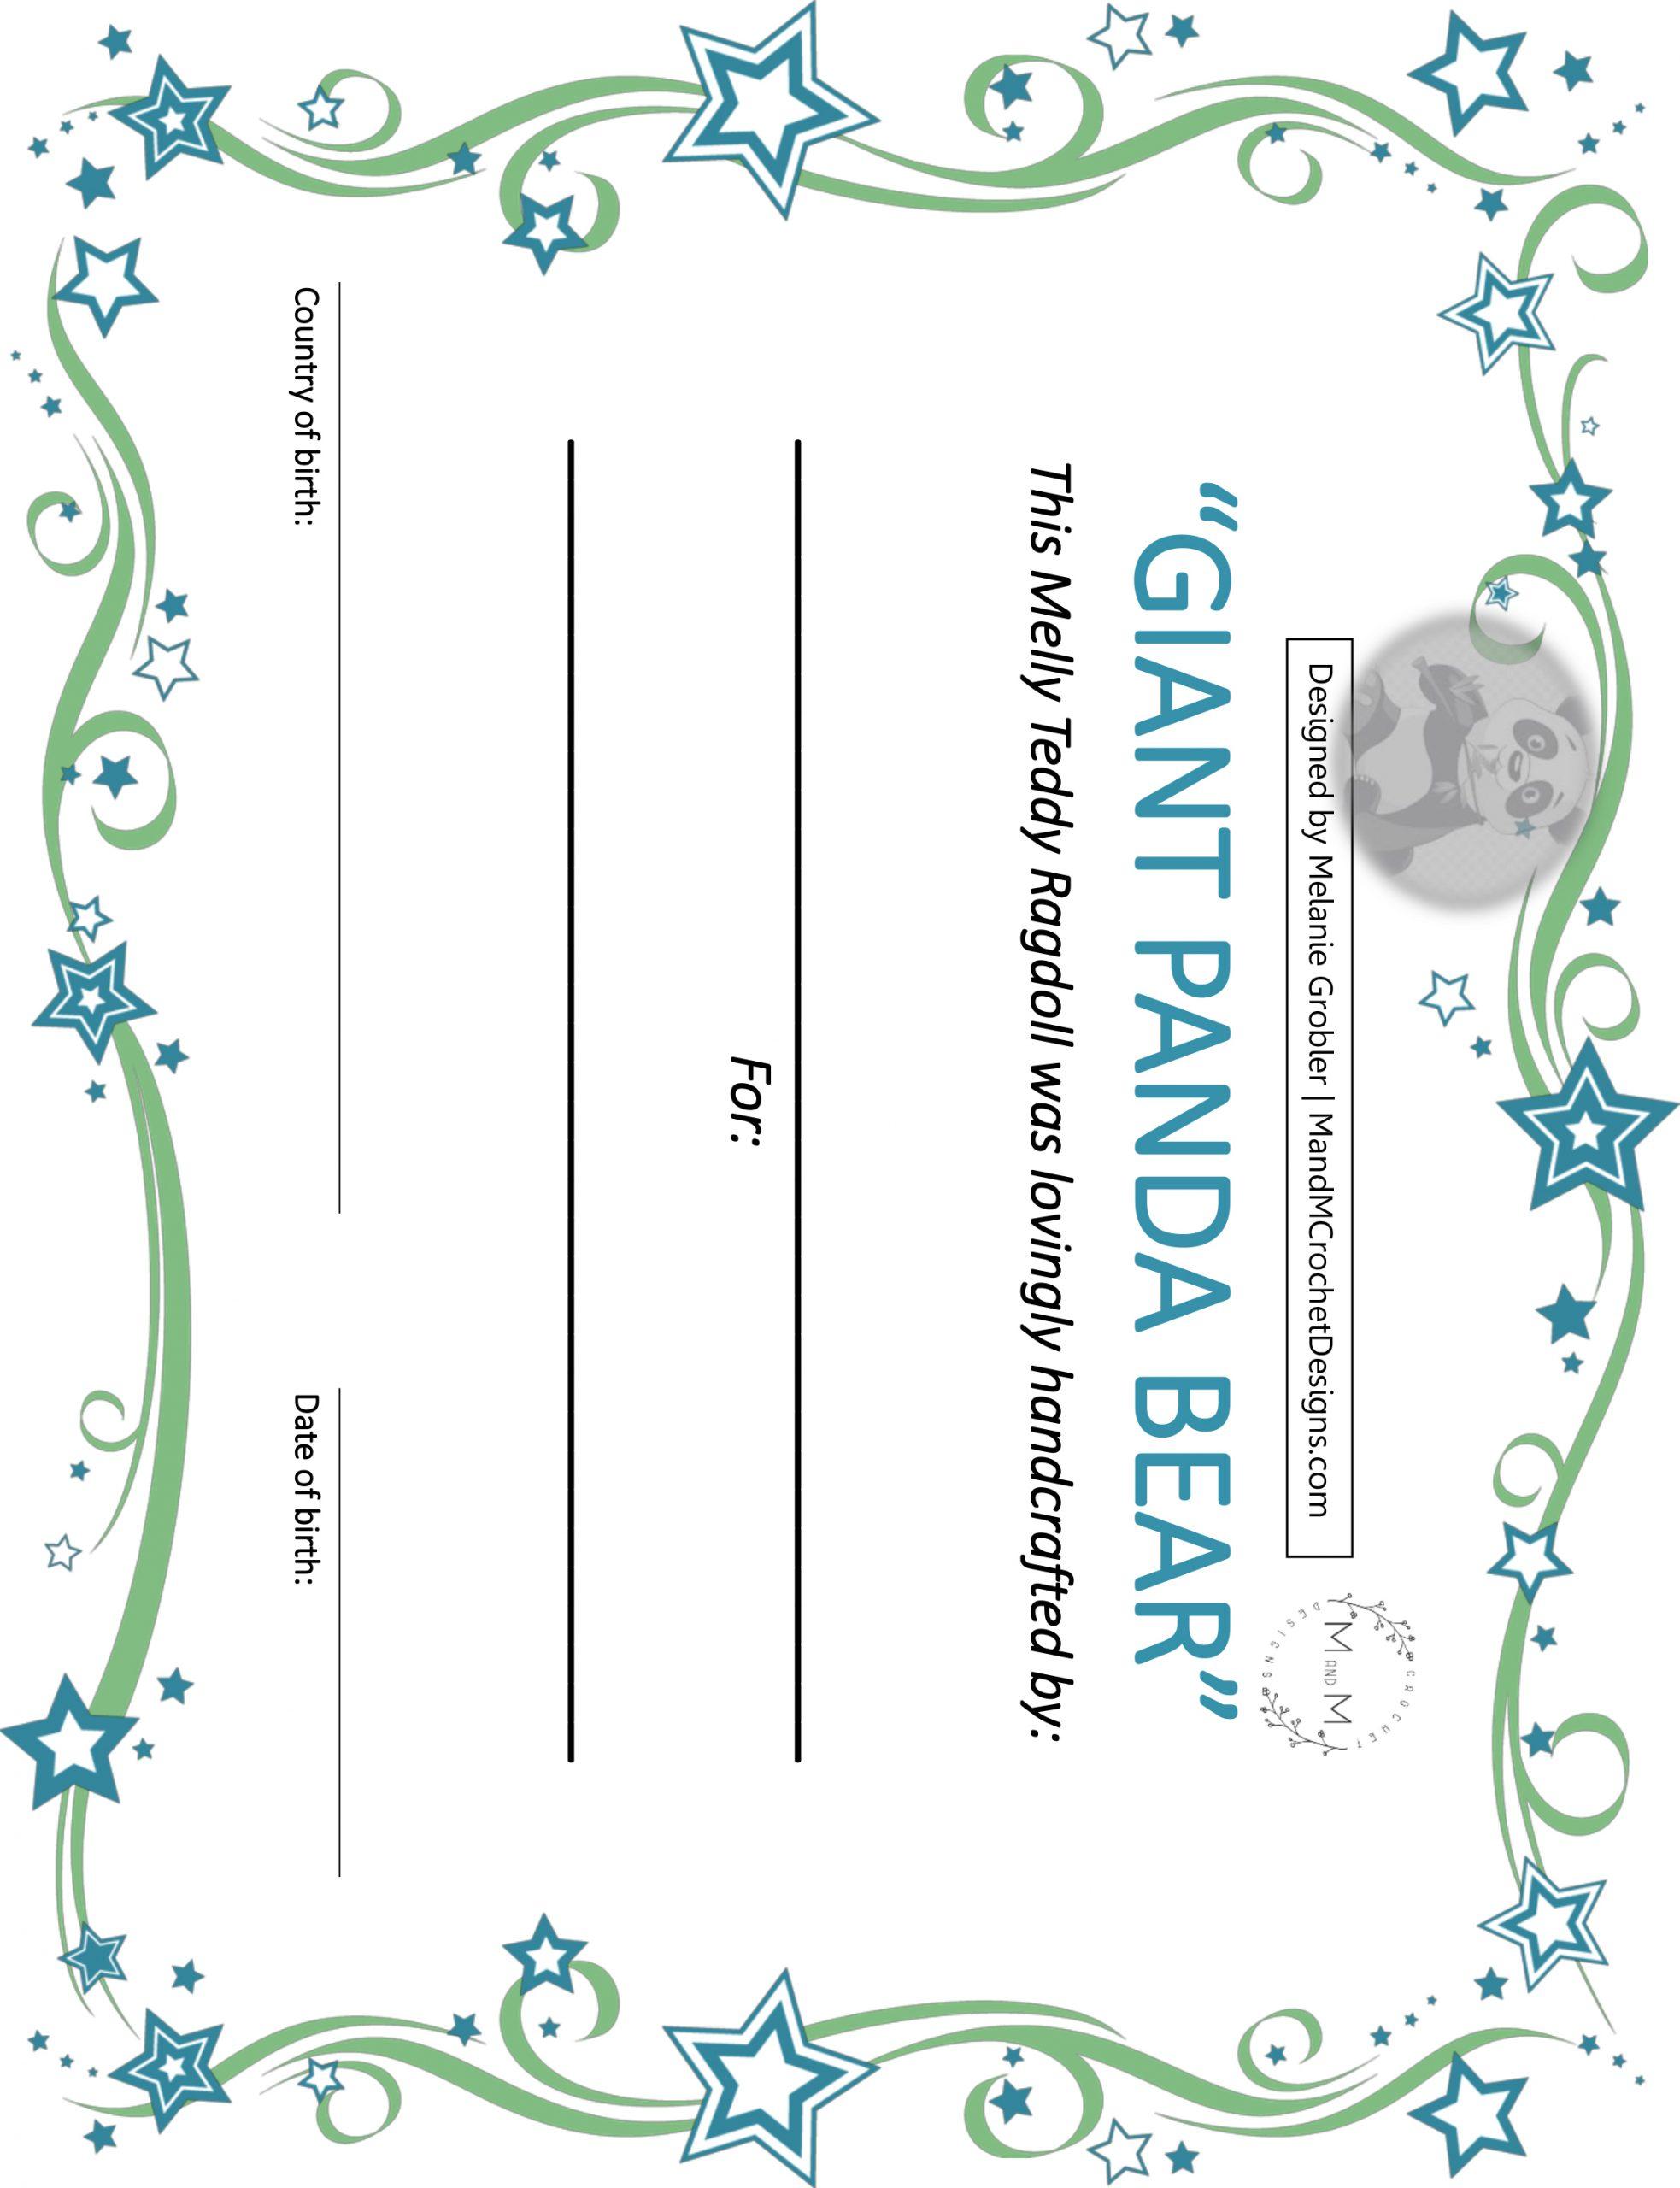
printable BIRTH CERTIFICATE
Well done! You have finished making your Melly Teddy Ragdoll. He or she is now ready for their forever home where they will be loved and cherished. There is a printable birth certificate available to complete because all Teddies need a certificate of birth.
You can read my interview with Melanie over on Instagram today.
Copyright © 2020 Melanie Grobler. Please do not copy, reproduce or sell this pattern or the images therein.


4 Comments
Jean A Sain
January 24, 2020 at 7:58 pmI love this pattern I have all of her patterns as well. Is there a way to print this up without all the ads on the paper as I take these patterns with me when I am out and about and have to wait on others.
Thank you so much
Anna
January 26, 2020 at 1:00 pmMelanie, My granddaughter just saw this pattern and fell in love with it! I don’t shop online so when I told her it was a free pattern, she asked me to tell you thank you. I so appreciate all that you do and share with the crochet community! I think this is my favorite rag doll pattern yet! ( But then I think I have thought that every time I see a new one.)
Amy
July 24, 2023 at 8:44 pmCould one stuff the body?
BellaCocoTeam
July 26, 2023 at 2:27 pmAs this was a guest post any queries will need to be sent directly to the designer who will be able to help you 🙂