
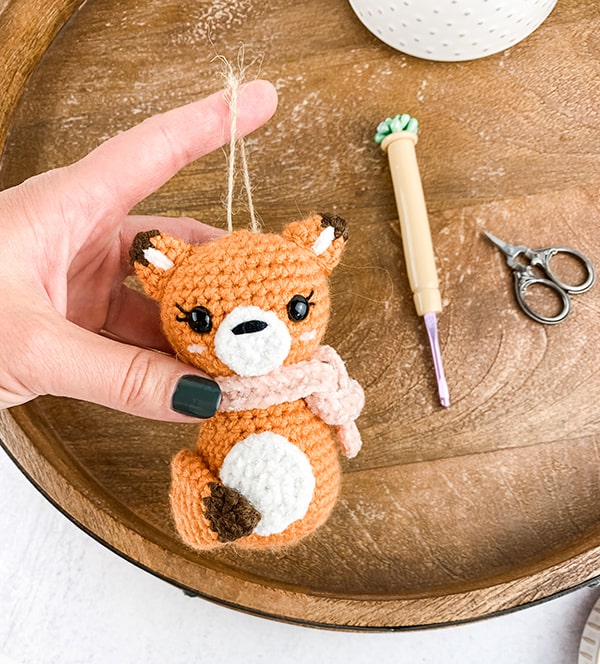
We are now in our 3rd week of this years' Christmas in July event and I'm super excited to share our new crochet fox ornament pattern with you!
I was inspired by last year's Penguin Ornament and wanted to add a fox to the collection. Well, my first attempt resembled an owl instead of a fox so I went back to the drawing board.
If you're just learning of our Christmas in July event you can check out our previous pattern releases below. The sweet Amanda of Loops and Love Crochet and I have teamed up again to give you 4 free pattern releases to help you get a head start on your Christmas makes this year!
Week 1 - Crochet Cow Stocking
Week 3- Amigurumi Fox Ornament (this post here)
Week 4- Releases July 30th
Pattern
PIN here to save for later
Grab the ad-free printable PDF in my Etsy or Ravelry shop
(Continue scrolling for the free version here on the blog)
Don't want to miss a new pattern?
Stay in touch through these platforms below!
Pinterest - Newsletter - Instagram - Grace & Yarn Crochet Group
This post may contain affiliate links, please see our disclosure for more information. Thank you so much for supporting Grace & Yarn!
You may make and sell items made from this pattern but please do not sell, share or reproduce the actual pattern. If you sell finished items online (Etsy, etc) please provide a link to the pattern and credit to me as the designer, thank you. I hope you enjoy this pattern!

Materials -
Abbreviations - US terminology
MC- Magic circle
SC- Single crochet
SC INC- Single crochet increase
HDC – Half double crochet
INV DEC- Invisible decrease
St(s)- Stitch(es)
Pattern
PIN here to save for later
Grab the ad-free printable PDF in my Etsy or Ravelry shop
(Continue scrolling for the free version here on the blog)
Don't want to miss a new pattern?
Stay in touch through these platforms below!
Pinterest - Newsletter - Instagram - Grace & Yarn Crochet Group
This post may contain affiliate links, please see our disclosure for more information. Thank you so much for supporting Grace & Yarn!
You may make and sell items made from this pattern but please do not sell, share or reproduce the actual pattern. If you sell finished items online (Etsy, etc) please provide a link to the pattern and credit to me as the designer, thank you. I hope you enjoy this pattern!

Materials -
- Size 4 worsted weight yarn (65 yards of orange; small amount of white, dark brown, and choice of color for cheeks/scarf)
- Yarn or craft string to hang ornament (approx. 6 inches long)
- 3.5 mm crochet hook (these are the hooks I use and love!)
- 9mm safety eyes
- Black crochet/embroidery thread for eyelashes/eyebrows/nose
- Scissors
- Tapestry needle (bent tips work wonders for amigurumi!)
- Stuffing
- Stitch markers
Abbreviations - US terminology
MC- Magic circle
SC- Single crochet
SC INC- Single crochet increase
HDC – Half double crochet
INV DEC- Invisible decrease
St(s)- Stitch(es)
NOTES -
- Slowly stuff as you go, you want it to be firm but not stretched. You will be working in the round; I like to use a stitch marker at the beginning of each round.
- The body and head will be made as one piece.
- Finished ornament measures approximately 4.5 inches tall.
Nose –
With white
Round 1: Create a magic circle with 6 SC
Round 2: SC INC in each st (12)
Round 3: SC around (12)
Fasten off leaving a long tail for sewing. With a small piece of black crochet thread and tapestry needle, pass through 2 sts between the 2nd and 3rd rounds.
Nose –
With white
Round 1: Create a magic circle with 6 SC
Round 2: SC INC in each st (12)
Round 3: SC around (12)
Fasten off leaving a long tail for sewing. With a small piece of black crochet thread and tapestry needle, pass through 2 sts between the 2nd and 3rd rounds.

Body –
With orange
Round 1: Create a magic circle with 6 SC
Round 2: SC INC in each st around (12)
Round 3: SC in the first st, SC INC in the next, rep around (18)
Round 4: SC in the first 2 sts, SC INC in the next, rep around (24)
Round 5: SC in the first 3 sts, SC INC in the next, rep around (30)
Round 6: SC in the first 4 sts, SC INC in the next, rep around (36)
Rounds 7-9: SC around (36)
Round 10: SC in the first 4 sts, INV DEC in the next, rep around (30)
Rounds 11-12: SC around (30)
Round 13: SC in the first 3 sts, INV DEC in the next, rep around (24)
Rounds 14-15: SC around (24)
Round 16: SC in the first 2 sts, INV DEC in the next, rep around (18)
Round 17: SC in the first st, INV DEC in the next, rep around (12)
*We will now start the head*
Round 18: SC in the first st, SC INC in the next, rep around (18)
Round 19: SC in the first 2 sts, SC INC in the next, rep around (24)
Round 20: SC in the first 3 sts, SC INC in the next, rep around (30)
Round 21: SC in the first 4 sts, SC INC in the next, rep around (36)
Rounds 22-27: SC around (36)
Note - Here is where we will add the facial features before we start closing the head. Insert your safety eyes between rounds 24 and 25, 5 stitches apart.
Optional - With black crochet/embroidery thread add eyebrows or eyelashes before securing the backs of your safety eyes.
Next, sew your nose centered between the eyes. Lastly, add your cheeks just below the eyes on either side of your nose.

Round 28: SC in the first 4 sts, INV DEC in the next, rep around (30)
Round 29: SC in the first 3 sts, INV DEC in the next, rep around (24)
*Continue to stuff the head firmly
Round 30: SC in the first 2 sts, INV DEC in the next, rep around (18)
Round 31: SC in the first st, INV DEC in the next, rep around (12)
Round 32: INV DEC around (6)
Fasten off and sew remaining part closed, weave in your end.
Ears- Make 2
With dark brown
Round 1: Create a magic circle with 6 SC
Change to orange
Round 2: SC around (6)
Round 3: SC in the first st, SC INC in the next, rep around (9)
Round 4: SC around (9)
Fasten off leaving a long tail for sewing. With white yarn and tapestry needle pass through from round 1-4 to create the white center.

Belly Patch –
With white
Round 1: Create a magic circle with 6 SC
Round 2: SC INC in each st around (12)
Round 3: *SC INC in the first 3 sts, SC into the next 3 sts*, *rep once more (18)
Fasten off leaving a long tail for sewing.
Tail –
With dark brown
Round 1: Create a magic circle with 6 SC
Round 2: SC around (6)
Round 3: SC in the first st, SC INC in the next, rep around (9)
Change to orange
Round 4: SC around (9)
Round 5: SC in the first 2 sts, SC INC in the next, rep around (12)
Round 6: SC around (12)
Round 7: SC in the first 3 sts, SC INC in the next, rep around (15)
Round 8: SC in the first 4 sts, SC INC in the next, rep around (18)
Round 9: SC around (18)
Round 10: SC in the first st, INV DEC in the next, rep around (12)
Round 11: SC around (12)
Round 12: SC in the first st, INV DEC in the next, rep around (9)
Rounds 13-16: SC around (9)
Fasten off leaving a long tail for sewing.

Scarf –
With color of choice ch 50, HDC in the 2nd ch from your hook and in each ch across. Fasten off and weave in your ends.
Assembly –
- Sew the ears onto each side of the head starting at the 4th round and ending at the 7th round from the top.
- Next, sew the belly patch centered onto the body.
- Sew your tail onto the bottom of the body and wrap around to end overlapping the belly patch.
- Tie your scarf around the neck (Optional: Sew to keep in place).
- Lastly, attach your string or yarn to the top of your fox to complete your ornament.

I hope you have enjoyed making this pattern. Let me know if you have any questions with this pattern or any of my other patterns, I would be happy to help.
Thanks for stopping by,
Stephanie


No comments