
This post may contain affiliate links. I may earn a small commission off of at NO extra cost to you. For more info, view my Privacy Policy.
I don’t know about y’all, but I have seen so many patterns for and made with Granny Squares! And, I mean, why not?! They are quick and easy to make, cute and can be made in so many different color combinations. So, I decided to create my own Flower Granny Squares!
One of my favorite things to crochet is baby blankets and I think that these put together with maybe some Solid Granny Squares would make the cutest baby blanket!

Plus, When I made these flower granny squares, I kept the size and stitch count in mind for the regular, solid granny squares. So, You can easily attach these granny squares to the solid ones. Of course, it depends on how many rounds you add to each, but you can easily count the stitches to see where you are at, Because the squares will have the same amount of stitches on each side.
Yarn I’m Using –
I recently purchased my very 1st order off of KnitPicks.com. I bought multiple types of yarn because I was wanting to experiment with it and see what I though about it. So far, I love it all!
One of my favorite things that I bought was their Brava Worsted Weight Mini Pack! It has 24 different mini skeins so you can hands on see the different colors and experiment on you own with them. They are absolutely perfect to make all kinds of granny squares with!

It’s very similar in weight and texture to I Love This Yarn, which has been one of my favorite yarns to date. I Love This Yarn may actually still be just a little bit softer than Brava. But, the difference is only minimal! I will definitely still be ordering and using Brava yarn because it’s a great yarn! And, it’s priced really good too! I think that the quality of the yarn is wonderful compared to the price!
And, they do also have a Brava Bulky! It comes in quite a few colors and is probably going to be a favorite of mine too!

Be sure to Follow me on Social Media
Never miss a new tutorial or pattern!
PIN this post to save for later!

Are you a visual learner? Check out my step-by-step video below!
Pattern
- You can purchase the ad-free, downloadable, printable PDF pattern in my Etsy shop Here Thank you so much for your support!
- Save to your Ravelry Queue Here
- Pin to Pinterest to save for later Here
- Subscribe to my Youtube channel Here
Things you will need:
- Brava Worsted Weight yarn in Custard, Cotton Candy (pink) & Cornflower (blue), Alfalfa & White
- 5.5mm / I Crochet Hook
- Yarn Needle
- Scissors
Stitch Key –
- mc = magic circle/ring
- ch = chain
- sc = single crochet
- hdc = half double crochet
- dc = double crochet
- tr = treble (triple) crochet
- st = stitch(es)
- sl st = slip stitch
- sp = space
Gauge – 14 st x 6 r = 4” in double crochet
Size –
- Each square measures approx. 5.5” x 5.5”
Notes –
- When slip stitching into the 1st stitch of the round, go ahead and slip stitch with the color of yarn you will be using for the next round.
Written Pattern –
With Custard (yellow)
Round 1: 10 dc into mc, sl st to join (10)

With Cotton Candy (pink)
Round 2: ch 2 (counts as hdc), (dc, tr, dc, hdc) in same st, sc, * (hdc, dc, tr, dc, hdc) in next st, sc * repeat * to * 3 more times, sl st into 1 st (30)


With Alfalfa (green)
work in back loops only for this round
Round 3: ch 2 (counts as hdc), sc, sl st, sc, hdc, dc * hdc, sc, sl st, sc, hdc, dc * repeat * to * 3 more times, sl st into 1st st (30)
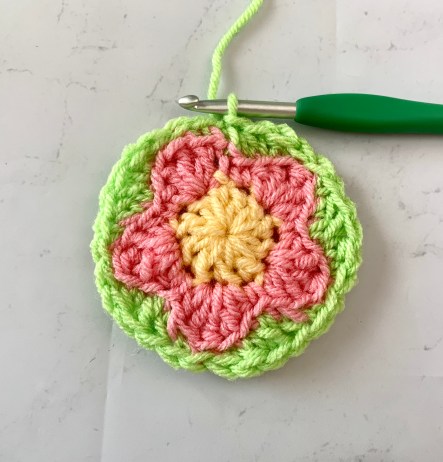
Round 4: ch 1, * sc in 4 st, 2 sc* Repeat * to * around, sl st into 1st st (36)

With white
Round 5: ch 3 (counts as dc), (dc, ch 2, 2 dc) in same st (corner made), dc in 2 st, hdc, sc in 2 st, hdc, dc in 2 st, * (2 dc, ch 2, 2 dc) in same st, dc in 2 st, hdc, sc in 2 st, hdc, dc in 2 st * repeat * to * 2 more times, sl st into top of 1st st

Round 6: sl st into next st, sl st into ch 2 sp, ch 3, ( dc, ch 2, 2 dc) in same ch 2 corner, dc in each st across until you reach next ch 2 sp,* ( 2 dc, ch 2, 2 dc) in corner, dc in each st until you reach next corner sp* repeat * to * around, sl st into top of ch 3

Repeat Round 6 as many times as you would like to make as big of a square as you want.
Cut yarn.
Weave in all ends.

I’d love to see your creations that you make from all of my patterns, be sure to tag me @okiegirlblingnthings on Instagram so I can see. Whether you make these Flower Granny Squares of something else entirely, tag me!
Happy Crocheting!


Love this pattern. The colors you used just drew my eye it. Have purchased on ETSY. Will probably not get to it until after I finish my items for the Christmas fair. LOL
Oh, Yay! I’m so glad that you like my pattern! Good luck with your Christmas fair! Kylee