


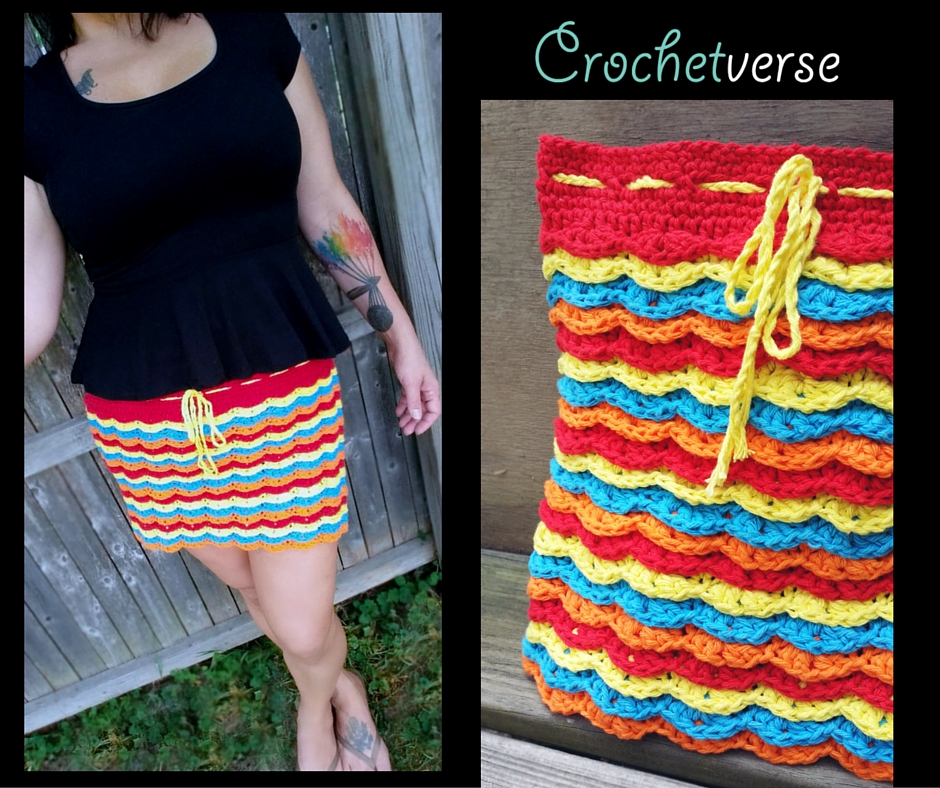
CURRENT MOOD: In love with COLOR, In love with SUMMER, In love with FIREWORKS!
So, here you have it: a new free pattern, the Fireworks Skirt! I wanted to create a wearable using the readily available cottons we find at our big box stores. In this case, Sugar’n Cream. THEN, I will teach you how to set the dye in the cotton using regular white vinegar so it doesn’t bleed so badly! DOUBLE WHAMMY! This skirt is sized for S-XL and, due to the nature of the rows, does NOT need lined! In addition, because it is worked “top down” you can make it as long as you desire!
Let the FIREWORKS BEGIN!!
Materials:
– For the Small & Medium about 800 yards worsted weight cotton
– For the Large & Extra Large about 1200 yards worsted weight cotton
SHOWN: Sugar’n Cream Cotton (4 oz./200 yards each)
For Small & Medium: (1) ball each of Red, Hot Orange, Hot Blue, and Sunshine
For Large & X-Large: (2) balls each of Red, Hot Orange, Hot Blue, and Sunshine
– Size I (5.5mm) crochet hook or SIZE NEEDED TO OBTAIN GAUGE
– tapestry needle, scissors, stitch marker or bobby pin to keep track of rounds
– plain white vinegar for dye setting tutorial
Sizing:
This is designed to sit at the LOW waist just above the hips. KEEP IN MIND, COTTON STRETCHES WITH WEAR! So, if you are between sizes, go DOWN! There is a drawstring so you can cinch if needed as it stretches.
Below are the actual approximate finished waist band measurements. Remember it sits at the low waist, just above the hips, if between sizes go down:
S: 32”
M: 36”
L: 40”
XL: 44”
Length:
Finished skirt as written measures about 12” in total length, instructions are given to increase length if desired.
Gauge:
With I hook and working in single crochet:
16 sts x 16 rows = 4” x 4”
THIS IS IMPORTANT, PLEASE CHECK IT OR YOUR SKIRT MIGHT NOT FIT!
Instructions:
Sizes are given in the pattern as Small (Medium, Large, Extra Large).
You may want to go through and circle all the counts that are for your intended size to minimize chance for error.
Waistband:
With I hook and red: (DO NOT turn rounds throughout.)
Chain 120 (138, 156, 174), sl st to 1st ch made to form loop, taking care not to twist the chain:
Rnd 1: ch 1, sc in same ch and in each ch around, sl st to 1st sc made. 120 (138,156,174)
Rnd 2: Repeat round 1.
Rnd 3: ch 1, sc in same sc, ch 2, sk nxt 2 sc, *sc in nxt sc, ch 2, sk nxt 2 sc, repeat from * around, sl st to 1st sc made. Chain Spaces: 40 (46, 52, 58)
Rnd 4: ch 1, sc in same sc, 2 sc in nxt ch-2 sp, *sc in nxt sc, 2 sc in nxt ch-2 sp, repeat from * around, sl st to 1st sc made. 120 (138, 156, 174)
Rnd 5: ch 1, sc in same sc and in each sc around, sl st to 1st sc made. 120 (138,156,174)
Rnd 6: ch 1 (does not count as a stitch) hdc in same st and in each st around, sl st to the BACK LOOP ONLY (the loop furthest from you) of 1st hdc made. 120 (138, 156, 174)
Refer to the image below during the remaining rounds to understand how each ruffle row is created and joined:
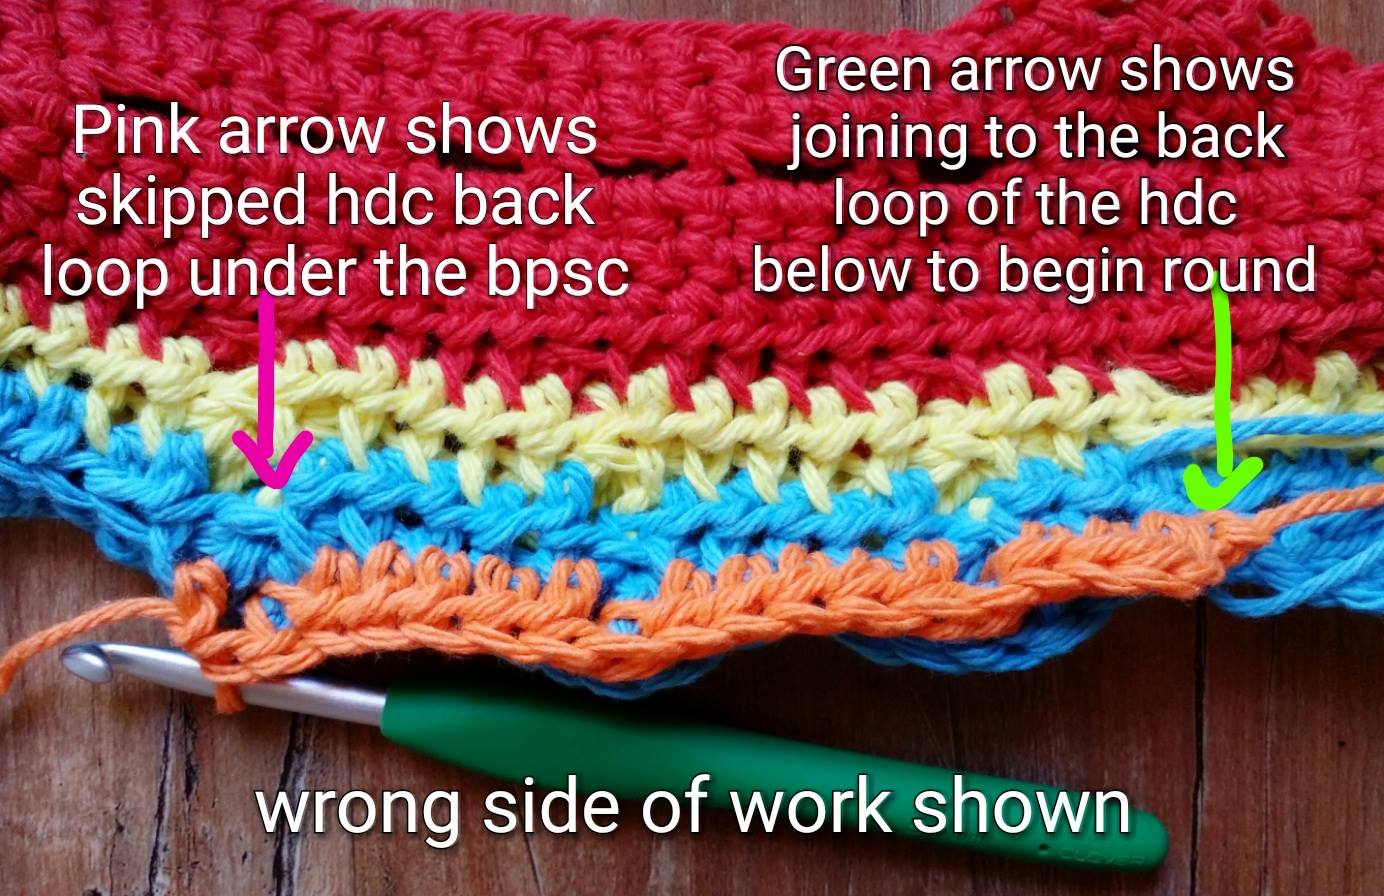
Rnd 7: (entire round worked in FRONT LOOPS ONLY, the loops closest to you with the right side of the fabric facing you) ch 1 (counts as sl st), sk nxt 2 sts, *5 dc in nxt st FRONT LOOP ONLY, sk nxt 2 sc, sl st in nxt stitch FRONT LOOP ONLY, sk nxt 2 sts, repeat from * around, sl st to the front loop only of the 1st ch-1 made, tie off red. Shells: 20 (23, 26, 29)
Rnd 8: (This round is worked in the stitches TWO rounds below, the one just before the shells just created) Due to the joining of rounds, you may feel there are more stitches between the shells, but there are 5, so don’t let the joins and ch-1s confuse you. Join next color with a sl st in the remaining back loop of the hdc that is two rounds below directly below the ch-1 just joined to, ch 1 (does not counts as a st) hdc in the same back loop and in the back loops of next 2 hdc back loops, *bpsc around the post of the 3rd (middle) dc of the nxt 5dc shell (insert hook from back to front and work the single crochet around the post of the stitch to secure the shell from flipping up when you wear the skirt), skip the back loop of the hdc below it (the one the shell was worked into the front loop of), hdc in the nxt 5 back loops, repeat from * around until just before the last shell is reached, sc back post around the 3rd dc of the last 5dc shell and skip the back loop below it, hdc in the nxt 2 back loops and sl st to the front loop only of the 1st hdc made. 120 (138, 156, 174)
Rnd 9: (entire round worked in FRONT LOOPS ONLY as round 7) ch 1 (counts as sl st), sk nxt 2 sts, *5 dc in the bpsc front loop only, sk nxt 2 sts, sl st in the nxt st front loop only, sk nxt 2 sts, repeat from * around and sl st to the front loop only of the beg ch-1, tie off. Shells: 20 (23, 26, 29)
Rnds 10-45: For remainder of skirt, repeat rows 8-9, EIGHTEEN TIMES MORE, OR until desired length is reached. Work one color for each repeat of rounds 8-9, so each shell row is a different color. Conversely, work however you choose for your color scheme, keeping in mind that one repeat of rnds 8-9 creates one shell ruffle row on the skirt.
Rnd 46: repeat Round 8 one time more to secure final layer of shells, tie off.
Finishing:
- Weave in all ends.
- Create drawstring by cutting 3 lengths of yarn in your color choice that measure about 5 ft long each. Knot the three strands together about 2” from one end. Secure them by closing the knot just inside a drawer (I use my silverware drawer!) Braid the strands, untangling about every 10 braid twists or so, until you have about 3” remaining. Knot the ends together again. Weave the braided tie in and out of the chain spaces created on Round 3 of the waist band. To wear, pull on skirt and tie to keep in place.
Set the Dye:
You may not need to do this if your skirt is all white or light colored. BUT, as you can see, this is a plethora of colors, so we must SET the dye in the cotton. By nature it WILL bleed and fade, so we can minimize this by setting the dye. Here’s how:
- Grab that white vinegar I listed in the supplies and head to your sink. (*you may choose to do this in a separate bucket or bowl if you are worried about your sink basin retaining the dye)
- Fill the container or sink with cold water and then mix in about 1 cup of vinegar (*this doesn’t have to be exact: about one sink full of cold water to 1 cup of white vinegar is as scientific as we have to get)
- Now, submerge your finished skirt in the water/vinegar mixture and let it sit for 30 minutes, rotating it around 3-4 times during the time.
- Remove your skirt from the bath and SQUEEZE (DO NOT WRING) the excess water out. Now, rinse rinse rinse with cold water until the vinegar is out and you don’t smell it in the skirt anymore.
- DO NOT WRING OUT OR HANG DRY YOUR ITEM! In fact, you will never want to do this to anything you make of cotton because it lacks elasticity and will droop and sag if you do. Instead, SQUEEZE out as much water as you can with your hands. If it remains very damp, lay it on a towel and roll the towel up with the skirt inside as tightly as you can. Then, press and push on it to remove as much water as possible. Now lay the puppy FLAT to dry. I usually put a fan on it to speed up the process because I am terribly impatient and the skirt fabric is somewhat thick.
You only have to set the dye once, but you should ALWAYS hand wash, squeeze excess water, and lay the item flat to dry so it retains its shape and lasts as long as possible!
That is it! I hope you learned some new tricks and wear your new skirt in health, wealth, and happiness! Please post your questions, comments, and finished projects on the Facebook page linked below!
Much Love and Yarn,
Stephanie
The information and photos in this posting are the sole copyrighted property of Crochetverse©2016. Please do not copy and paste any of the information contained within either electronically, verbally, or written in part or in whole. Instead, please share the DIRECT LINK to this posting only, and if you do, I thank you for sharing. You of course may sell anything you make from this pattern that you have made with your own two hands, no contract labor or mass productions are permitted. If you credit Crochetverse as the designer that is greatly appreciated!
