Daisy Day Throw Crochet Pattern
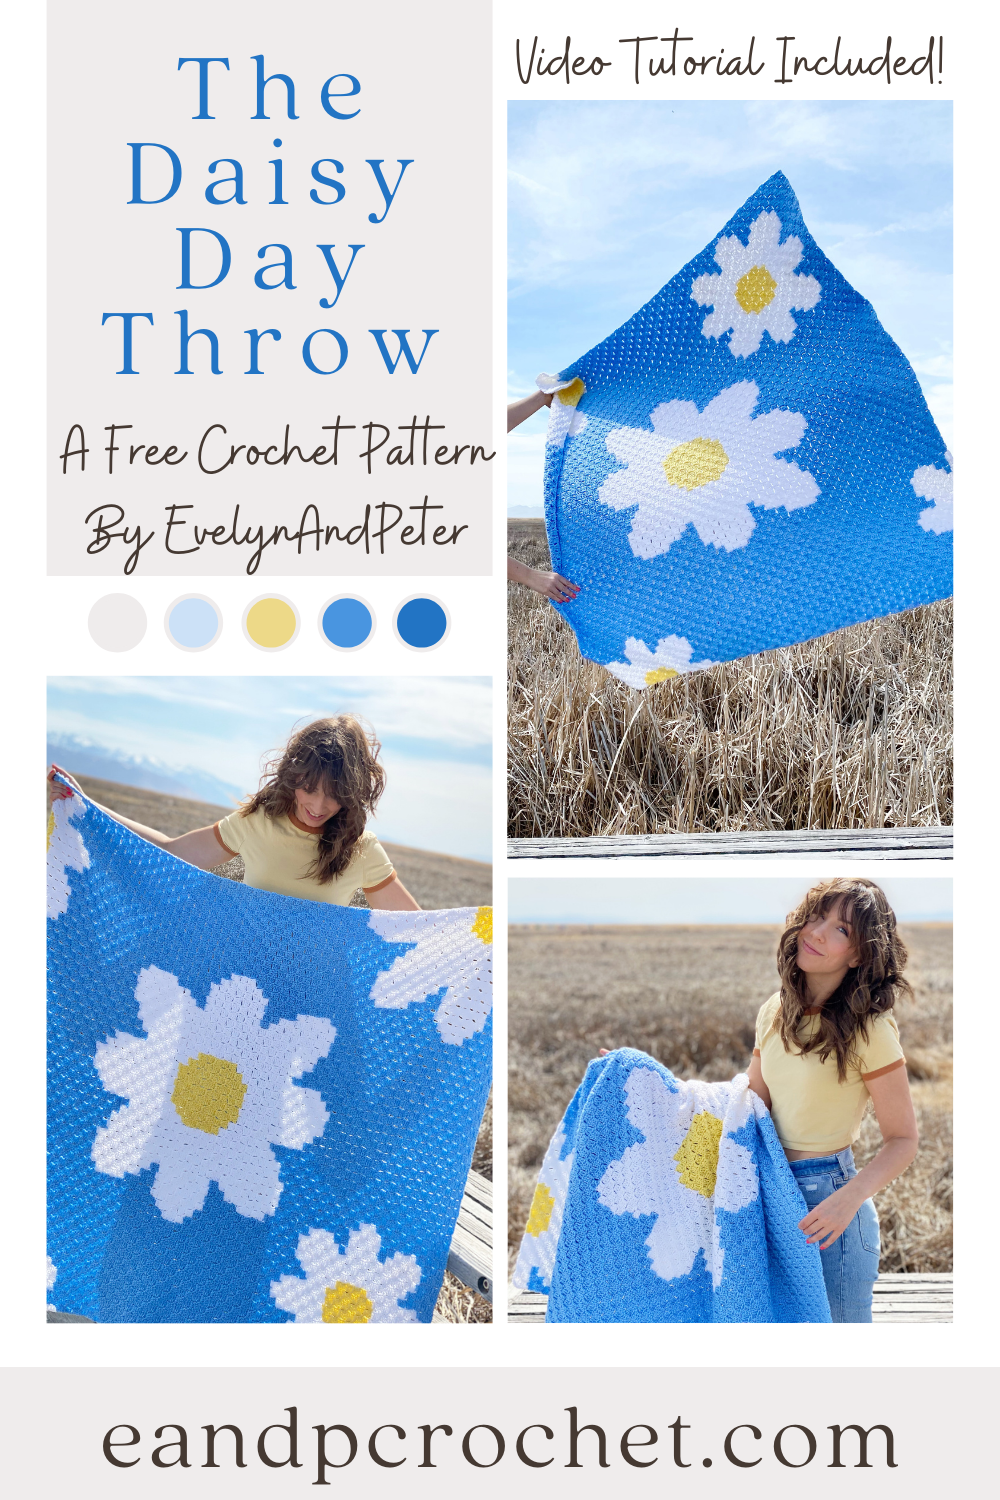
Every few months I get the urge to make a C2C crochet blanket and it never disappoints. The Daisy Day Throw was perfect to make on these cloudy spring days, to bring some happiness. I don’t know if you guys have noticed but the 90s are making a big comeback in design and fashion! I think that the Daisy Day Throw fits in perfectly with 90s vibes. It reminds me of my childhood and I love it!
The Daisy Day Throw is a Corner 2 Corner (C2C) blanket which means it’s made from the bottom right corner, diagonally to the top left corner. If you’ve never made a C2C then I recommend checking out my video tutorial as you create the blanket. You could even work up a practice swatch before diving into the project.
I also recommend making separate balls of yarn to help prevent cutting and joining your yarn with each color change. For example, when you get to the petal sections you will want a separate ball/skein of yarn for each petal and a separate ball for the blue sections in between. That way you don’t have to cut and join the yarn each time. Now, at some points there will be NO avoiding the cutting of the yarn. You will have to do it and you will have ends to weave in. I found with this blanket that it wasn’t too overwhelming and I got them all weaved in within an hour or so. If you need some visuals on how to keep your yarn organized there are lots of tutorials available out there!
If you love C2C make sure you check out some of my other free patterns!
Links:
-
The Daisy Day Throw is available as a kit with Lionbrand! The kit comes with all the yarn you need to make your Daisy Day Throw + the digital PDF pattern. (currently on sale today for 30% off expires 4/15/22)
-
If you are new to C2C crochet then be sure to check out the video tutorial on my YouTube!
-
You can save The Daisy Day Throw pattern to your Ravelry account for later or purchase the low cost ad-free printable PDF!
-
Or grab the low cost ad-free printable PDF from my Etsy shop!
Description: The Daisy Day Throw is in full bloom! This blanket is worked up using the C2C method. Using bright and happy colors, it’s perfect for spring!
Materials:
-
Worsted (4) weight yarn, Lion Brand Basic Stitch Anti-pilling in Baby Blue (8 skeins, 1410 yards), White (4 skeins, 650 yards), Lemonade (1 skein, 95 yards)
-
H/5mm Crochet Hook
-
Yarn Needle
-
Scissors
Gauge:
4X4”= 5 squares by 5 squares
Finished Blanket Measurements:
48” W by 55” L
Notes:
-
This is a Corner 2 Corner Pattern. If you are unfamiliar with this technique be sure to check out the video tutorial below.
-
The graph is read from the bottom right corner to the top left corner. You will be working diagonally and reading the rows from right to left and then left to right.
-
Each square on the graph counts as one block. One block consists of one Ch 3 and 3 Dc.
-
You will begin the rows with an increase square until you reach the bottom left corner. When you reach the corner you will be decreasing on this side and continuing to increase on the other. Once you reach the upper right corner you will no longer be increasing on either side and will start each row by decreasing until you finish.
-
I recommend using separate balls/skeins of yarn when switching colors to eliminate having to cut and join yarn frequently.
Video Link:
Check out the Video Tutorial if you need some extra help!
Stitches and Abbreviations (US Terms):
Square (Sq)- Join to next Ch Sp with a Sl St. Ch 3. Work 3 Dc into same space.
Increase square- Ch 6 work 1 Dc in 4th Ch from hook. Work 1 Dc in each of the next 2 Ch.
Decrease square- Join to previous row with a Sl St. Turn. Work 1 Sl St into the top of each of the 3 Dc across square. Sl St into the ch 3 sp. Ch 3. Work 3 Dc into Ch Sp.
Dc- Double Crochet
Sl St– Slip Stitch
Ch- Chain
Legend:
Color A- Baby Blue
Color B- White
Color C- Lemonade
Pattern:
← Row 1: A
→ Row 2: 2A
← Row 3: 3A
→ Row 4: 3A, B
← Row 5: B, 4A
→ Row 6: 5A, B
← Row 7: B, 6A
→ Row 8: 4A, 4B
← Row 9: 5B, 4A
→ Row 10: 4A, 5B, C
← Row 11: C, 5B, 5A
→ Row 12: 5A, 5B, 2C
← Row 13: 2C, 5B, 6A
→ Row 14: 7A, 5B, 2C
← Row 15: 2C, 3B, 10A
→ Row 16: 10A, 6B
← Row 17: 7B, 10A
→ Row 18: 10A, 8B
← Row 19: 8B, 11A
→ Row 20: 11A, 3B, A, 3B, A, B
← Row 21: B, A, 4B, A, 2B, 12A
→ Row 22: 16A, 3B, 3A
← Row 23: 3A, 4B, 16A
→ Row 24: 17A, 3B, 4A
← Row 25: 5A, 2B, 18A
→ Row 26: 26A
← Row 27: 27A
→ Row 28: 28A
← Row 29: 29A
→ Row 30: 30A
← Row 31: 31A
→ Row 32: 32A
← Row 33: 33A
→ Row 34: 34A
← Row 35: 35A
→ Row 36: 36A
← Row 37: 37A
→ Row 38: 38A
← Row 39: 39A
→ Row 40: 40A
← Row 41: 19A, 2B, 20A
→ Row 42: B, 19A, 3B, 19A
← Row 43: 19A, 4B, 19A, B
→ Row 44: 2B, 18A, 5B, 19A
← Row 45: 20A, 4B, 19A, 2B
→ Row 46: 2B, 19A, 5B, 20A
← Row 47: 20A, 6B, 19A, 2B
→ Row 48: 5B, 12A, 3B, 2A, 5B, 2A, 3B, 16A
← Row 49: 16A, 4B, A, 6B, A, 4B, 11A, 5B, C
→ Row 50: 2C, 5B, 10A, 5B, A, 5B, A, 5B, 16A
← Row 51: 17A, 16B, 11A, 5B, 2C
→ Row 52: 3C, 5B, 10A, 17B, 17A
← Row 53: 18A, 16B, 11A, 5B, 3C
→ Row 54: 3C, 5B, 11A, 17B, 18A
← Row 55: 4A, 2B, 13A, 16B, 14A, 3B, 2C, B
→ Row 56: 7B, 14A, 15B, 13A, 3B, 4A
← Row 57: 4A, 4B, 13A, 14B, 14A, 8B
→ Row 58: 9B, 14A, 5B, 3C, 5B, 14A, 3B, 5A
← Row 59: 2A, 2B, A, 4B, A, 2B, 8A, 7B, 4C, 7B, 12A, 9B
→ Row 60: 2B, A, 3B, A, 3B, 10A, 8B, 5C, 8B, 6A, 3B, A, 3B, A, 3B, 2A
Corner (the first white square made in row 60 is the corner square and your last increase on this end of the blanket)
← Row 61: 3A, 10B, 6A, 8B, 6C, 8B, 10A, 2B, A, 4B, A, B
→ Row 62: 2A, 3B, 13A, 8B, 7C, 8B, 5A, 11B, 3A
← Row 63: 4A, 10B, 5A, 9B, 6C, 9B, 12A, 4B, A
→ Row 64: A, 3B, 13A, 8B, 7C, 8B, 6A, 9B, 5A
← Row 65: 6A, 3B, 2C, 3B, 6A, 9B, 6C, 9B, 13A, 2B, A
→ Row 66: 16A, 8B, 7C, 8B, 4A, 5B, 3C, 5B, 4A
← Row 67: 4A, 5B, 4C, 5B, 4A, 8B, 6C, 8B, 16A
→ Row 68: 16A, 8B, 5C, 8B, 4A, 5B, 5C, 5B, 4A
Corner (the last blue square made in row 68 is your second corner. You will be decreasing on both side from here on out)
← Row 69: 4A, 5B, 4C, 5B, 6A, 7B, 4C, 7B, 17A
→ Row 70: 19A, 5B, 3C, 5B, 8A, 5B, 5C, 5B, 3A
← Row 71: 3A, 5B, 4C, 5B, 8A, 14B, 18A
→ Row 72: 17A, 15B, 8A, 5B, 3C, 5B, 3A
← Row 73: 5A, 3B, 2C, 3B, 10A, 16B, 16A
→ Row 74: 15A, 17B, 9A, 9B, 4A
← Row 75: 3A, 10B, 9A, 16B, 15A
→ Row 76: 14A, 17B, 8A, 11B, 2A
← Row 77: 2A, 10B, 9A, 16B, 14A
→ Row 78: 13A, 5B, A, 5B, A, 5B, 8A, 3B, A, 3B, A, 3B, A
← Row 79: A, 2B, A, 4B, A, 2B, 9A, 4B, A, 6B, A, 4B, 13A
→ Row 80: 13A, 3B, 2A, 5B, 2A, 3B, 13A, 3B, 4A
← Row 81: 3A, 4B, 17A, 6B, 17A
→ Row 82: 17A, 5B, 18A, 3B, 3A
← Row 83: 3A, 2B, 19A, 4B, 17A
→ Row 84: 16A, 5B, 23A
← Row 85: 23A, 4B, 16A
→ Row 86: 16A, 3B, 23A
← Row 87: 23A, 2B, 16A
→ Row 88: 40A
← Row 89: 39A
→ Row 90: 38A
← Row 91: 37A
→ Row 92: 36A
← Row 93: 35A
→ Row 94: 34A
← Row 95: 19A, 2B, 12A
→ Row 96: 11A, 3B, 18A
← Row 97: 17A, 4B, 10A
→ Row 98: 9A, 5B, 16A
← Row 99: 16A, 4B, 9A
→ Row 100: 8A, 5B, 15A
← Row 101: 14A, 6B, 7A
→ Row 102: 2A, 3B, 2A, 5B, 2A, 3B, 9A
← Row 103: 8A, 4B, A, 6B, A, 4B, A
→ Row 104: 5B, A, 5B, A, 5B, 7A
← Row 105: 7A, 16B
→ Row 106: 16B, 6A
← Row 107: 6A, 15B
→ Row 108: 15B, 5A
← Row 109: 5A, 14B
→ Row 110: 13B, 5A
← Row 111: 5A, 12B
→ Row 112: 3B, 3C, 5B, 5A
← Row 113: 2A, 7B, 4C, 2B
→ Row 114: B, 5C, 8B
← Row 115: 7B, 6C
→ Row 116: 6C, 6B
← Row 117: 6B, 5C
→ Row 118: 5C, 5B
← Row 119: 5B, 4C
→ Row 120: 4C, 4B
← Row 121: 4B, 3C
→ Row 122: 2C, 4B
← Row 123: 4B, C
→ Row 124: 4B
← Row 125: 3B
→ Row 126: 2B
← Row 127: B
Tie off, weave in all ends.


