
![[image description] a white woman stands looking to the side in front of a ivy covered wall holding the Cute Mushrooms Bag to the camera](https://d3gel9wqxksnxm.cloudfront.net/wp-content/uploads/2022/11/CuteMushroomBag-755x1000-1.jpg)
![[image description] a white woman stands looking to the side in front of a ivy covered wall holding the Cute Mushrooms Bag to the camera](https://d3gel9wqxksnxm.cloudfront.net/wp-content/uploads/2022/11/CuteMushroomBag-755x1000-1.jpg.webp)
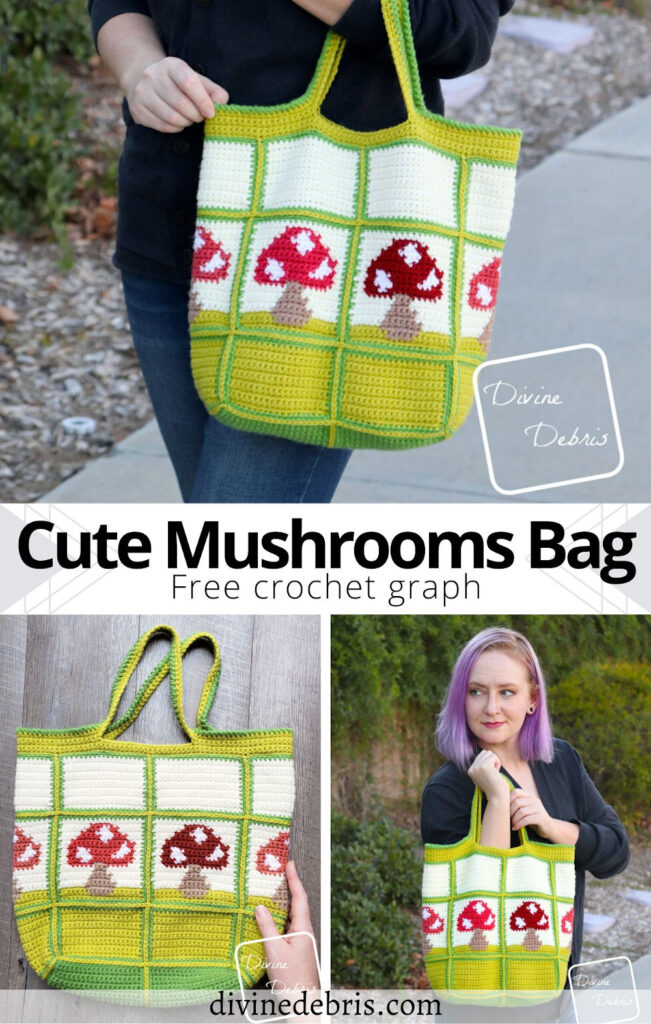
Holy more mushrooms Batman! This week’s new pattern is colorful, fun, and guaranteed to grow on you. Get it? Ok, that’s really corny but doesn’t matter because I love this one – the Cute Mushrooms Bag crochet pattern.
So last week I released the Cute Mushroom Coaster. Did you happen to see it? Well, if you didn’t, it’s a fun little square that’s full of color and great for stash busting. But while I was designing it I fell in love with how cute the mushroom is. Long time fans will know I love a good mushroom design and I with that coaster, I just wanted more. So… I decided to make more! And the whole thing turned into a bag.
But I didn’t want a whole bag of mushrooms, not that there’s anything wrong with that, but I wanted to make the mushrooms really stand out against some other elements. I sketched it out (mostly in my head but also on graph) and realized 6 mushroom squares and 12 other squares would make a really good-sized bag and still keep the focus on the mushrooms. And, as they say, the rest is history. It’s a fun little design that’s really colorful and bright and I’m positively in love with it.
And do you see those details? I used a slip st into the back loop only to secure the squares (you can do any join method you’d like though). Here’s a little video on me using it on Instagram. And of course I brought back out the Reverse Crab Stitch, here’s another video I shared of it on Instagram for the final rnd of the handles. I really wanted the last bit to pop, ya know? And texture is always the way to go (in my opinion). Don’t forget to check out this post from Moogly for the stitch, as it’s also called the Reverse Single Crochet). It’s so handy and I love what it brings to a project.
Anyway, I hope you like this new mushroom pattern. It’s the bees knees for me and I hope for you too. And don’t forget to please wear and wash your masks and be kind to each other. It’s been a hard one these few years, we need solidarity more than ever <3
This post is linked to Loop Scoop 50.
Copyright @ Divine Debris 2022. No part of this document may be reproduced or transmitted in any form by any means, electronic, mechanical, photocopying, or otherwise, without prior written permission from the author. Sales of finished products are permitted, but the designer requests that you link back to the pattern and credit Divine Debris with the original design under the Creative Commons Attribution-Share Alike license. If you have any questions, comments or concerns please contact info@divinedebris.com.
(this post contains affiliate links)

If you appreciate my weekly patterns I hope you’d consider purchasing an ad-free pdf of this pattern in my Ravelry shop and Lovecrafts shop!
Thank you Caz for becoming my newest patron on Patreon!
Where to purchase the Cute Mushrooms Bag crochet pattern


![[Image description] Top down view of 3 Cute Mushroom squares, one of which is not finished, on a wood grain background.](https://d3gel9wqxksnxm.cloudfront.net/wp-content/uploads/2022/11/CuteMushroom-Coaster-897x1000-1.jpg)
Level
Intermediate (need to know how to read a graph and do color work)
Materials
- US G (4.00 mm) crochet hook
- Worsted weight/ size #4 yarn
- At least 6 colors
- Specific on amounts in the Notes
- Notions: scissors, measuring tape, yarn needle
Gauge
- 19 sc x 20 rows = 4” (blocked)
Terms/ Stitches used
- RS: Right side
- Ch: Chain
- St: Stitch
- Sc: Single crochet
- Sc2tog: Single crochet 2 sts together
- BLO: Back loop only
- Fsc: Forward crab stitch (explained below)
Notes
- As is industry standard, this pattern is just a free graph and not written instructions but you can purchase the pattern for a fee in my Ravelry shop.
- This bag is worked in 3 sections: the Sides/Base, Assembly, and the Top/Handles. The Sides/Base are worked in individual squares (18 for the Sides and 2 for the Base) and seamed together. The Top/Handles are then worked onto the Sides to complete the bag.
- Each section has its own Notes to assist the pattern.
- Blocking is suggested for this pattern.
- This mushroom square is worked in sc, so the instructions will only tell you the number and the color; ie: “35” highlighted in green means sc 35 times in your green color.
- In the photos: color A is lime green (2.5 oz/ 158 yds), color B is brown (.5 oz/ 32), color C is cream (2 oz/ 127 yds), color D is red (.75 oz/ 47 yds), color E is white (.2 oz/ 13 yds), and color F is grass green (2 oz/ 127 yds).
Blocked Cute Mushrooms Bag crochet pattern measurements (approx)
| Height of the side from base to final row, not the the extended handles though | Width when laid flat |
| 12.5 | 14″ – 14.5″ |
![[Image description] Top down view of the Cute Mushrooms Bag crochet pattern on a wood grain background with a white woman's hand holding the bottom right corner](https://d3gel9wqxksnxm.cloudfront.net/wp-content/uploads/2022/11/CuteMushroomBag-822x1000-1.jpg)
Cute Mushrooms Bag Crochet Pattern Instructions
Sides
Notes
- The squares for the Sides are broken into 3 different squares: the Bottom Blank Square (6), the Mushroom Square (6), and the Top Blank Square (6). The Bottom and Top Squares are the same pattern in different colors – the Bottom is made in color A and the Top is made in color C.
- For the Mushroom Square: Begin with a ch 20 in color A, turn, and start in the 2nd ch from the hook. Each row begins with a “ch 1, turn” and all st counts are 19 sc.
- The squares are worked from the bottom up in rows, with turns at the beginning of the rows.
- The ch 1 at the beginning of the rows does not count as a stitch.
- Each square has a Border, which you add once the square is done. You will use the Border to assemble the Sides/ Base.
- Blocking is suggested for these squares.
- In the photos: color A is lime green, color B is brown, color C is cream, color D is red, color E is white, and color F is grass green.
![[Image description] Top down flat lay look on sets of Top and Bottom Blank Squares for the Cute Mushroom Bag on a wood grain background.](https://d3gel9wqxksnxm.cloudfront.net/wp-content/uploads/2022/11/CuteMushroomBag-827x1000-1.jpg)
Top/ Bottom Blank Square
(make 6 of each, color A for the Bottom and color C for the Top)
Row 1: Ch 20, sc into the 2nd ch from the hook and across – 19 sc
Rows 2 – 12: Ch 1, turn, sc across – 19 sc
Fasten off, weave in your ends.
Border
With the RS facing you, join your yarn (color F) in the first st on the other side of Row 1 of one of your Top/ Bottom Blank Squares.
Row 1: F: Ch 1, sc into the next 19 sts, ch 1 at the corner and rotate your square, sc into the next 12 row ends, ch 1 at the corner and rotate your square, sc into the next 19 sts on Row 12, ch 1 at the corner and rotate your square, sc into the next 12 row ends, ch 1 at the corner and rotate your square, join – 62 sc
Fasten off, weave in your ends. Block so your square measures 4.4″ x 2.8″.
![[Image description] Top down flat lay look of the Base Square for the Cute Mushroom Bag.](https://d3gel9wqxksnxm.cloudfront.net/wp-content/uploads/2022/11/CuteMushroomBag-1000x742-1.jpg)
Base Square
(make 2 in color F)
Row 1: F: Ch 20, sc into the 2nd ch from the hook and across – 19 sc
Rows 2 – 20: Ch 1, turn, sc across – 19 sc
Fasten off, weave in your ends.
Border
With the RS facing you, join your yarn (color F) in the first st on the other side of Row 1 of your Base Square.
Row 1: F: Ch 1, sc into the next 19 sts, ch 1 at the corner and rotate your square, sc into the next 20 row ends, ch 1 at the corner and rotate your square, sc into the next 19 sts of Row 20, ch 1 at the corner and rotate your square, sc down the next 20 row ends, ch 1 at the corner and rotate your square, join with a slip st – 78 sc, 4 ch-1 spaces
Fasten off, weave in your ends. Block so your square measures
![[Image description] Top down flat lay look of the Mushroom Square for the Cute Mushroom Bag.](https://d3gel9wqxksnxm.cloudfront.net/wp-content/uploads/2022/11/CuteMushroom-Coater-1000x976-1.jpg)
![[Image description] Top down flat lay look of the Mushroom Square for the Cute Mushroom Bag.](https://d3gel9wqxksnxm.cloudfront.net/wp-content/uploads/2022/11/CuteMushroom-Coater-1000x976-1.jpg.webp)
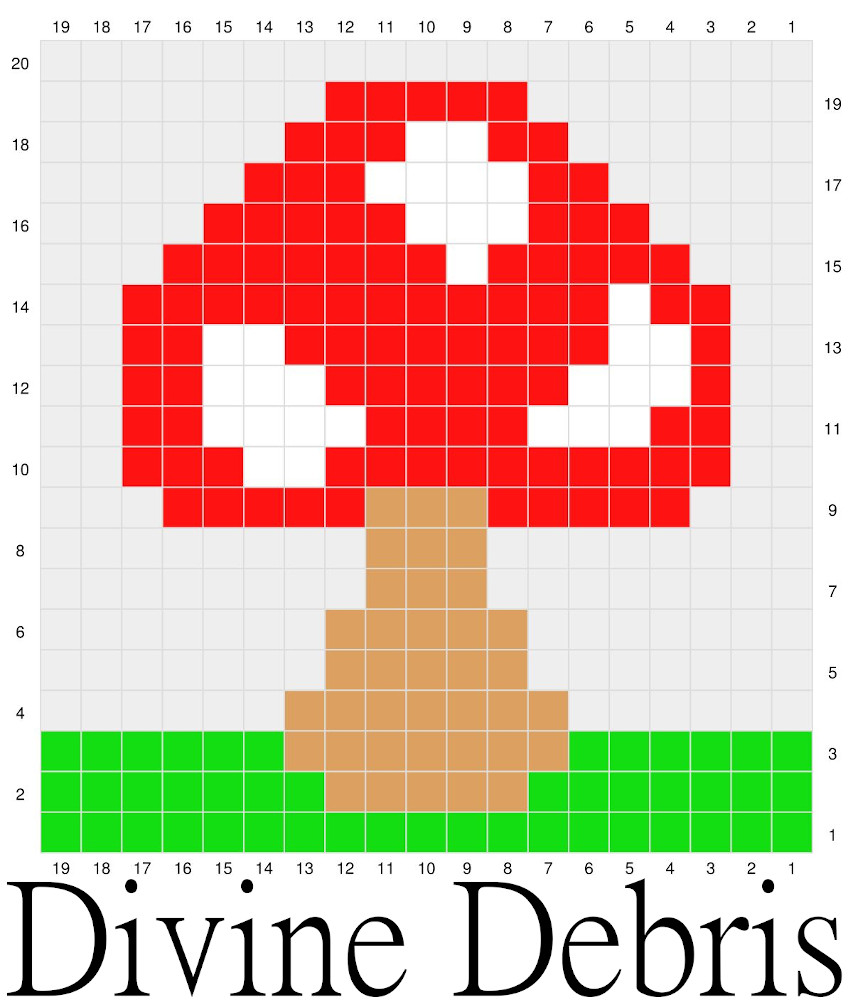
Mushroom Square Graph
Graph Key: Color A is green, color B is brown, color C is gray, color D is red, color E is white.
Border
With the RS facing you, join your yarn in the first st on the other side of Row 1 of the coaster.
Row 1: A: Ch 1, sc into the next 19 sts, ch 1 at the corner and rotate your square, sc into the next 20 row ends, ch 1 at the corner and rotate your square, sc into the next 19 sts of Row 20, ch 1 at the corner and rotate your square, sc down the next 20 row ends, ch 1 at the corner and rotate your square, join with a slip st – 78 sc, 4 ch-1 spaces
Fasten off, weave in your ends. Block so your square measures 4.4” x 4.4”.
Assembly
Notes
- You should have a total 20 squares (6 Bottom, 6 Top, 6 Mushroom, and 2 Base).
- You can use any method of seaming for this section. I used a back loop only slip st.
- Fasten off between each seam and weave in your ends securely.
- Be sure to also seam the ch1 at the corner of each square.
To better visualize how you need to assemble your bag, lay your squares in rows: 6 Bottom Blank Squares, 6 Mushroom Squares, and 6 Top Blank Squares, and then add the 2 Base Squares beneath the 2 center-most Bottom Blank Squares. See the photo below for reference.
You can seam horizontally or vertically as you’d like, in your preferred method of seaming using the Border sts. I used a slip st method in the back loop only of the Border sts.
![[Image description] Top down flat lay look of the unseamed squares for the Cute Mushroom Bag.](https://d3gel9wqxksnxm.cloudfront.net/wp-content/uploads/2022/11/CuteMushroomBag-1000x606-1.jpg)
Once you have it completely seamed but still flat (like the photo below shows) seam the last vertical edge so you have a cylinder, then finish seaming the Base Squares to the other 4 Bottom Blank Squares.
![[Image description] Top down flat lay look of the seamed squares Mushroom Square for the Cute Mushroom Bag.](https://d3gel9wqxksnxm.cloudfront.net/wp-content/uploads/2022/11/CuteMushroomBag-1000x550-1.jpg)
Top/Handles
Note
- This section is worked in the rnd, with a join at the end of the rnd.
- The ch 1 at the beginning of the rnd does not count as a st.
- There’s a turn at the beginning of each rnd of both the Top and the Handles.
- Forward crab stitch (Fcs): Insert your hook into the stitch, pull up a loop, turn your hook clockwise once so you twist the stitch, yarn over, pull through the 2 loops on your hook. Also called a Twisted Single Crochet. This stitch is like a crab stitch, only you work it forward. Here’s the Moogly video on it.
![[Image description] Close up of where to start the Top/Handles section](https://d3gel9wqxksnxm.cloudfront.net/wp-content/uploads/2022/11/CuteMushroomBag-1000x794-1.jpg)
Top
With the RS of the shorter side facing you (where you only have 1 square, not 2), join your yarn (color A) in the first st (not the ch 1 at the corner) of the Top Blank Square. See photo above for assistance.
Rnd 1: A: Ch 1, *sc into the BLO of the next 19 sts, sc2tog the corner ch1 of this square and the corner ch1 next square,* repeat from * to * 5 more times, join – 120 sc
Rnds 2 – 3: Ch 1, turn, sc around, join — 120 sc
Do not fasten off, move onto the Handles section.
Handles
Rnd 4: A: Ch 1, turn, sc into the next 10 sts, ch 50, skip 19 sts, sc into the next 41 sts, ch 50, skip 19 sts, sc into the last 31 sts, join – 82 sc, 2 ch 50 spaces
Rnd 5: Ch 1, turn, sc around (this counts sc and ch sts from the last rnd), join – 182 sc
Rnd 6: Ch 1, turn, sc around, join – 182 sc
Fasten off color A, switch to color C.
Rnd 7: C: Ch 1, turn, fcs around, join – 182 fcs
Fasten off, weave in your ends. Block your Top/Handles section if it feels stiff (especially if you blocked the rest of your piece).
You can pick up written instructions for the Cute Mushrooms Bag crochet pattern in my Ravelry shop.
![[image description] a white woman stands in front of a ivy covered wall holding the Cute Mushrooms Bag with arms extended to the camera](https://d3gel9wqxksnxm.cloudfront.net/wp-content/uploads/2022/11/CuteMushroomBag-732x1000-1.jpg)

Miss Daisy
Thursday 10th of November 2022
That is just too Cute!!! Absolutely love it and plan on making it. Thank you for not charging for it.