***You can purchase an INEXPENSIVE AD-FREE PDF of this pattern on Etsy HERE and LoveCrochet HERE! This beautifully formatted PDF includes the step-by-step pictures and the patterns for BOTH the Crochet Faux Fur Mittens AND Faux Fur Headband! The PDF is a total of 6 pages including the cover page! Lion Brand Yarn has put together a convenient kit HERE that contains all the yarn you need to make the mittens and headband along with the patterns, and comes in three beautiful color options: pink, grey and white!
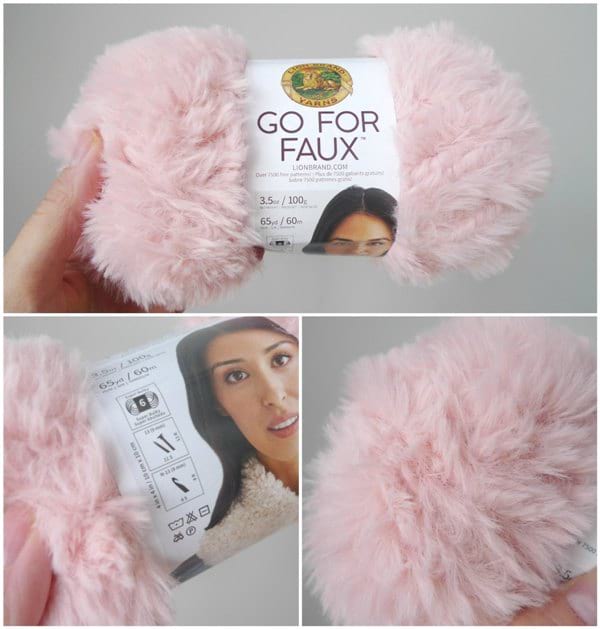
Have you worked with faux fur yarn before? It can appear daunting as seeing individual stitches is a challenge, but the overall resulting look is gorgeous and unmatched compared to any other yarn. For amigurumi, pieces made with faux fur yarn look amazing as you can hardly tell that they are crocheted since individual stitches are not visible. I worked with faux fur yarn previously with my Fluff Bears (free pattern HERE), and I was so excited to see that Lion Brand Yarn developed a brand new line of gorgeous faux fur yarn called “Go For Faux“! It is a super bulky (level 6) yarn that is 100% polyester, and it comes in 6 different shades. I chose to work with this lovely blush shade called “Pink Poodle“.
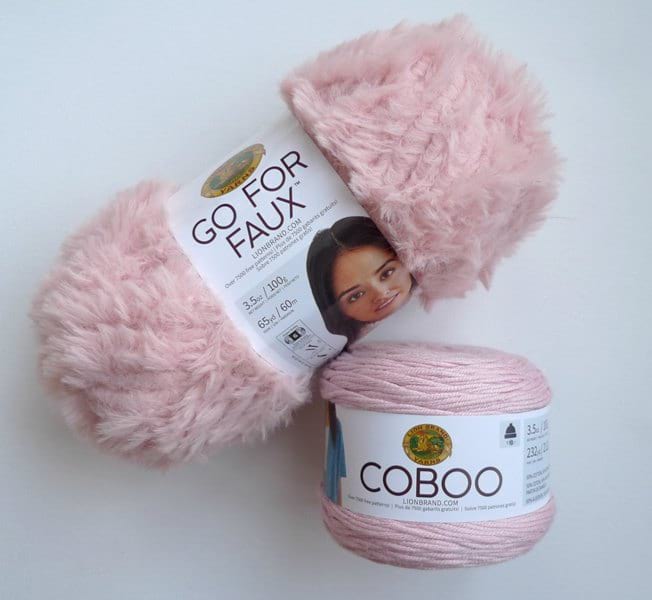
I wanted to create a wearable item this time with faux fur yarn: fluffy mittens! I used Go For Faux for the body of the mittens, and Coboo yarn (level 3 lightweight, 50% Cotton/50% Bamboo) for the bottom ribbing. These two yarns provide such a beautiful contrast to each other as the stitches are blurred with the faux fur while the stitches are crisply defined with the Coboo! It is important to note that different colourways of the faux fur yarn may shed to different degrees from what I have read online. However, I am happy to report that my Pink Poodle yarn did not shed a single bit, and I ended up frogging my design at least 4 times and it held up incredibly well!
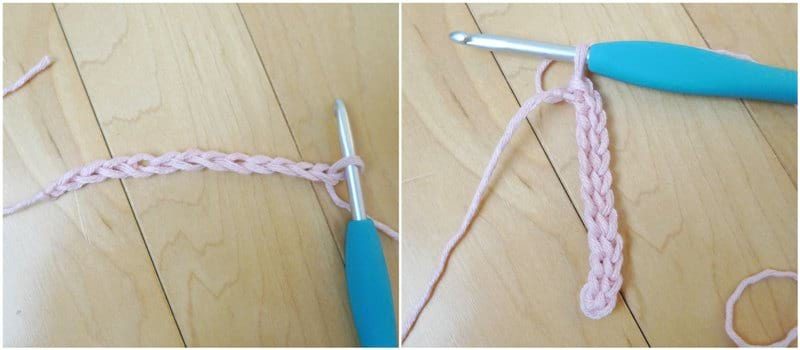
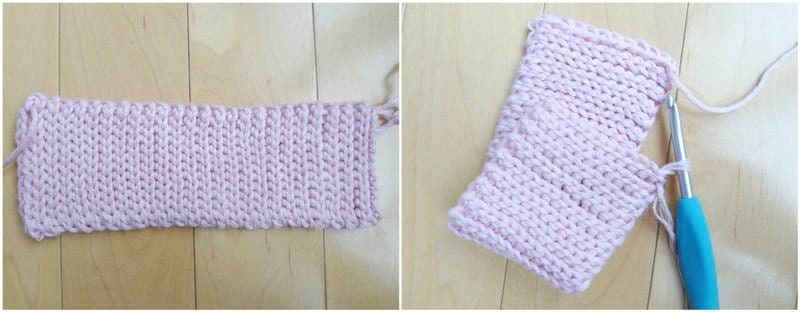
To start off, I used my 4.5 mm crochet hook and the Coboo yarn to crochet a clean and tight ribbing. I started off with a series of chain stitches, and then worked slip stitches in each chain across.
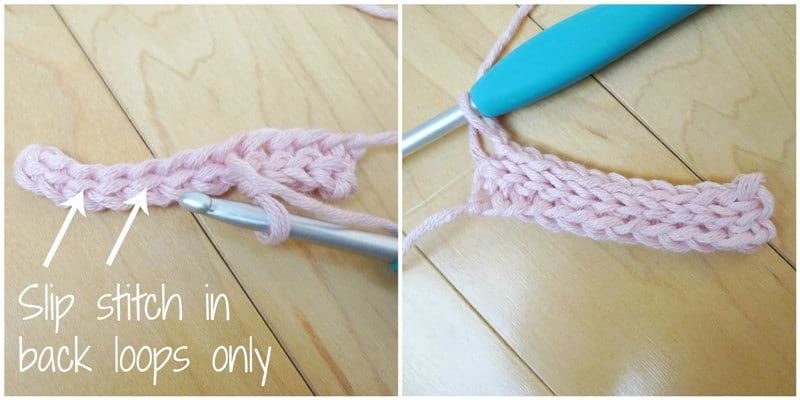
For the following row, I slip stitched in the back loops only and continued this same pattern (slip stitching in the back loops only) for subsequent rows. Be sure to work these slip stitches loosely, otherwise it will be hard to insert your crochet hook, and your ribbing may shrink over time.
The resulting ribbing using this technique is beautiful and is capable of stretching. It has an almost knit look to it, and it looks the same on either side (V’s point downwards on one side and upwards on the other side).
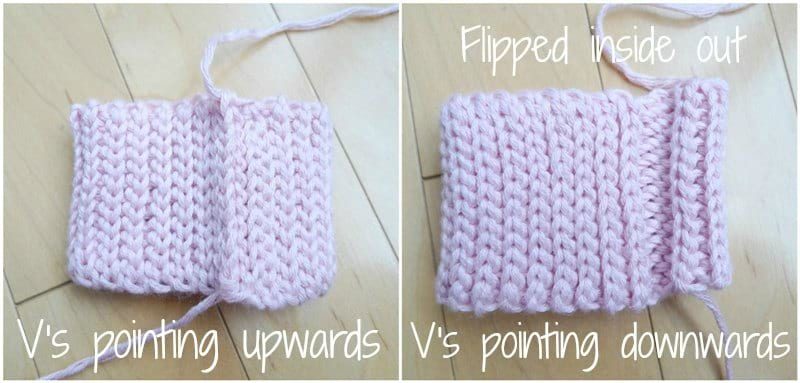
To seam up the short ends of the ribbed cuff together, I slip stitched the back loops of one side to the front loops of the other side.

The left picture below shows the cuff after the edges have been seamed together- note that the V’s are pointing upwards! It is important to note that fluffy yarn tends to be fluffier on the “wrong” side when working in the round (see my “The Right Side of Amigurumi” blog post HERE to read about the right versus wrong side). Thus, we will be flipping our mitten inside out at the very end of this whole process. Since I want my V’s to be pointing upwards in the final mitten, I flipped my cuff inside-out and ensured that the V’s were pointing downwards at this point in time.
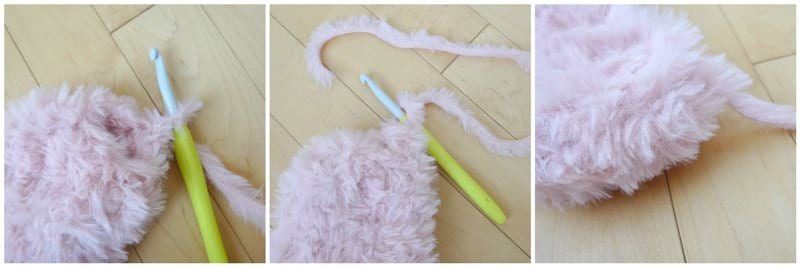
I used a 6 mm crochet hook to pick up stitches along the top of the ribbed cuff using the faux fur yarn. Since I wanted to pick up 18 stitches, I used a green stitch marker to indicate the halfway point as a guide for myself- at the stitch marker, I should have about 9 stitches. I picked up stitches evenly across the entire circumference of the ribbed cuff!
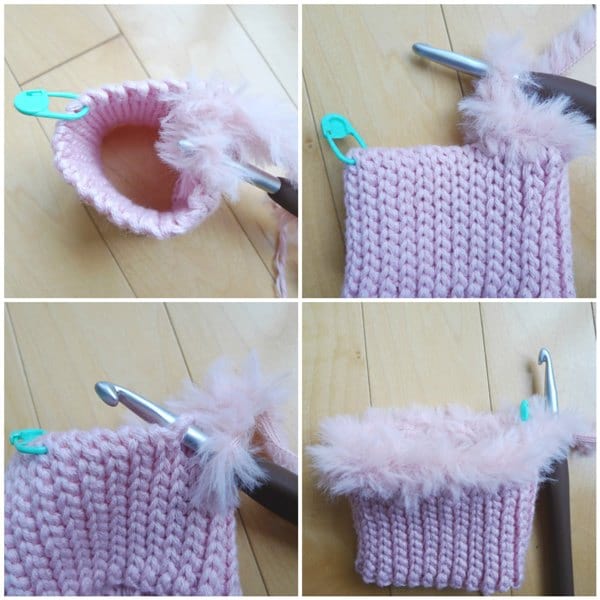
Then, I switched to my 7 mm crochet hook and continued working the body of the mitten. It is VITAL to use a stitch marker during this entire process to indicate the beginning of each round. Since you cannot see individual stitches, you need to feel for the next stitch and insert your crochet hook by faith, almost like muscle memory. I would highly recommend you keep track of your rounds after you have completed each one too (with a pen and paper beside you or on your phone) as you may forget where you are in the process, and it can be tricky trying to count the number of rows.

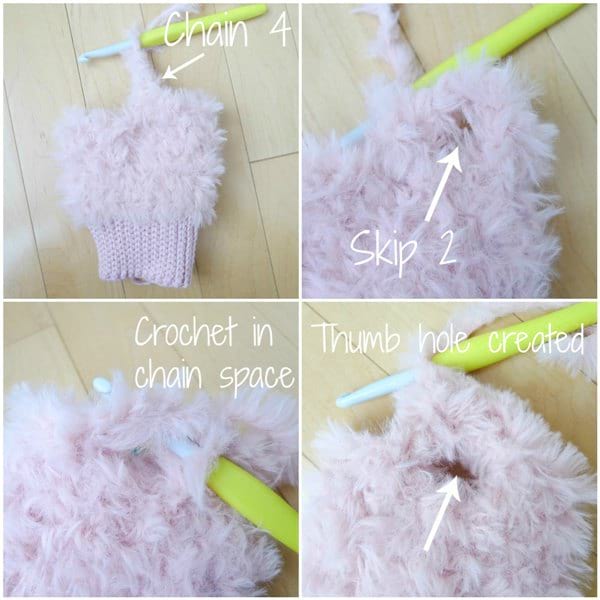
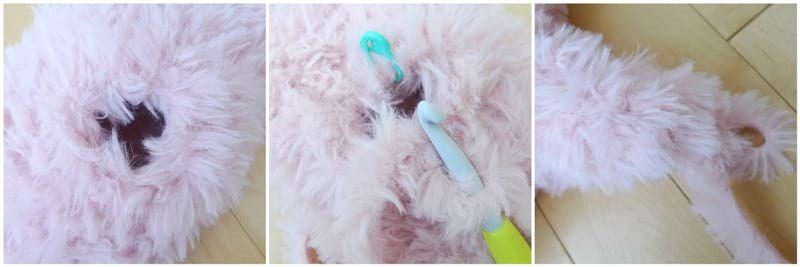
At this point, it was time to create the thumb hole. I chained 4 and skipped 2. On the subsequent round, I crocheted in the chain space.
When it was time to close up the top of the mitten, I decreased towards the top and pulled the yarn end through the last remaining stitches. I then tried my mitten on and used the yarn tail to close up any gaps that I could feel at the tip of the mitten.
The last part was to crochet the thumb! I picked up stitches around the thumb hole and once again used a stitch marker as a guide. After the thumb was complete, I then flipped the entire mitten inside-out and marveled at my finished faux fur mittens!
***********************
Here is the free pattern for my Crochet Faux Fur Mittens:
Materials:
- Go For Faux Yarn in “Pink Poodle” by Lion Brand Yarn (super bulky level 6), ~112 grams
- Coboo Yarn in “Pink” by Lion Brand Yarn (lightweight level 3), ~16 grams
- 4.5 mm, 6 mm and 7 mm Clover Amour crochet hooks
- Clover lock ring stitch markers
- Yarn needle
- Cork garment tag BrickBubble (optional)
Notes:
- Faux fur yarn can be challenging to work with: you cannot see individual stitches, so you will need to FEEL for the next stitch when you are moving your crochet hook into the next stitch.
- Be patient and go slowly- it is imperative that you use a stitch marker to indicate the beginning or end of the round so you can space out your stitches correctly and have a reference point. For example, if the round has 18 stitches, I know I should have 9 stitches by the time I am halfway across my stitch marker.
- Keep track of your rounds in some way (e.g. write them down on a piece of paper or on your phone as you complete them) as it is hard to remember where you are if you need to put down your project and pick it back up again.
- For the ribbed cuff, work the slip stitches loosely and slowly. If the slip stitches are worked too tightly, it will be hard to insert your crochet hook and the ribbed cuff will shrink over time.
- When working the slip stitches of the ribbed cuff, do not miss that last stitch as it can be easy to miss.
- When working with fluffy yarn, the WRONG side tends to be fluffier, so we will have this side be the outside of the mitten that is seen. We will work the mitten as normal (working clockwise) and then flip the mitten inside-out at the very end. Please reference my blog post entitled “The Right Side of Amigurumi” to read about the right versus wrong side of crochet when working in a round.
- The ribbed cuff is worked in turned rows and then seamed together at the end to form a ring.
- Stitches are picked up along the ring using fluffy yarn. From then on, the mitten is worked in continuous rounds.
- Note that three different hook sizes are used to make this mitten: 4.5 mm hook for the ribbing, 6 mm hook to pick up stitches along the edge of the ribbing, and 7 mm hook for the rest of the faux fur body.
- Both mittens are worked exactly the same (no distinction between left or right mitten), so repeat the following pattern twice to crochet a pair of mittens.
- There will be at least 80 grams of faux fur yarn left after completing the pair of mittens- follow my Crochet Faux Fur Headband pattern HERE to use up the rest of your yarn to make a matching headband!
Gauge: 7 sts and 8 rows = 4” (using faux fur yarn and 7 mm hook)
PATTERN
Ribbed Cuff
Using pink Coboo yarn and 4.5 mm hook,
Chain 13.
Row 1: Starting from 2nd chain from hook, Slip stitch in each chain across (12 sts).
Row 2: Chain 1, turn. Slip stitch in back loops only across. (12 sts).
Row 3-51: Repeat Row 2.
At this point, cuff is approximately 2″ tall and 6″ long. Do not fasten off- it is now time to join the short ends of the ribbed cuff together. Slip stitch to other side of ribbed cuff. Slip stitch back loops of one side to front loops of other side. Fasten off.
Flip cuff inside-out and ensure V’s are facing downwards (we will be flipping the mitten inside-out at the very end, so currently we want the V’s to be facing downwards so the final product has the V’s facing upwards).
Faux Fur Body
Using pink faux fur yarn and 6 mm hook,
Round 1: Pick up 18 stitches around circumference of ribbed cuff. To do this, make a slip knot. Insert hook in any space around ribbed cuff. Place slip knot on hook and pull through the space. Insert hook in adjacent space, yarn over and pull up a loop. Yarn over again and pull through both loops to complete a single crochet. Keep inserting hook in adjacent spaces, and working single crochets until all 18 stitches have been picked up around the edge. Try to space stitches out as evenly as possible. (18 sts)
SWITCH to 7 MM HOOK,
Round 2-6: Sc 18.
It is now time to create the thumb hole,
R7: Sc 7, Chain 4, Skip 2, Sc 9. (20 sts)
R8: Sc 7, Sc 6 in chain space, Sc 9. (22 sts)
R9: *Sc 2, Dec*, rep 2 times. Sc 5. *Sc 2, Dec*, rep 2 times. Sc 1. (18 sts)
R10-16: Sc 18. (18 sts).
R17: *Sc 1, Dec*, rep 6 times. (12 sts)
R18: *Dec*, rep 6 times. (6 sts).
Fasten off and leave long end for sewing. Pull yarn end through last remaining 6 stitches. Try mitten on and use yarn tail to close up any gaps that may be felt at tip of mitten. Weave in end.
Thumb
Using 7 mm hook and faux fur yarn,
Round 1: Pick up 10 stitches around thumb hole (as described above in Round 1 of body). (10 sts)
R2: Sc 10. (10 sts)
R3: *Sc 3, Dec*, rep 2 times. (8 sts)
R4-5: Sc 8. (8 sts)
R6: *Dec*, rep 4 times. (4 sts)
Fasten off and sew opening shut.
Flip mitten inside out so that fuzzier/”wrong” side is on the outside.
Final Dimensions: 10”/25.4 cm tall, 4.5”/11 cm wide (when flat), 10”/25.4 cm circumference
*****************
I am in LOVE with my new Faux Fur Mittens, and they turned out even better than I expected! They are so pretty and fluffy!
Go For Faux and Coboo yarn look so beautiful together, and I’m glad that these shades of pink are a perfect match as well! These mittens are such a cute addition to any outfit on a brisk day, and they envelop your hands with such soft fluffiness!
Since these mittens use just a little over 1 skein of Go For Faux yarn (so 2 skeins are needed), I decided to design a MATCHING FAUX FUR HEADBAND! How adorable is this set? The headband works up extremely quickly in the round, and you get this amazingly soft and fluffy cloud that hugs your head! The free pattern can be found HERE!
Lion Brand Yarn has put together a convenient kit so that you can make this mitten and headband set using their special yarns! You can find it HERE!
I hope you love these mittens as much as I do! They are such a fun project, and a neat way to work with faux fur yarn. Once again, the free pattern for the matching Crochet Faux Fur Headband can be found HERE! Hope you all enjoy wrapping yourselves in this soft and fluffy goodness! Happy crocheting, everyone!

This pattern is an original pattern by Stephanie Lau of All About Ami. Please do not claim this pattern as your own. If you wish to share this pattern, you may link to this pattern but please do not reprint it on your site. You may keep a copy for your own personal use but please DO NOT sell the pattern or distribute it.
You may sell products made from this pattern but please clearly credit the design to me, Stephanie Lau of All About Ami, and provide a link to my blog www.AllAboutAmi.com. Permission is NOT granted for mass production or factory manufacturing of any kind. Thank you for being respectful and for your understanding!
Save