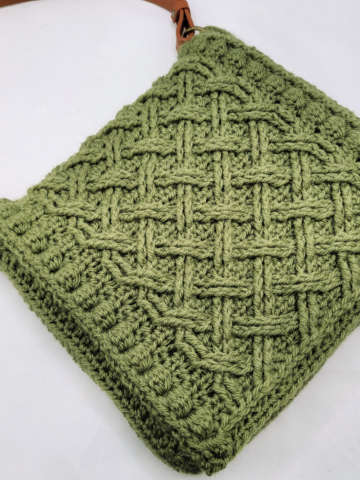
More and more places are eliminating plastic bags - and with all the wonderful cotton yarn out there, it's so much fun to make your own shopping bags! The Citrus Twist Tote brings a fresh squeeze to the ever popular crochet cotton market bag!
 Disclaimer: This post includes affiliate links; materials provided by Red Heart and Clover.
The Citrus Twist Tote is made with 4 bright colors of Red Heart Scrubby Smoothie that made me think of... well, citrus! But of course, there are 30 gorgeous solids and prints of Scrubby Smoothie to choose from - who want to whip up a Berry Smoothie version? Or something Beachy in cool blues?

You could even add in some Red Heart Scrubby Cotton for some fun texture! The Citrus Twist Tote features a two-row repeat that's easy to memorize and works up fast. I have included all the row instructions (rather than a general repeat) so you can cross them off as you go - time for some of that "easy summer living", or at least easy summer crocheting!

Citrus Twist Tote
Add this pattern to your Ravelry Queue and Favorites
US - I, 5.5mm - Clover Amour
300 yds Red Heart Scrubby Smoothie (100% Cotton; “4”/Medium/Worsted/UK: 10-12 ply)
Color A: Lime (1 ball)
Color B: White (1 ball)
Color C: Bright Orange (1 ball)
Color D: Lemony (1 ball)
Gauge: 13 sts x 7 rows = 4"/10cm in dc
Finished Size: 13" wide x 13.5" tall excluding handles
Helpful Links & Tutorials:
FDC - Foundation Double Crochet
Enclosing Chains - What and How To
SPECIAL STITCH:
cluster - tr2tog worked in just one (indicated) st
NOTES:
If you would prefer to avoid the FDC stitch, you can create a Row 1 made of 40 dc sts using your preferred method. (eg: ch 42, dc in the 4th ch from the hook and each rem ch across)
Note that the pattern switches from Rows to Rounds in Rnd 5 - in this round you will crochet all around the rectangle made in Rows 1-4. Please see the Bag Bottoms tutorial linked above for more help if needed.
To change colors, make the slip stitch to end the previous rnd with the new color.
You can choose to break your yarn after each color change or to carry it along the inside of the bag. Shown is the latter.
After placing the stitch markers in Rnd 29 for the handles, be sure to check their placement since everyone's gauge is a little different. Please see the Bag Handles tutorial linked above for more help if needed.
INSTRUCTIONS:
Row 1: With Color A, FDC 40, turn. (40 sts)
Row 2 – 4: Ch 2 (does not count as a st), dc in each st across, turn. (40 sts)
Rnd 5: Ch 2, dc in each st across, dc 8 across sides of rows, dc in each st across foundation chain, dc 8 across other sides of rows; join with sl st to 1st dc to work in the round. (96 sts)
Rnd 6: Ch 2, dc in each st around, join with a sl st to 1st dc. (96 sts)
Rnd 7: With Color B, ch 1, sc in the first st, *ch 2, skip the next st, sc in the next st, ch 4, skip 5 sts,** sc in the next st; rep from * around, finishing last rep at **, join to first sc with sl st. (12 sc)
Rnd 8: With Color C, sl st into next ch-2 sp, ch 1, sc in same ch-2 sp, (3 dc, ch 1, 3 dc) in next ch-4 sp, *sc in next ch-2 sp, (3 dc, ch 1, 3 dc) in next ch-4 sp; rep from * around, join. (72 dc, 12 sc)
Rnd 9: With Color B, ch 3 (does not count as a st), tr in first st, ch 2, *(cluster, ch 4, cluster) in next sc, ch 2; rep from * around, cluster in same st as first tr, ch 4, join to top of tr. (23 clusters, 1 tr)
Rnd 10: With Color D, sl st into next ch-2 sp, ch 1, sc in ch-1 sp below the ch-2 sp enclosing the ch-2, (3 dc, ch 1, 3 dc) in next ch-4 sp, *sc in ch-1 sp below the ch-2 sp enclosing the ch-2, (3 dc, ch 1, 3 dc) in next ch-4 sp; rep from * around, join. (72 dc, 12 sc)

Rnd 11: With Color B, rep Rnd 9.
Rnd 12: With Color A, rep Rnd 10.
Rnd 13: With Color B, rep Rnd 9.
Rnd 14: With Color C, rep Rnd 10.
Rnd 15: With Color B, rep Rnd 9.
Rnd 16: With Color D, rep Rnd 10.
Rnd 17: With Color B, rep Rnd 9.
Rnd 18: With Color A, rep Rnd 10.
Rnd 19: With Color B, rep Rnd 9.
Rnd 20: With Color C, rep Rnd 10.
Rnd 21: With Color B, rep Rnd 9.
Rnd 22: With Color D, rep Rnd 10.
Rnd 23: With Color B, rep Rnd 9.
Rnd 24: With Color A, rep Rnd 10, break Color A.
Rnd 25: With Color B, rep Rnd 9.
Rnd 26: With Color C, rep Rnd 10, break Color C.
Rnd 27: With Color B, rep Rnd 9, break Color B.
Rnd 28: With Color D, ch 1, sc in each cluster, enclose each ch-2 with 2 sc worked in the ch-1 sp below, 4 sc in each ch-4 sp around; join. (96 sts)
Rnd 29: Ch 1, sc in each st around; join. (96 sts) Place stitch markers in sts # 18, 44, 66, 92, and check placement.
Rnd 30: Ch 1, sc in each st to 1st marker, sc in marked st, ch 70, sc in 2nd marked st skipping sts in between markers, sc in each st to 3rd marker, sc in 3rd marked st, ch 70, sc in 4th marked st skipping sts in between markers, sc in each remaining st around; join. (198 sts including chs)
Rnd 31: Ch 1, sc in each st and ch around; join. (198 sts)
Rnd 32 and 33: Ch 1, sc in each st around, join. (198 sts) Break yarn after Rnd 33.
Extra Bit: Join and sc around inside handle openings if desired.
Are you ready to go green (or any other color!) with your own Citrus Twist Tote? If this free crochet market bag pattern does inspire you, and you post a photo on social media, be sure to tag me @mooglyblog or #mooglyblog so I can check it out too! I love seeing what you make!


Follow Moogly on Facebook, Twitter, Pinterest, Instagram, and Tumblr! Thank you to Red Heart Yarns and Clover for providing the materials shown in this post. Written pattern copyright Tamara Kelly 2019, all rights reserved. Please do not reprint or repost this pattern, but please do link to this page to share this pattern with others.
To print or download, use the Print Friendly button below, or go to PrintFriendly.com, or right-click to copy and paste it into a word processing document if those options do not work for you (please note that Print Friendly is a free outside website that the button links to, and you can click here for a tutorial on how to use it, but I cannot provide additional technical support for this service). If you wish to make items for sale from this pattern or translate it to another language, please visit the About page for details.


Paula Johnson
This is SO HAPPY! Thanks for sharing Tamara, I’m going to love making this one.
Tamara Kelly
😀 Thank you so much, Paula!
Carys
Hi. I'm making the tote right now and I have a question about Rnd 30. It says to skip 19 sts between the stitch markers. If placed in the sts indicated in rnd 29 there are either 21 sts or 25 sts between the markers. The way mine has worked up, the larger gap (25 sts) lines up on the front and back of the bag. I'm trying to figure out how many sts wide the handle gap should be. (Hope that makes sense.)
Tamara Kelly
Hi Carys! I've updated the pattern (19 was wrong, sorry about that). You should have 25 sts skipped, and 21 sts worked between the handles (which is 23 if you include the marked sts). Does that help?
Carys
Yes ma'am!! Thank you! I'm making this for my son's teacher and can't wait to give it to her. Have a great day! 🙂
Aadila
Hi tamara I'm busy with the tote round 8 says sc in first stitch ch2 sk 1 stitch sc in next ch4 sk 5 sttitches sc in next repeat and at the end 12sc. If I have 96 stitches and repeat the ch2 sk1 sc in next ch4 sk5 sc in next all round I have more then 12 sc. What Am I doing wrong?
Tamara Kelly
Hi Aadila! There are only sc sts in the ch-2 sps. Did you have more than 12 ch-2 sps in the previous rnd?
Aadila
Hi Tamara no I had 12 ch2 spaces but at the end of the round where the ch2 spaces are made you say there must be 12 sc smile. but it all worked out fine thank you smile I see the bag goes in at the short sides is this part of the shape? Sorry for all the questions but I'm a blind crocheter smile. Thank you.
Tamara Kelly
Hi Aadila! If you had 12 ch-2 sps in the previous round, and then just worked one sc in each of those ch-2 sps, then you should have 12 sc at the end of Rnd 8. I'm not sure I understand your question, I'm sorry.