
The Tilted Tunic (Child/Youth) – Free Crochet Sweater Pattern is copyrighted by I Need It Crochet. You may not copy, share, change, or sell the pattern itself. Also, you may not claim this pattern as your own. All pictures contained in this pattern fall under the copyright and may not be used.
Finished items made from the Tilted Tunic (Child/Youth) – Free Crochet Sweater Pattern belong to you, and you may do what you wish with them. If you choose to sell them on Etsy, I would very much appreciate it if you credited me as the pattern designer.


Or… Just scroll down to see it for free!
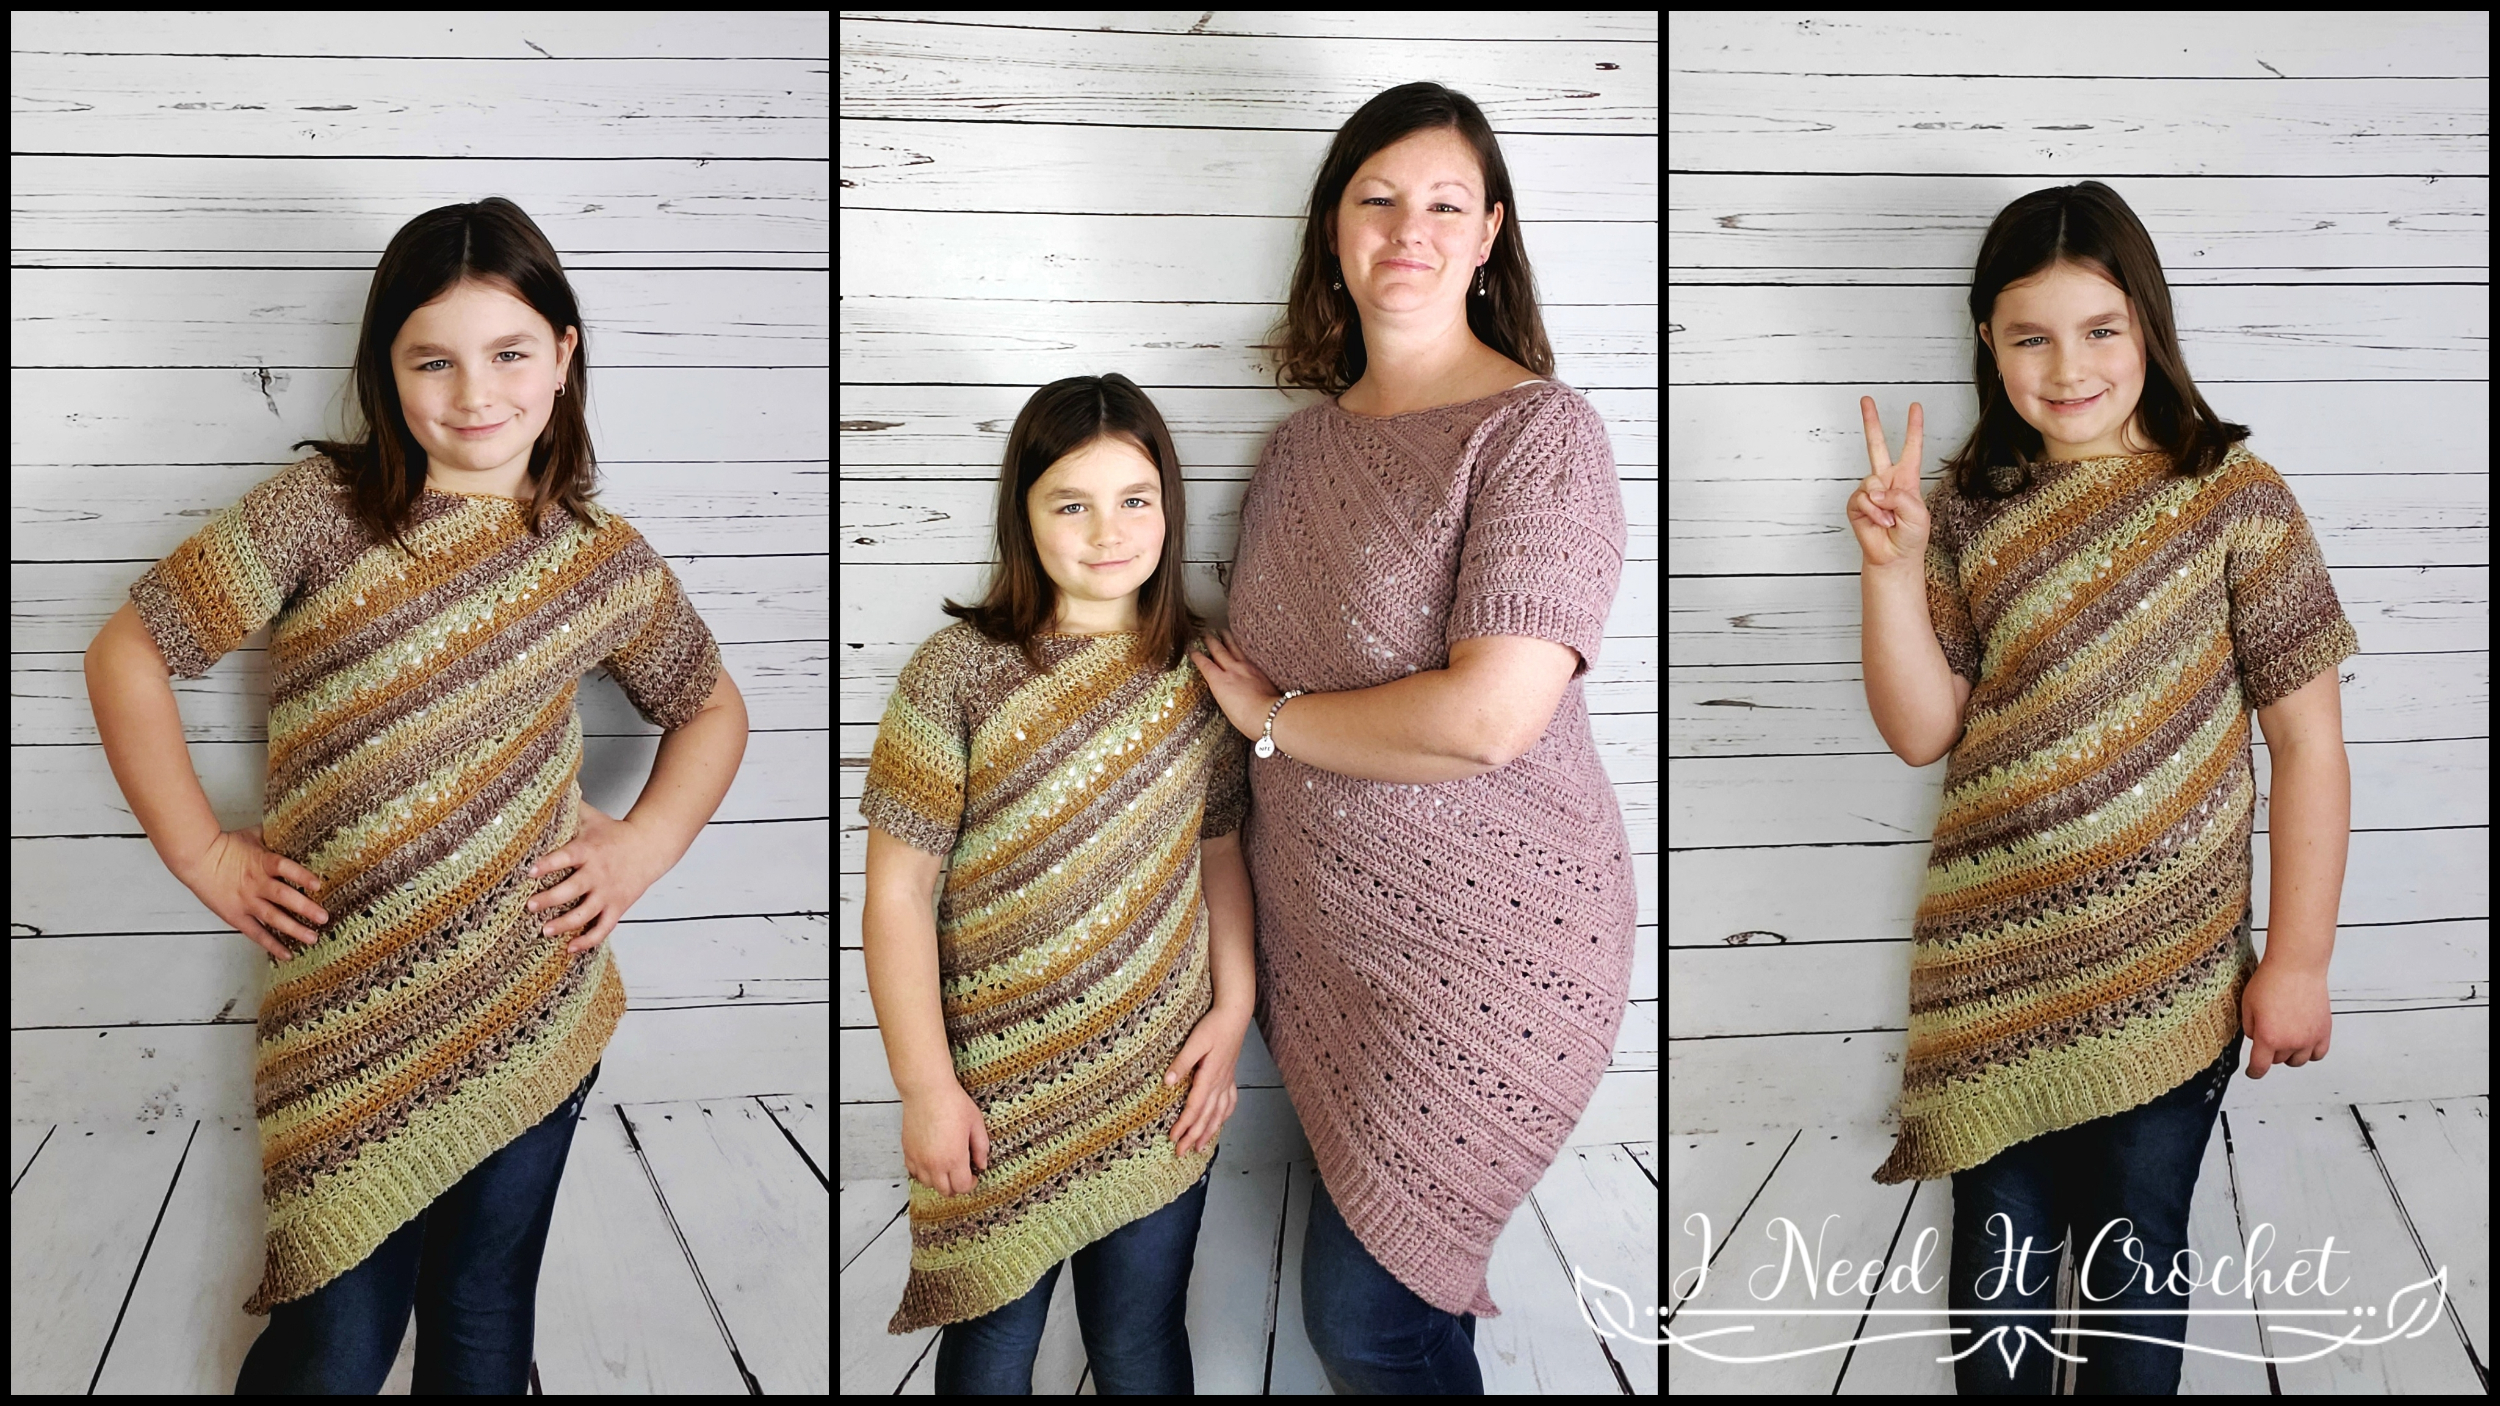
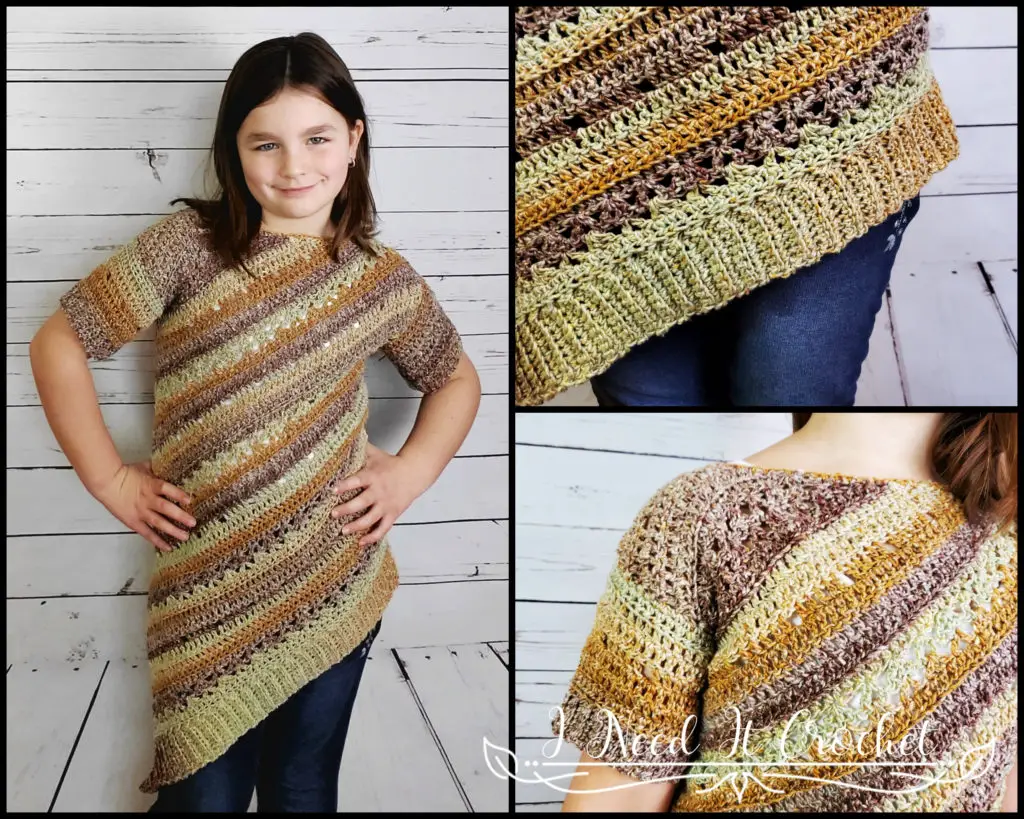
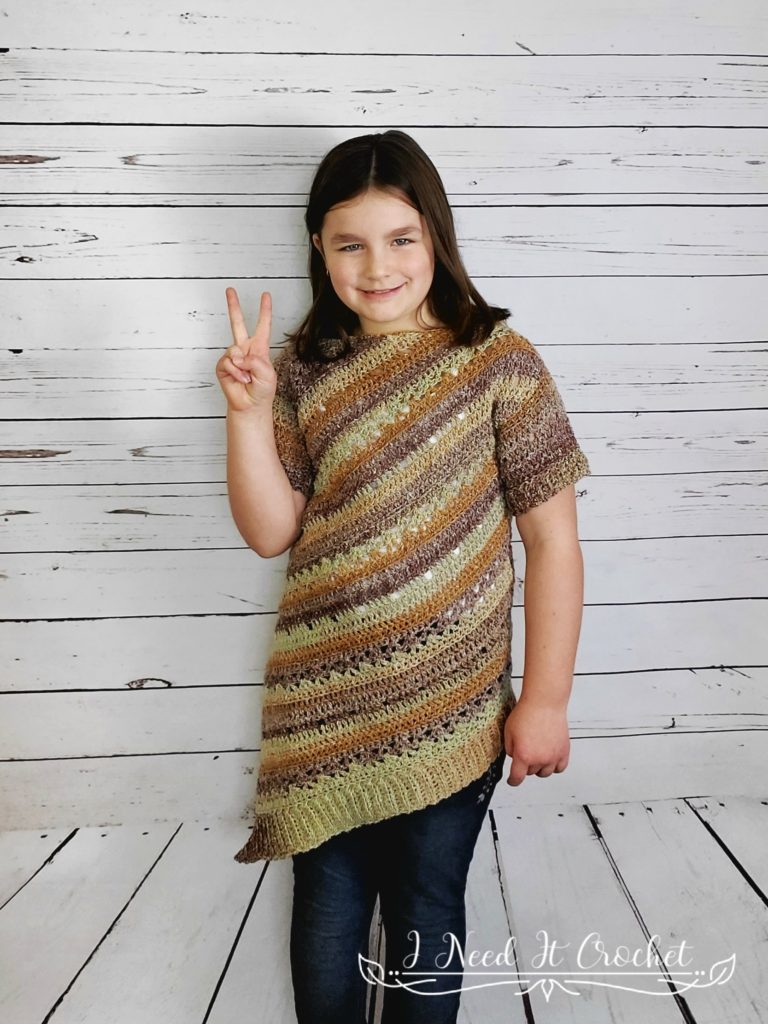
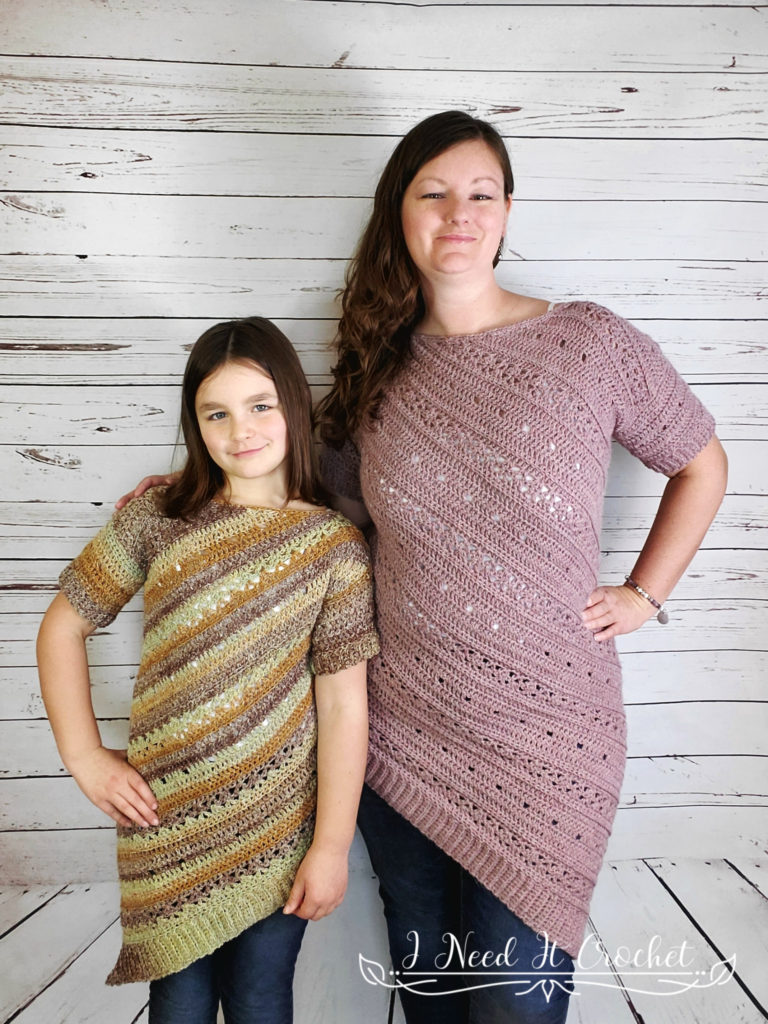
As soon as I finished the adult version of this tunic, I had people begging me to write a kid’s version. How could I say no? Besides, I’ll take any excuse to make something for my own little girl. And she sure does love to model for me!
The following pattern is for the child/youth version only. If you would like to see the adult version of the Tilted Tunic, you can find it here.
Finished Sizes:
Instructions given to fit children’s size 2; changes for 4, 6, 8, 10, 12, 14 & 16 are in ()
2 (4, 6, 8, 10, 12, 14, 16)
To Fit Chest Size: 21” (23”, 25”, 26 ½”, 28”, 30”, 31, 32 ½”)
Finished Length: Customizable..
Arm Circumference: Each size may choose whichever arm circumference they like from the following options: 6 ½” (8”, 9 ½”, 11 ½”, 13 ½”, 15”).
Materials:
I used Sugarbush Rapture, which is a 50% Llamasoft/50% Superfine Merino Wool, #4 Worsted weight yarn.
Any yarn of similar weight would work.
Approximately 350 (450, 500, 600, 650, 750, 800, 900) yds.
5.5mm Hook
Stitch Markers
Yarn Needle
Scissors
Measuring Tape
Abbreviations:
Rs = Right Side
Ws = Wrong Side
Sk = Skip
Sp = Space
St = Stitch
BLO = Back Loop Only
Ss = Slip Stitch
Ch = Chain
Sc = Single Crochet
Hdc = Half Double Crochet
Dc = Double Crochet
Tr = Treble Crochet
Hdc2tog = Half Double Crochet 2 Together
Dc2tog = Double Crochet 2 Together
Vst = V Stitch
Gauge:
There will be points within the pattern where you should measure for gauge. Be sure to check your gauge. It will save you much time and heartache.
Notes:
Ch1 and ch2 at the beginning of a row is never considered a stitch.
Ch3 at the beginning of a row is considered a dc.
Ch4 at the beginning of a row is considered a tr.
A Vst consists of a (Dc, ch1, dc) all in the same st.
A Vst counts as 3 sts.
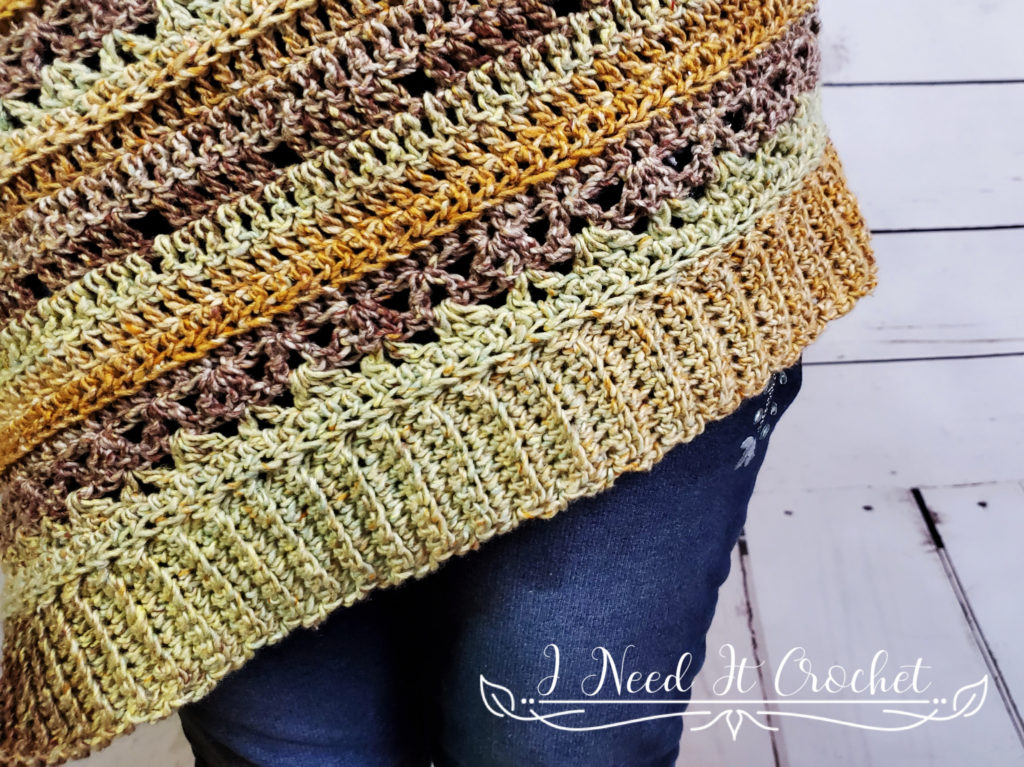
The Tilted Tunic (Child/Youth) – Free Crochet Sweater Pattern
Instructions
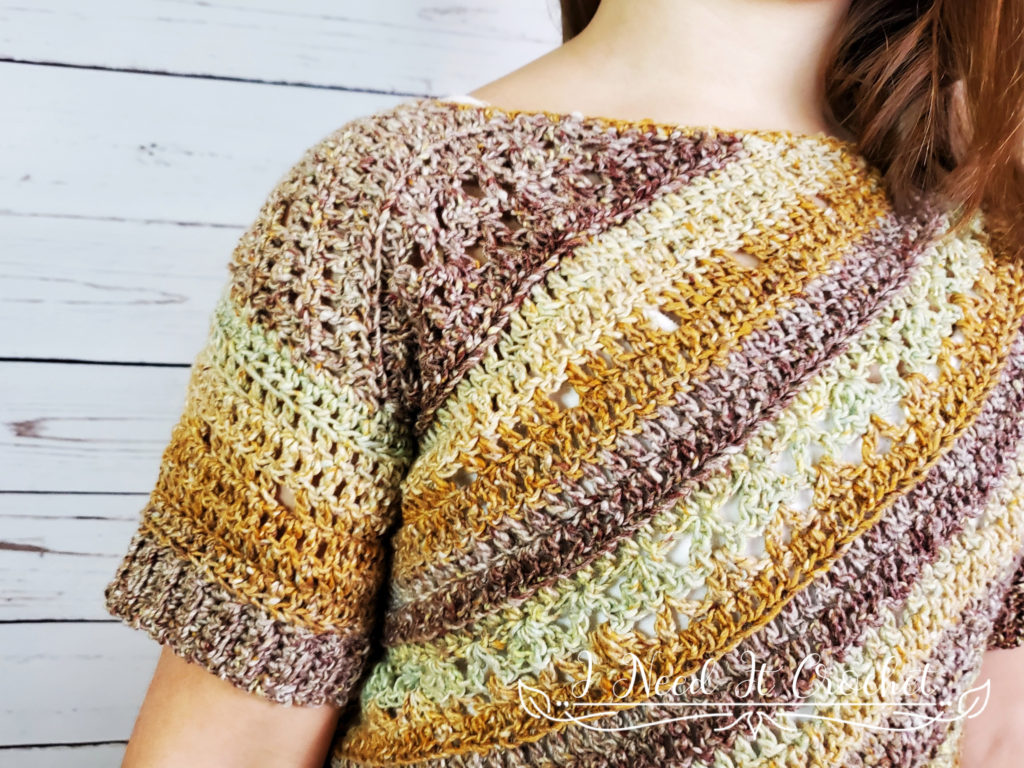
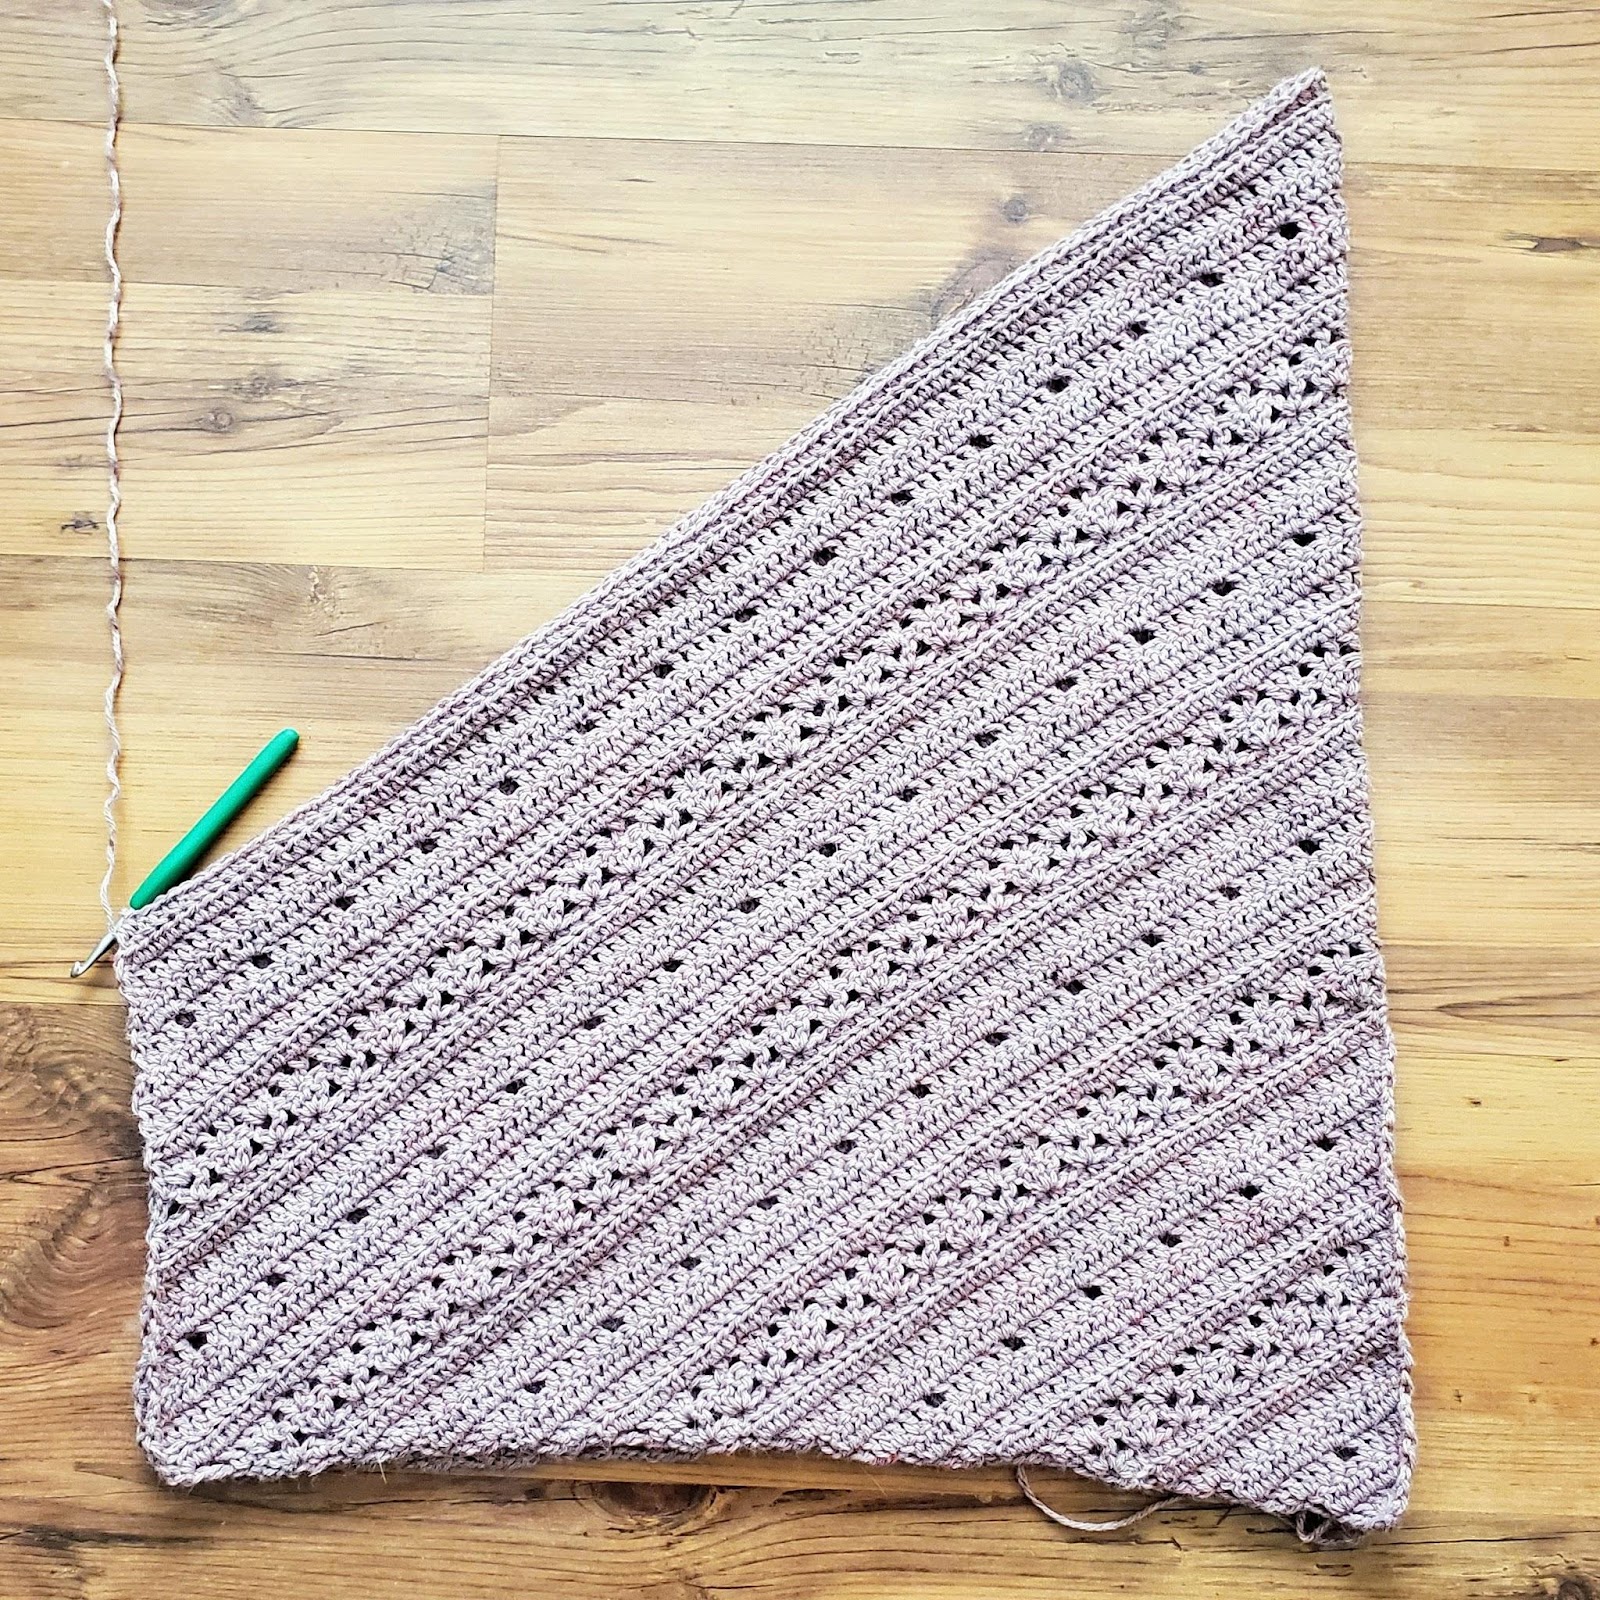
This tunic is designed to be nearly seamless. The only sewing we will have to do is in the shoulders. The design starts out as two triangles, which are then joined together. Then, the tunic continues to grow from there. To make the instructions a bit easier to follow, I have divided them up into sections.
Section 1 – 1st Triangle
The pattern begins at one shoulder. We will begin by making our first triangle. The size of the triangle you make will depend on your desired upper arm circumference. You may choose whichever arm size you want, regardless of body size. Instructions are given for the following sleeve circumferences: 6 ½” (8”, 9 ½”, 11 ½”, 13 ½”, 15”).
Ch4. Ss to 1st ch to form a ring.
1. (Right Side) Working this row into the ring: Ch3, 4dc, 1tr. Turn. – 6 st
2. (Wrong Side) Ch4, 2dc in 1st st. Dc in each st across until there is only 1 st left unworked. 2dc in last st. Turn. – 9 st
3. Ch3, dc in 1st st. Dc in next 3 sts. Ch1, sk 1 st, dc in next 3 sts. (2dc, tr) in last st. Turn. – 12 st
4. Ch4, 2dc in 1st st. Dc in each st and ch sp across until there is only 1 st left. 2dc in last st. Turn. – 15 st
5. Ch3, dc in 1st st. Dc in each st across until there is only 1 st left unworked. (2dc, tr) in last st. Turn. – 18 st
6. Ch3, 2hdc in 1st st. Hdc in each st across until there is only 1 st left unworked. 2hdc in last st. Turn. – 21 st
Those who are making a 6 ½” sleeve: Skip rows 7-13 and continue to the instructions below.
Gauge Check: Your triangle should measure 3” H x 5 ½” W. Height is measured from the ring to the center of the last row worked. Width is measured across the top of your last row. If your measurements are not close to correct, try again with a different sized hook.
7. Working this row in the BLO: Ch1, 2hdc in 1st st. Hdc in each st across until there is only 1 st left unworked. (2hdc, dc) in last st. Turn. – 24 st
Those who are making a 8” sleeve: Skip rows 8-13 and continue to the instructions below.
8. Ch4, Vst in 1st st. Sk 2 sts, 3dc in next st. *Sk 2 sts, Vst in next st. Sk 2 sts, 3dc in next st. ** Repeat from * to ** until there are only 2 sts left unworked. Sk 1 st, 2dc in last st. Turn. – 27 st
9. Ch3, dc in 1st st, dc in next st. Sk 1 st, Vst in next st. Sk 2 sts, 3dc in next ch1 sp. *Sk 2 sts, Vst in next st. Sk 2 sts, 3dc in next ch1 sp. ** Repeat from * to ** until there are only 2 sts left unworked. Sk 1 st, (dc, ch1, tr) in last st. Turn. – 30 st
Those who are making a 9 ½” sleeve: Skip rows 10-13 and continue to the instructions below.
Gauge Check: Your triangle should measure 4 ½” H x 8” W. If your measurements are not close to correct, try again with a different sized hook.
10. Ch3, 2hdc in 1st st. Hdc in each st and ch sp across until there is only 1 st left unworked. 2hdc in last st. Turn. – 33 st
Those who are making an 11 ½” sleeve: Skip rows 11-13 and continue to the instructions below.
11. Working this row in the BLO: Ch3, dc in 1st st. Dc in each st across until there is only 1 st left unworked. (2dc, tr) in last st. Turn. – 36 st
12. Ch4, 2dc in 1st st. Dc in each st across until there is only 1 st left unworked. 2dc in last st. Turn. – 39 st
Those who are making a 13 ½” sleeve: Skip row 13 and continue to the instructions below.
13. Ch3, dc in 1st st. Dc in next 3 sts. *Ch1, sk 1 st, dc in next 5 sts. ** Repeat from * to ** until there are only 5 sts left unworked. Ch1, sk 1 st, dc in next 3 sts. (2dc, tr) in last st. Turn. – 42 st
Those who are making a 15” sleeve: Continue to the instructions below.
Gauge Check: Your triangle should measure 6 ¼” H x 11 ¼” W. If your measurements are not close to correct, try again with a different sized hook.
Bind off and continue to Section 2.
Section 2 – 2nd Triangle
Your second triangle will be a mirror image of your first triangle. Follow the instructions carefully and be sure to work the same number of rows as you did with your first triangle.
Ch4. Ss to 1st ch to form a ring.
1. (Right Side) Working this row into the ring: Ch4, 5 dc. Turn. – 6 st
2. (Wrong Side) Ch3, dc in 1st st. Dc in each st across until there is only 1 st left unworked. (2dc, tr) in last st. Turn. – 9 st
3. Ch4, 2dc in 1st st. Dc in next 3 sts. Ch1, sk 1 st, dc in next 3 sts. 2dc in last st. Turn. – 12 st
4. Ch3, dc in 1st st. Dc in each st and ch sp across until there is only 1 st left. (2dc, tr) in last st. Turn. – 15 st
5. Ch4, 2dc in 1st st. Dc in each st across until there is only 1 st left unworked. 2dc in last st. Turn. – 18 st
6. Ch1, 2hdc in 1st st. Hdc in each st across until there is only 1 st left unworked. (2hdc, dc) in last st. Turn. – 21 st
Those who are making a 6 ½” sleeve: Skip rows 7-13 and continue to the instructions below.
Gauge Check: Your triangle should measure 3” H x 5 ½” W. Height is measured from the ring to the center of the last row worked. Width is measured across the top of your last row. If your measurements are not close to correct, try again with a different sized hook.
7. Working this row in the BLO: Ch3, 2hdc in 1st st. Hdc in each st across until there is only 1 st left unworked. 2hdc in last st. Turn. – 24 st
Those who are making a 8” sleeve: Skip rows 8-13 and continue to the instructions below.
8. Ch3, dc in 1st st. Sk 1 st, 3dc in next st. *Sk 2 sts, Vst in next st. Sk 2 sts, 3dc in next st. ** Repeat from * to ** until there are only 3 sts left unworked. Sk 2 sts, (Vst, tr) in last st. Turn. – 27 st
9. Ch5, dc in 1st st (counts as a (tr, ch1, dc) in same st). Sk 1 st, 3dc in next ch1 sp. Sk 2 sts, Vst in next st. *Sk 2 sts, 3dc in next ch1 sp. Sk 2 sts, Vst in next st. ** Repeat from * to ** until there are only 3 sts left unworked. Sk 1 st, dc in next st, 2dc in last st. Turn. – 30 st
Those who are making a 9 ½” sleeve: Skip rows 10-13 and continue to the instructions below.
Gauge Check: Your triangle should measure 4 ½” H x 8” W. If your measurements are not close to correct, try again with a different sized hook.
10. Ch1, 2hdc in 1st st. Hdc in each st and ch sp across until there is only 1 st left unworked. (2hdc, dc) in last st. Turn. – 33 st
Those who are making an 11 ½” sleeve: Skip rows 11-13 and continue to the instructions below.
11. Working this row in the BLO: Ch4, 2dc in 1st st. Dc in each st across until there is only 1 st left unworked. 2dc in last st. Turn. – 36 st
12. Ch3, dc in 1st st. Dc in each st across until there is only 1 st left unworked. (2dc, tr) in last st. Turn. – 39 st
Those who are making a 13 ½” sleeve: Skip row 13 and continue to the instructions below.
13. Ch4, 2dc in 1st st. Dc in next 3 sts. *Ch1, sk 1 st, dc in next 5 sts. ** Repeat from * to ** until there are only 5 sts left unworked. Ch1, sk 1 st, dc in next 3 sts. 2dc in last st. Turn. – 42 st
Those who are making a 15” sleeve: Continue to the instructions below.
Gauge Check: Your triangle should measure 6 ¼” H x 11 ¼” W. If your measurements are not close to correct, try again with a different sized hook.
Bind off and continue to Section 3.
Section 3 – Joining the Triangles and Increasing to Width
Next, we will join our triangles. Lay out your triangles with the right side facing up and the short edges facing each other as in Figure 1. Use the yarn end at the top of your short edge to join the tops of the triangles. Now, we will rejoin our yarn on the end of your last completed row (where you have another yarn end. This end may be on the left or the right side of your work, depending on what arm size you are making. In Figure 1, it is on the left side, just out of frame.) Note: This section does not have stitch counts listed. Unless you like to live dangerously, I suggest you make note of your stitch count on a scrap piece of paper and keep track at the end of each row.

Joining Row
These instructions are only for the first row after you have joined your triangles. I have numbered the rows to correspond with the rows in Sections 1 & 2. Therefore, if you finished Sections 1 & 2 on row 9, you will work row 10 below. If you finished on row 10, you will work row 11 below. If you finished Sections 1 & 2 on row 13, you will work row 4 below. You will only work 1 row from these instructions. Then, you will carry on to the next instructions. This row will add 6 sts to your stitch count.
4. Ch4, 2 dc in 1st st. Dc in each st and ch sp across until there is 1 st left before the center join. 2dc in next st, ch1, 2dc in next st. Dc in each st across until there is only 1 st left unworked. (2dc, tr) in last st. Turn.
5. Ch4, 2 dc in 1st st. Dc in each st across until there is 1 st left before the center join. 2dc in next st, ch1, 2dc in next st. Dc in each st across until there is only 1 st left unworked. (2dc, tr) in last st. Turn.
6. Ch3, 2 hdc in 1st st. Hdc in each st across until there is 1 st left before the center join. 2hdc in next st, ch1, 2hdc in next st. Hdc in each st across until there is only 1 st left unworked. (2hdc, dc) in last st. Turn.
7. Working this row in the BLO: Ch3, 2 hdc in 1st st. Hdc in each st across until there is 1 st left before the center join. 2hdc in next st, ch1, 2hdc in next st. Hdc in each st across until there is only 1 st left unworked. (2hdc, dc) in last st. Turn.
8. Ch4, Vst in 1st st. Sk 2 sts, 3dc in next st. *Sk 2 st, Vst in next st. Sk 2 st, 3dc in next st. ** Repeat from * to ** until there are only 2 sts left before the center join. Sk 1 st, 2dc in next st, ch1, 2dc in next st. Sk 1 st, 3dc in next st. Repeat from * to ** again until there are only 3 sts left unworked. Sk 2 st, (Vst, tr) in last st. Turn.
9. Ch5, dc in 1st st (counts as (tr, ch1, dc) in same st). Sk 1 st, 3dc in next ch1 sp. Sk 2 sts, Vst in next st. * Sk 2 sts, 3dc in next ch1 sp. Sk 2 sts, Vst in next st. ** Repeat from * to ** until there are only 3 sts left before the center join. Sk 1 st, dc in next st, 2dc in next st, ch1, 2dc in next st, dc in next st. Sk 1 st, Vst in next st. Sk 2 sts, 3dc in next ch1 sp. *Sk 2 sts, Vst in next st. Sk 2 sts, 3dc in next ch1 sp. ** Repeat from * to ** until there are only 2 sts left unworked. Sk 1 st, (dc, ch1, tr) in last st. Turn.
10. Ch3, 2 hdc in 1st st. Hdc in each st and ch sp across until there is 1 st left before the center join. 2hdc in next st, ch1, 2hdc in next st. Hdc in each st across until there is only 1 st left unworked. (2hdc, dc) in last st. Turn.
11. Working this row in the BLO: Ch4, 2dc in 1st st. Dc in each st across until there is 1 st left before the center join. 2dc in next st, ch1, 2dc in next st. Dc in each st across until there is only 1 st left unworked. (2dc, tr) in last st. Turn.
12. Ch4, 2dc in 1st st. Dc in each st across until there is 1 st left before the center join. 2dc in next st, ch1, 2dc in next st. Dc in each st across until there is only 1 st left unworked. (2dc, tr) in last st. Turn.
13. Ch4, 2dc in 1st st. Dc in next 3 sts. *Ch1, sk 1 st, dc in next 5 sts. ** Repeat from * to ** until there are only 5 sts left before the center join. Ch1, sk1 st, dc in next 3 sts. 2dc in next st, ch1, 2dc in next st. Dc in next 3 sts. Repeat from * to ** again until there are only 5 sts left unworked. Ch1, sk 1 st, dc in next 3 sts. (2dc, tr) in last st. Turn.
Increase Rows
Once you have worked only one of the rows above, carry on to the rows below. Once again, I have numbered the rows to correspond with the Joining Rows. Therefore, if you just finished Joining Row 9, you will now begin at row 10 below. If you just finished Joining Row 10, you will begin at row 11 below. If you just finished Joining Row 13, you will begin at row 4 below. You will work the rows below until you have 14 (16, 17, 18, 19, 20, 21, 22) rows (counting from one of the starting ch4 rings) for sizes 2 (4, 6, 8, 10, 12, 14, 16). Again, each of these rows will add 6 sts to your st count.
4. Ch4, 2 dc in 1st st. Dc in each st and ch sp across to center ch1. (Dc, ch1, dc) in ch1 sp. Dc in each st across until there is only 1 st left unworked. (2dc, tr) in last st. Turn.
5. Ch4, 2 dc in 1st st. Dc in each st across to center ch1. (Dc, ch1, dc) in ch1 sp. Dc in each st across until there is only 1 st left unworked. (2dc, tr) in last st. Turn.
6. Ch3, 2 hdc in 1st st. Hdc in each st across to center ch1. (Hdc, ch1 hdc) in ch1 sp. Hdc in each st across until there is only 1 st left unworked. (2hdc, dc) in last st. Turn.
7. Working this row in the BLO: Ch3, 2 hdc in 1st st. Hdc in each st across to center ch1. (Hdc, ch1 hdc) in ch1 sp. Hdc in each st across until there is only 1 st left unworked. (2hdc, dc) in last st. Turn.
8. Ch4, Vst in 1st st. Sk 2 sts, 3dc in next st. *Sk 2 st, Vst in next st. Sk 2 st, 3dc in next st. ** Repeat from * to ** until there are only 2 sts left before the center ch1. Sk 2 sts, (2dc, ch1, 2dc) in ch1 sp. Sk 2 sts, 3dc in next st. Repeat from * to ** again until there are only 3 sts left unworked. Sk 2 st, (Vst, tr) in last st. Turn.
9. Ch5, dc in 1st st (counts as (tr, ch1, dc) in same st). Sk 1 st, 3dc in next ch1 sp. Sk 2 sts, Vst in next st. * Sk 2 sts, 3dc in next ch1 sp. Sk 2 sts, Vst in next st. ** Repeat from * to ** until there are only 3 sts left before the center ch1. Sk 2 sts, dc in next st, (2dc, ch1, 2dc) in ch1 sp), dc in next st. Sk 2 sts, Vst in next st. Sk 2 sts, 3dc in next ch1 sp. *Sk 2 sts, Vst in next st. Sk 2 sts, 3dc in next ch1 sp. ** Repeat from * to ** until there are only 2 sts left unworked. Sk 1 st, (dc, ch1, tr) in last st. Turn.
10. Ch3, 2 hdc in 1st st. Hdc in each st and ch sp across to center ch1. (Hdc, ch1 hdc) in ch1 sp. Hdc in each st across until there is only 1 st left unworked. (2hdc, dc) in last st. Turn.
11. Working this row in the BLO: Ch4, 2 dc in 1st st. Dc in each st across to center ch1. (Dc, ch1, dc) in ch1 sp. Dc in each st across until there is only 1 st left unworked. (2dc, tr) in last st. Turn.
12. Ch4, 2 dc in 1st st. Dc in each st across to center ch1. (Dc, ch1, dc) in ch1 sp. Dc in each st across until there is only 1 st left unworked. (2dc, tr) in last st. Turn.
13. Ch4, 2dc in 1st st. Dc in next 3 sts. *Ch1, sk 1 st, dc in next 5 sts. ** Repeat from * to ** until there are only 5 sts left before the center ch1 Ch1, sk1 st, dc in next 4 sts. (dc, ch1, dc) in ch1 sp. Dc in next 4 sts. Repeat from * to ** again until there are only 5 sts left unworked. Ch1, sk 1 st, dc in next 3 sts. (2dc, tr) in last st. Turn.
If you complete row 13 and do not have enough rows yet, repeat the row sequence from row 4 until you have 14 (16, 17, 18, 19, 20, 21, 22) rows. You should have a total stitch count of 90 (102, 108, 114, 120, 126, 132, 138) st + center ch1. The base of your triangle (the side with the slit in it) should be 21” (23”, 25”, 26 ½”, 28”, 30”, 31”, 32 ½”) wide.
Section 4 – No Increases, Add Rows to Underarm Depth
Now that we have made our sweater the ideal width, we are going to start adding height. We will work the rows below (again, I have numbered them to correspond with the previous sections) until you have worked the same amount of rows as you worked in Section 1. For example, if you worked 9 rows in Section 1, you will work 9 of the rows below. If you worked 10 rows in Section 1, you will work 10 rows below. Your stitch count will stay the same as it was when you finished Section 3. Begin with the row after the row you last worked in Section 3. If you just finished Increase Row 9, you will now begin at row 10 below. If you just finished Increase Row 10, you will begin at row 11 below.
4. Ch2, dc in next st (counts as dc2tog). Dc in each st and ch sp across to center ch1. (Dc, ch1, dc) in ch1 sp. Dc in each st and ch sp across until there is only 2 sts left unworked. Dc2tog over last 2 sts. Turn. – 90 (102, 108, 114, 120, 126, 132, 138) st + center ch1
5. Ch2, dc in next st (counts as dc2tog). Dc in each st across to center ch1. (Dc, ch1, dc) in ch1 sp. Dc in each st across until there is only 2 sts left unworked. Dc2tog over last 2 sts. Turn. – 90 (102, 108, 114, 120, 126, 132, 138) st + center ch1
6. Ch1, hdc in next st (counts as hdc2tog). Hdc in each st across to center ch1. (Hdc, ch1 hdc) in ch1 sp. Hdc in each st across until there is only 2 sts left unworked. Hdc2tog over last 2 sts. Turn. – 90 (102, 108, 114, 120, 126, 132, 138) st + center ch1
7. Working this row in the BLO: Ch1, hdc in next st (counts as hdc2tog). Hdc in each st across to center ch1. (Hdc, ch1 hdc) in ch1 sp. Hdc in each st across until there is only 2 sts left unworked. Hdc2tog over last 2 sts. Turn. – 90 (102, 108, 114, 120, 126, 132, 138) st + center ch1
8. Work this row according to your size.
Sizes 2, 4, 8, 12, & 16:
Ch3. *Sk 2 sts, Vst in next st. Sk 2 sts, 3dc in next st. ** Repeat from * to ** until there are only 2 sts left before the center ch1. Sk 2 sts, (2dc, ch1, 2dc) in ch1 sp. *Sk 2 sts, 3dc in next st. Sk 2 sts, Vst in next st. ** Repeat from * to ** until there are only 3 sts left unworked. Sk 2 sts, dc in last st. Turn. – 90 (102, 108, 114, 120, 126, 132, 138) st + center ch1
Sizes 6, 10, & 14:
Ch3, sk 2 sts, 3dc in next st. *Sk 2 st, Vst in next st. Sk 2 st, 3dc in next st. ** Repeat from * to ** until there are only 2 sts left before the center ch1. Sk 2 sts, (2dc, ch1, 2dc) in ch1 sp. *Sk 2 sts, 3dc in next st. Sk 2 sts, Vst in next st. **Repeat from * to ** until there are only 3 sts left unworked. Sk 2 sts, dc in last st. Turn. – 90 (102, 108, 114, 120, 126, 132, 138) st + center ch1
9. Work this row according to your size.
Sizes 2, 4, 8, 12, & 16:
Ch2, sk 1 st, 3dc in next ch1 sp. Sk 2 sts, Vst in next st. *Sk 2 sts, 3dc in next ch1 sp. Sk 2 sts, Vst in next st. ** Repeat from * to ** until there are only 3 sts left before the center ch1. Sk 2 sts, dc in next st. (2dc, ch1, 2dc) in ch1 sp, dc in next st. Sk 2 sts, Vst in next st. Repeat from * to ** again until there are only 5 sts left unworked. Sk 2 sts, 2dc in ch1 sp. Work dc2tog over same ch1 sp and last st. Turn. – 90 (102, 108, 114, 120, 126, 132, 138) st + center ch1
Instructions for last st: Yo, insert your hook in the same ch1 sp you just worked, pull up a loop. Yo, pull through 2 loops. Yo, sk 1 st, insert your hook into last st, pull up a loop. Yo, pull through 2 loops. Yo, pull through last 3 loops.
Sizes 6, 10, & 14:
Ch2, sk 1 st, Vst in next st. *Sk 2 sts, 3dc in next ch1 sp. Sk 2 sts, Vst in next st. ** Repeat from * to ** until there are 3 sts left before the center ch1. Sk 2 sts, dc in next st, (2dc, ch1, 2dc) in center ch1, dc in next st. *Sk 2 sts, Vst in next st. Sk 2 sts, 3dc in next ch1 sp. ** Repeat from * to ** until there are only 5 sts left unworked. Sk 2 sts, dc in next st, ch1, work dc2tog over same st and last st. Turn. – 90 (102, 108, 114, 120, 126, 132, 138) st + center ch1
Instructions for last st: Yo, insert your hook in the same st you just worked, pull up a loop. Yo, pull through 2 loops. Yo, sk 1 st, insert your hook into last st, pull up a loop. Yo, pull through 2 loops. Yo, pull through last 3 loops.
10. Ch1, hdc in next st (counts as hdc2tog). Hdc in each st and ch sp across to center ch1. (Hdc, ch1 hdc) in ch1 sp. Hdc in each st and ch sp across until there is only 2 sts left unworked. Hdc2tog over last 2 sts. Turn. – 90 (102, 108, 114, 120, 126, 132, 138) st + center ch1
11. Working this row in the BLO: Ch2, dc in next st (counts as dc2tog). Dc in each st across to center ch1. (Dc, ch1, dc) in ch1 sp. Dc in each st across until there is only 2 sts left unworked. Dc2tog over last 2 sts. Turn. – 90 (102, 108, 114, 120, 126, 132, 138) st + center ch1
12. Ch2, dc in next st (counts as dc2tog). Dc in each st across to center ch1. (Dc, ch1, dc) in ch1 sp. Dc in each st across until there is only 2 sts left unworked. Dc2tog over last 2 sts. Turn. – 90 (102, 108, 114, 120, 126, 132, 138) st + center ch1
13. Work this row according to your size.
Sizes 2, 4, 8, 12, & 16:
Ch2, dc in next st (counts as dc2tog). Dc in next 2 sts. *Ch1, sk 1 st, dc in next 5 sts. ** Repeat from * to ** until there are only 5 sts left before the center ch1. Ch1, sk 1 st, dc in next 4 sts. (Dc, ch1, dc) in ch1 sp, dc in next 4 sts. Repeat from * to ** again until there are only 5 sts left unworked. Ch1, sk 1 st, dc in next 2 sts, dc2tog over last 2 sts. Turn. – 90 (102, 108, 114, 120, 126, 132, 138) st + center ch1
Sizes 6, 10, & 14:
Ch2, dc in next st (counts as dc2tog). Dc in next 5 sts. *Ch1, sk 1 st, dc in next 5 sts. ** Repeat from * to ** until there are only 5 sts left before the center ch1. Ch1, sk 1 st, dc in next 4 sts. (Dc, ch1, dc) in ch1 sp, dc in next 4 sts. Repeat from * to ** again until there are only 2 sts left unworked. Dc2tog over last 2 sts. Turn. – 90 (102, 108, 114, 120, 126, 132, 138) st + center ch1
Once you have finished row 13, you will repeat rows 4 – 13 until you have worked the same amount of rows as you worked in Section 1. For example, if you worked 9 rows in Section 1, you will work 9 of the rows above. If you worked 10 rows in Section 1, you will work 10 rows. Do not bind off. Do not turn at the end of your last row.
Section 5 – Join & Work in the Round
Next we will join to the first stitch of the last row we just worked. Fold your project in half widthwise as in Figure 2. Ss to the first stitch of your last row and pull it tight (I do this to avoid a gap) as in Figure 3. Turn. We will now be working in the round. Begin with the round after the row you last worked in Section 4. If you just finished Section 4, row 9, you will now begin at round 10 below. If you just finished Section 4, row 10, you will begin at round 11 below.
4. Ch2. Beginning in next st, dc2tog. Dc in each st and ch sp around to center ch1. (Dc, ch1, dc) in ch1 sp. Dc in each st and ch sp around until all sts are worked. Ss to join to 1st st. Turn. – 90 (102, 108, 114, 120, 126, 132, 138) st + center ch1
5. Ch2. Beginning in next st, dc2tog. Dc in each st around to center ch1. (Dc, ch1, dc) in ch1 sp. Dc in each st around until all sts are worked. Ss to join to 1st st. Turn. – 90 (102, 108, 114, 120, 126, 132, 138) st + center ch1
6. Ch1. Beginning in next st, hdc2tog. Hdc in each st around to center ch1. (Hdc, ch1 hdc) in ch1 sp. Hdc in each st around until all sts are worked. Ss to join to 1st st. Turn. – 90 (102, 108, 114, 120, 126, 132, 138) st + center ch1
7. Working this row in the BLO: Ch1. Beginning in next st, hdc2tog. Hdc in each st around to center ch1. (Hdc, ch1 hdc) in ch1 sp. Hdc in each st around until all sts are worked. Ss to join to 1st st. Turn. – 90 (102, 108, 114, 120, 126, 132, 138) st + center ch1
8. Work this row according to your size.
Sizes 2, 4, 8, 12, & 16:
Ch3, dc in next st. *Sk 2 sts, Vst in next st. Sk 2 sts, 3dc in next st. ** Repeat from * to ** until there are only 2 sts left before the center ch1. Sk 2 sts, (2dc, ch1, 2dc) in ch1 sp. *Sk 2 sts, 3dc in next st. Sk 2 sts, Vst in next st. ** Repeat from * to ** until there are only 2 sts left unworked. Sk 2 sts, ss to join to 1st st. Turn. – 90 (102, 108, 114, 120, 126, 132, 138) st + center ch1
Sizes 6, 10, & 14:
Ch3, dc in next st. Sk 2 sts, 3dc in next st. *Sk 2 st, Vst in next st. Sk 2 st, 3dc in next st. ** Repeat from * to ** until there are only 2 sts left before the center ch1. Sk 2 sts, (2dc, ch1, 2dc) in ch1 sp. *Sk 2 sts, 3dc in next st. Sk 2 sts, Vst in next st. **Repeat from * to ** until there are only 2 sts left unworked. Sk 2 sts, ss to join to 1st st. Turn. – 90 (102, 108, 114, 120, 126, 132, 138) st + center ch1
9. Work this row according to your size.
Sizes 2, 4, 8, 12, & 16:
Ch2, sk 1 st, 3dc in next ch1 sp. Sk 2 sts, Vst in next st. *Sk 2 sts, 3dc in next ch1 sp. Sk 2 sts, Vst in next st. ** Repeat from * to ** until there are only 3 sts left before the center ch1. Sk 2 sts, dc in next st. (2dc, ch1, 2dc) in ch1 sp, dc in next st. Sk 2 sts, Vst in next st. Repeat from * to ** again until there are only 5 sts left unworked. Sk 2 sts, 2dc in ch1 sp. Work dc2tog over same ch1 sp and last st. Ss to join to 1st st. Turn. – 90 (102, 108, 114, 120, 126, 132, 138) st + center ch1
Instructions for last st: Yo, insert your hook in the same ch1 sp you just worked, pull up a loop. Yo, pull through 2 loops. Yo, sk 1 st, insert your hook into last st, pull up a loop. Yo, pull through 2 loops. Yo, pull through last 3 loops.
Sizes 6, 10, & 14:
Ch2, sk 1 st, Vst in next st. *Sk 2 sts, 3dc in next ch1 sp. Sk 2 sts, Vst in next st. ** Repeat from * to ** until there are 3 sts left before the center ch1. Sk 2 sts, dc in next st, (2dc, ch1, 2dc) in center ch1, dc in next st. *Sk 2 sts, Vst in next st. Sk 2 sts, 3dc in next ch1 sp. ** Repeat from * to ** until there are only 5 sts left unworked. Sk 2 sts, dc in next st, ch1, work dc2tog over same st and last st. Ss to join to 1st st. Turn. – 90 (102, 108, 114, 120, 126, 132, 138) st + center ch1
Instructions for last st: Yo, insert your hook in the same st you just worked, pull up a loop. Yo, pull through 2 loops. Yo, sk 1 st, insert your hook into last st, pull up a loop. Yo, pull through 2 loops. Yo, pull through last 3 loops.
10. Ch1. Beginning in next st, hdc2tog. Hdc in each st around to center ch1. (Hdc, ch1 hdc) in ch1 sp. Hdc in each st around until all sts are worked. Ss to join to 1st st. Turn. – 90 (102, 108, 114, 120, 126, 132, 138) st + center ch1
11. Working this row in the BLO: Ch2. Beginning in next st, dc2tog. Dc in each st around to center ch1. (Dc, ch1, dc) in ch1 sp. Dc in each st around until all sts are worked. Ss to join to 1st st. Turn. – 90 (102, 108, 114, 120, 126, 132, 138) st + center ch1
12. (Wrong Side) Ch2. Beginning in next st, dc2tog. Dc in each st around to center ch1. (Dc, ch1, dc) in ch1 sp. Dc in each st around until all sts are worked. Ss to join to 1st st. Turn. – 90 (102, 108, 114, 120, 126, 132, 138) st + center ch1
13. (Right Side) Work this row according to your size.
Sizes 2, 4, 8, 12, & 16:
Ch2. Beginning in next st, dc2tog. Dc in next 2 sts. *Ch1, sk 1 st, dc in next 5 sts. ** Repeat from * to ** until there are only 5 sts left before the center ch1. Ch1, sk 1 st, dc in next 4 sts. (Dc, ch1, dc) in ch1 sp, dc in next 4 sts. Repeat from * to ** around until there are only 4 sts left unworked. Ch1, sk1 st, dc in last 3 sts. Ss to join to 1st st. Turn. – 90 (102, 108, 114, 120, 126, 132, 138) st + center ch1
Sizes 6, 10, & 14:
Ch2. Beginning in next st, dc2tog. Dc in next 5 sts. *Ch1, sk 1 st, dc in next 5 sts. ** Repeat from * to ** until there are only 5 sts left before the center ch1. Ch1, sk 1 st, dc in next 4 sts. (Dc, ch1, dc) in ch1 sp, dc in next 4 sts. Repeat from * to ** again until there is only 1 st left unworked. Dc in last st. Ss to join to 1st st. Turn. – 90 (102, 108, 114, 120, 126, 132, 138) st + center ch1
Once you have finished round 13, you will repeat rounds 4 – 13 until you have achieved your desired length, minus 2”. The edging can be worked from any round, but I find it looks best if you finish the above section with a round 6 or round 10 repeat. Do not bind off.
Section 6 – Bottom Trim
To make the ribbed bottom trim, we will be working short rows off of the last row worked in Section 5. I chose to work my short rows into the BLO of the body, but if you prefer, you can work into both loops. Remember, you will need to work the trim stitches into the BLO in order to get the ribbed effect. Turn your work so that the right side is facing you.
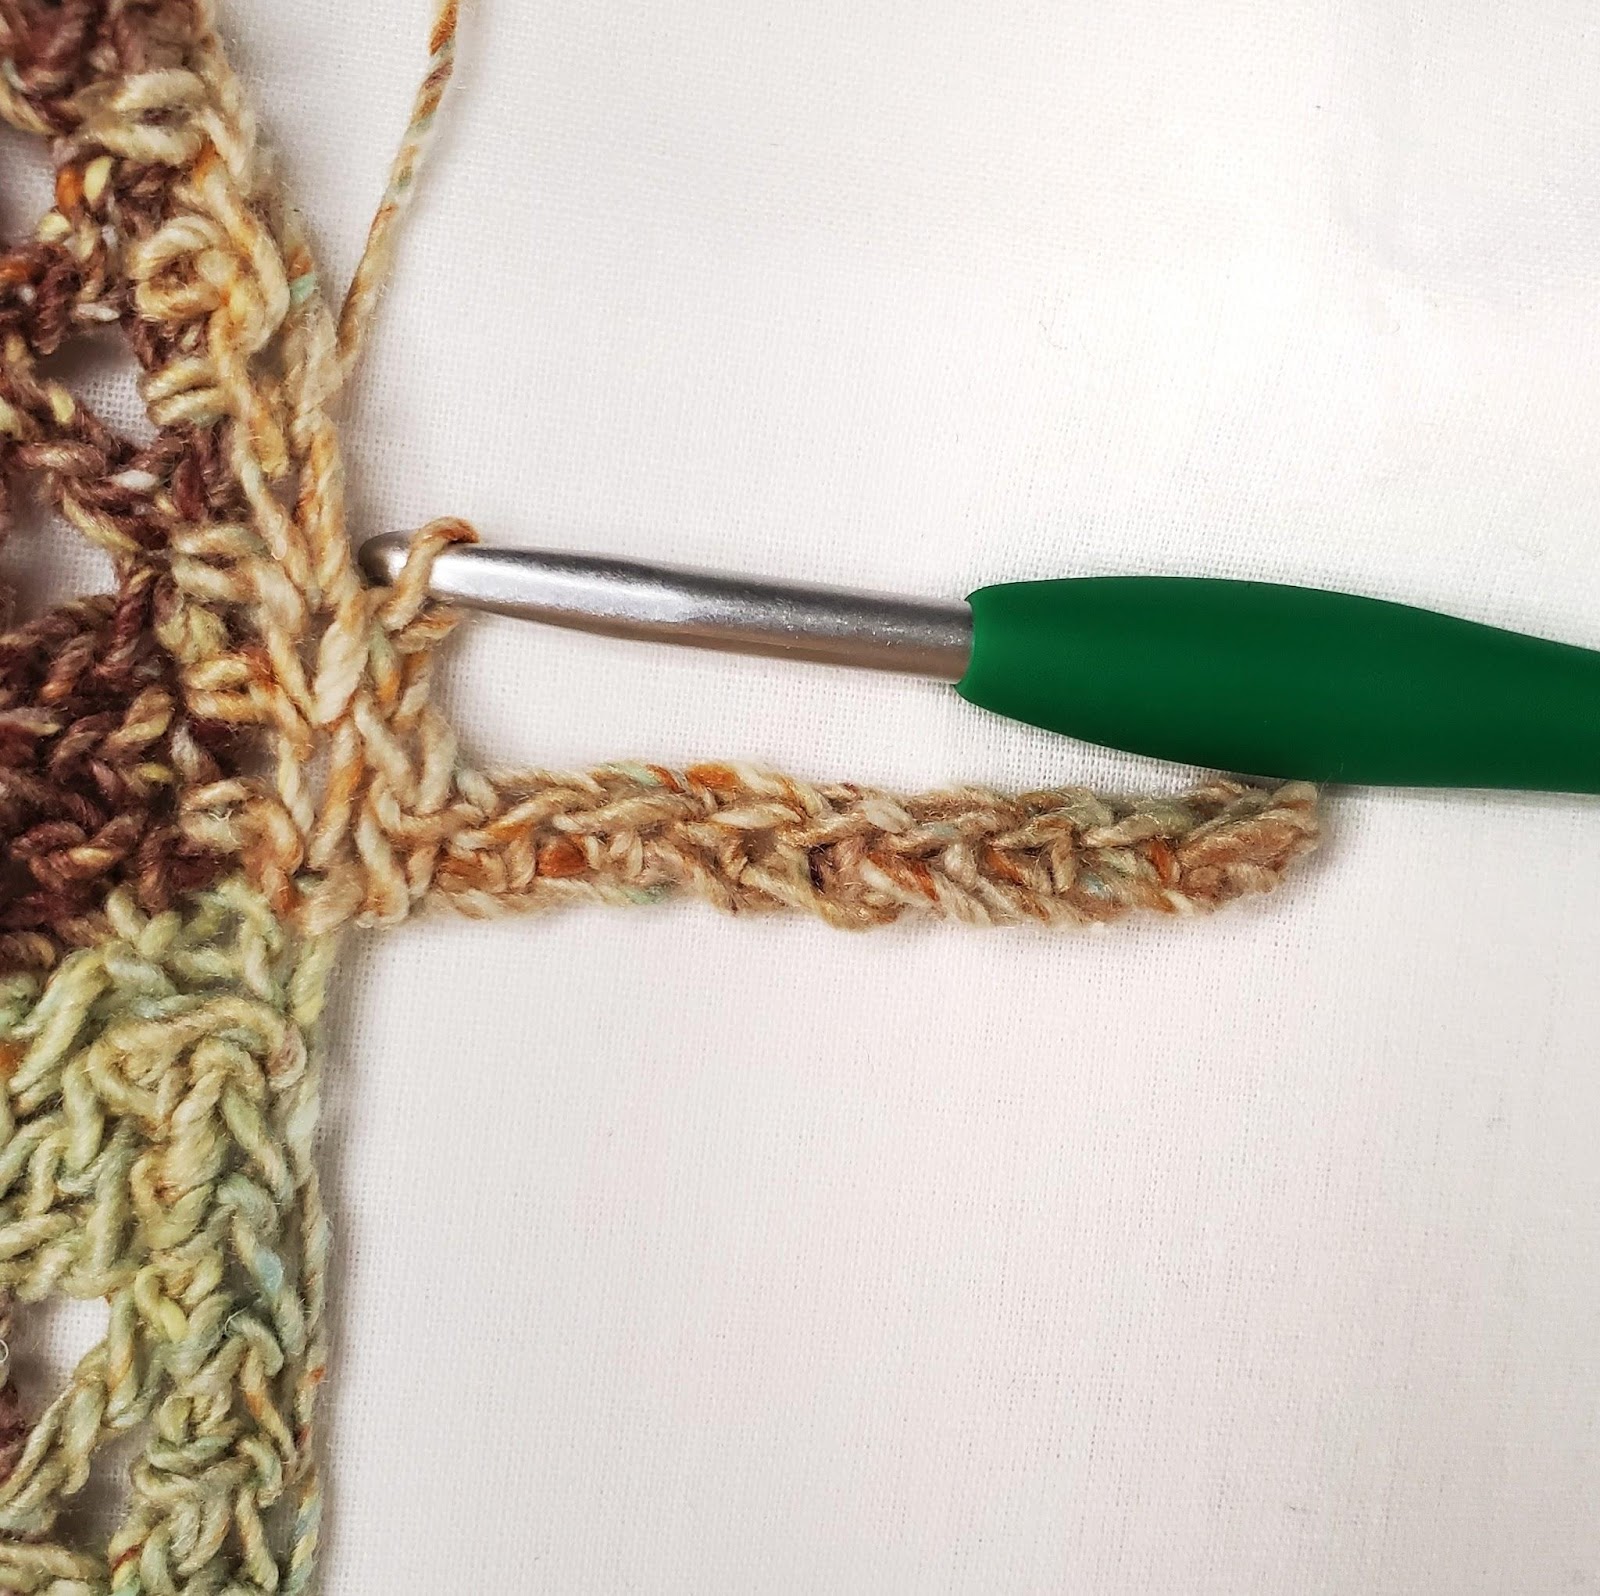
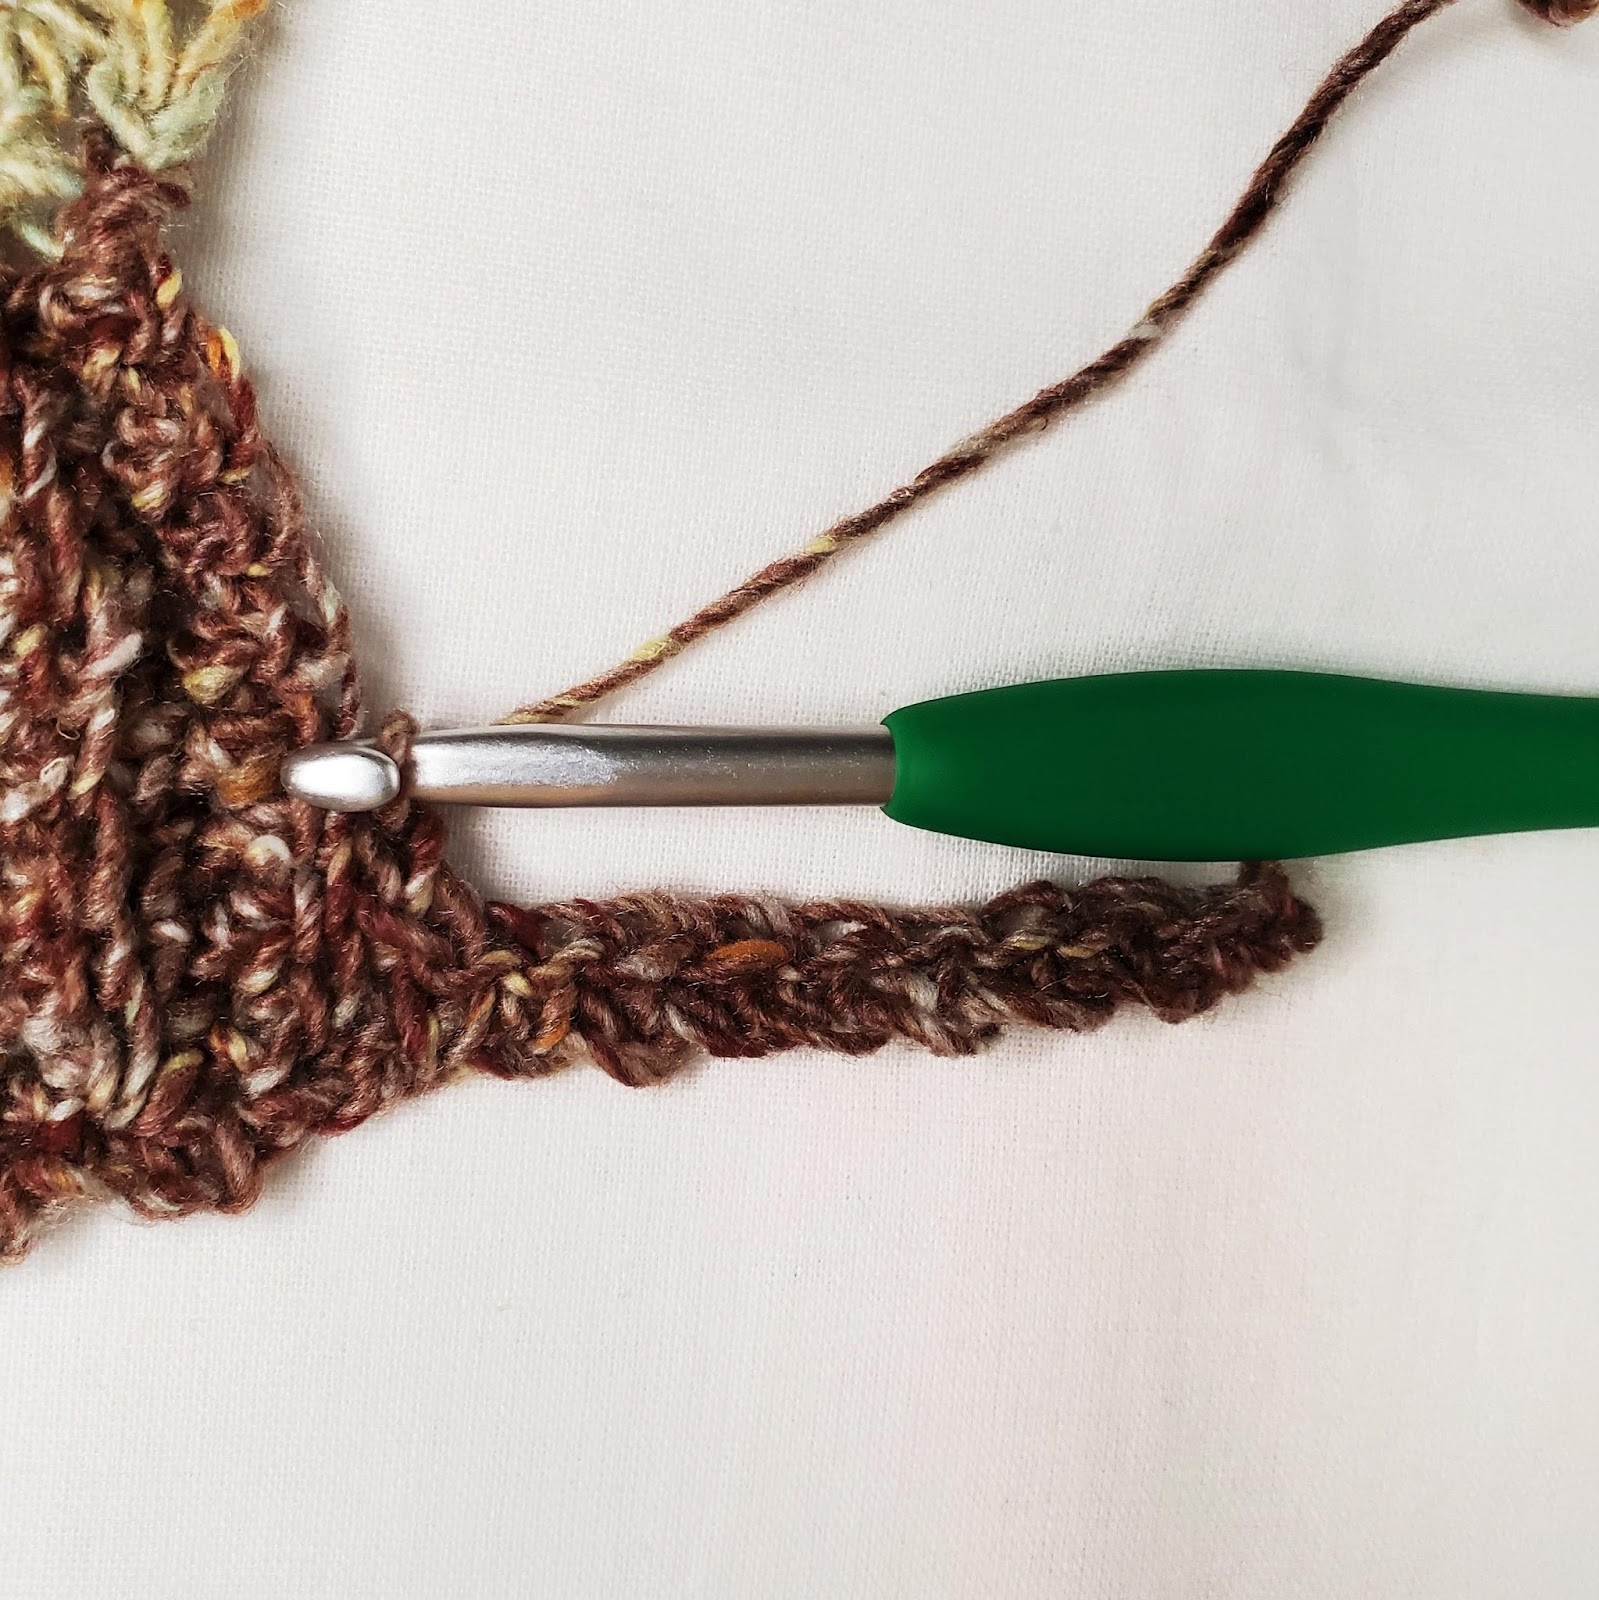
1. Ch10. (See Figure 4) Sc in 2nd ch from hook and each ch across. Ss into the BLO (optional) of next unworked st on body. Ss into the BLO (optional) of next unworked st on body. (See Figure 5) Turn. – 9 st
2. Sk 2 ss. Sc in BLO of next 8 sts. Sc in both loops of last st. (See Figure 6) Turn. – 9 st
3. Ch1. Sc in both loops of 1st st. Sc in BLO of next 8 sts. Ss into the BLO (optional) of next unworked st on body. Ss into the BLO (optional) of next unworked st on body. Turn. – 9 st
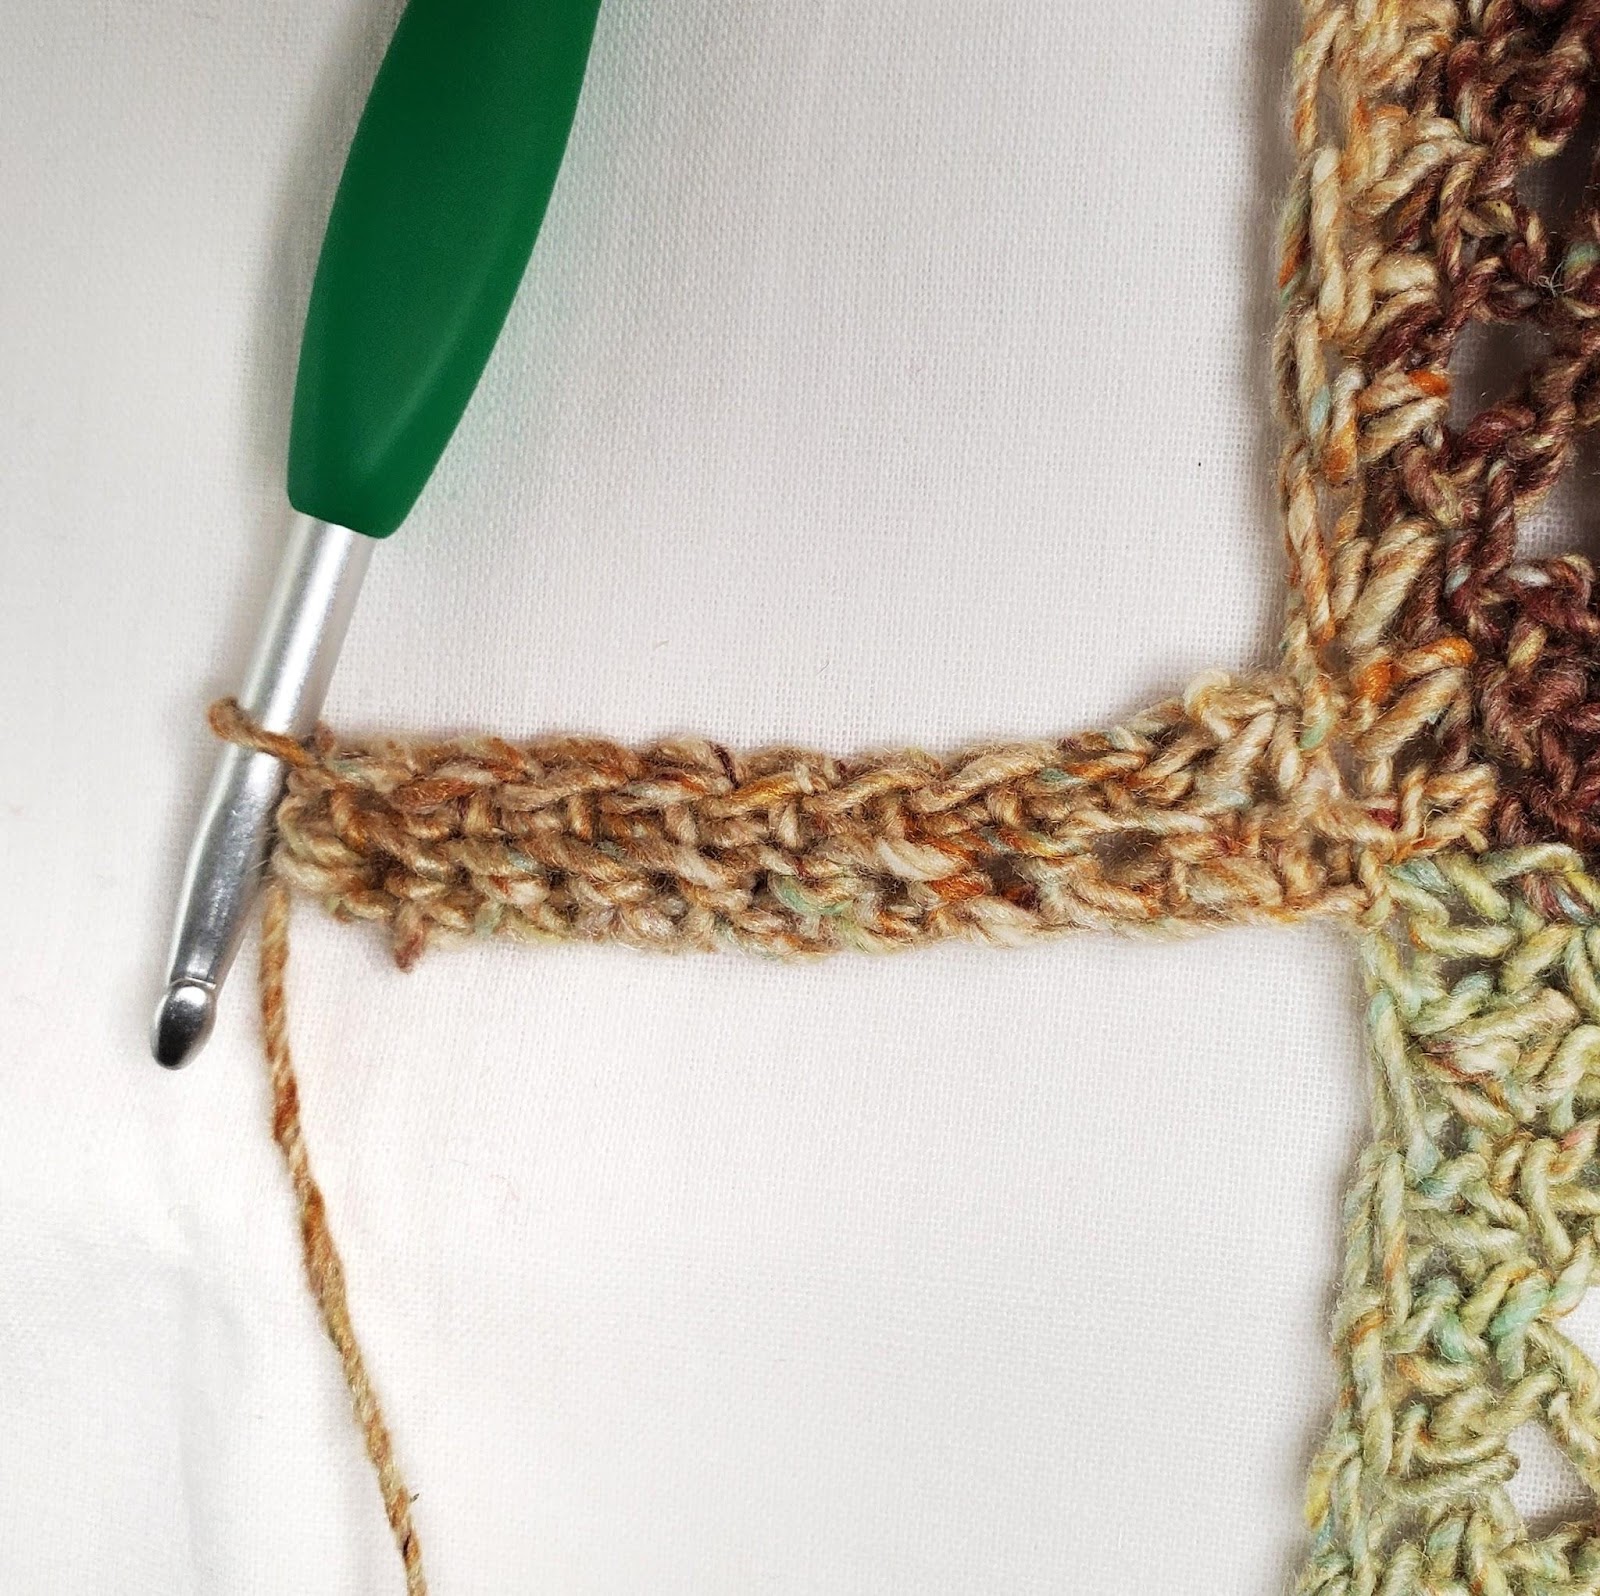
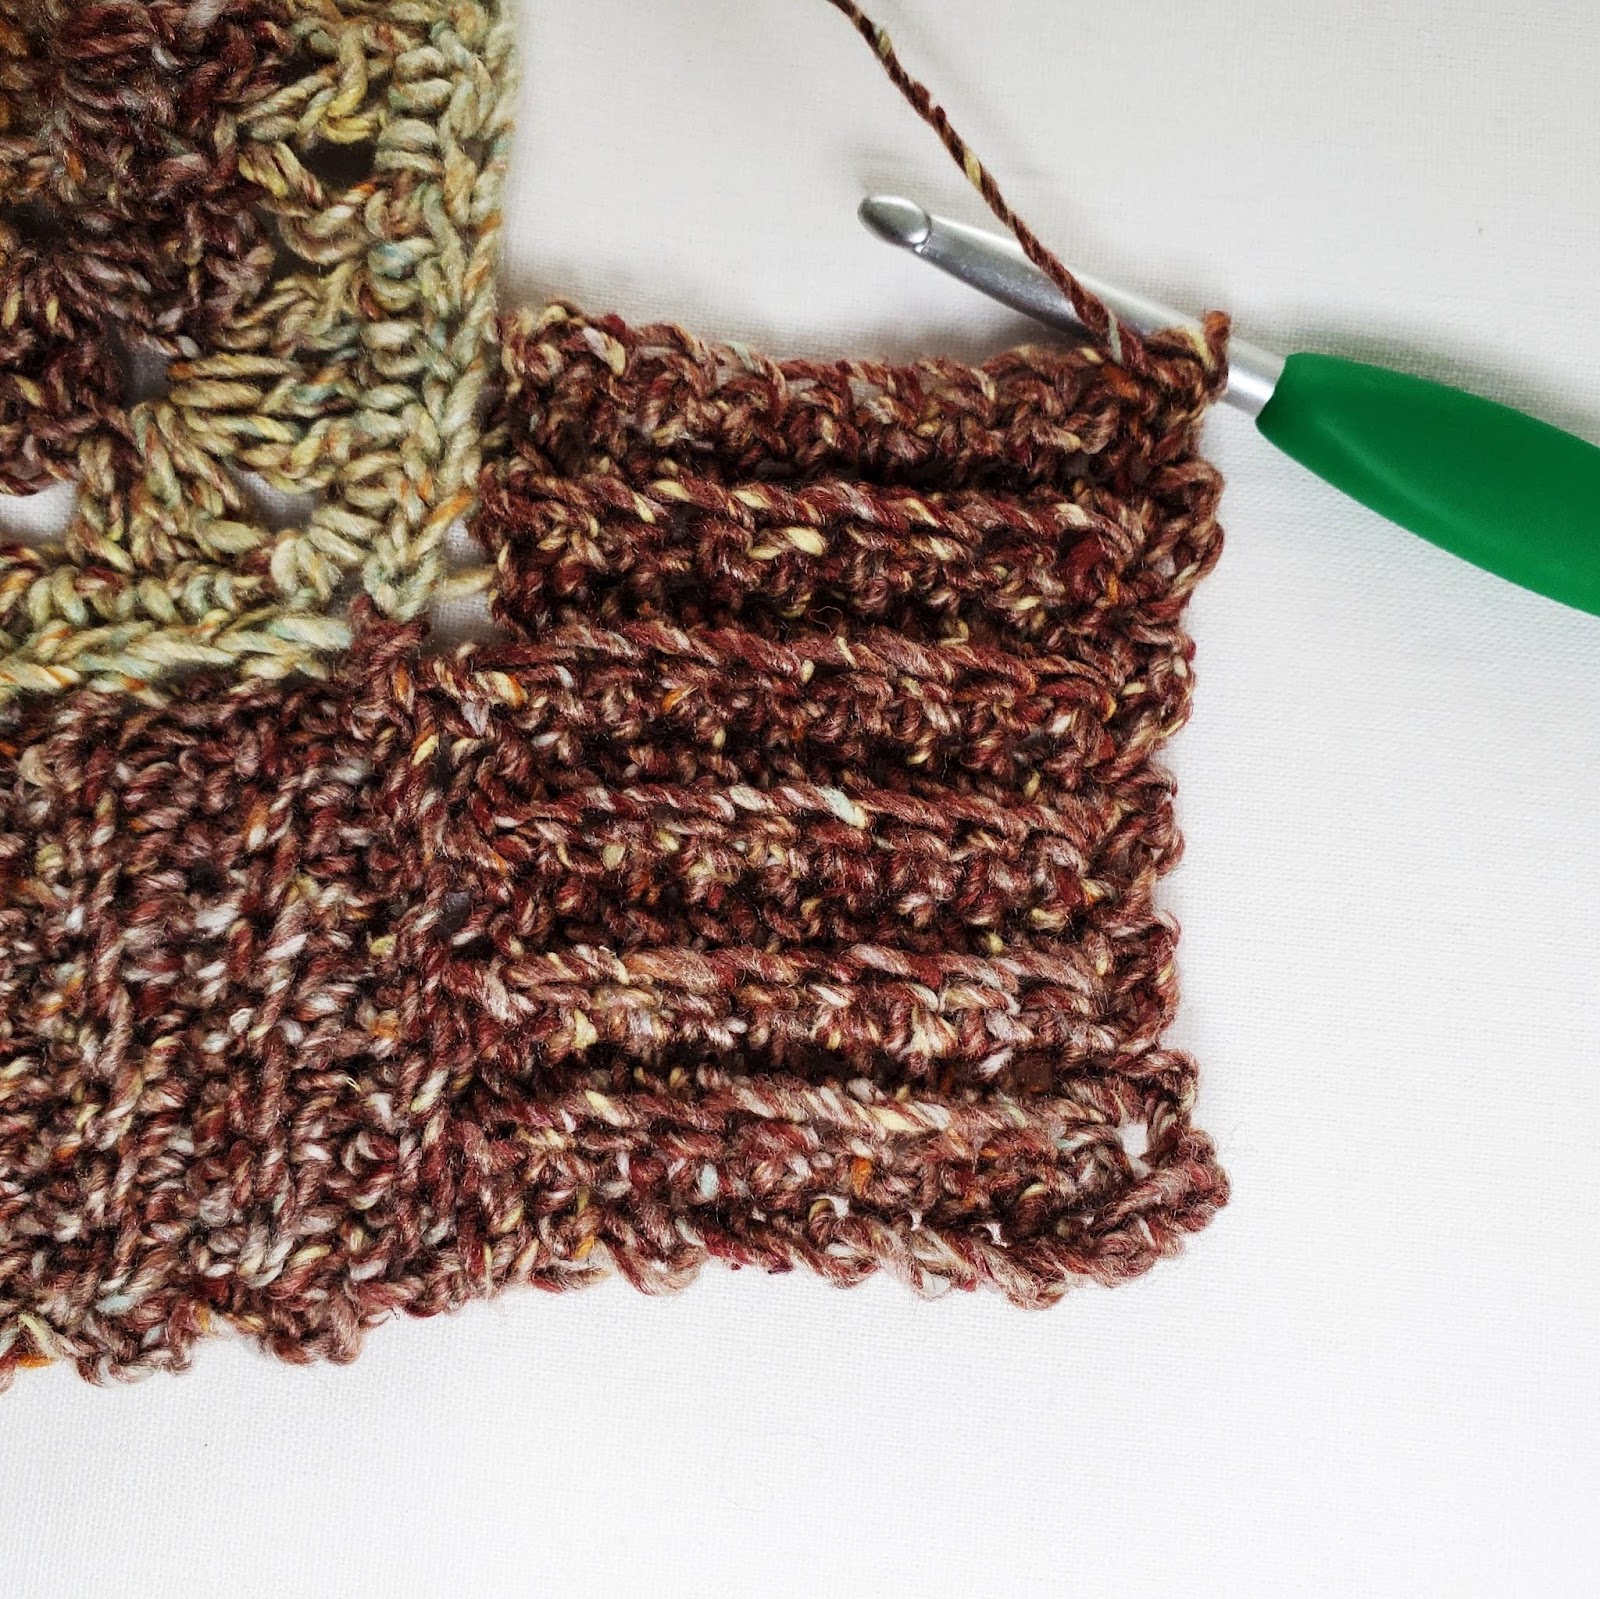
Repeat rows 2 and 3 until you have worked into every stitch up to the center ch1 and just finished a row 2 repeat. (See Figure 7)
1. Ch10. (See Figure 8) Sc in 2nd ch from hook and each ch across. Ss into the BLO of next st. Ss into the BLO of next st. (See Figure 9) Turn. – 9 st
2. Sk 2 ss. Sc in BLO of next 8 sts. Sc in both loops of last st. Turn. – 9 st
3. Ch1. Sc in both loops of 1st st. Sc in BLO of next 8 sts. Ss into the BLO of next st. Ss into the BLO of next st. Turn. – 9 st
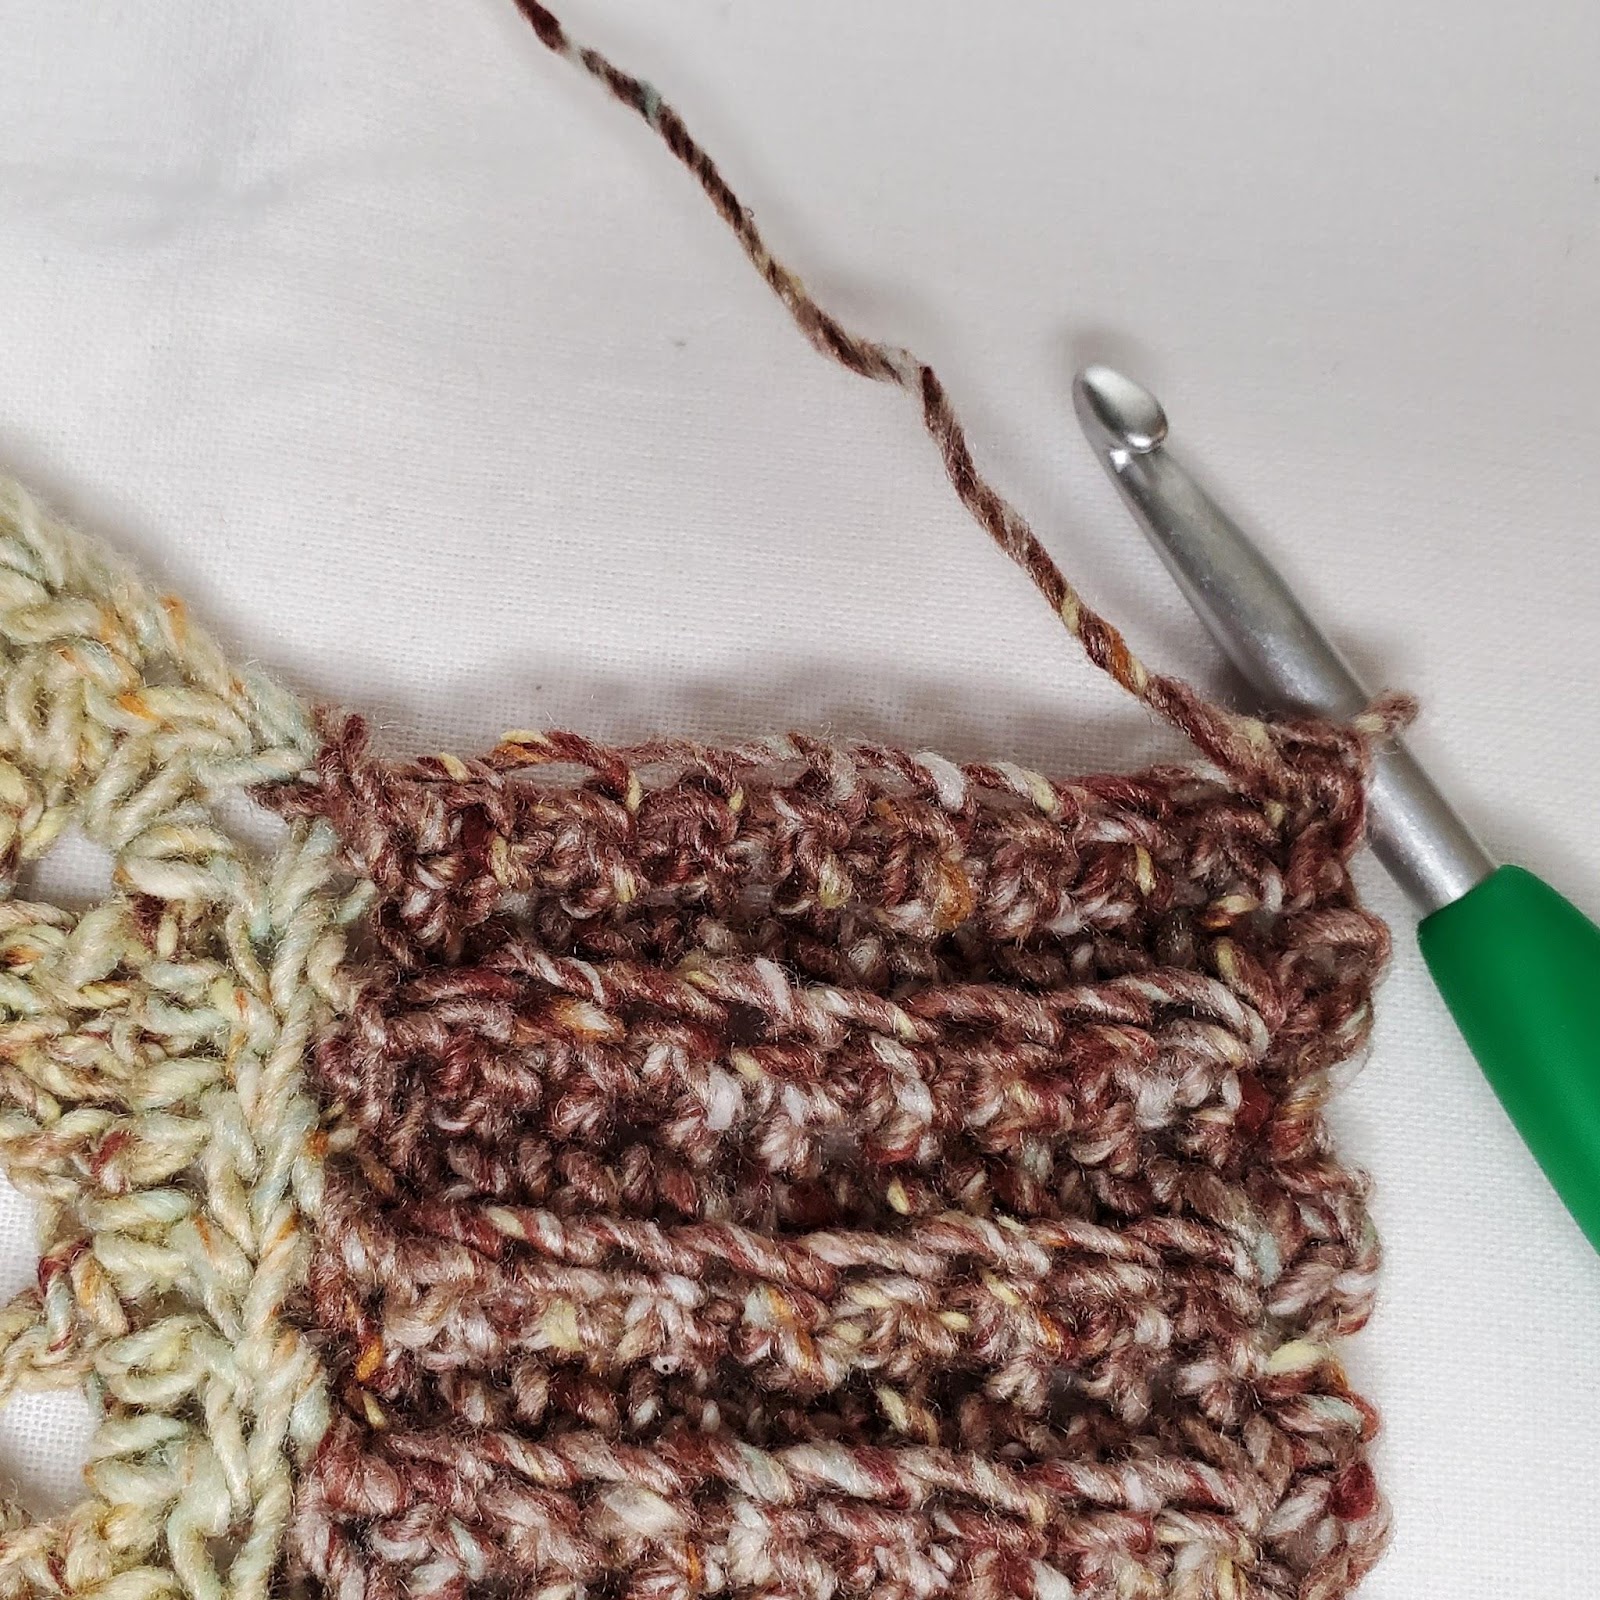
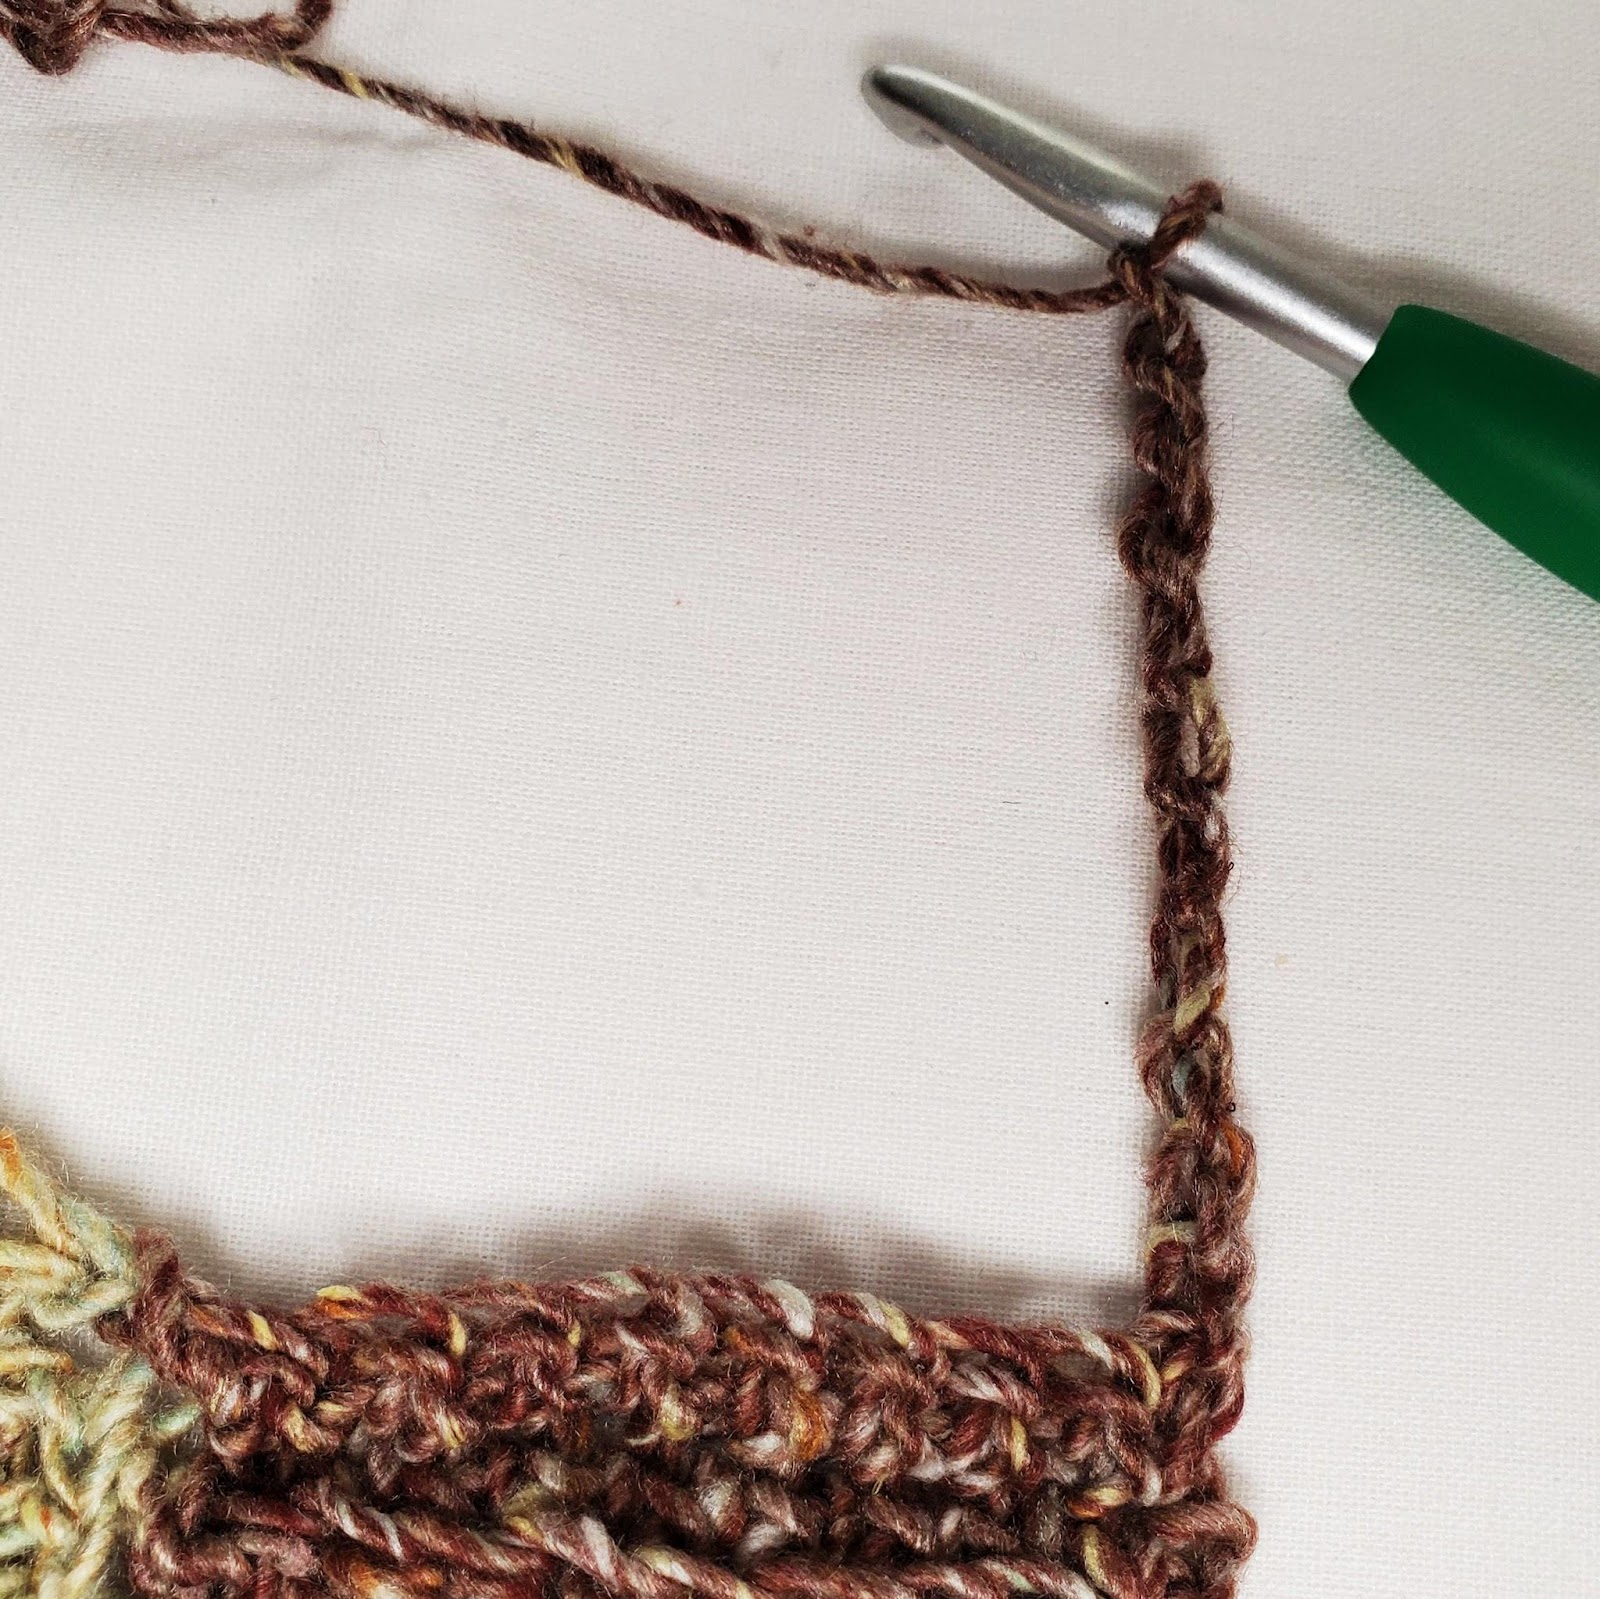
Repeat rows 2 & 3, first working into the side of the bottom edging, then into the ch1 sp, then into the body (see Figure 10 for an example of what your corner should look like), until you have made it all the way around to your first row of edging. You want to finish with a row 3 repeat. If there is an extra stitch, you can skip it. Turn your work so that the wrong side is facing you. Ss the ends of the bottom trim together, working through the BLO of your last row and the bottom bar of your first row. Bind off.
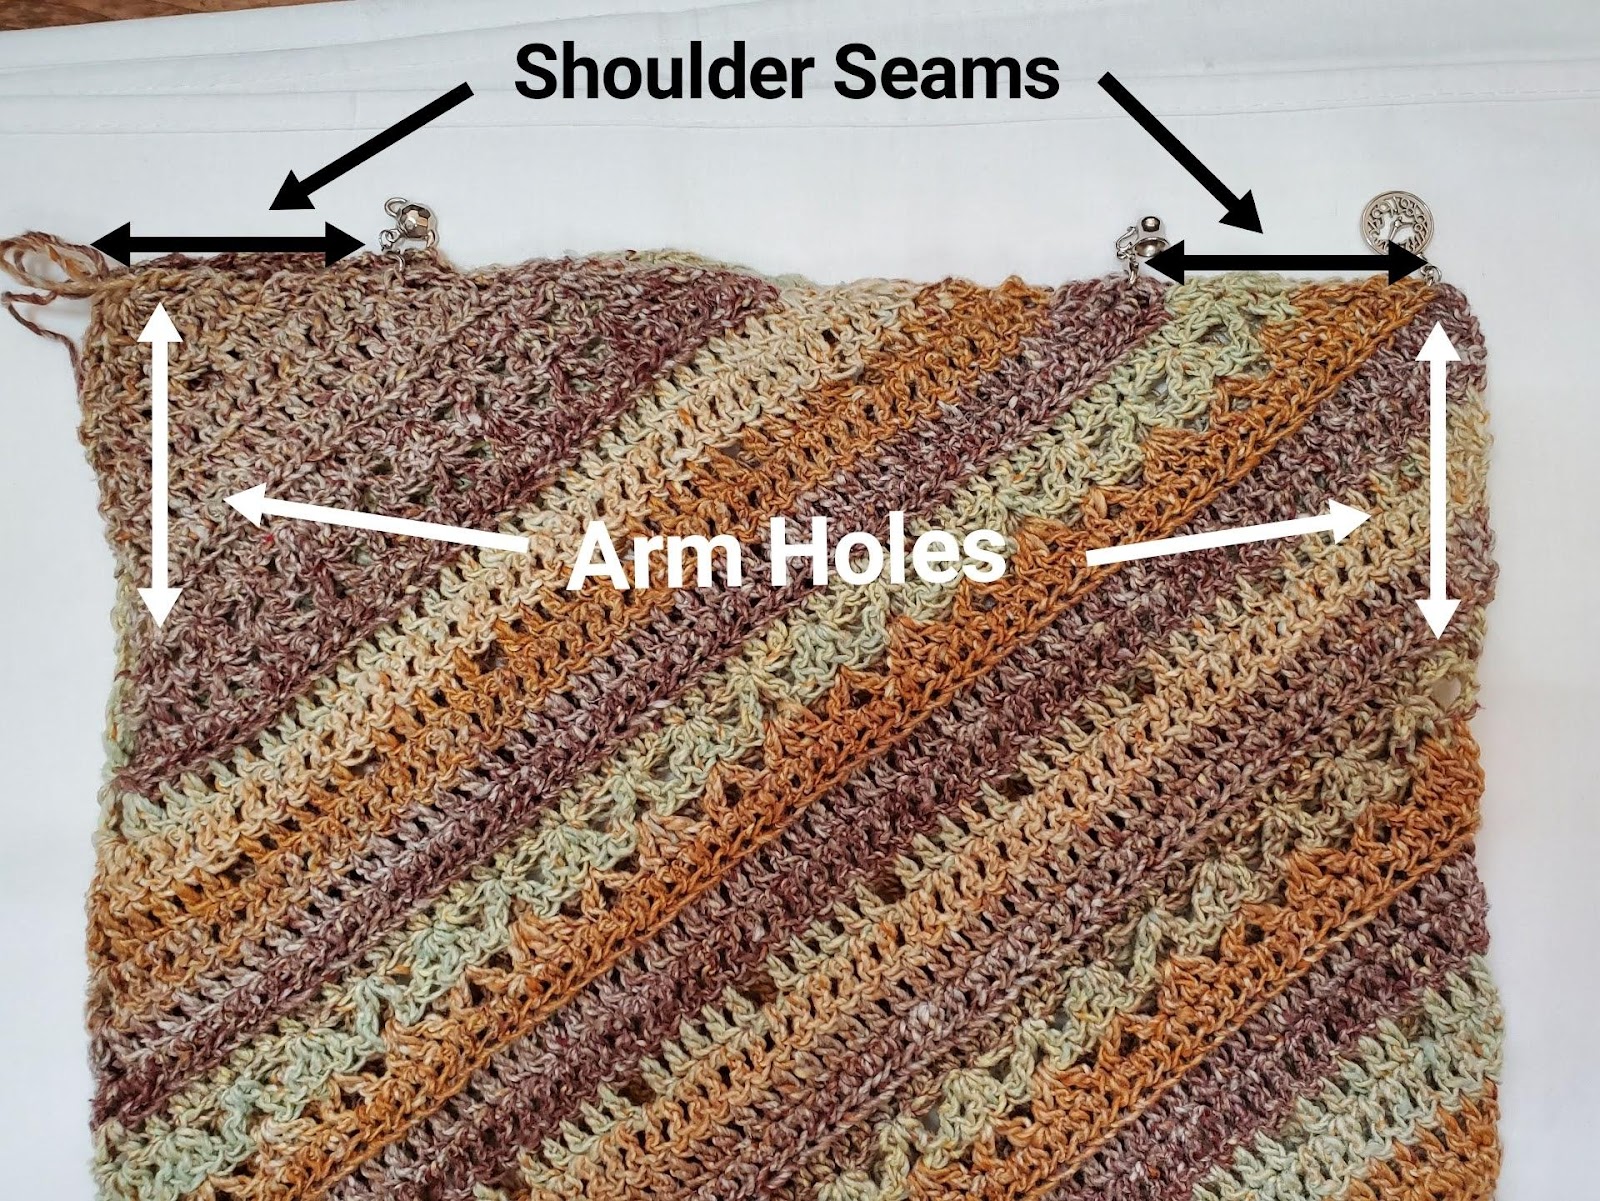
Section 7 – Shoulders & Neckline
The neckline is finished with a simple single crochet edge which means you can make the neck as wide or as narrow as you desire! I recommend that you use locking stitch markers to hold the shoulders closed, mark where you think your neckline should end, and then, try your sweater on to see if you like it. Once you have your neckline the size you want, sew the shoulders closed. When sewing my shoulders, I like to work from the outside in, so that I can easily adjust it if I change my mind. See figures 11 & 12 for reference.

Once you have sewn the shoulders, you can finish off the neckline. Join your yarn anywhere on the neck and work sc stitches into the side of each row around in the following manner:
– 2 sc in the side of each hdc.
– 2 sc in the side of each dc.
– 3 sc in the side of each tr.
Section 8 – Sleeves
I have written this pattern with four different options for sleeves (because you gotta have options!): a short sleeve, a 1/2 sleeve, a 3/4 sleeve, and a long straight sleeve. Instructions are given for the following sleeve circumferences: 10” (11 ½”, 13 ½”, 15”, 16 ½”, 18 ½”, 20”, 21 ½”, 23 ½”).
Sleeve
With the RS facing you, attach your yarn in the underarm.
1. Ch1. Work 36 (42, 48, 54, 60, 66, 72, 78, 84) sc around the arm hole. Ss to join to 1st st. Turn. – 36 (42, 48, 54, 60, 66, 72, 78, 84) st
2. Ch1. Hdc in 1st st and each st around. Ss to join to 1st st. Turn. – 36 (42, 48, 54, 60, 66, 72, 78, 84) st
3. Working this round into the BLO: Ch3. Dc in next st and each st around. Ss to join to 1st st. Turn. – 36 (42, 48, 54, 60, 66, 72, 78, 84) st
4. Ch3. Dc in next st and each st around. Ss to join to 1st st. Turn. – 36 (42, 48, 54, 60, 66, 72, 78, 84) st
5. Ch3. Dc in next 4 sts. *Ch1, sk 1 st, dc in next 5 sts. ** Repeat from * to ** around until only 1 st left unworked. Ch1, sk 1 st, ss to join to 1st st. Turn. – 36 (42, 48, 54, 60, 66, 72, 78, 84) st
6. Ch3. Dc in next ch sp and each st and ch sp around. Ss to join to 1st st. Turn. – 36 (42, 48, 54, 60, 66, 72, 78, 84) st
7. Ch3. Dc in next st and each st around. Ss to join to 1st st. Turn. – 36 (42, 48, 54, 60, 66, 72, 78, 84) st
8. Ch1. Hdc in 1st st and each st around. Ss to join to 1st st. Turn. – 36 (42, 48, 54, 60, 66, 72, 78, 84) st
Short Sleeve: Skip the rest of the rounds and proceed to the Cuff instructions below.
9. Working this round into the BLO: Ch1. Hdc in 1st st and each st around. Ss to join to 1st st. Turn. – 36 (42, 48, 54, 60, 66, 72, 78, 84) st
10. Ch3, 2dc in same st. Sk 2 sts, Vst in next st. *Sk 2 sts, 3dc in next st. Sk 2 sts, Vst in next st. Repeat from * to ** around until there are only 2 sts left unworked. Sk 2 sts, ss to join to 1st st. Ss to next st. Turn. – 36 (42, 48, 54, 60, 66, 72, 78, 84) st
11. Ch4, dc in 1st st (counts as Vst). Sk 2 sts, 3dc in next st. *Sk 2 sts, Vst in next st. Sk 2 sts, 3dc in next st. ** Repeat from * to ** around until there are only 2 sts left unworked. Sk 2 sts, ss to join to 1st st. Ss into next st. Turn. – 36 (42, 48, 54, 60, 66, 72, 78, 84) st
Repeat rounds 2 – 11 until you have achieved the desired length, minus 1 ½”. The cuff can be worked from any round, but I find it looks best if you finish the sleeve with a round 2 or round 8 repeat. Do not bind off.
Cuff
The sleeve cuff is worked in the same manner as the Bottom Trim. Make sure the RS of your work is facing you.
1. Ch6. Sc in 2nd ch from hook and each ch across. Ss into the BLO of next st. Ss into the BLO of next st. Turn. – 5 st
2. Sk 2 ss. Sc in BLO of next 4 sts. Sc in both loops of last st. Turn. – 5 st
3. Ch1. Sc in both loops of 1st st. Sc in BLO of next 4 sts. Ss into the BLO of next st. Ss into the BLO of next st. Turn. – 5 st
Repeat rows 2 & 3, until you have made it all the way around the sleeve to your first row of edging. You want to finish with a row 3 repeat. If there is an extra stitch, you can skip it. Turn your work so that the wrong side is facing you. Ss the ends of the bottom trim together, working through the BLO of your last row and the bottom bar of your first row. Bind off.
Weave in your ends, and you’re done!
I hope you love your new sweater, and I look forward to seeing all of your beautiful pictures on Ravelry!
If you’d like to know when I post new patterns and tutorials, head on over to my Facebook and Instagram and give me a like and a follow!
If you enjoyed The Tilted Tunic (Child/Youth) – Free Crochet Sweater Pattern, you may want to check out my other designs!
And until next time… Happy Hooking! 😉

Could you possibly do the tilted sweather in an adult size? Thx
Hi Sarah,
I actually have published the adult version already! You can find it here: https://ineeditcrochet.com/tilted-tunic-free-crochet-sweater-pattern/
Enjoy!
Sarah