
Hi everyone!
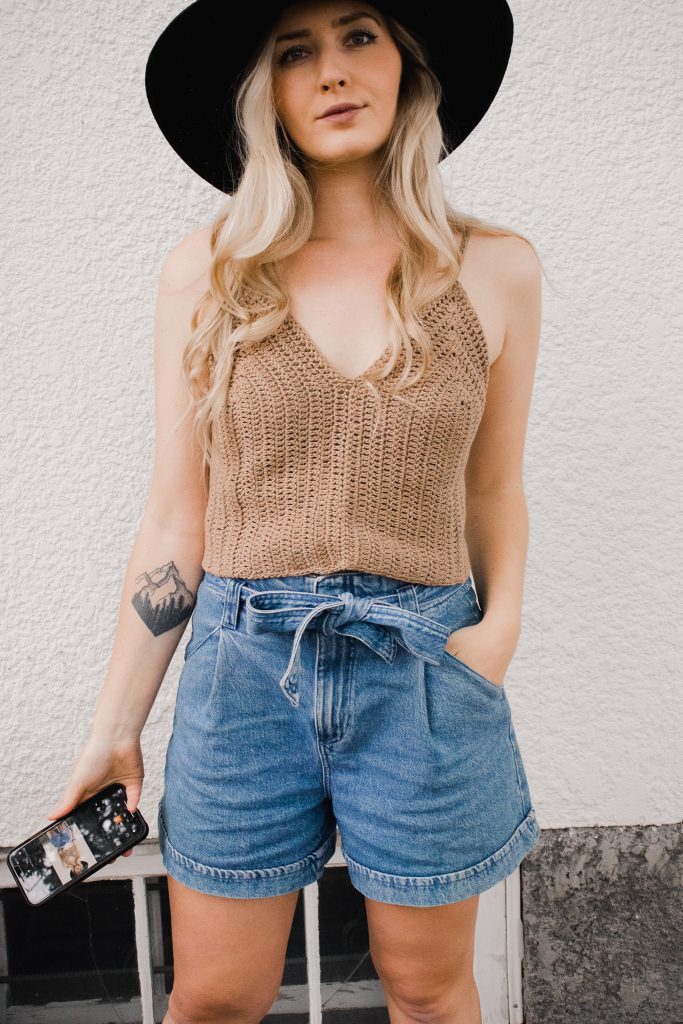
Today I’m sharing a brand new FREE tank top pattern using WeCrochet Cotlin DK, called the Chasing Summer Tank.
My favourite thing to make lately has been light, summer-friendly pieces, and this tank top is about as easy as it gets!
Before we begin, here are some quick links for you:
- Find the PDF version on Ravelry here, and on my website here, and on the WeCrochet website here.
- Add your finished project and view other completed projects on Ravelry here.
- Use the pattern hashtag #ChasingSummerTank on Instagram to show off your makes!
- Shop WeCrochet CotLin DK here!
- View my other WeCrochet CotLin Patterns: Goldstone Bralette; Wings of a Butterfly
- Shop my WeCrochet exclusive summer pattern bundle here (5 patterns for $9.99)
- For any questions about this pattern, please email knitsnknotswpg@gmail.com and I’ll get back to you asap!
Preorder my book – Modern Crochet Sweaters: 20 Chic Designs for Everyday Wear – here!
If you want to be notified of all new pattern releases (and get exclusive discounts on all new paid patterns), sign up below!
This post contains affiliate links. This means, should you make a purchase, I will receive a small portion of the sale at no extra cost to you. All opinions are my own. View my Privacy + Disclosures Policy here. This post is sponsored by We Crochet.


About
After a long winter of hunkering down with not much else to do, I’ve been so insanely excited for the summer to plant my garden. This is my first full summer living in my own house, with my own yard, and I have been dreaming of all the flowers and vegetables that I’m going to grow this year! Here in Winnipeg, we usually have to wait until the second last week of May to plant the garden because that’s usually around the last frost date. This year, we were able to plant a few weeks earlier because it was so hot out! I’ve just been impatiently waiting for hot weather – I live for the summertime! I named this tank top the “Chasing Summer Tank” because of this current season of my life.. I’m sure if you’re from a cold climate like me, you understand!
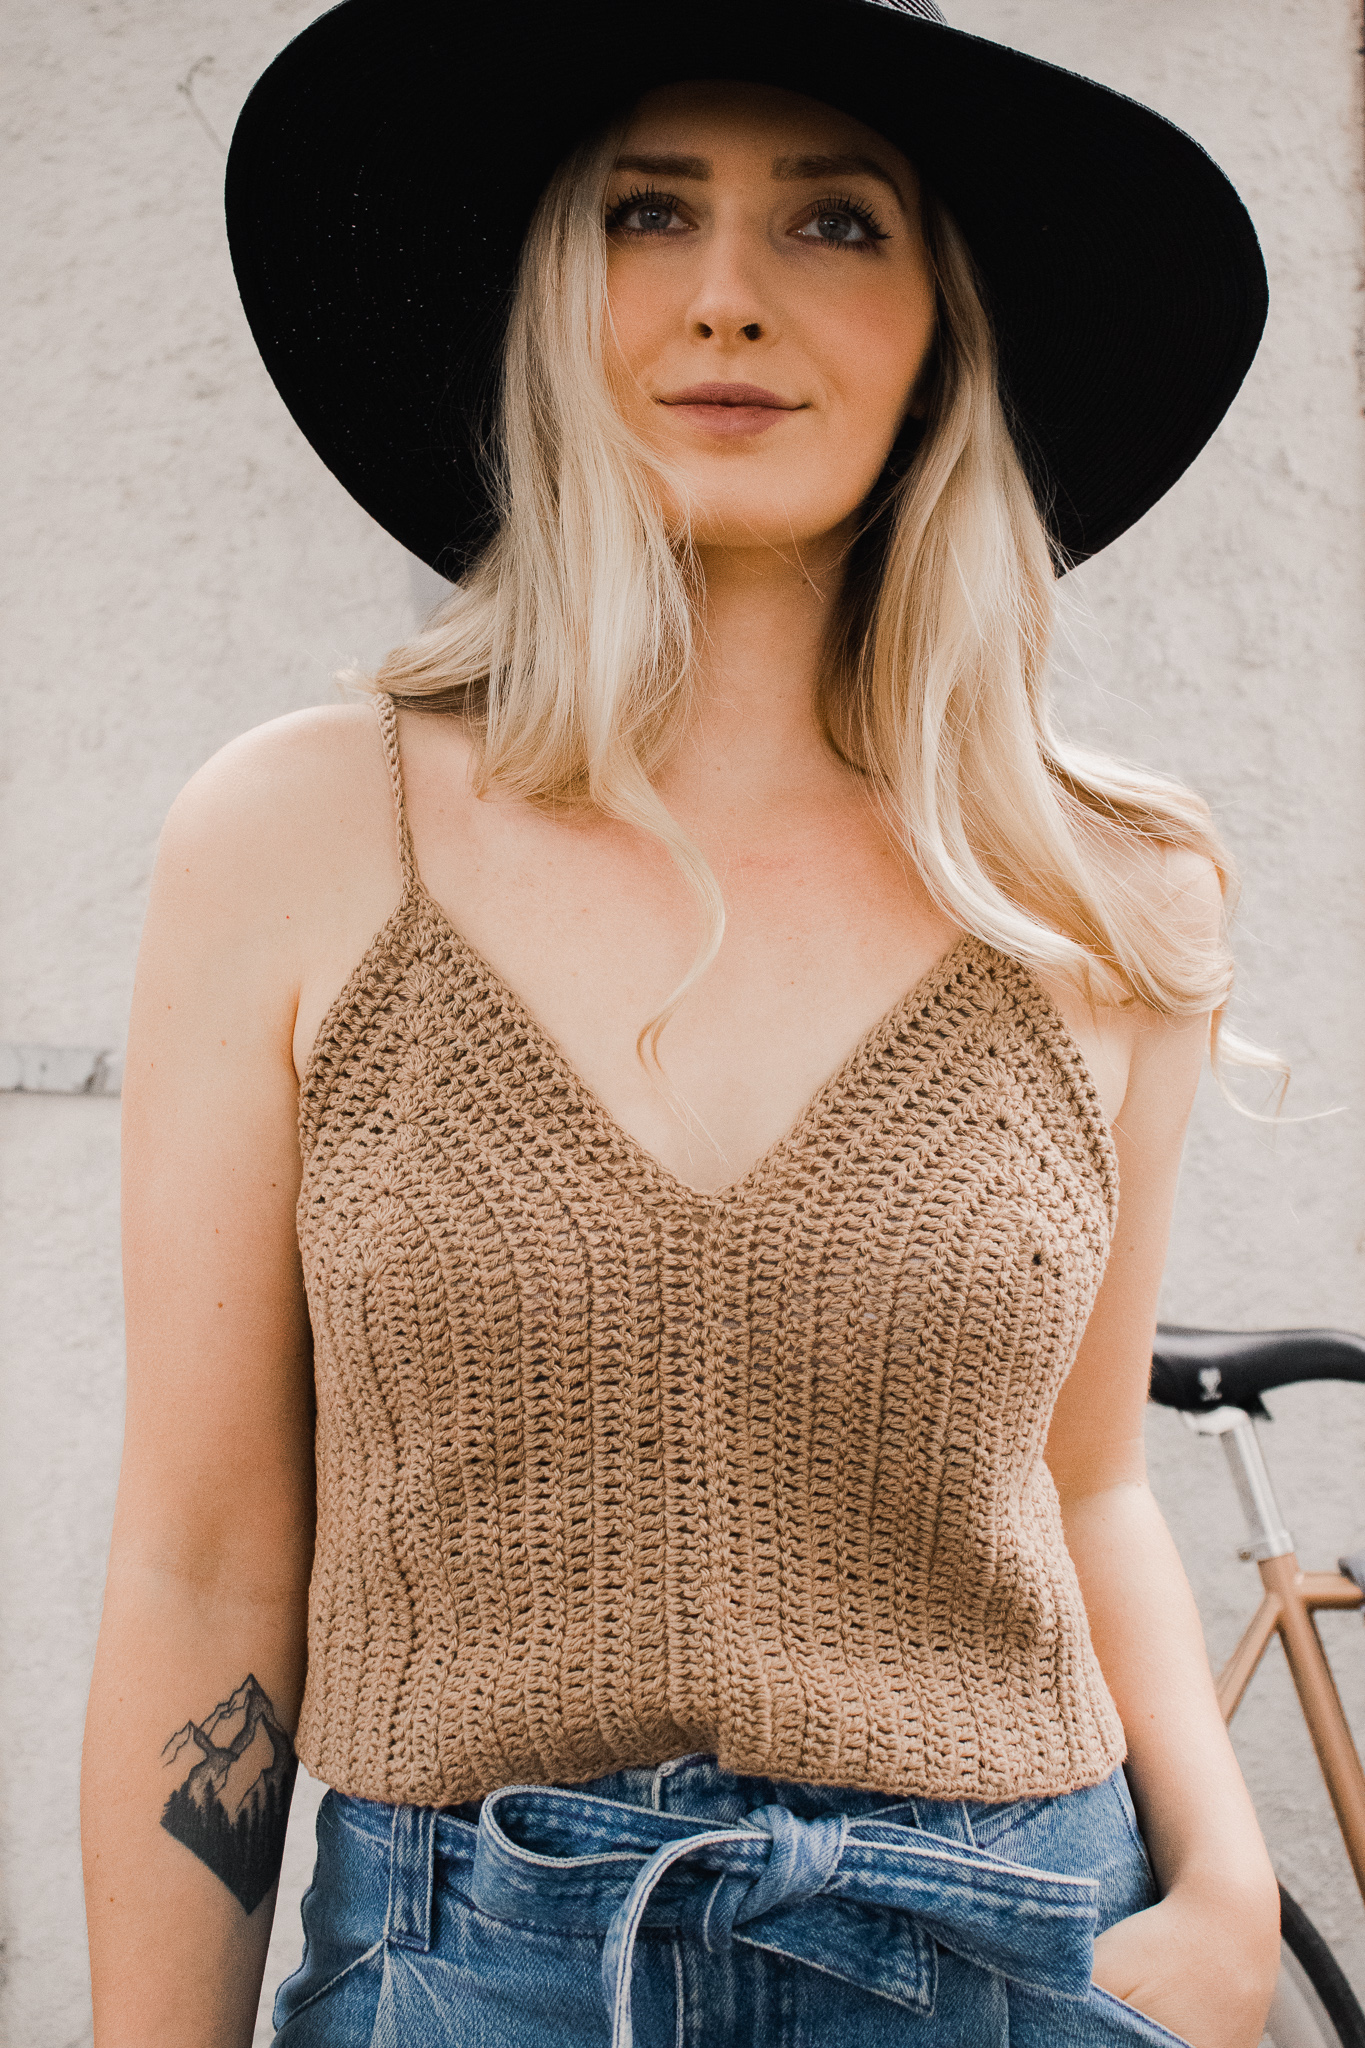
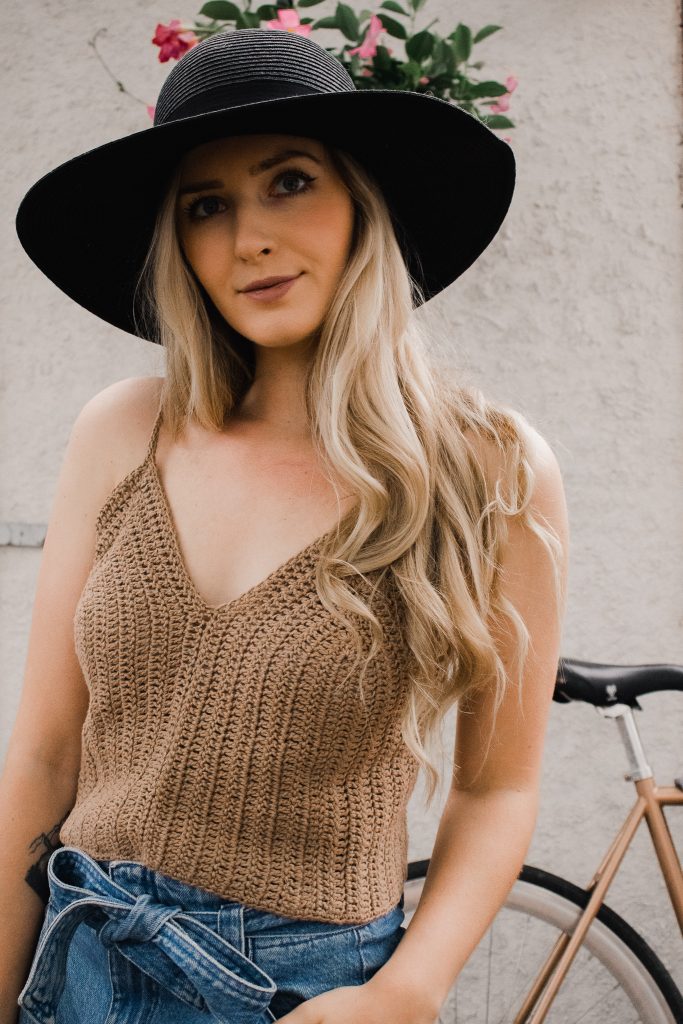
The Chasing Summer Tank is an extremely easy-to-crochet summer tank top with thin straps and vertical stitching. The stand-out feature of this piece is the thoughtful shaping around the chest which provides an incredible fit on any size. There are adjustable elements sprinkled throughout the pattern – see some modification ideas below – to create a top that perfectly suits your personal style. The beauty of the Chasing Summer Tank is the variety of unique pieces you can create from this one pattern simply by working some basic modifications.
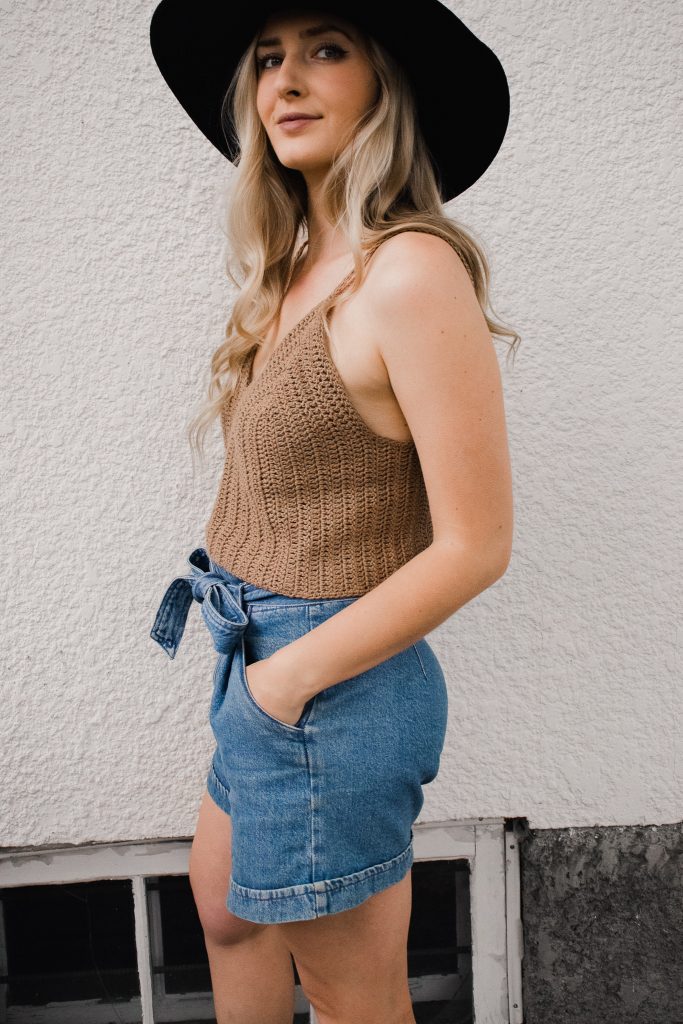
With the exception of the straps which are worked in the single crochet stitch, the majority of this top is worked in the double crochet stitch, making it a breeze to complete in a weekend (or even a day if you’re ambitious). The sideways construction creates the appearance of vertical lines running throughout the garment, creating a flattering fit and allowing the fabric to flow nicely during wear rather than looking bulky. Interestingly enough, the neckline is actually created from the seam of the two front panels. The first step of the pattern is to create two identical front panels, and then you’ll be instructed to seam them together to create the full front panel of your tank top. The higher you seam these panels, the higher the neckline will be, and the more your front panels will pull together. This is a way to avoid the straps sliding off your shoulders – by seaming the front panels a little closer together and pulling them inward. This is one unique thing about this pattern – you can finesse with this seam until you are happy with the way it lays on your body. Crocheted in a breezy, cotton-linen blend, CotLin provides a lovely drape that feels casual and effortless. Wear your Chasing Summer Tank all season long and enjoy the breathability of this yarn, the comfort of this relaxed fit, and the ease in which you can mix-and-match it with your existing wardrobe.
As for my yarn choice, I used some of my leftover CotLin from my Goldstone Bralette that was released last month! I initially ordered 10 skeins in the colour “Cashew”, and I still have a few skeins leftover to make a third pattern with it. CotLin is a cotton/linen blend with 40+ colour options that are really nicely saturated – you may notice that cotton yarns are often light and subtle. That’s how cotton usually dyes up, however; this yarn is comprised of a white kind of cotton called Tanguis Cotton allowing it to absorb dyes really well.
Sizing
This pattern is written in 9 sizes: XS (S, M, L, XL) (2X, 3X, 4X, 5X) to fit bust sizes 28-30 (32-34, 36-38, 40-42, 44-46) (48-50, 52-54, 56-58, 60-62)“. If you’re unsure which size you fall under, you can check out this sizing chart. For this pattern, if you’re in between sizes, size down.
See sizing chart below.
Materials
Yarn: DK–WeCrochet CotLin in Cashew
- 70% Tanguis Cotton, 30% Linen
- 123 yds [112 m] per 1.76-oz [50 g] skein
- Only $4.99 per skein
- Find this yarn on crochet.com
Yarn Substitution Notes: Substitute WeCrochet CotLin with any similar, DK weight yarn. Most fibers should work fine in place of CotLin, but for similar results to the sample shown, choose a cotton yarn. Many cotton yarns (like CotLin) are stretch-less and this provides nice drape to your finished top. Alternatively, if you want to make a form-fitting top with more negative ease, you might want to opt for a fiber some more bounce and memory. This will allow your top to stay taught to your body during wear.
A note on yarn weight: You can also choose a totally different yarn weight altogether and follow the pattern as it’s written, making sure to work the front panels to their specified width! Just make sure to take note of the measurements provided for you to ensure your top will have a fit that is similar to the sample shown.
Yardage: 2 (3, 3, 3, 4) (4, 5, 5, 6) skeins of CotLin or 225 (275, 300, 350, 400) (450, 500, 600, 675) yds [206 (252, 275, 321, 366) (412, 458, 549, 618) m] of a similar, DK weight yarn.
Hook: Size U.S. E/4 (3.5 mm) or size needed to obtain gauge
- I used the 3.5 mm hook from this set
Notions: Tapestry needle, several locking stitch markers
Gauge
4 x 4″ [10 x 10 cm] = 19 sts and 9 rows in Double Crochet
Abbreviations (US Terms)
ch: chain
dc: double crochet
dc2tog: double crochet 2 stitches together
FDC: foundation double crochet
PM: place marker
rep: repeat
sc: single crochet
sk: skip
sl st: slip stitch
st(s): stitch(es)
Pattern Notes
Sizing: This tank top is written in nine sizes as follows: XS (S, M, L, XL) (2X, 3X, 4X, 5X). Make sure to follow the numbers for your size only.
Stitch Counts: Stitch counts are listed after each row. If no stitch count is given, there has been no change since the previous row. If only one number is provided, it applies to all sizes.
Reversible: There is no right side or wrong side; both sides are identical. You choose which side to wear as the “right side.”
Seaming: When seaming your garment, make sure to keep all seams loose and do not pull tight in order to maintain some stretch, otherwise this seam will pucker during wear.
Turning Chain: The turning does not count as a stitch.
Construction: The front of this top is worked in two identical pieces that get seamed together along the center-front. After seaming these pieces together, the back panel is worked directly onto your front piece until reaching your desired circumference. You can follow the number of rows as instructed on the back piece to achieve the dimensions in the chart, or you can work fewer (or more) rows along the back in order to achieve your desired amount of ease.
Modification Suggestions
To make a top of any length: For a longer or shorter top, work a longer or shorter foundation chain when beginning the front panels. Work an identical stitch adjustment when beginning the back panel.
To make a top in any yarn weight: Using the corresponding hook to your chosen yarn, work a foundation chain that equals your approximate desired length from the center of the breast to the bottom of your tank top. Then, follow the pattern as it’s written, and stop working Row 2 repeats once your front panel equals the width provided in the chart for your size. Then, work the back panel until reaching your desired circumference.
To make a top with a different amount of ease (positive or negative): Instead of sizing up or sizing down, choose to follow the size that is true to your actual size. Follow the instructions for the front panel as they are written. Then, adjust the number of repeats when working the back panel in order to adjust your amount of ease. For more negative ease, work fewer Row 2 reps until reaching your desired circumference. For more positive ease, work more Row 2 reps until reaching your desired circumference.
Schematics

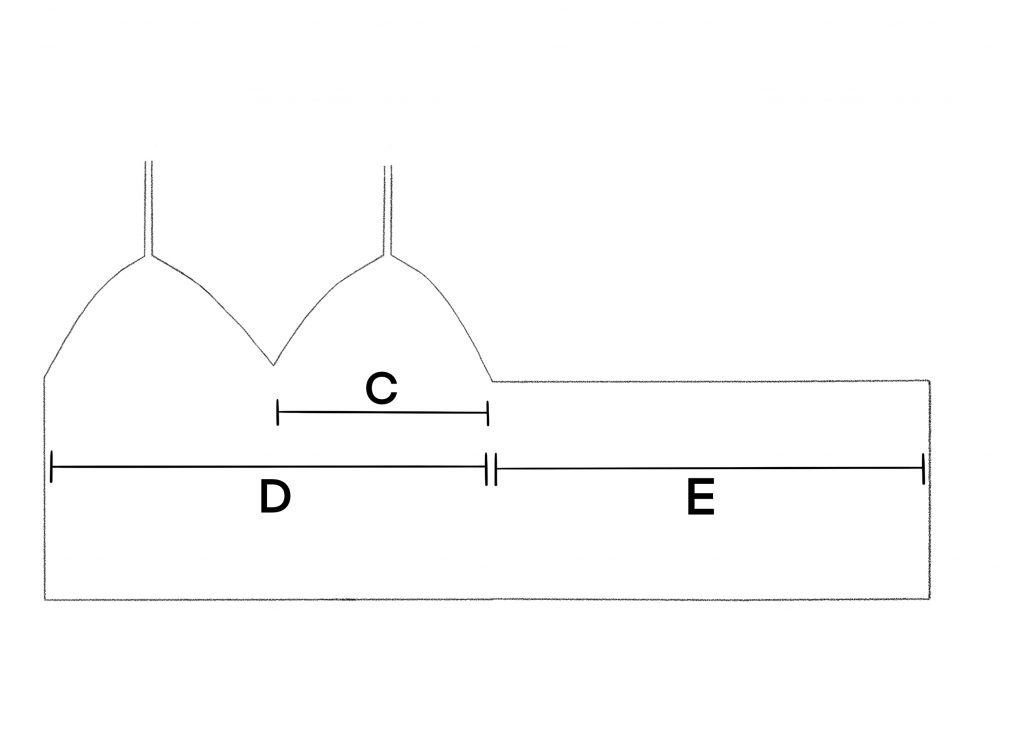
Measurements
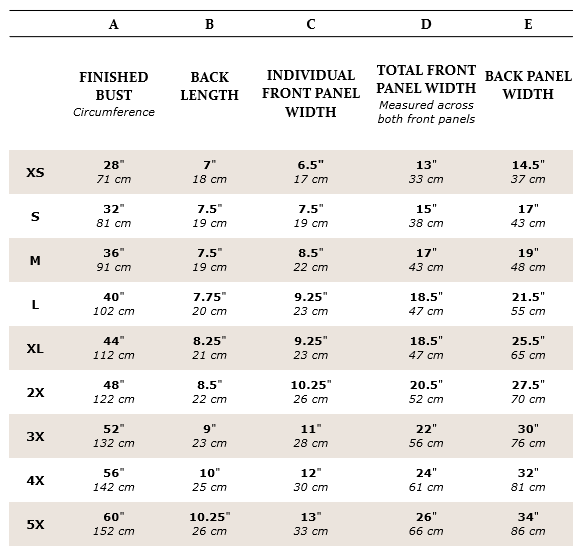
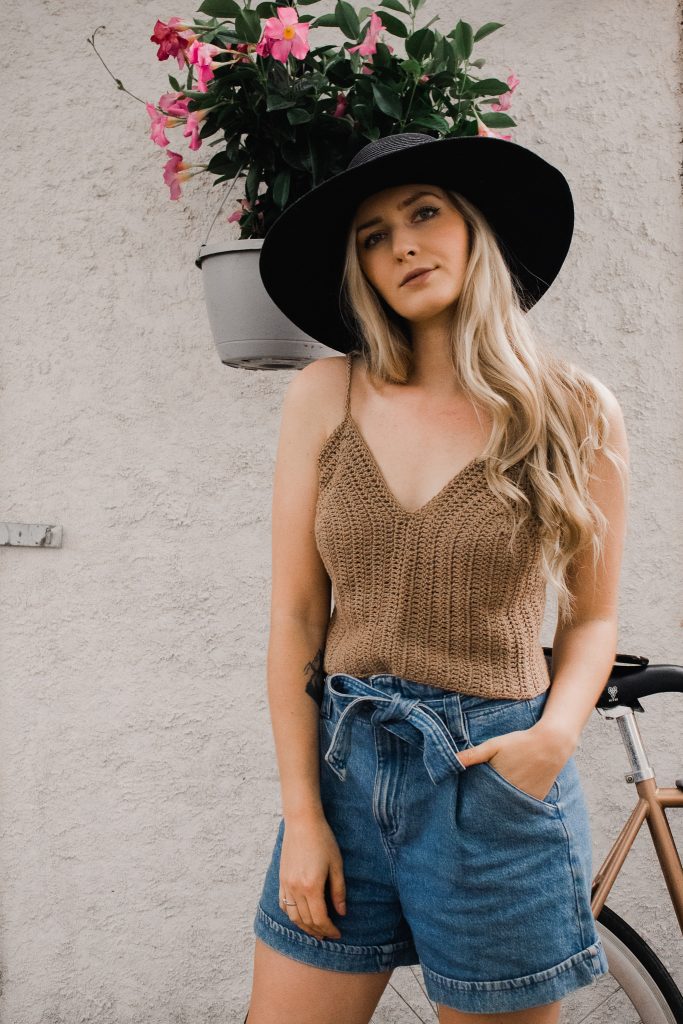
This chart shows the finished garment measurements. This top is designed to be worn with approximately 0 to 2 inches [0–5 cm] of negative ease. Find the finished bust measurement in this chart and choose a size that is up to 2 inches [5 cm] smaller than your actual bust measurement. For reference, the model has a 34-inch [86-cm] bust and is wearing a size small with a finished garment bust measurement of 32 inches [81 cm] with 2 inches [5 cm] of negative ease. If between sizes, size down. Note: When choosing a size, it’s best to choose your true size, and then adjust the ease by working additional or fewer rows to the back panel, rather than sizing up or down.
PATTERN
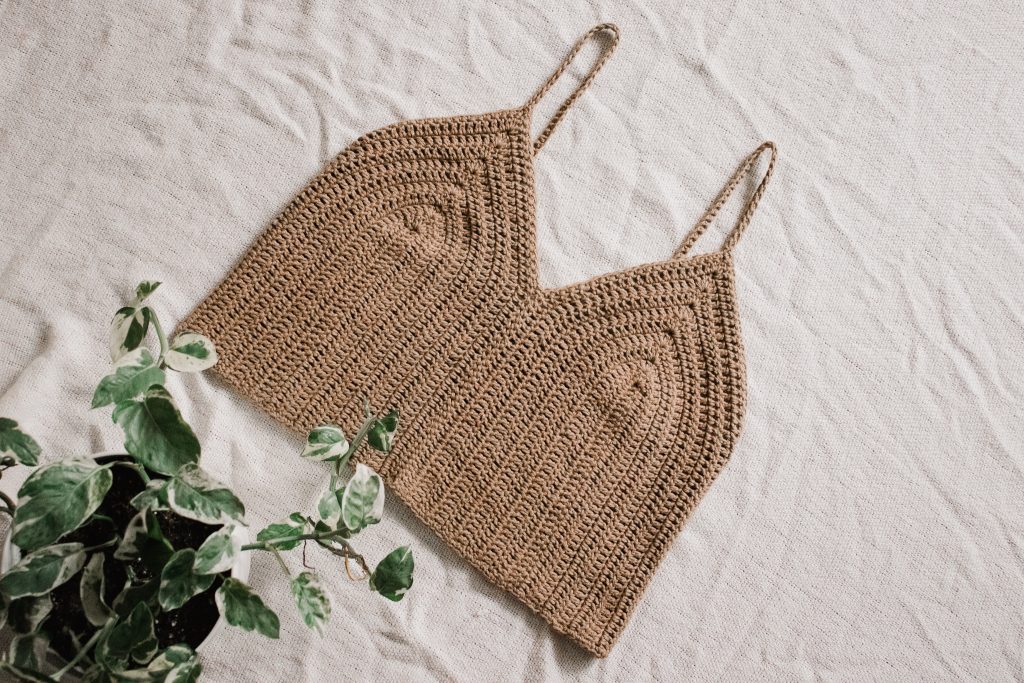
FRONT PANEL (Make 2)
Leaving a long tail for seaming, FDC 34 (36, 36, 38, 40) (42, 44, 48, 50). For a longer (or shorter) tank top than sample shown, work a longer (or shorter) chain here.
Row 1 (Set-Up Row): Ch 2, dc in each st to end of row, work 5 dc in end of last st (see Fig. 1 below), PM in 3rd dc of this 5-dc cluster, continue working in the same direction down your foundation chain, work 34 (36, 36, 38, 40) (42, 44, 48, 50) dc to end of row, turn. [73 (77, 77, 81, 85) (89, 93, 101, 105) dc]

Row 2: Ch 2, dc in each st to marked st, work 5 dc in marked st, PM in 3rd dc of this 5-dc cluster, continue dc in each st to end of row. [77 (81, 81, 85, 89) (93, 97, 105, 109) dc]
Rep last row 5 (6, 7, 8, 8) (9, 10, 11, 12) more times, or until your piece measures approximately 6.5 (7.5, 8.5, 9.5, 9.5) (10.25, 11, 12, 13)” [16.5 (19, 21.5, 24, 24) (26, 28, 30.5, 33) cm] in width.
Each Row 2 rep increases your stitch count by 4.
You should finish with 97 (105, 109, 117, 121) (129, 137, 149, 157) dc in your final row, unless you adjusted the number of Row 2 reps.
Fasten off, leaving long tail for seaming.
Rep all instructions for an identical panel, but do not fasten off after completing your second panel. Place a stitch marker in this active loop and proceed to Seaming Your Front Panels Together. You will come back to this loop to work the Back Panel.
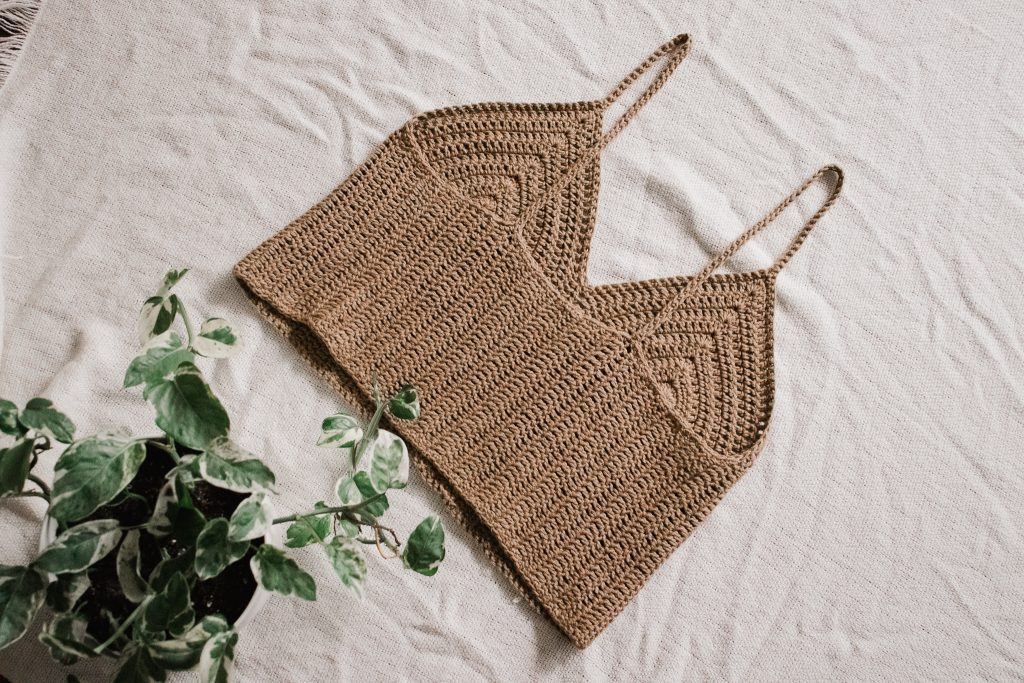
Seaming Your Front Panels Together
Lay both of your panels flat with the same side facing you and the long tail you left after finishing the first panel in the center. You will use this tail to seam your pieces together.
With a tapestry needle and your long tail, seam your panels together using the whip stitch or seaming method of your choice. Stop at approximately 1 (1.5, 1.5, 1.5, 2) (2, 2.5, 2.5, 3)” [2.5 (4, 4, 4, 5) (5, 6, 6, 8) cm] past the length of your initial foundation chain. The height at which you stop seaming is what determines your neckline depth. Do not weave in this end yet, you will come back to it once your top is seamed together in case you need to make any adjustments to this neckline.
BACK PANEL
Return to the live loop from your second front panel and insert your hook to continue crocheting.
Row 1: Ch 2, dc in next 33 (35, 35, 37, 39) (41, 43, 47, 49) sts, dc2tog, turn. [34 (36, 36, 38, 40) (42, 44, 48, 50) dc]
Note: If you adjusted your front panel foundation chain, adjust this number of back panel stitches by the same amount. For example, if you worked 10 additional foundation double crochets, add 10 double crochets to this Row 1 stitch count.
Row 2: Ch 2, sk first dc, dc in each st to end of row, turn. [33 (35, 35, 37, 39) (41, 43, 47, 49) dc]
Row 3: Ch 2, dc in each st to end of row, turn.
Rep Row 3 until you have worked a total of 32 (37, 42, 47, 56) (61, 66, 71, 76) rows across your back panel.
Next Row (S, L, 2X, 4X): Ch 2, dc in each st to last st, work 2 dc in last st.
Next Row (XS, M, XL, 3X, 5X): Ch 2, work 2 dc in first st, dc in each st to end of row.
Your back panel width should measure approximately 14.5 (17, 19, 21.5, 25.5) (27.5, 30, 32, 34)” [37 (43, 48, 55, 65) (70, 76, 81, 86) cm].
Fasten off, leaving long tail for seaming panels together.
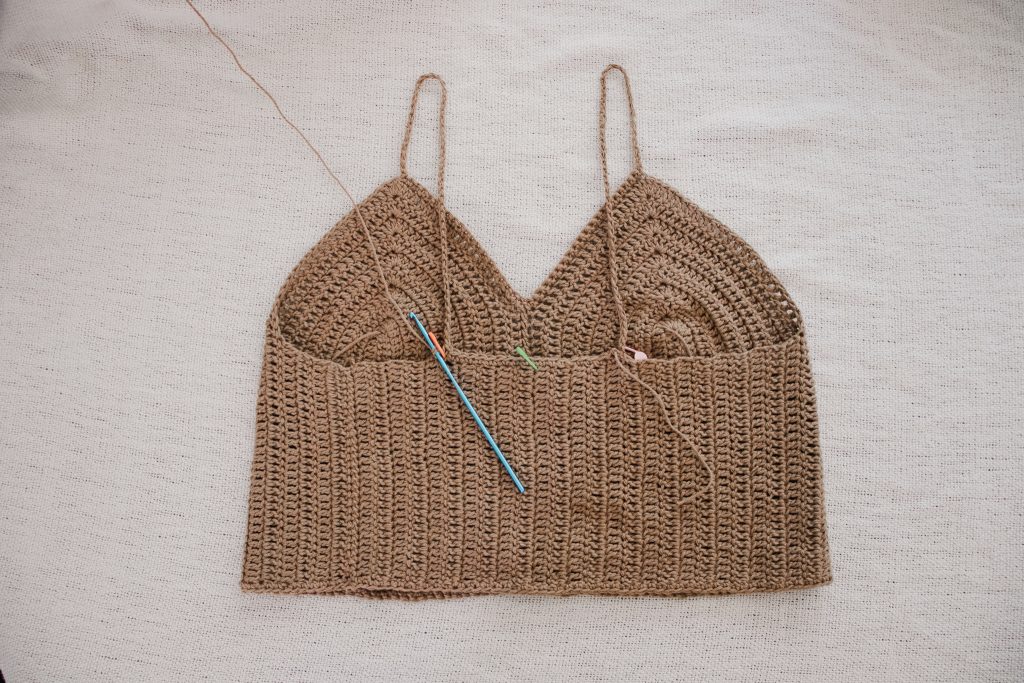
Seaming Your Tank Top
Optional: To double-check your fit before seaming, you can pin your top into a tube with locking stitch markers and try it on. Bring the last back panel row together with your front panel. Pin these stitches together lengthwise. Try on your top before seaming it closed and adjust the number of rows on your back panel if needed. For a tighter top, rip out a few rows; if your top is too tight, work additional Row 2 reps until reaching your desired circumference.
With a tapestry needle use your long tail to seam your panels together into a tube using the whip stitch or seaming method of your choice. Weave in ends.
Bottom Finishing Row
Next, you will work a row of single crochet along the bottom edge for a neater finish.
Join yarn somewhere on the side of your tank top to the bottom edge with a sl st, ch 1, work 2 sc for every dc row-end until reaching your starting point, sl st into first sc to join, fasten off, weave in ends.
STRAPS
See Fig. 2 below.
Choose which side you’d like to wear as the front and lay your top so that this Right Side is facing down, and the back of your top is toward you.
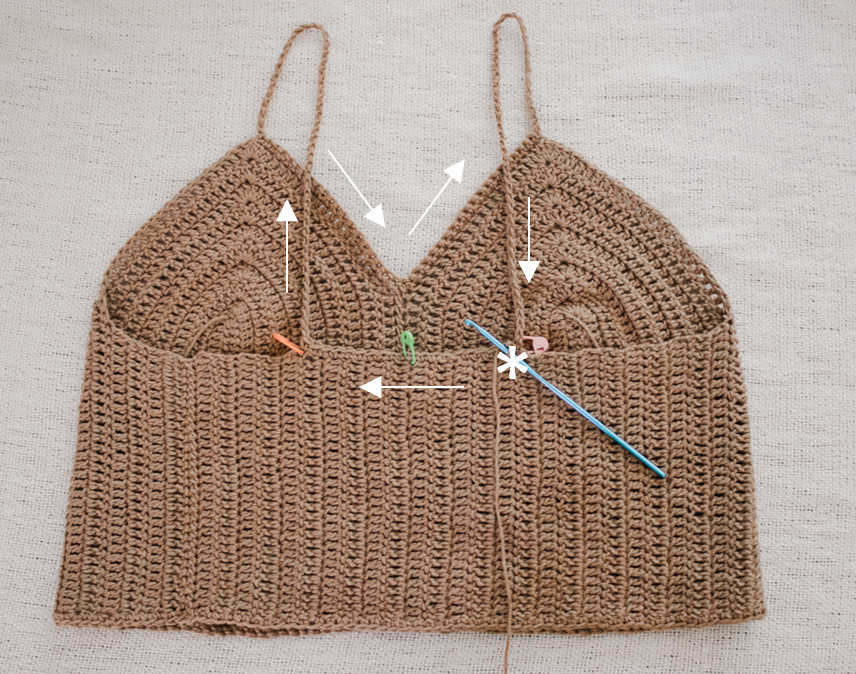
Place a stitch marker into the top edge of your Back Panel to mark the true center-back. Being mindful of this center point, place two additional markers on either side of the center marker at equal distances apart to mark out where you would like your straps to be. My straps are each approximately 3” [8 cm] from the center marker, or 6” [15 cm] apart, for reference. However, you can experiment with this distance to achieve your desired look.
You can remove your center marker now.
Join new yarn to the right-most marker with a sl st.
Ch 1, sc across to opposite marker by working approximately 2 sc into each dc row-end.
For longer (or shorter) straps, work a longer (or shorter) chain than instructed below.
Ch 50, sc into the center marked st on your front panel to join your strap to the front, sc in each dc, working toward the center-front of your top, continue to sc into each dc until reaching the center marked st on your other front panel, sc into this marked st, ch 50, sc into the marked st that you started with. You should be at your starting point. Sl st into your first sc to join.
Before fastening off, try on your top to make sure you are happy with the strap length. Adjust if necessary. Once satisfied with strap length, fasten off. At this point, you can also adjust your center-front seam to your desired height, now that you can see how the tank top lays on your body. Weave in ends.
Strap Finishing Rows
Next, you will work a row of sc along the straps and the raw edges at the underarm for a neater finish.
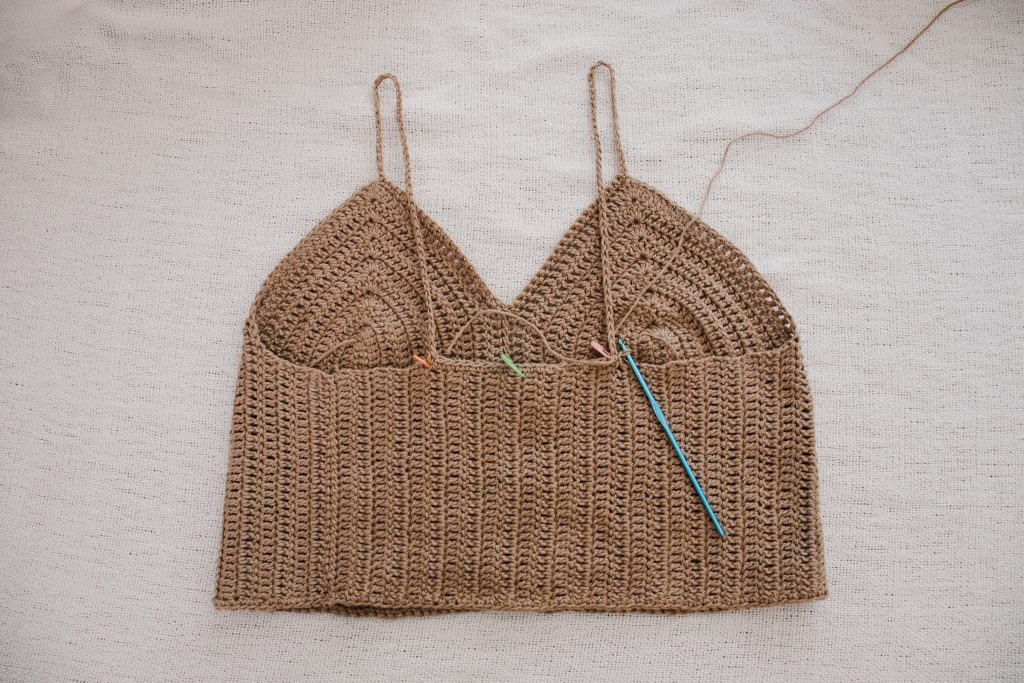
Lay your tank top in the same orientation as you did when working the straps, with your Right Side facing down, and the back of your top toward you (as shown in the photos below).
First Side
Join new yarn to the left of the strap on your left with a sl st. Sc into each st along the back working 2 sc for every dc row-end, continue to sc into each dc from your front panel until reaching the strap. Sc into the back-bumps of each ch until reaching your starting point, sl st into first sc to join, fasten off, weave in ends.
Second Side
Join new yarn to the right of the strap on your right with a sl st. Sc into the back-bumps of each ch, sc into each dc along the front panel until reaching the dc row-ends from the back panel, work 2 sc for every dc row-end until reaching your starting point, sl st into first sc to join, fasten off, weave in ends.
Weave in any remaining ends, block to dimensions in chart.
#ChasingSummerTank
That’s it! Hope you love your new tank top. This is one of my favourite designs that I’ve made in a long time, and I’ve already made 3 of them this week!
If you’d like an easy-to-read printable PDF, find it here on my website or here on Ravelry, or on the WeCrochet site here.
If you love warm-weather crochet, check out my post here which includes 21 lightweight spring pieces!
Here are some other free patterns you might like – the Tyndall Top, Goldstone Bralette, Linden Cardigan, and the Teulon Tank!
I can’t wait to see your WIPs! Make sure to tag me @knitsnknotswpg and use the pattern hashtag #ChasingSummerTank so that everyone can see your projects!
Happy crocheting,
xx
Janine
You May Also Like
Magen Labelle
What is PM??
23 . May . 2021Janine Myska
Ah yes, PM = Place marker!
23 . May . 2021Desert Stroll Tank – [FREE] Crochet Tank with High Neck and Thick Straps – Knits 'N Knots
[…] View last month’s free pattern with WeCrochet: Chasing Summer Tank […]
10 . Jun . 2021