
This post contains affiliate links. This means that when you purchase through one of these links we will receive a small commission at no additional cost to you. Thank you for supporting Rich Texture Crochet!
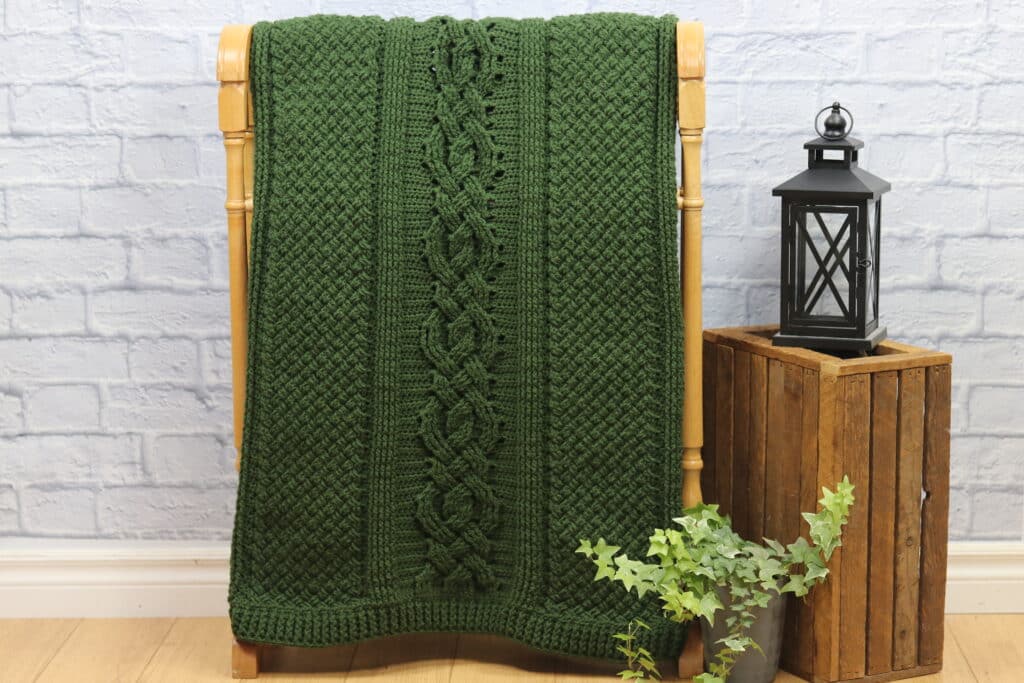
The Ceilidh Throw is a beautiful cabled blanket design! It is worked as one piece featuring braided cables and Celtic weave stitch.
As a child and teenager I used to love attending Ceilidhs with my family! They are a wonderful time filled with friends, food, laughter, lots of music and lots of dancing! My whole family danced! My mother and father performed Scottish Country dancing while two of my brothers and I performed Highland dancing. Another brother played the bagpipes and another the fiddle. Growing up in Nova Scotia with ties to Cape Breton and a very Scottish background, Ceilidhs were a regular part of my childhood.
This Ceilidh Throw is a party! It is an advanced crochet pattern and at first glance the written instructions below seem like a mouthful. I recommend printing it off and marking it up as needed! And don’t forget to check out the free video tutorial that is also below.
This post contains affiliate links. This means that when you make a purchase through one of these links, Rich Textures Crochet will earn a small commission at no additional cost to yourself. Thank you for supporting Rich Textures Crochet!
The Construction:
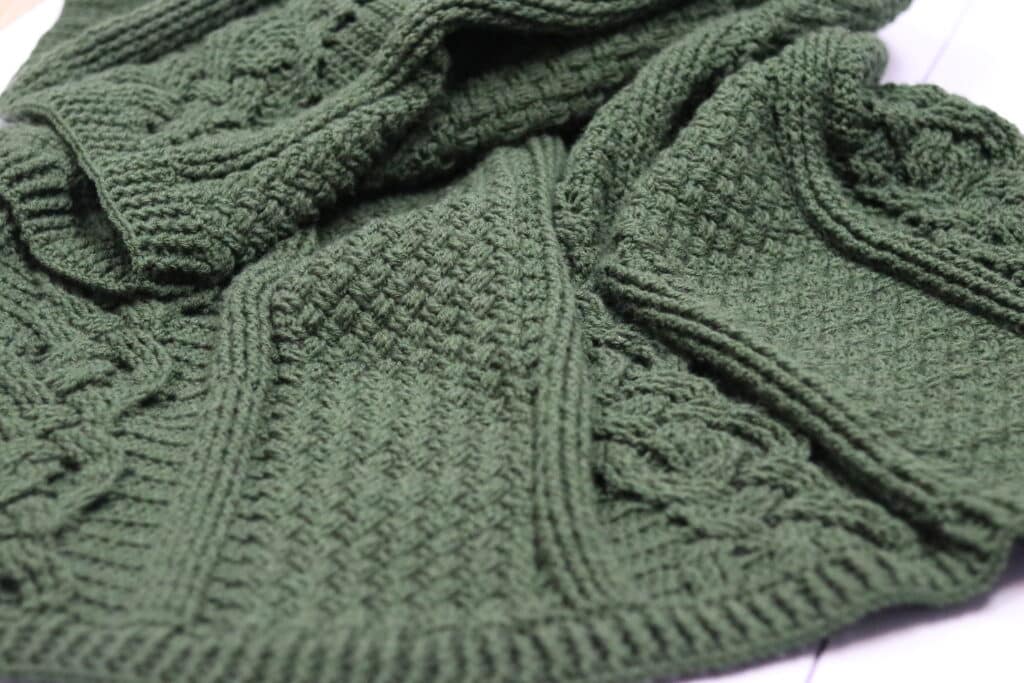
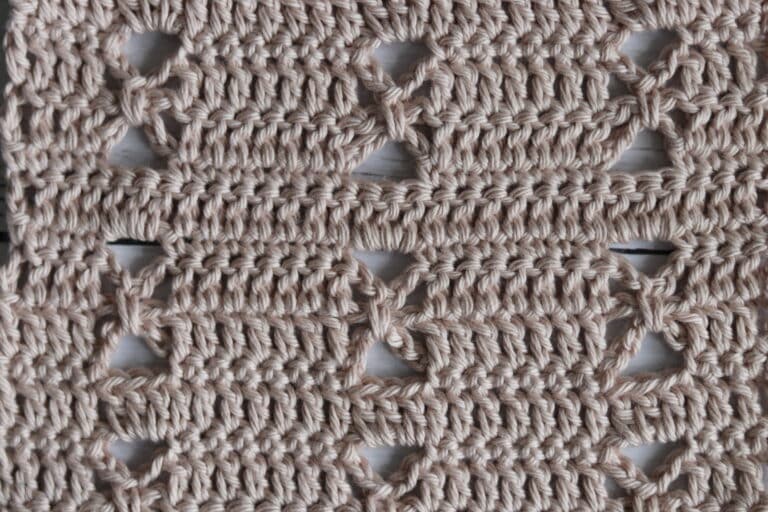
This crochet blanket is worked all as one piece. When you break it down, the design features three braided cable design panels and two panels featuring the Celtic weave stitch. They are separated by rows of front post double crochet stitches.
Another thing to note about this blanket is that every second row is a repeat of row two. Also, whenever you reach the Celtic weave panel, it always alternates between two rows.
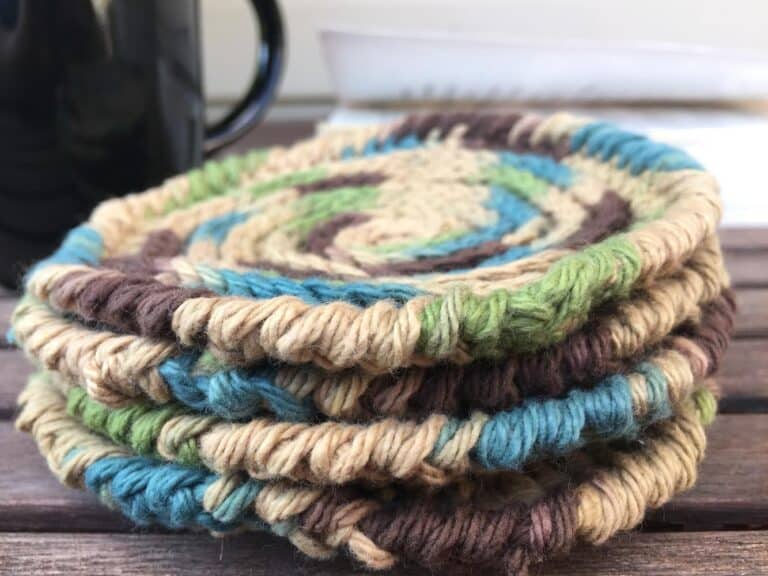
Finally, you may find that as you are working the blanket that your sides curl under. Do not worry! When you work the double crochet ribbed edging all the way around it will help to straighten it out. Another option is to go up a crochet hook size such as from a 5.5 mm to a 6.0 mm.

The Materials:
For this project you are going to need approximately 4300 yards of a worsted weight yarn. For my Celtic Throw I am using 20 balls of Brava Worsted Yarn by WeCrochet in the colour Dublin. And I would like to take a moment and thank WeCrochet for providing the yarn to me by way of yarn support in order for me to complete the pattern for you today! You will also need a 5.5 mm crochet hook.
The Spring Style 2022 Blog Hop
This pattern is being featured in the 2022 Spring Style Blog Hop in partnership with WeCrochet and I couldn’t be more excited! This blog hop is being hosted by features over 30 crochet designers and many, many gorgeous patterns for you and your home!

PDF Copies are also Available:
PDF Copies will always be available in my Ravelry and Etsy Shops in case you would like to add this pattern to your library or purchase an ad free copy. The Ceilidh Throw can be found through my shops linked below:
Click Here for the Ceilidh Throw on Etsy
Click Here for the Ceilidh Throw on Ravelry
Thank you so much for stopping by! As always, don’t hesitate to sign up for my email newsletter and connect on social! I can’t wait to see your finished Ceilidh Throws! If you like this pattern, you may also wish to check out the Rose Trellis Throw Crochet Pattern.
Happy Crocheting!
Sarah
The Ceilidh Throw Crochet Pattern:
Skill Level: Advanced
Gauge: 16 sts x 12 rows hdc = 4 inches
Finished Size: 45 inches x 55 inches
Hook: Size I/9 (5.5 mm) Hook. Adjust hook size if necessary to obtain correct gauge.
Notions: Yarn Needle.
Stitches and Abbreviations:
Bpdc – Back Post Double Crochet
Ch – Chain
Dc – Double Crochet
Fpdc – Front Post Double Crochet
Fpdtr – Front Post Double Treble
Hdc – Half Double Crochet
Rpt – Repeat
Sc – Single Crochet
Sk – Skip
Sl st – Slip stitch
Sp – Space
Tr – Triple Stitch
Yo – Yarn over
Pattern Notes:
- Pattern is written in American English terms.
- Pattern is worked in rows and completed with an edging that is worked in rounds.
- Ch 1 at the beginning of the row does not count as a stitch.
- Ch 3 at the beginning of the row counts as a double crochet stitch.
- Weave in ends as needed.
- In the rows where you are working the cable design, you will see that I broke up the instructions into three paragraphs (including the “cable design” and the “Celtic Weave Design” – I am hoping that this helps to differentiate the different “panels” and simply makes the more complicated portions easier to follow.
- As you are working the body of the blanket, the sides will curl under. These sides will be uncurled once you work the edging of the blanket.
Free Crochet Pattern:
Ch 183 .
Row 1: Dc in the 4th ch from hook and in each st across, ch 1, turn. (181 sts)
Row 2: Hdc in the 1st st, bpdc in each of the next 7 sts, *hdc in each of the next 27 sts, bpdc in each of the next 5 sts, hdc in each of the next 2 sts, [sk the next 2 sts, bpdc in each of the next 2 sts, now working in behind the last two stitches worked, bpdc in each of the skipped sts] 7 times, hdc in each of the next 2 sts, bpdc in each of the next 5 sts; rpt from * once more to the final 35 sts, hdc in each of the next 27 sts, bpdc in each of the next 7 sts, hdc in the top of the turning ch, ch 1, turn.
Row 3: (Cable Design) Hdc in the 1st st, fpdc in each of the next 7 sts, *hdc in each of the next 4 sts, fpdtr over each of the next 3 sts working around the post of the st 2 rows below, hdc in each of the next 3 sts, fpdtr over each of the next 3 sts working around the post of the st 2 rows below, hdc in the next st, fpdtr over each of the next 3 sts working around the post of the st 2 rows below, hdc in each of the next 3 sts, fpdtr over each of the next 3 sts working around the post of the st 2 rows below, hdc in each of the next 4 sts, fpdc around each of the next 5 sts,
(Celtic Weave Design) hdc in each of the next 2 sts, fpdc in each of the next 2 sts, [sk the next 2 sts, fpdc in each of the next 2 sts, now working in front of the sts just worked, fpdc in each of the previously skipped sts] 6 times, fpdc in each of the next 2 sts, hdc in each of the next 2 sts, fpdc in each of the next 5 sts; rpt from * once more,
(Cable Design) hdc in each of the next 4 sts, fpdtr over each of the next 3 sts working around the post of the st 2 rows below, hdc in each of the next 3 sts, fpdtr over each of the next 3 sts working around the post of the st 2 rows below, hdc in the next st, fpdtr over each of the next 3 sts working around the post of the st 2 rows below, hdc in each of the next 3 sts, fpdtr over each of the next 3 sts working around the post of the st 2 rows below, hdc in each of the next 4 sts, fpdc around each of the next 7 sts, hdc in the final st, ch 1, turn.
Row 4: Repeat Row 2
Row 5: (Cable Design) Hdc in the 1st st, fpdc in each of the next 7 sts, *hdc in each of the next 6 sts, fpdtr over each of the next 3 sts working around the post of the fpdtr sts 2 rows below, hdc in the next st, sk the next 3 sts, fpdtr over each of the next 3 sts working around the post of the fpdtr sts 2 rows below, hdc in the next st, now working in front of the sts just worked, fpdtr over each of the next 3 sts working around the post of the 3 previously skipped fpdtr sts 2 rows below, hdc in the next st, fpdtr over each of the next 3 sts working around the post of the fpdtr sts 2 rows below, hdc in each of the next 6 sts, fpdc around each of the next 5 sts,
(Celtic Weave Design) hdc in each of the next 2 sts, fpdc in each of the next 2 sts, [sk the next 2 sts, fpdc in each of the next 2 sts, now working in front of the sts just worked, fpdc in each of the previously skipped sts] 6 times, fpdc in each of the next 2 sts, hdc in each of the next 2 sts, fpdc in each of the next 5 sts; rpt from * once more,
(Cable Design) *Hdc in each of the next 6 sts, fpdtr over each of the next 3 sts working around the post of the fpdtr sts 2 rows below, hdc in the next st, sk the next 3 sts, fpdtr over each of the next 3 sts working around the post of the fpdtr sts 2 rows below, hdc in the next st, now working in front of the sts just worked, fpdtr over each of the next 3 sts working around the post of the 3 previously skipped fptr sts 2 rows below, hdc in the next st, fpdtr over each of the next 3 sts working around the post of the fpdtr sts 2 rows below, hdc in each of the next 6 sts, fpdc around each of the next 7 sts, hdc in the final st, ch 1, turn.
Row 6: Repeat Row 2
Row 7: (Cable Design) Hdc in the 1st st, fpdc in each of the next 7 sts, *hdc in each of the next 6 sts, sk the next 3 fpdtr stitches 2 rows below and fpdtr over each of the next 3 sts working around the post of each of the next fpdtr sts 2 rows below, hdc in the next st, sk the next 3 fpdtr sts, fpdtr over each of the next 3 sts working behind the sts just worked and around the post of the previously skipped fpdtr sts 2 rows below, hdc in the next st, sk the next 3 sts, fpdtr over each of the next 3 sts working around the post of the fpdtr sts 2 rows below, hdc in the next st, sk the next 3 sts, fpdtr over each of the next 3 sts working behind the sts just worked and around the post of the previously skipped fpdtr sts 2 rows below, hdc in each of the next 6 sts, fpdc around each of the next 5 sts,
(Celtic Weave Design) hdc in each of the next 2 sts, fpdc in each of the next 2 sts, [sk the next 2 sts, fpdc in each of the next 2 sts, now working in front of the sts just worked, fpdc in each of the previously skipped sts] 6 times, fpdc in each of the next 2 sts, hdc in each of the next 2 sts, fpdc in each of the next 5 sts; rpt from * once more,
(Cable Design) *Hdc in each of the next 6 sts, sk the next 3 fpdtr stitches 2 rows below and fpdtr over each of the next 3 sts working around the post of each of the next fpdtr sts 2 rows below, hdc in the next st, sk the next 3 fpdtr sts, fpdtr over each of the next 3 sts working behind the sts just worked and around the post of the previously skipped fpdtr sts 2 rows below, hdc in the next st, sk the next 3 sts, fpdtr over each of the next 3 sts working around the post of the fpdtr sts 2 rows below, hdc in the next st, sk the next 3 sts, fpdtr over each of the next 3 sts working behind the sts just worked and around the post of the previously skipped fpdtr sts 2 rows below, hdc in each of the next 6 sts, fpdc around each of the next 7 sts, hdc in the final st, ch 1, turn.
Row 8: Repeat Row 2.
Row 9: (Cable Design) Hdc in the 1st st, fpdc in each of the next 7 sts, *hdc in each of the next 6 sts, sk the next 3 fpdtr stitches 2 rows below and fpdtr over each of the next 3 sts working around the post of each of the next fpdtr sts 2 rows below, hdc in the next st, sk the next 3 fpdtr sts, fpdtr over each of the next 3 sts working around the post of the fpdtr sts 2 rows below, hdc in the next st, fpdtr over each of the next 3 sts working over the sts just worked and around the post of each the previously sk fpdtr sts 2 rows below, hdc in the next st, fpdtr over each of the next 3 sts working around the post of the fpdtr sts 2 rows below, hdc in each of the next 6 sts, fpdc around each of the next 5 sts,
(Celtic Weave Design) hdc in each of the next 2 sts, fpdc in each of the next 2 sts, [sk the next 2 sts, fpdc in each of the next 2 sts, now working in front of the sts just worked, fpdc in each of the previously skipped sts] 6 times, fpdc in each of the next 2 sts, hdc in each of the next 2 sts, fpdc in each of the next 5 sts; rpt from * once more,
(Cable Design) *Hdc in each of the next 6 sts, sk the next 3 fpdtr stitches 2 rows below and fpdtr over each of the next 3 sts working around the post of each of the next fpdtr sts 2 rows below, hdc in the next st, sk the next 3 fpdtr sts, fpdtr over each of the next 3 sts working around the post of the fpdtr sts 2 rows below, hdc in the next st, fpdtr over each of the next 3 sts working over the sts just worked and around the post of each the previously sk fpdtr sts 2 rows below, hdc in the next st, fpdtr over each of the next 3 sts working around the post of the fpdtr sts 2 rows below, hdc in each of the next 6 sts, fpdc around each of the next 7 sts, hdc in the final st, ch 1, turn.
Row 10: Repeat Row 2.
Row 11: (Cable Design) Hdc in the 1st st, fpdc in each of the next 7 sts, *hdc in each of the next 6 sts, sk the next 3 fpdtr stitches 2 rows below and fpdtr over each of the next 3 sts working around the post of each of the next fpdtr sts 2 rows below, hdc in the next st, sk the next 3 fpdtr sts, fpdtr over each of the next 3 sts working behind the sts just worked and around the post of the previously skipped fpdtr sts 2 rows below, hdc in the next st, sk the next 3 sts, fpdtr over each of the next 3 sts working around the post of the fpdtr sts 2 rows below, hdc in the next st, sk the next 3 sts, fpdtr over each of the next 3 sts working behind the sts just worked and around the post of the previously skipped fpdtr sts 2 rows below, hdc in each of the next 6 sts, fpdc around each of the next 5 sts,
(Celtic Weave Design) hdc in each of the next 2 sts, fpdc in each of the next 2 sts, [sk the next 2 sts, fpdc in each of the next 2 sts, now working in front of the sts just worked, fpdc in each of the previously skipped sts] 6 times, fpdc in each of the next 2 sts, hdc in each of the next 2 sts, fpdc in each of the next 5 sts; rpt from * once more,
(Cable Design) *Hdc in each of the next 6 sts, sk the next 3 fpdtr stitches 2 rows below and fpdtr over each of the next 3 sts working around the post of each of the next fpdtr sts 2 rows below, hdc in the next st, sk the next 3 fpdtr sts, fpdtr over each of the next 3 sts working behind the sts just worked and around the post of the previously skipped fpdtr sts 2 rows below, hdc in the next st, sk the next 3 sts, fpdtr over each of the next 3 sts working around the post of the fpdtr sts 2 rows below, hdc in the next st, sk the next 3 sts, fpdtr over each of the next 3 sts working behind the sts just worked and around the post of the previously skipped fpdtr sts 2 rows below, hdc in each of the next 6 sts, fpdc around each of the next 7 sts, hdc in the final st, ch 1, turn.
Row 12: Repeat Row 2.
Row 13: (Cable Design) Hdc in the 1st st, fpdc in each of the next 7 sts, *hdc in each of the next 4 sts, fpdtr over each of the next 3 sts working around the post of the fpdtr sts 2 rows below, hdc in each of the next 3 sts, sk the next 3 sts, fpdtr over each of the next 3 sts working around the post of the fpdtr sts 2 rows below, hdc in the next st, now working in front of the sts just worked, fpdtr over each of the next 3 sts working around the post of the 3 previously skipped fpdtr sts 2 rows below, hdc in each of the next 3 sts, fpdtr over each of the next 3 sts working around the post of the fpdtr sts 2 rows below, hdc in each of the next 4 sts, fpdc around each of the next 5 sts,
(Celtic Weave Design) hdc in each of the next 2 sts, fpdc in each of the next 2 sts, [sk the next 2 sts, fpdc in each of the next 2 sts, now working in front of the sts just worked, fpdc in each of the previously skipped sts] 6 times, fpdc in each of the next 2 sts, hdc in each of the next 2 sts, fpdc in each of the next 5 sts; rpt from * once more,
(Cable Design) *Hdc in each of the next 4 sts, fpdtr over each of the next 3 sts working around the post of the fpdtr sts 2 rows below, hdc in each of the next 3 sts, sk the next 3 sts, fpdtr over each of the next 3 sts working around the post of the fpdtr sts 2 rows below, hdc in the next st, now working in front of the sts just worked, fpdtr over each of the next 3 sts working around the post of the 3 previously skipped fpdtr sts 2 rows below, hdc in each of the next 3 sts, fpdtr over each of the next 3 sts working around the post of the fpdtr sts 2 rows below, hdc in each of the next 4 sts, fpdc around each of the next 7 sts, hdc in the final st, ch 1, turn.
Rows 14 onward: Repeat rows 2-13 eleven more times.
Fasten off, weave in ends.
Edging (worked along both short ends):
Join yarn with a sl st in the top right hand corner.
Rnd 1: Ch 3 (counts as a dc) st, dc in each st across the top, 3 dc in the corner st, now working along the side, evenly work 200 dc, 3 dc in corner, dc in each st across the bottom, 3 dc in the corner st, evenly work 200 dc along the next long edge, 2 dc in the final corner st. Join with a sl st in the 1st st. Ch 1, do not turn.
Rnd 2: Fpdc in the same st as joining, *[bpdc in the next st, fpdc in the next st] across to your first corner st, into the first corner st work a (bpdc, fpdc and bpdc) in the same st; rpt from * around, join with a sl st in the first st. Ch 1, do not turn.
Rnds 3-5: Repeat rnd 2 working fpdc in ever fpdc and bpdc in every bpdc. When you reach your corner sts, (fpdc, bpdc, fpdc) or (bpdc, fpdc, bpdc) as per the pattern in each corner st.
NOTE: You can adjust the number of sts along the long edges, simply make sure that you are consistent on both sides!
Fasten off, weave in ends.
Video Tutorial:
The photographs and pattern contained in this document are the property of Rich Textures Crochet.
This pattern is for personal use only.
No unauthorized reproduction, in whole or in part, or distribution of this pattern or content is permitted. ALL FINISHED PRODUCTS from this pattern can be used for local sales and sold online.
Thank you so much for supporting Rich Textures Crochet! To stay in touch or see more great products, be sure to visit me on Facebook and Instagram (Rich Textures Crochet). Thanks again! Happy Crocheting!


This is gorgeous!! Thanks for sharing!
You’re welcome 🙂
I have done the first three rows for the woven panel four times now, and I am just getting stripes as a result, not the weave look like the picture. Can you please recheck the instructions to make sure that I am not reading them incorrectly?
Having an issue with the Celtic Weave. The first two dc on the right if your holding the blanket up in front of you are coming out in a straight line not a crisscross weave. All the directions call for two fpdc in the first stitches. What am I doing wrong? The pattern is beautiful and except for two stitches at the beginning of the weave sections, is looking perfect. Please help.