***You can purchase an INEXPENSIVE AD-FREE PDF of this pattern on Etsy HERE and on LoveCrochet HERE! This beautifully formatted PDF includes the step-by-step tutorial on how to work braided cables (from “Braided Cabled Blanket tutorial“) and the full pattern for both the “Braided Cabled Cowl” AND “Braided Cabled Slouchy Beanie”! It is a total of 11 pages including the cover page! You can also purchase a kit HERE on the Lion Brand Yarn website that includes the pattern and all the yarn needed to make the cowl and beanie!
As long-time readers of my blog know, I absolutely love crochet cables! From cabled beanies and blankets to cabled mittens and legwarmers, I have enjoyed incorporating crochet cabling techniques into various designs.
![]()
Most recently, I designed a Braided Cabled Cowl that I shared with you using Heartland yarn by Lion Brand Yarn. This cowl inspired me to design a matching beanie using braided cables so that there could be a set!
![]()
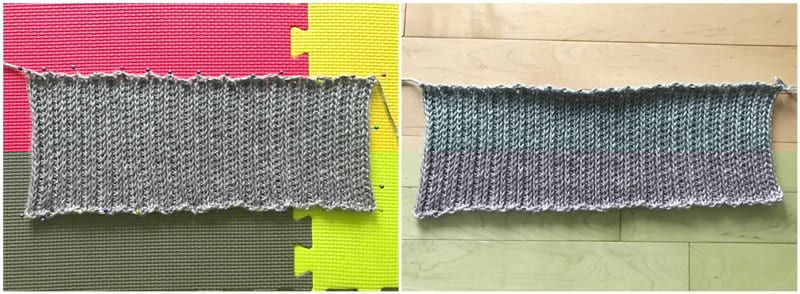
For this new crocheted beanie, I wanted to design a double brim reminiscent of the knitted Savante Beanie that I had just made using Teresa of Debrosse’s pattern. Thus, I used the same ribbing pattern that I used for my Granite Cardigan by working half double crochets in the third and back loops with a 4.5 mm hook. This ribbing has a beautiful knit look to it but has a tendency to curl. Thus, I blocked the ribbing by pinning it to some foam mats and blasting it with steam from my iron. Be sure not to cut the yarn as you will continue working with it!
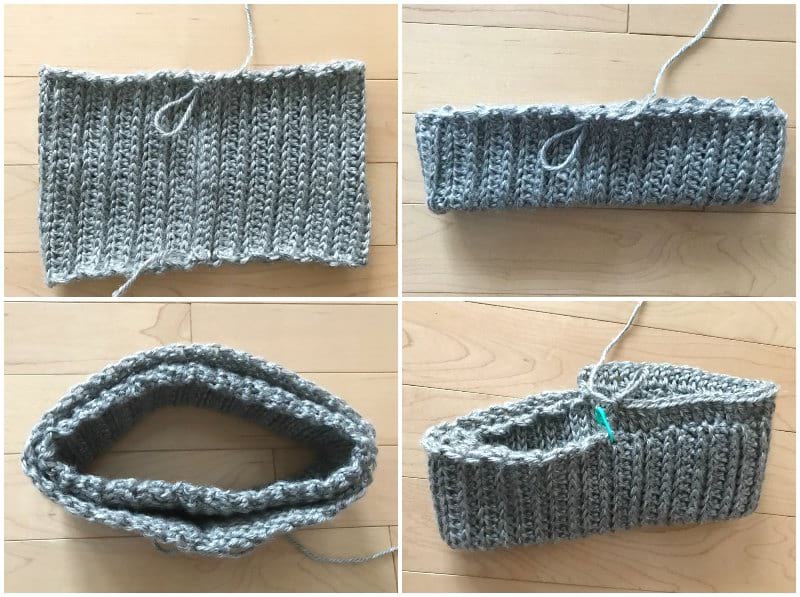
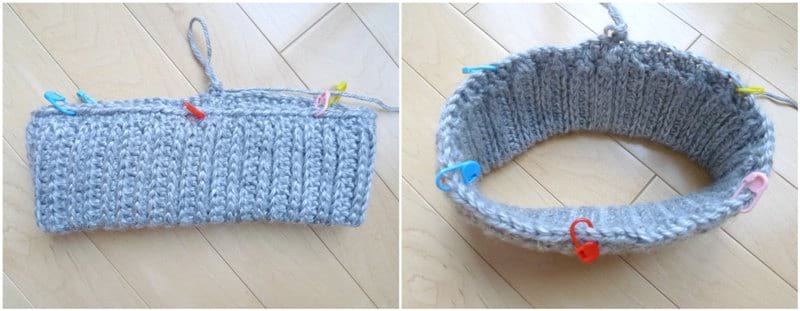
Next, I formed a ring by slip stitching the back loops and third loops of the ends together (i.e. the first and last row). I made this ribbing quite snug as I have noticed that many of my crochet hats have stretched a lot over time. You can adust the length of your ribbing to your liking and keep in mind that it will stretch a bit with repeated wears! Once again, do not cut the yarn as you will continue working with it!
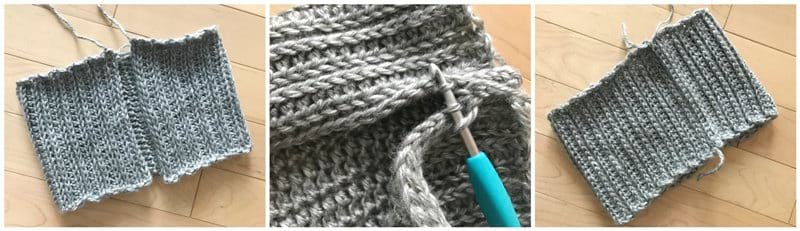
After seaming the ends together, I then folded the ribbing inside itself so that the edges were touching and the right sides of the ribbing were facing outwards. I slip stitched to the other edge to join the open ends together. I also placed a stitch marker on the exact opposite side to indicate the halfway point around the circle.
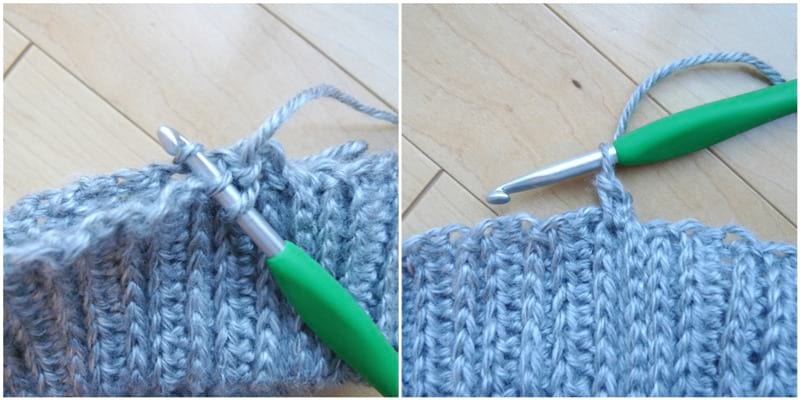
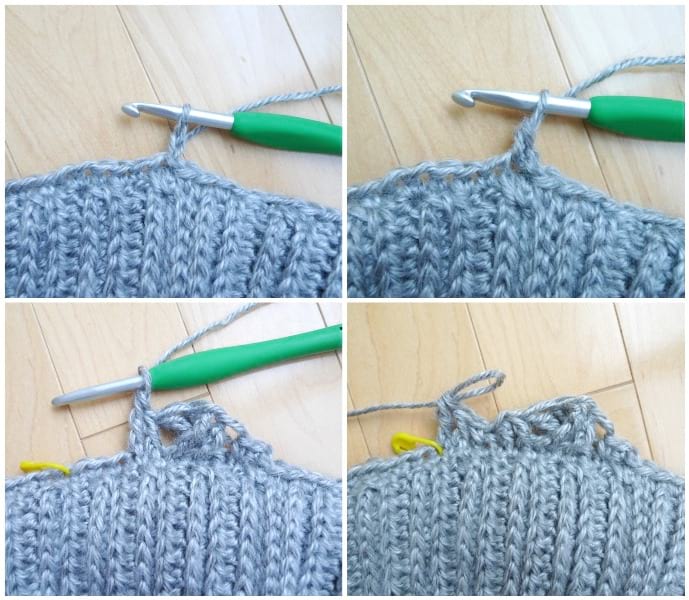
Now that the ribbing was complete, it was time to work the braided cabled body. I switched to my 5.5 mm hook to work this portion to get looser stitches compared to the tighter ribbing that used a 4.5 mm hook. I chained 1 and then worked a single crochet in the same stitch. I worked 72 single crochets around the open brim, sealing it up as I went along. To close up the opening, I inserted my crochet hook into one stitch along the side closest to me and the other stitch on the side further from me. I yarned over, pulled up two loops (these two loops from the edges are treated as one), yarned over again, and then pulled up the last two loops (working a single crochet). Since I needed to pick up 72 single crochets (must be a multiple of 12), I knew I needed to reach 36 stitches by the halfway point as indicated by my stitch marker!
When it was time to close up the round, I slip stitched to the first single crochet (not the chain 1). I then placed stitch markers along every twelve stitches to help me visualize where each set of cable stitches would be worked. It can get confusing where to place the stitches when working post stitches, so this method helped me quite a bit! The stitch markers are placed on the 12th, 24th, 36th, etc stitches.
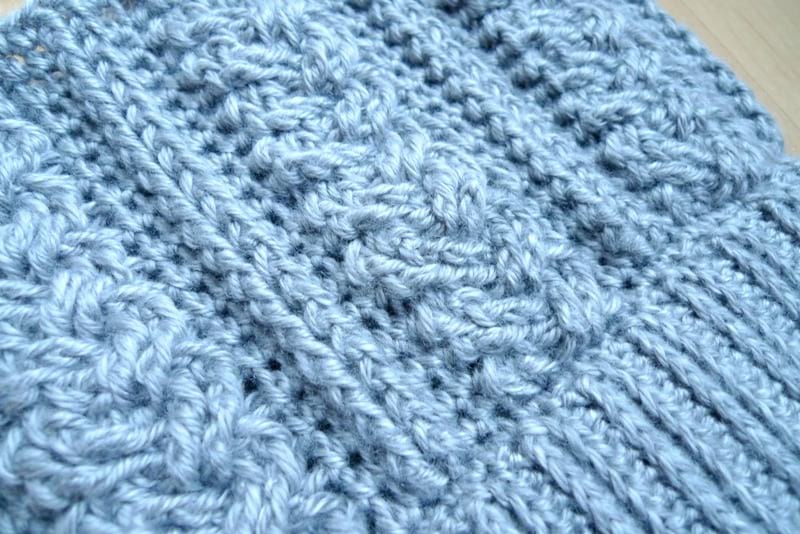
To begin Round 2 of the first cabling round, I chained 1 and then worked a single crochet in the same stitch. Then, I worked the cabling repeat which is worked over a total of 12 stitches (including that first single crochet): two single crochets, braided cable over the next six stitches, two single crochets and two front post double crochets. The last stitch of the repeat should be worked where you have placed the stitch marker (the 12th stitch). Then you repeat this pattern around!
The braided cables are worked the same way as in my Chunky Braided Cabled Blanket and Braided Cabled Cowl! See the in-depth step-by-step tutorial on how to work braided cables HERE! The only difference is that these braided cabled are worked in rounds rather than rows since we are making a hat. Thus, we do not need to do the even rows of single crochets on the back side of the pattern since we can just do the rounds of cabling.
After you have reached your desired height for your beanie, it is time to taper the top and close up the beanie. I worked two rounds of decreases by simply working single crochet decreases around.
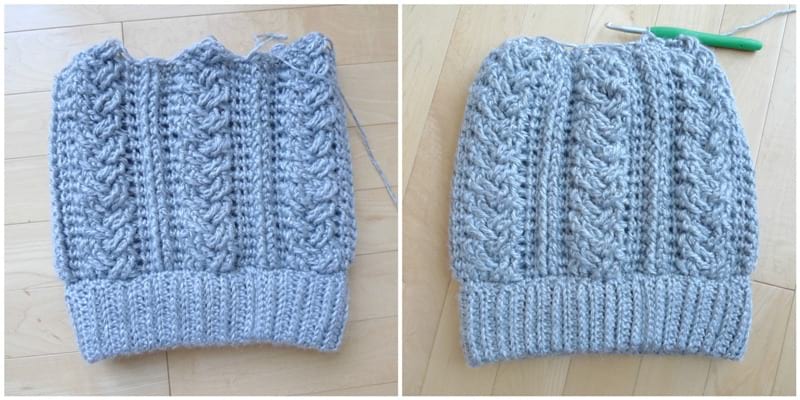
To close up the beanie, I worked slip stitches across opposite ends. Thus, I inserted my hook through a stitch on the opposite side of the opening, yarned over and pulled through both stitches. I then inserted my hook through two other opposite ends and slip stitched together, continuing around in this manner until the opening became shut.

You can watch this video to see the closing up of the top of the beanie in action! After seaming up the top of the beanie, you could leave it as is or add a yarn pom pom or a faux fur pom pom ontop!
*************************
Here is the free pattern for my Braided Cabled Slouchy Beanie:
![]()
***You can purchase an INEXPENSIVE AD-FREE PDF of this pattern on Etsy HERE and on Craftsy HERE! This beautifully formatted PDF includes the step-by-step tutorial on how to work braided cables (from “Braided Cabled Blanket tutorial“) and the full pattern for both the “Braided Cabled Cowl” AND “Braided Cabled Slouchy Beanie”! It is a total of 11 pages including the cover page! You can also purchase a kit HERE on the Lion Brand Yarn website that includes the pattern and all the yarn needed to make the cowl and beanie!
Materials:
- Heartland yarn by Lion Brand Yarn in Mount Rainier (worsted, level 4): 1-2 skeins required (~150 g); on the Lion Brand site HERE
- 4.5 and 5.5 Clover Amour hook
- Clover lock ring stitch markers
- Yarn needle
- Optional: pom pom – yarn pom pom (Clover pom pom maker) or faux fur pom pom (I bought a pom pom keychain from Ardene for this beanie, but see similar handmade version HERE)
Special stitches:
- Front Post Treble Crochet (Fptc): Yarn Over (YO) twice, insert hook behind post of stitch (insert hook from front to back). YO and pull up a loop, [YO and draw through 2 loops on hook] 3 times.
- Front Post Double Crochet (Fpdc): YO, insert hook behind post of stitch (insert hook from front to back of stitch), YO, pull up a loop, YO, (pull through 2 loops) twice.
Notes:
- The ribbed band is formed by working half double crochets in the third and back loops. The ribbed band is then seamed shut and folded in half to form the double brim.
- Stitches are picked up along the folded ribbed band to create the braided cabled body.
- To make this beanie smaller in circumference, decrease the number of rows for the ribbing and decrease the number of stitches you pick up for the body of the beanie by multiples of 12 stitches.
- To make this beanie larger in circumference, increase the number of rows for the ribbing and increase the number of stitches you pick up for the body of the beanie by multiples of 12 stitches.
- To make the beanie slouchier, add more rounds to the cabled body.
- To make a thicker double brim, add more initial chains to the ribbed band.
- When closing up the round of the cabled body, always slip stitch to the first sc, NOT the chain 1. The chain 1 does not count as a stitch.
- PLEASE reference my detailed step-by-step tutorial on how to work the braided cable in my blanket post HERE! Note that we are working in rounds versus turned rows, so we do not need to do the rows of single crochets that we did for the even rows of the blanket and scarf.
- To see videos of the Braided cables, see Elizabeth Ham’s very helpful 3-part YouTube tutorial HERE!
Gauge: Using 5.5 mm hook, 14 dc and 7 rows = 4″
Ribbed Band:
Using 4.5 mm hook,
Ch 23
Row 1: Hdc 1 in 2nd chain from hook and across. (22 sts)
R2: Chain 1, turn. Hdc in third loops across. (22 sts)
R3: Chain 1, turn. Hdc in back loops across. (22 sts)
R4-45 (or until desired length): Repeat Rows 2-3.
Do not fasten off.
My ribbed band measured 15″ long and 6″ wide. Keep in mind that the ribbed band will stretch over time- my resultant circumference was 18” after stretching and being worn. I kept mine quite tight so that it does not slip off my head. Measure ribbed band around your head and adjust as necessary (add more rows to make it longer). Block if needed.
Form a ring with the ribbed band and slip stitch the back loops and third loops together. Fold ring in half so that the edges touch each other and right sides are facing out. Slip stitch to the other side.
We will now begin the Braided Cabled Body by picking up stitches along the edges, closing up the opening as we crochet along both edges.
Braided Cabled Body:
Using 5.5 mm hook,
Round 1: Chain 1 and sc in same stitch. Pick up 72 single crochets along the edges, seaming them shut as you work around the circle. Slip stitch to first sc of round.
R2: Chain 1 and sc in same stitch. Sc 1. Fpdc in next 6 sts, sc 2, Fpdc in next 2 sts. *Sc 2. Fpdc in next 6 sts, sc 2, Fpdc in next 2 sts* , rep 5 times. Sl st to first sc of round.
R3: Ch 1 and sc in same stitch. Sc 1. Skip 2 post sts, Fptc in next 2 posts, working BEHIND post sts just made, Fptc in 2 skipped post sts. Fpdc in next 2 post sts, Sc 2, Fpdc in next 2 post sts. *Sc 2. Skip 2 post sts, Fptc in next 2 posts, working BEHIND post sts just made, Fptc in 2 skipped post sts. Fpdc in next 2 post sts, Sc 2, Fpdc in next 2 post sts*, rep 5 times. Sl st to first sc of round.
R4: Ch 1 and sc in same stitch. Sc 1. Fpdc in next 2 post sts. Skip 2 post sts, Fptc in next 2 post sts. Working IN FRONT of post sts just made, Fptc in 2 skipped post sts. Sc 2, Fpdc in next 2 post sts. *Sc 2. Fpdc in next 2 post sts. Skip 2 post sts, Fptc in next 2 post sts. Working IN FRONT of post sts just made, Fptc in 2 skipped post sts. Sc 2, Fpdc in next 2 post sts*, rep 5 times. Sl st to first sc of round.
Repeat Rows 3-4 until Round 20.
R21: *Sc2tog* around (36 sts).
R22: *Sc2tog* around (18 sts)
Closing up top of beanie: Insert hook into opposite end of opening and slip stitch two stitches together. Insert hook into two other opposing stitches of opening and slip stitch them together. Keep slip stitching opposite ends together until beanie is closed up. Fasten off and weave in end.
Add a faur fux pom pom ontop of beanie.
Finished Dimensions: 10″ tall, 9″ wide (when flat), 18″ circumference
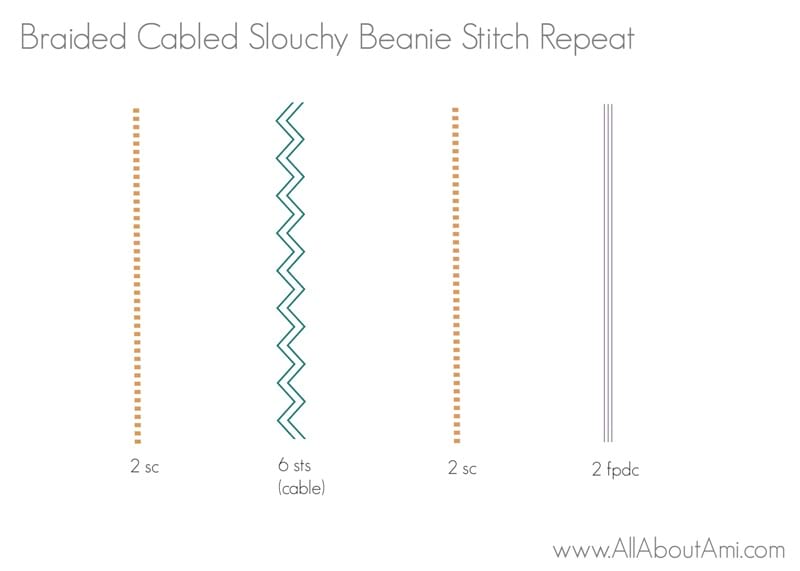
Please reference this diagram below to see how the stitches are laid out: you work 2 sc, the cable over 6 stitches, 2 sc and 2 fpdc (12 stitches total). You repeat this pattern a total of 6 times around the beanie (12 stitches x 6 repeats = 72 stitches).
***********************
I am very proud of this Braided Cabled Slouchy Beanie design as the elegant cables are so romantic, and it has the perfect amount of slouch!
![]()
This Braided Cabled set is stunning and uses a total of 4 skeins of Heartland! This beanie uses a little over one skein of yarn while the cowl uses a little under three skeins of yarn, so it works out well!
![]()
The double brim and braided cables give this crochet beanie such a unique look! I really love this grey Mount Rainier colourway as grey matches with everything! My wardrobe is full of grey as I tend to gravitate towards this timeless and classic neutral!
![]()
To make the matching Braided Cabled Cowl, check out the free pattern HERE!
![]()
Let me know if you will be making this set and what colour you will be using! I love adding more beautiful crochet cable designs to my pattern repertoire, and I hope you enjoy crocheting this set as much as I did! Happy cabling, everyone!
{This post is sponsored by Lion Brand Yarn! I’ve loved working with their yarn throughout the years and I’m thrilled that I get to collaborate with them every month!}
This pattern is an original pattern by Stephanie Lau of All About Ami. Please do not claim this pattern as your own. If you wish to share this pattern, you may link to this pattern but please do not reprint it on your site. You may keep a copy for your own personal use but please DO NOT sell the pattern or distribute it.
You may sell products made from this pattern but please clearly credit the design to me, Stephanie Lau of All About Ami, and provide a link to my blog www.AllAboutAmi.com. Permission is NOT granted for mass production or factory manufacturing of any kind. Thank you for being respectful and for your understanding!