***You can purchase an INEXPENSIVE AD-FREE PDF of this pattern on Etsy HERE and on LoveCrafts HERE! This beautifully formatted PDF includes ALL the step-by-step photos, graphics and special bonus Christmas accessories (hat for bear and headband for bunny) and is a total of 11 pages including the cover page! You can also check out my All About Ami Amigurumi Bundle HERE as it includes ALL my amigurumi designs at a discounted price!
***PLEASE follow along with my step-by-step tutorial HERE to see all the process photos of the making of this Boucle Bear & Bunny!
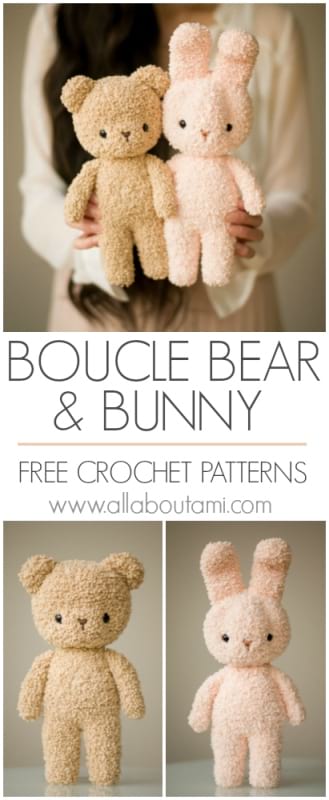
Crochet your own adorable classic teddy bear and bunny using special boucle yarn! These sweet stuffies are so soft and cuddly and will make perfect gifts for you and your loved ones!
Materials:
- Baby Soft Boucle Yarn by Lion Brand (level 5 bulky) in “Tan” (for bear) and “Peach” (for bunny) – you will need less than 1 skein of yarn for each animal; 70 g/84 yds for bear, 80 g/96 yds for bunny (note that the “Peach” color is very difficult to find right now, but the Ballet Pink is also a pretty option); You can find this yarn through Lion Brand, LoveCrafts, Amazon, and Herrschners (they have the Peach in stock).
- 4.50 mm Clover Amour Hook
- Yarn needle (bent tip helpful for attaching amigurumi parts- see HERE)
- Fiberfill
- 12 mm safety eyes
- Lock Ring stitch markers
- Brown embroidery floss for Bear’s nose, Deep rose embroidery floss for Bunny’s nose
Notes:
- Please check out my blog posts entitled “Amigurumi for Beginners“, “How to Read Amigurumi Patterns“, “The Magic Circle“, “The Invisible Decrease“, “The Right Side of Amigurumi” and “Amigurumi Nose Tutorial” for helpful tips and techniques that you can use when crocheting this amigurumi.
- Work in continuous rounds so there is no visible seam (do not slip stitch after each round).
- Boucle/fuzzy yarn is challenging to work with (see tips below), so we will be creating basic shapes without complicated or uneven increases or decreases. Then, we will use special shaping techniques to help redefine the face.
- We begin with a simple sphere for the head and will be using these shaping techniques to give more definition: for the bear, we will do eye indentation, head flattening, and snout definition. For the bunny, we will do eye indentation and forehead shaping.
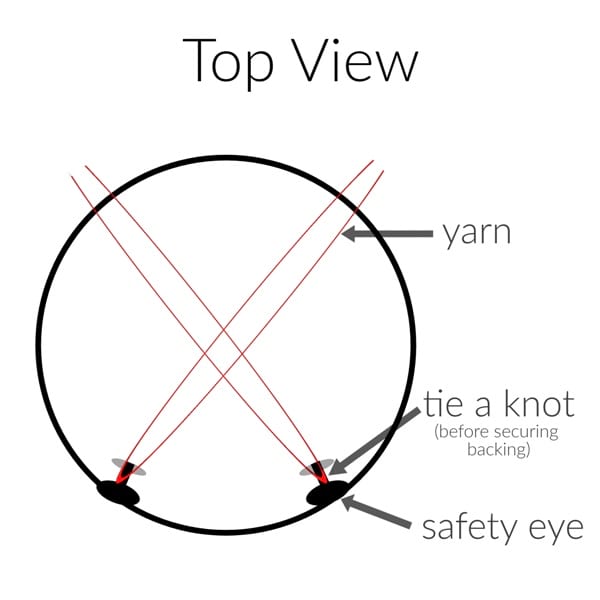
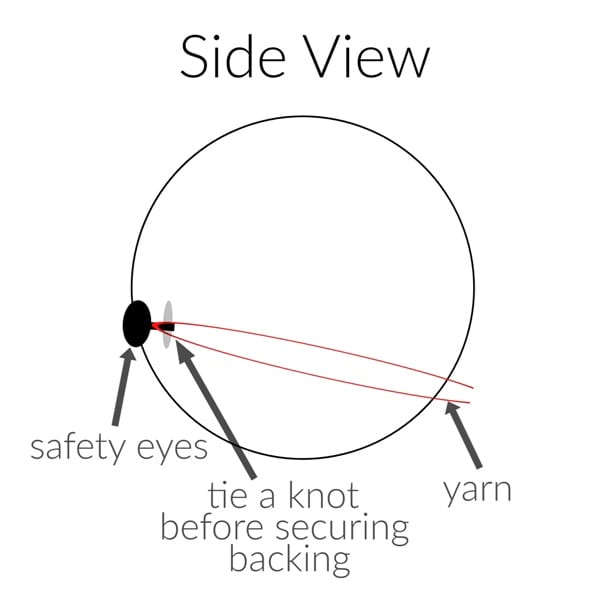
- Eye indentation pulls the safety eyes back to give them more depth. Before you begin crocheting the head, cut two long strands of yarn (approximately 20”/51 cm each) to use for the eye indentation.
- The snout, forehead and foot shaping involves weaving strands of yarn through different parts, pulling tight and tying knots (described in more detail below). Note that this technique works when using fuzzy yarn as the strands of yarn blend in and become hidden due to the texture of the yarn. We do not recommend using these techniques if you are using regular yarn, as the strands of yarn will be visible.
- Inc (increase) = Work 2 sc in the next stitch. [1 stitch becomes 2 stitches.]
- Dec (I use the invisible decrease): Insert hook into front loops of the next two stitches. Yarn over and draw through first two loops. Yarn over and draw through remaining two loops. See detailed tutorial HERE.
- Accessories and garments ideas for the Boucle Bear and Bunny can be found in this blog post HERE!
Boucle/Fuzzy Yarn Tips:
It can be challenging working with boucle/fuzzy yarn if you have never worked with this special type of yarn before (not recommended for complete beginners). Here are some tips when working with fuzzy yarn:
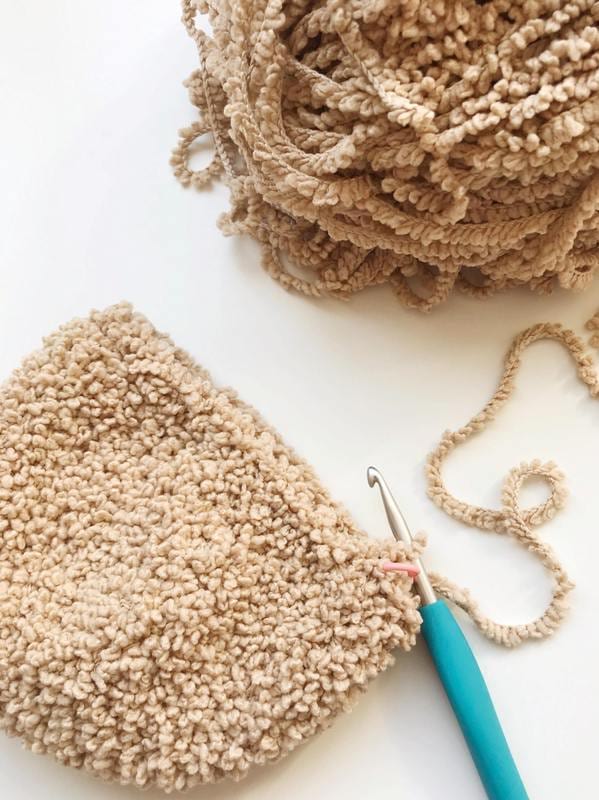
(1) You will need to feel for the next stitch and insert your hook into the next gap as you will not be able to see your stitches or where the next space is. Since you cannot see the stitches, this also means that fuzzy yarn is more forgiving as you cannot easily see mistakes.
(2) I highly recommend using a stitch marker to mark the end of each round. This helps you keep your place in case you need to put down your work or if you get interrupted. You can also use the stitch marker as a guide and reference point for how many stitches you should be making at any given point around the circle. For example, if you know that there are a total of 42 stitches in a round, you should have 21 stitches by the halfway point (halfway across the circle). By the one quarter mark, you should have approximately 10 or 11 stitches. If you do not reach the desired number of stitches by the time you reach the stitch marker, you can frog the stitches (back to the stitch marker) and try again!
(3) Record your number of rounds using a pencil and paper or on your phone! It is very challenging to try and count your rounds when looking at the piece so it can be very easy to lose your place (unlike amigurumi using regular yarn, where you can easily count how many rounds you have completed and where you are in a pattern).
Finished Dimensions: Bear = 9″/23 cm tall, Bunny = 12″/30 cm tall
PATTERN
Before beginning to crochet, cut two long strands of yarn (at least 20″/51 cm) and set aside for eye indentation.
HEAD
R1: 6 sc in magic ring. (6 sts)
R2: *Inc*, rep 6 times (12 sts)
R3: *Sc 1, Inc*, rep 6 times. (18 sts)
R4: *Sc 2, Inc*, rep 6 times. (24 sts)
R5: *Sc 3, Inc*, rep 6 times (30 sts)
R6: *Sc 4, Inc*, rep 6 times (36 sts)
R7: *Sc 5, Inc*, rep 6 times (42 sts)
R8-14: Sc 42
R15: *Sc 5, dec*, rep 6 times (36 sts)
R16: *Sc 4, dec*, rep 6 times (30 sts)
R17: *Sc 3, dec* rep 6 times (24 sts)
R18: *Sc 2, dec*, rep 6 times. (18 sts)
Add safety eyes about 3″/7.6 cm below top of head, approximately 2.75″/7 cm apart (note that after the eye indentation technique and face shaping at the very end, the eyes will be about 2”/5 cm apart). DO NOT snap in washers yet.
With eyes loosely in place, embroider nose using embroidery floss and needle into an upside down triangle shape with a downward line. Position the nose between the eyes: the top of the nose should be positioned at the midline of the safety eyes. The dimensions of our triangular nose are: 0.25”/0.6 cm wide x 0.25″/0.6 cm tall. The little line below the triangle is 0.25”/0.6 cm long.

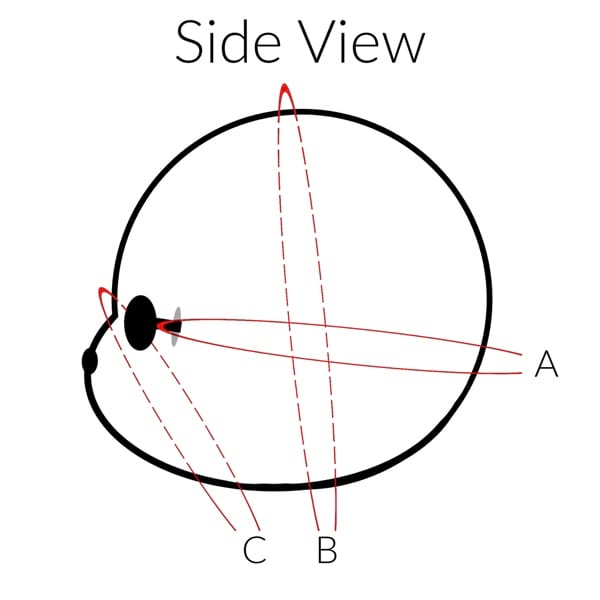
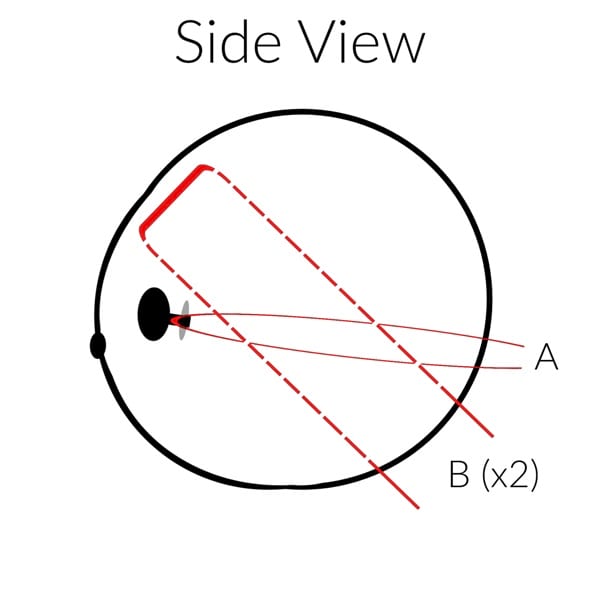
To give the face more definition, we will be using a technique called eye indentation (reference Top and Side View graphics below). After inserting the safety eyes (without attaching washer/backing yet), use the yarn strands you set aside at the beginning and tie knots around the post of each safety eye. Snap in the washers. Have the strands cross each other inside the head and have them exit out the back of the head. Ensure that both strands from the SAME safety eye are in close proximity to each other when they exit the back of the head to make it easier to tie a knot (but they should not come out of the same hole). After this is done, you should have 4 strands of yarn coming out the back of the head, each exiting from their own hole. Stuff head, making sure there is stuffing above and below the criss-crossed eye indentation strands.
R19: *Sc 1, dec*, rep 6 times. (12 sts)
Finish stuffing as needed.
R20: *Dec*, rep 6 times. (6 sts)
Fasten off and weave in end.
Finish off the eye indentation: grab the two strands of yarn that correlate with one safety eye. Pull back to desired indentation and tie a double knot to secure. Repeat with other eye. Weave in ends.
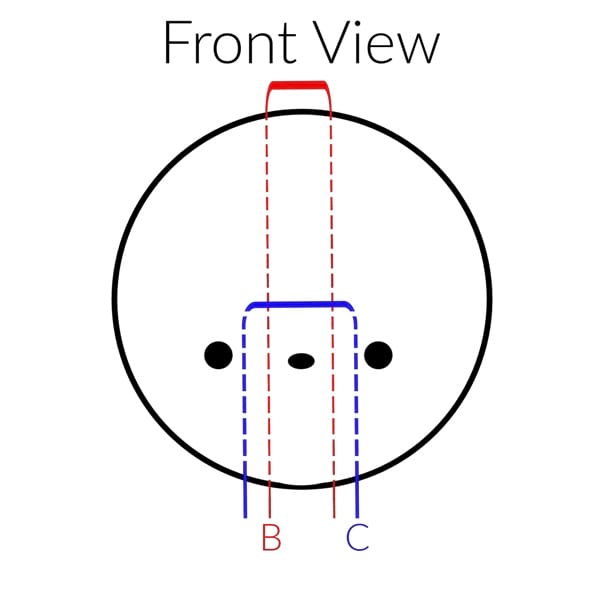
We will now do some special head shaping techniques (note that A refers to eye indentation in the diagrams below for the Bear & Bunny):
BEAR (reference Front and Side View graphics below – see process photos HERE):
- To alter the shape of the head in order to flatten the top and the bottom, cut a 20”/51 cm strand of yarn and thread it from the bottom of the head up to the top and back down again (reference the red line B in both front and side view diagrams below – the dotted line is within the head and the solid lines are outside the head). Pull tightly until desired face shape, tie both ends into a knot and weave in ends. The top and the bottom of the head have now been flattened.
- To create the snout, cut a 12”/30 cm strand of yarn and thread it from the bottom of the head up to 0.5”/1.3 cm above top of nose, across, and back down again (reference blue line C in front view and line C in side view diagrams). Pull tightly until desired snout is created, tie both ends into a knot and weave in ends. The snout has now been created.
BUNNY (reference Front & Side View graphics below):
- To alter the shape of the forehead, cut two 20”/51 cm strands of yarn and thread through the head as shown in diagrams below (red line B). The solid line above the eyes is approximately 1.5″/3.8 cm in length. Pull tightly until desired forehead has been created. Tie both ends into a knot and weave in ends. The forehead has now been shaped.

Using a sharp pair of scissors, trim the boucle yarn around the safety eyes of both Bear and Bunny to make the safety eyes more visible.
BEAR EARS (make 2)
R1: 6 sc in magic ring. (6 sts)
R2: *Inc*, rep 6 times. (12 sts)
R3-4: Sc 12.
Fasten off and leave long end for sewing. Flatten sphere and sew onto head about 2″/5 cm apart.
BUNNY EARS (make 2)
R1: 6 sc in magic ring. (6 sts)
R2: *Inc*, rep 6 times. (12 sts)
R3-12: Sc 12. (12 sts)
R13: Sc 6. Leave remaining 6 sts unworked.
Fasten off and leave long end for sewing (do not stuff). Position ears so that the side with the 6 additional stitches worked from R13 are towards the outer side of the head (not on the side towards the middle of the head where the ears are close together). This ensures that the ears will stick straight up (rather than tilted to the side) since you will be attaching these parts onto a curved head. Sew onto head about 0.25″/0.6 cm apart.
LEGS (make 2)
R1: 6 sc in magic ring. (6 sts)
R2: *Sc 2, Inc*, rep 2 times. (8 sts)
R3: Sc 8. (8 sts)
R4: *Sc 3, Inc*, rep 2 times. (10 sts)
R5-7: Sc 10. (10 sts)
R8: *Sc 4, Inc*, rep 2 times. (12 sts)
R9-11: Sc 12. (12 sts)
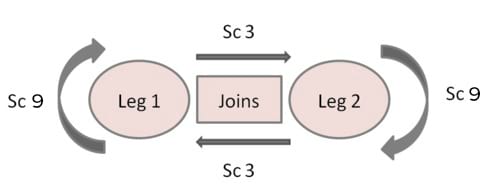
We will now join the two legs and begin crocheting the body. For the first leg, fasten off and leave a long end (we will be using this end to sew the bottom of the body shut later on). For the second leg, DO NOT CUT OFF the yarn. Chain 1 and join with slip stitch to any sc on first leg. *Slip stitch in next sc on same leg, Chain 1, then slip stitch to next sc on opposite leg*, repeat a total of 3 times. You will now begin working the body in a round as illustrated by this diagram with a total of 24 stitches (first round of body):
BODY (continues from legs)
R1: Sc 24
R2: *Sc 3, Inc*, rep 6 times. (30 sts)
R3-7: Sc 30. (30 sts)
Using a yarn needle or crochet hook, move the yarn end from the first leg down to the bottom of the body. Seam the bottom shut so there are no longer any holes or gaps.
R8: *Sc 3, Dec*, rep 6 times. (24 sts)
R9: Sc 24. (24 sts)
R10: *Sc 2, Dec*, rep 6 times. (18 sts)
R11: Sc 18. (18 sts)
R12: *Sc 7, Dec*, rep 2 times. (16 sts)
R13: Sc 16. (16 sts)
Fasten off and leave long end for sewing. Stuff legs and body and seam to head.
We will now do some foot shaping (see process photos HERE): cut two 10”/25 cm strands of yarn (one strand for each foot). Thread one strand through the bottom of one foot and upwards about 1″/2.5 cm of the leg. Move 0.5”/1.3 cm across into the leg and then back down through the bottom of the foot. Pull tight, tie knots and hide ends. The foot has now been defined. Repeat on other leg. Reference the photo tutorial HERE to see pics of this process.
ARMS (make 2)
R1: 4 sc in magic ring. (4 sts)
R2: *Sc 1, Inc*, rep 2 times. (6 sts)
R3-10: Sc 6. (6 sts)
R11: *Sc 1, Dec*, rep 2 times. (4 sts)
R12-13: Sc 4
Fasten off and leave long end for seaming. You do not need to stuff the arms. Sew onto sides of body.
TAIL (optional)
R1: 6 sc in magic ring. (6 sts)
R2: *Sc 2, Inc*, rep 2 times. (8 sts)
R3: *Sc 2, dec*, rep 2 times. (6 sts)
Fasten off and leave long for sewing. Sew onto bottom back of body.
********************************
I absolutely LOVE how our sweet Teddy turned out! I have had Baby Soft Boucle sitting in my stash for the past couple of years and as soon as I felt this yarn and saw the “Tan” colorway, I knew it would make such an adorable teddy bear. On a recent Saturday, I finally decided to pick up the yarn and just start crocheting away! He turned out even better than I imagined with all these neat shaping techniques that Ryan figured out. He is such a classic and timeless teddy bear! Our daughters watched us create these amigurumi with wide eyes and were sooo happy to see us bring these stuffed animals to life! Teddy belongs to our older daughter Myla, and she has already created a special bed for him. He is a great size since he is so huggable!
Our bunny named Rosie is for our younger daughter Brielle! Rosie is such a sweet bunny with her adorable ears standing straight up! It is amazing using this special Baby Soft Boucle yarn with its unique texture to create amigurumi as all the stitches are blurred. You can hardly tell that these stuffed animals are crocheted!
This soft and cuddly pair would make such precious gifts for yourself and loved ones! When I showed some sneak peeks of these two on social media, so many of you said that you wanted to make the bear or bunny for your own children, nieces, nephews, mothers, and other loved ones who collect teddy bears. I personally used to have a teddy bear collection growing up and I have so many fond memories playing bears with my sister as we used to create elaborate story lines with each bear having distinctive characters and names. Teddy bears hold a special place in my heart as I’m sure they do for many! Some of you said how you would love to make these as stocking stuffers too – how adorable would they be peeking out of the stockings? Ryan and I designed and crocheted both Teddy and Rosie over a Saturday and a Sunday – I love how quickly amigurumi work up (especially compared to garments) and how they typically use less than one skein of yarn!
Stuffed animals look so adorable with accessories, and it is so fun dressing them up! We found this beautiful pink skirt in our playroom as it belonged to one of Myla’s dolls – we thought it suited Rosie perfectly! Ryan made this little bowtie for Teddy and now they look like they are ready for a fancy outing! You can have fun creating different clothing items and accessories for your bear and bunny, especially if you are good at sewing. I think mixing mediums and materials looks so good (e.g. fabric with yarn) and I will try making more accessories in a separate blog post!
With Christmas approaching, I thought I would quickly try and whip up some special Christmas accessories for Teddy & Rosie! I crocheted a hat for Teddy and a headband for Rosie – you can find the free crochet patterns for these accessories in this blog post HERE! I will continue updating the accessories page if I continue making more items for them – check out the post to see a knit raglan sweater and some scarves I made for these adorable amigurumi! Note that the PDF for purchase includes the hat and headband pattern as well!
I hope you LOVE creating your own classic teddy bears and bunnies! I have always loved creating and designing amigurumi, and this love is what motivated and inspired me to start my blog “All About Ami” (the ‘ami’ is short for amigurumi) back in 2011! I am so happy that I am diving back into the world of amigurumi and creating more precious stuffed animals. I think these are my favorite amigurumi that we have designed since I love teddy bears and bunnies so much, and this yarn is so special. You can check out my other original amigurumi designs HERE!
If you are interested in making this design, I highly recommend checking out the PDF HERE as I have condensed all the step-by-step photos and graphics into this document, making it easy to reference and print. You can also check out my “All About Ami Amigurumi Bundle” HERE as it includes ALL my amigurumi patterns that I’ve designed over the years! I would love to see your work-in-progress and finished pictures, so you can use the hashtag #bouclebear and #bouclebunny when you post on social media! Thank you for your support, everyone, and happy amigurumi making!