
Asanas Blanket Free Crochet Pattern
Hellooo!! I hope things are well in your neck of the woods. My neck of the woods is Utah. And here, it's cold in November!! Which makes me want to snuggle up in my comfy orange crocheting chair with the fire and a cozy blanket over my legs for some added warmth while I play with hook and yarn. What better time to introduce to you my newest free pattern...

I shared with you a little sneak peek of the square here and also my love affair with the squishy and soft Scheepjes Namaste yarn that I used to make it.
I used 24 of the 34 colors--hey, don't judge, it's what ended up in my bag upon leaving Yarndale and all that would fit in my suitcase or there would have been more! Phew!

Gorgeous palette, huh? You might have noticed that each color is named after a yoga pose. So I chose the name Asanas for my blanket as that is the Sanskrit word for the collection of various yoga poses. Maybe I'll make another blanket using every color--at least I will if I don't have to try to fit them all in my suitcase for an international flight! I'm thinking this blanket would super classy worked in all one color, too, or black and white checkered, or all of those pale pastels, or...ombre!!
Having worked with DK and fingering yarn a lot lately, crocheting with this bulky yarn was exciting because the project grew so quickly. And did I tell you that it's like "butta" on your hook? I'm terrifically happy with the color selection and looking forward to playing with that mustard (Lotus) there.

I'm really pleased with the square--tons of texture that looks almost knitted, fabulous stitch definition and each square uses nearly the entire ball of yarn--with only bits left over for the tassels. I rate the pattern as intermediate but any ambitious beginner would handle it well, I think. So do you want to know how to crochet your own? Let's get to it.
Pattern:
Yarn: Scheepjes Namaste*; Bulky (#5); 50% Virgin Wool/50% Acrylic; 100g/3.5oz; 85m/93yds; 2011-2039m/2200-2230yds total
Hook: J (6mm) -- the yarn band calls for a larger hook, but remember, I was going for dense, textured and squishy.
Gauge: Gauge/tension is important here because if yours is any larger, you will not have enough yarn to complete the motif, for the long tail needed for whipstitching them together and for the tassels.

I also used a stitch you may not have tried before. It's called a FPCl or Front Post Cluster. Here's how it goes...


I shared with you a little sneak peek of the square here and also my love affair with the squishy and soft Scheepjes Namaste yarn that I used to make it.
I used 24 of the 34 colors--hey, don't judge, it's what ended up in my bag upon leaving Yarndale and all that would fit in my suitcase or there would have been more! Phew!

Gorgeous palette, huh? You might have noticed that each color is named after a yoga pose. So I chose the name Asanas for my blanket as that is the Sanskrit word for the collection of various yoga poses. Maybe I'll make another blanket using every color--at least I will if I don't have to try to fit them all in my suitcase for an international flight! I'm thinking this blanket would super classy worked in all one color, too, or black and white checkered, or all of those pale pastels, or...ombre!!
Having worked with DK and fingering yarn a lot lately, crocheting with this bulky yarn was exciting because the project grew so quickly. And did I tell you that it's like "butta" on your hook? I'm terrifically happy with the color selection and looking forward to playing with that mustard (Lotus) there.
I'm really pleased with the square--tons of texture that looks almost knitted, fabulous stitch definition and each square uses nearly the entire ball of yarn--with only bits left over for the tassels. I rate the pattern as intermediate but any ambitious beginner would handle it well, I think. So do you want to know how to crochet your own? Let's get to it.
Pattern:
Yarn: Scheepjes Namaste*; Bulky (#5); 50% Virgin Wool/50% Acrylic; 100g/3.5oz; 85m/93yds; 2011-2039m/2200-2230yds total
|
Color
|
Color
|
Color
|
Color
|
|
1: Bridge (617)
|
2: Gate (618)
|
3: Lord of the Dance (632)
|
4: Revolved Triangle (631)
|
|
5: Fish (619)
|
6: Pigeon (624)
|
7: Monkey (623
|
8: Downward Dog (633)
|
|
9: Handstand (620)
|
10: Garland (612)
|
11: Side Plank (628)
|
12: Hero (622)
|
|
13: Plow (611)
|
14: Happy Baby (621)
|
15: Pigeon (624)
|
16: Mountain (613)
|
|
17: Upward Salute (630)
|
18: Half Moon (615)
|
19: Warrior (614)
|
20: Scale (625)
|
|
21: Wild Thing (627)
|
22: Tree (610)
|
23: Staff (626)
|
24: Upward Bow (629)
|
Hook: J (6mm) -- the yarn band calls for a larger hook, but remember, I was going for dense, textured and squishy.
Gauge: Gauge/tension is important here because if yours is any larger, you will not have enough yarn to complete the motif, for the long tail needed for whipstitching them together and for the tassels.
- Square motif = 10”/25.4cm
- Rnds 1-3 = 2.25”/5.7cm; Rnds 1-4 = 3”/7.6cm; Rnd 7 = 5”/12.7cm
- Blanket = 40” X 58” (102cm X 147cm)
A few notes about the pattern:
• Motifs are worked in the round with right side (RS) facing throughout, joining at the end of each round.
• Ch 1 or ch 2 at the beginning of a round does NOT count as a stitch.
• All joining at the end of a round is completed with a sl st.
My blanket uses 24 squares (4 wide X 6 long), but yours can be made to any dimension by altering the number and layout of squares.And if you choose another yarn, you can really go to town with the layout, size and colors. Endless options make me happy.
Stitch abbreviations (US Terms):
|
BLO
|
Back Loop Only
|
RS
|
Right Side
|
|
ch
|
chain
|
sc
|
single crochet
|
|
dc
|
double crochet
|
sk
|
skip
|
|
hdc
|
half double crochet
|
sl st
|
slip stitch
|
|
FPdc
|
Front Post double crochet
|
sp(s)
|
space(s)
|
|
FPCl(s)
|
Front Post Cluster(s)
|
st(s)
|
stitch(es)
|
|
rep
|
repeat
|
tr
|
treble (triple) crochet
|
|
Rnd(s)
|
Round(s)
|
yo
|
yarn over
|
[yo twice, insert hook from front to back to front around post of indicated st, yo and draw up loop, (yo and draw through two loops) twice] twice, yo and draw through all 3 loops on hook
Thanks to my infatigable testers for helping me get the explanation for that stitch just right. Essentially, you are working two front post trebles together around the same stitch. This is what gives the ridge down each "leaf" at the corners.
Asana Motif:
Rnd 1 (RS): Make magic ring (or ch 3, sl st to first ch to form ring), ch 1, 8 sc in ring, pull tail to close ring, join to first sc (8 sc)
Rnd 2: working in BLO around, ch 1, 2 sc in each sc around, join to first sc (16 sc)
Rnd 3: working in BLO around, ch 1, sc in same st as joining, 2 sc in next st, (sc in next sc, 2 sc in next sc) rep around, join to first sc (24 sc)
Rnd 4: ch 1, hdc in same st as joining, ch 2, sk 1 st, (hdc in next st, ch 2, sk 1 st) rep around, join to first hdc (12 hdc, 12 ch-2 sps)
Rnd 5: ch 2, FPdc around hdc below (beginning ch 2 “hides” behind FPdc), *(dc, ch 1, tr, ch 1, dc) in next ch-2 sp, FPdc around next hdc, 2 dc in next ch-2 sp, dc in next hdc, 2 dc in next ch-2 sp, FPdc around next hdc; rep from * 3 more times omitting final FPdc, join to first FPdc (7 dc, 2 FPdc and 2 ch-1 sps between corner tr)
Rnd 6: ch 2, FPdc around FPdc below, FPdc around next dc, *dc in ch-1 sp, ch 1, FPCl (see Special Stitches) around tr, ch 1, dc in ch-1 sp, FPdc around next 2 sts, dc in next 5 sts**, FPdc around next 2 sts; rep from * 2 more times, then from * to ** once, join to first FPdc (7 dc, 4 FPdc and 2 ch-1 sps between FPCls)
Rnd 7: ch 2, FPdc around st below and next 2 sts, *dc in ch-1 sp, ch 1, FPCl around FPCl, ch 1, dc in ch-1 sp, FPdc around next 3 sts, dc in next 5 sts, FPdc around next 3 sts; rep from * 3 more times omitting last 3 FPdc, join to first FPdc (7 dc, 6 FPdc, 2 ch-1 sps between FPCls)
Rnd 8: ch 2, FPdc around st below and next 3 sts, *dc in ch-1 sp, ch 1, FPCl around FPCl, ch 1, dc in ch-1 sp, FPdc around next 4 sts, hdc in next 5 sts, FPdc around next 4 sts; rep from * 3 more times omitting last 4 FPdc, join to first FPdc (2 dc, 5 hdc, 8 FPdc, 2 ch-1 sps – between FPCls)
Rnd 9: ch 2, FPdc around st below and next 4 sts, *dc in ch-1 sp, ch 1, FPCl around FPCl, ch 1, dc in ch-1 sp, FPdc around next 5 sts, hdc in next 5 sts, FPdc around next 5 sts; rep from * 3 more times omitting last 5 FPdc, join to first FPdc (2 dc, 5 hdc, 10 FPdc, 2 ch-1 sps – between FPCls)
Rnd 10: ch 1, hdc in st below and next st, FPdc around next 4 sts, *dc in ch-1 sp, ch 1, FPCl around FPCl, ch 1, dc in ch-1 sp, FPdc around next 4 sts**, hdc in next 9 sts, FPdc around next 4 sts; rep from * 2 more times, then from * to ** once, hdc in next 7 sts, join to first hdc (2 dc, 9 hdc, 8 FPdc, 2 ch-1 sps – between FPCls)
Rnd 11: ch 1, hdc in st below and next 3 sts, FPdc around next 3 sts, *dc in ch-1 sp, ch 1, FPCl around FPCl, ch 1, dc in ch-1 sp, FPdc around next 3 sts**, hdc in next 13 sts, FPdc around next 3 sts; rep from * 2 more times, then from * to ** once, hdc in next 9 sts, join to first hdc (2 dc, 13 hdc, 6 FPdc, 2 ch-1 sps – between FPCls)
Rnd 12: ch 1, hdc in st below and next 5 sts, FPdc around next 2 sts, *dc in ch-1 sp, ch 1, FPCl around FPCl, ch 1, dc in ch-1 sp, FPdc around next 2 sts**, hdc in next 17 sts, FPdc around next 2 sts; rep from * 2 more times, then from * to ** once, hdc in next 11 sts, join to first hdc (2 dc, 17 hdc, 4 FPdc, 2 ch-1 sps, -- between FPCls)
Rnd 13: ch 1, sc in BLO of each st around placing sc in each ch-1 sp and 3 sc in each FPCl at corners, join to first sc, fasten off leaving long tail for joining (27 sc – between corners)
You will be making one of each color except for Squares #6 and #15 which are both made with the same color, Pigeon.
After making each square, I wet blocked them on my ironing board. They were blocked to 10"/25.5cm. They didn't desperately need blocking to be honest, but I'm always impressed with how blocking tidies them up. If you want to see how I do the blocking thing, I've posted about it here.
They are simply so pretty. I mean, would you look at that happy stack of motifs? Sorry...let's finish things up...
I joined my squares by holding wrong sides together and whipstitching through the back loops only. This gives a clean and tidy finish. Since each motif ends in the center of a side, a good hint is to use a tapestry needle and to whipstitch the tail of the motif from its center to the nearest corner through the back loops before joining it to other motifs. That way the color of the joining tail will match the motifs it's connecting along the whole side.
If you want to do your color placement like mine, this shows my plan:
|
1
|
2
|
3
|
4
|
|
5
|
6
|
7
|
8
|
|
9
|
10
|
11
|
12
|
|
13
|
14
|
15
|
16
|
|
17
|
18
|
19
|
20
|
|
21
|
22
|
23
|
24
|
Match up your layout to the numbered colors in the yarn table above, or mix and arrange them however suits your fancy.
I personally like tassels. They really add a bit of whimsy and fun. I attached mine to the joins between squares and the four outer corners of the blanket. I used leftovers in coordinating colors to the square to which it is attached and the color of adjacent squares.
For each tassel, I cut sixteen 10”/25cm lengths of yarn. Then I folded 14 of those lengths in half and tied them at the fold with one of the lengths of yarn. I used the last length of yarn to wrap around the top of the tassel 1”/2.5cm below the top of the fold several times before tying tightly (these tails can become part of the tassel). Attach tassel to blanket edge with the tie at the fold, knot tightly and weave ends into blanket. Trim tassels evenly. Ta--Dah!!! Easy peasy!!
Shop here for Namaste yarn and other notions:
If you are interested in an an ad-free, easy to print PDF version of the Asanas Blanket pattern, you can find it in on in the Felted Button shop here or in my Etsy shop here or on LoveCrafts here.
I hope you enjoy your squishy, heavy and warm blanket! And if you make one, or anything else with this fun motif, please share your creations with me on my Facebook page or better yet in my very own Facebook group here!! I love to see the magic that rolls off other hooks. This crochet community is my favorite part of this crochet gig.
I'm gearing up for the holidays and looking forward to as much hooky time as I can get. I hope you have plenty of time planned with your hook, yarn and loved ones.
Soon...xx
| On the Board | -- Be a Fruit Loop in a World of Cheerios.

*This post contains affiliate links. If you make a purchase through these links it costs you no more but provides me a small commission that allows me to continue providing free patterns and blogging. Thank you!
Related Posts
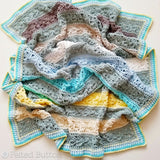
Under the Awning Blanket Crochet Pattern Update
I suppose it happens. I must accept change. I'm not talking about changes like my kids growing up, or the crows feet ...
Read More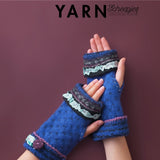
YARN 8 Book-a-Zine: How to Make Felted Mitts
Ever since discovering the magic of felting, I'm honestly gleeful when I get to create anything with the technique. R...
Read More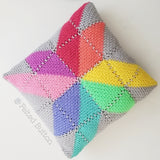
Prism Pillow Crochet Pattern
You know when you are finished with a project and are left with the few bits of leftover yarn--and those leftovers ar...
Read More