
![[Image description] the Striped Alix Stocking crochet pattern lays flat in the center of the photo with Christmas tree ornaments surrounding it](https://d3gel9wqxksnxm.cloudfront.net/wp-content/uploads/2021/12/Alix-Stocking-806x1000-1.jpg)
![[Image description] the Striped Alix Stocking crochet pattern lays flat in the center of the photo with Christmas tree ornaments surrounding it](https://d3gel9wqxksnxm.cloudfront.net/wp-content/uploads/2021/12/Alix-Stocking-806x1000-1.jpg.webp)
Wow! Will you look at that, it’s the last month of 2021. Are you ready for this year to be over with or are you still trying to get every last minute out of it? I’m kinda in both places, I’ve lots I still want to do but I’m also excited to see what 2022 will bring us. Before I start to look to the new year, I still have a whole month of patterns to release, including this week’s Alix Stocking crochet pattern.
For the last few years I’ve been trying and release at least one stocking pattern (see the last 2 year’s here) and like I often do, I like to traipse beyond the classic stocking designs with texture or colors (sometimes both!). And the Alix Stocking crochet pattern isn’t any different. This design incorporates the hdc texture from the Alix Line while still making a fun and simple stocking pattern that works from the toe up in rounds.
This is a really simple pattern, it really would take just a couple days to complete if you want to make sure to take breaks to work on other patterns. Just make sure you read all the instructions, especially when you get to the Heel portion. You don’t need to turn there and if you do you will end up with your stocking facing the wrong direction… which is fine if you want that. But I just wanted to make note of it so people didn’t feel like they did the pattern incorrectly.
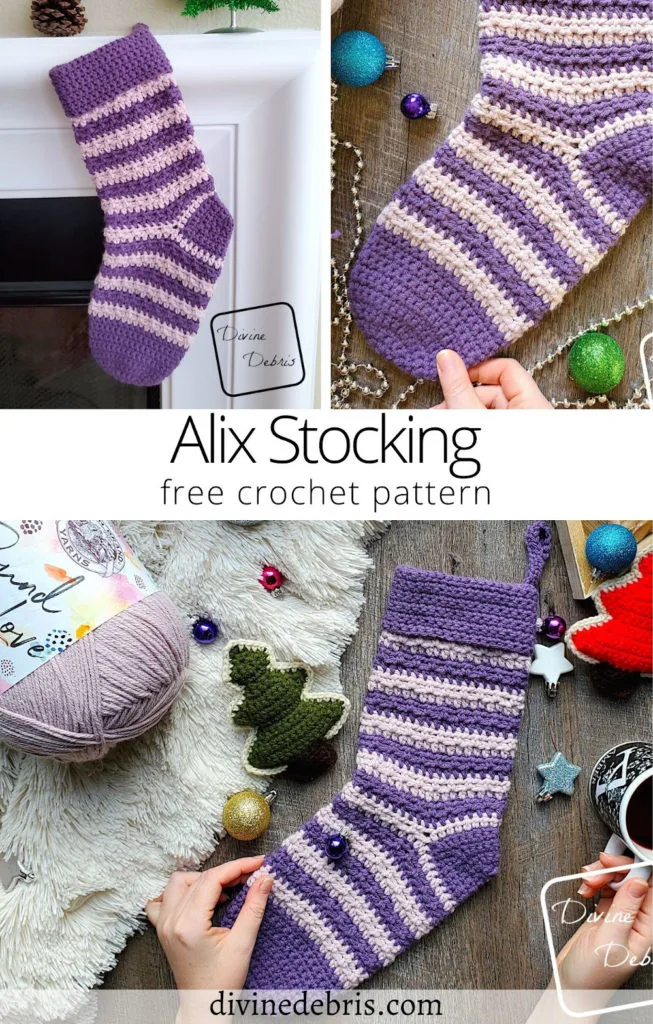
Now this pattern is also a great stash buster. I did it in 2 colors (both Pound of Love from Lion Brand Yarn) but you could do each section a different color or even use a striping yarn. Ooh, you could also use a bulky yarn that’s nice at stiff to make this a big old stocking! It’s totally up to you how you’d like this to turn out. You can have fun and make some wild color combinations (which I would like to see by the way, please tag me in photos if you post them).
Overall, I hope you like this pattern. I’m usually a Grinch during the holidays but I haven’t had to work retail in a year (got fired last year) so I’m coming around to being festive. This design is definitely helping, even if it’s not very traditional. Who needs traditional anyway? It’s all about what makes you feel good.
Always to be kind to each other, wash your masks, and stay safe friends <3 <3 Please remember to subscribe and share your photos on social media so I can see them!
Please note: I was provided Pound of Love by Lion Brand Yarn for the purposes of designing the Alix Stocking crochet pattern, without compensation. I wasn’t provided the yarn with the expectations of positive or negative reviews but I honestly can say I do enjoy this yarn, I used it to make last month’s Bridget Bobble Blanket. If you purchase yarn through any of the links in this post, I will be compensated.
This post is linked on Loop Scoop 27.
(this post contains affiliate links)
If you appreciate my weekly patterns I hope you’d consider purchasing an ad-free pdf of this pattern in my Ravelry shop and Lovecrafts shop!
Thank you to all my patrons on Patreon!
Where to purchase the Alix Stocking crochet pattern


![[Image description] The unfinished Alix Stocking and Odette Stocking crochet patterns lay on a wood grain background with a candle tray to the top left and yarn on the sides.](https://d3gel9wqxksnxm.cloudfront.net/wp-content/uploads/2021/12/Alix-Stocking-1000x1000-1.jpg)
Level
Easy
Materials
- US H (5.00 mm) crochet hook
- Size #4 worsted weight yarn
- I used Pound of Love by Lion Brand Yarn in 2 colors (specific names in the Notes section)
- A (darker purple): 2 oz / 128 yds
- B (lighter purple): 1 oz/ 64 yds
- Notions: scissors, measuring tape, yarn needle
Gauge
- 13 hdc x 9 rows = 4”
Terms/ Stitches used
- Magic Circle
- RS: Right side
- Rnd: Round
- Join: Join the round with a slip st
- Ch: Chain
- St: Stitch
- Sc: Single crochet
- Sc2tog: Sc 2 sts together
- Hdc: Half double crochet
- BTLO: Back third loop only (explained below)
Notes
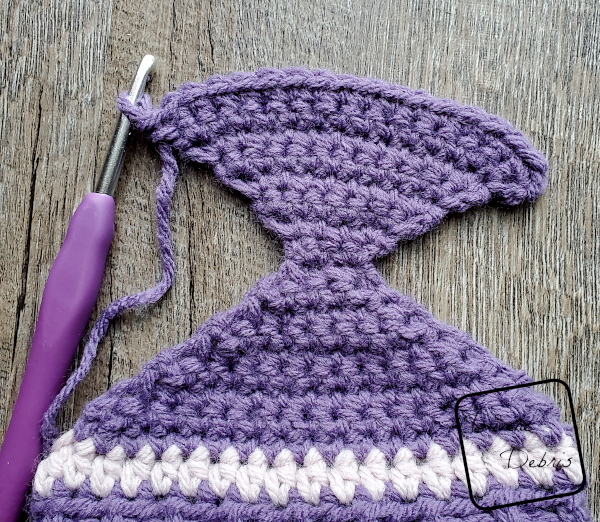
- Back third loop only (BTLO): when looking at the stitch you will have the 2 loops on top of the hdc (the V on top), lean the stitch towards you and will see the third loop that runs along the back of the stitch. This is the loop you will work into. This stitch is also known as the Camel Stitch. Please note that when you work this stitch you will be looking at the back of the previous row’s hdc, so the third loop will be facing you.
- This pattern is mostly worked in the round (Rnd) with a slip st into the first st of the rnd.
- The ch 1 at the beginning of the row does not count as a stitch.
- This stocking is worked from the Toe up in sections (but still one piece): first the Toe, the Arch, the Heel (which is not worked in the rnd), the Ankle, and the Cuff.
- The colors in the photos: color A is dark purple (Pound of Love in Thistle) and color B is light purple (Pound of Love in Quartz).
Approx Finished Product Details for the Alix Stocking crochet pattern
| Height | Width |
| Height: 15.75” – 16” (Toe to folded over Cuff) | Width: 5.5” (at widest) |
![[Image description] the Striped Alix Stocking crochet pattern lays flat in the center of the photo with Christmas tree ornaments and 2 skeins of yarn surrounding it. A white woman's hands hold the bottom of the stocking and a coffee cup to the right of the stocking.](https://d3gel9wqxksnxm.cloudfront.net/wp-content/uploads/2021/12/Alix-Stocking-1000x972-1.jpg)
Alix Stocking Crochet Pattern Instructions
Toe
Rnd 1: A: Create a magic circle, ch 1, sc 6 times into the circle, join — 6 sc
(RS) Rnd 2: Ch 1, turn, sc twice into the same st as join, *sc twice into the next st,* repeat from * to * 4 more times, join — 12 sc
Rnd 3: Ch 1, turn, sc twice into into the first st, sc into the next st, *sc twice into the next st, sc into the next st,* repeat from * to * 4 more times, join — 18 sc
Rnd 4: Ch 1, turn, sc twice into into the first st, sc into the next 2 sts, *sc twice into the next st, sc into the next 2 sts,* repeat from * to * 4 more times, join — 24 sc
Rnd 5: Ch 1, turn, sc twice into into the first st, sc into the next 3 sts, *sc twice into the next st, sc into the next 3 sts,* repeat from * to * 4 more times, join — 30 sc
Rnd 6: Ch 1, turn, sc twice into into the first st, sc into the next 4 sts, *sc twice into the next st, sc into the next 4 sts,* repeat from * to * 4 more times, join — 36 sc
Rnds 7 – 15: Ch 1, turn, sc into the next 36 sts, join — 36 sc
Do not fasten off color A, switch to color B.
Arch
Rnd 16: B: Ch 1, turn, hdc around, join — 36 hdc
Rnd 17: Ch 1, turn, hdc into the first st, hdc BTLO into the next st, *hdc into the next st, hdc BTLO into the next st,* repeat from * to * the rest of the way around, join — 36 hdc
Drop color B, switch to color A.
Rnds 18 – 19: A: repeat rnds 16 – 17.
Drop color A, switch to color B.
Rnds 20 – 21: B: repeat rnds 16 – 17.
Drop color B, switch to color A.
Rnds 22 – 23: A: repeat rnds 16 – 17.
Drop color A, switch to color B.
Rnds 24 – 25: B: repeat rnds 16 – 17.Drop color B, switch to color A.
Rnds 26 – 27: A: repeat rnds 16 – 17.
Drop color A, switch to color B.
Rnd 28: B: Ch 1, turn, hdc around, join — 36 hdc
Drop color B, switch to color A.
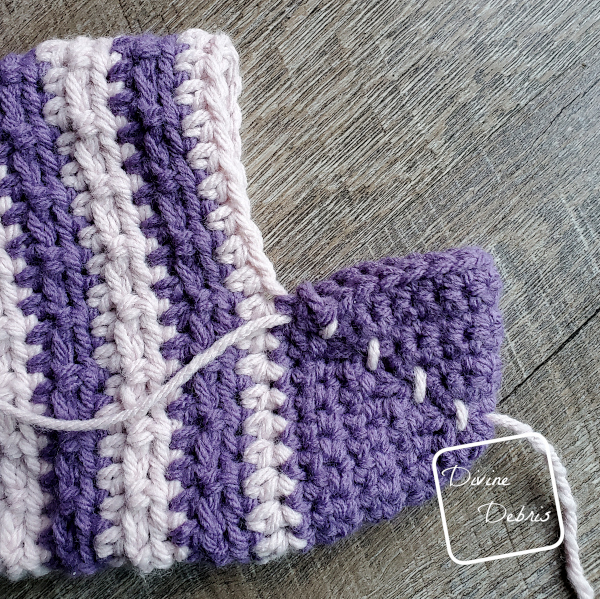
Heel
Note
- The Heel has its own row count.
- This section is worked in one piece and folded in half, with the row ends being secured to create the Heel.
Row 1: A: Ch 1, sc into the next 18 sts – 18 sc
Row 2: Ch 1, turn, sc2tog the first 2 sts, sc into the next 14 sts, sc2tog the last 2 sts – 16 sc
Row 3: Ch 1, turn, sc2tog the first 2 sts, sc into the next 12 sts, sc2tog the last 2 sts – 14 sc
Row 4: Ch 1, turn, sc2tog the first 2 sts, sc into the next 10 sts, sc2tog the last 2 sts – 12 sc
Row 5: Ch 1, turn, sc2tog the first 2 sts, sc into the next 8 sts, sc2tog the last 2 sts – 10 sc
Row 6: Ch 1, turn, sc2tog the first 2 sts, sc into the next 6 sts, sc2tog the last 2 sts – 8 sc
Row 7: Ch 1, turn, sc2tog the first 2 sts, sc into the next 4 sts, sc2tog the last 2 sts – 6 sc
Row 8: Ch 1, turn, sc2tog the first 2 sts, sc into the next 2 sts, sc2tog the last 2 sts – 4 sc
Row 9: Ch 1, turn, sc2tog the first 2 sts, sc2tog the last 2 sts – 2 sc
Row 10: Ch 1, turn, sc twice into the first st, sc twice into the last st – 4 sc
Row 11: Ch 1, turn, sc twice into the first st, sc into the next 2 sts, sc twice into the last st – 6 sc
Row 12: Ch 1, turn, sc twice into the first st, sc into the next 4 sts, sc twice into the last st – 8 sc
Row 13: Ch 1, turn, sc twice into the first st, sc into the next 6 sts, sc twice into the last st – 10 sc
Row 14: Ch 1, turn, sc twice into the first st, sc into the next 8 sts, sc twice into the last st – 12 sc
Row 15: Ch 1, turn, sc twice into the first st, sc into the next 10 sts, sc twice into the last st – 14 sc
Row 16: Ch 1, turn, sc twice into the first st, sc into the next 12 sts, sc twice into the last st – 16 sc
Row 17: Ch 1, turn, sc twice into the first st, sc into the next 14 sts, sc twice into the last st – 18 sc
Fasten off.
Heel Seaming
Fold your Heel in half along Row 9, lining up Rows 1 – 8 with Rows 10 – 17 (8 rows) and seam the row ends together in your preferred method of seaming. Repeat on the other side of the Heel.
Fasten off, weave in your ends.
Ankle
Pick up color B where you dropped it on the Arch. For Rnd 29 you will be working into the Rnd 28 of the Arch and then onto the 18 sts of the Heel.
Rnd 29: B: Ch 1, turn, hdc into the first st, hdc BTLO into the next st, *hdc into the next st, hdc BTLO into the next st,* repeat from * to * until you get to the sts of the Heel, hdc into the next 18 sts, join — 36 hdc
Drop color B, switch to color A.
Rnd 30: A: Ch 1, turn, hdc around, join — 36 hdc
Rnd 31: Ch 1, turn, hdc into the first st, hdc BTLO into the next st, *hdc into the next st, hdc BTLO into the next st,* repeat from * to * the rest of the way around, join — 36 hdc
Drop color A, switch to color B.
Rnds 32 – 33: B: repeat rnds 30 – 31.
Drop color B, switch to color A.
Rnds 34 – 35: A: repeat rnds 30 – 31.
Drop color A, switch to color B.
Rnds 36 – 37: B: repeat rnds 30 – 31.
Drop color B, switch to color A.
Rnds 38 – 39: A: repeat rnds 30 – 31.Drop color A, switch to color B.
Rnds 40 – 41: B: repeat rnds 30 – 31.
Drop color B, switch to color A.
Rnds 42 – 43: A: repeat rnds 30 – 31.
Drop color A, switch to color B.
Rnds 44 – 45: B: repeat rnds 30 – 31.
Fasten off color B, switch to color A.
Cuff
Rnds 46 – 65: A: Ch 1, turn, sc into the next 36 sts, join — 36 sc
Fasten off, weave in your ends.
Loop
With color A ch 21, sc into the second ch from the hook and into the next 19 sts. Fasten off, leaving good sized tails on either end. With the right side facing you, fold the Cuff portion so it’s doubled over. Secure the Loop on the inside of the Cuff so it can be hung. You can also do a foundation single crochet or add rows to strengthen the loop.
![[Image description] the Striped Alix Stocking crochet pattern lays flat in the center of the photo on a white fake fur background, with Christmas tree ornaments surrounding it](https://d3gel9wqxksnxm.cloudfront.net/wp-content/uploads/2021/12/Alix-Stocking-876x1000-1.jpg)
And don’t forget you can buy this pattern on Ravelry.

Kathleen Peters
Wednesday 8th of December 2021
Loved your Alix Stocking! The directions are very simply written for easy understanding. The stocking went together quickly and easily. Made several different color combos and love them all. A great idea for everyone on my shopping list, especially the kids, which I did in bright and variegated bright colors. Thank you so much. This pattern is a great addition to my pattern collection.